
Uk Manual
Page 2
...approved BS1362 type should be fitted to persons, read the following important precautions and information before operating the treadmill. 1. Keep children under the treadmill. 4. Never start the treadmill whilst you are standing on the treadmill at a time. 9. It is no longer than 1.5 m (5 ft.). 12. clothes that ...PRECAUTIONS WARNING: To reduce the risk of burns, fire, electric shock, or injury to the fuse carrier. Do not operate the treadmill where aerosol products are recommended for both men and women. When connecting the power cord (see page 7), plug the power cord ...
...approved BS1362 type should be fitted to persons, read the following important precautions and information before operating the treadmill. 1. Keep children under the treadmill. 4. Never start the treadmill whilst you are standing on the treadmill at a time. 9. It is no longer than 1.5 m (5 ft.). 12. clothes that ...PRECAUTIONS WARNING: To reduce the risk of burns, fire, electric shock, or injury to the fuse carrier. Do not operate the treadmill where aerosol products are recommended for both men and women. When connecting the power cord (see page 7), plug the power cord ...
Uk Manual
Page 3
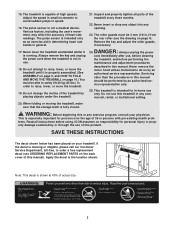
... in determining heart rate trends in .) from the rear roller (see ORDERING REPLACEMENT PARTS on the back cover of heart rate readings. This treadmill is not a medical device. ICON assumes no responsibility for in speed. 16. Note: This decal is missing or illegible, please call our...described in any commercial, rental, or institutional setting. 20. The roller guards must be performed by placing objects under the treadmill. 21. WARNING: Before beginning this treadmill in this manual should be able to safely lift 20 kg (45 lbs.) in order to avoid sudden jumps in -...
... in determining heart rate trends in .) from the rear roller (see ORDERING REPLACEMENT PARTS on the back cover of heart rate readings. This treadmill is not a medical device. ICON assumes no responsibility for in speed. 16. Note: This decal is missing or illegible, please call our...described in any commercial, rental, or institutional setting. 20. The roller guards must be performed by placing objects under the treadmill. 21. WARNING: Before beginning this treadmill in this manual should be able to safely lift 20 kg (45 lbs.) in order to avoid sudden jumps in -...
Uk Manual
Page 4
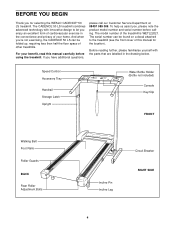
...CADENCE 50 LS can be folded up, requiring less than half the floor space of other treadmills. Before reading further, please familiarise yourself with innovative design to the treadmill (see the front cover of cardiovascular exercise in the drawing below. The model number of your benefit, read this manual for selecting the WESLO CADENCE® 50 LS treadmill... attached to let you enjoy an excellent form of this manual carefully before calling. The CADENCE 50 LS treadmill combines advanced technology with the parts that are labelled in the convenience and privacy of the...
...CADENCE 50 LS can be folded up, requiring less than half the floor space of other treadmills. Before reading further, please familiarise yourself with innovative design to the treadmill (see the front cover of cardiovascular exercise in the drawing below. The model number of your benefit, read this manual for selecting the WESLO CADENCE® 50 LS treadmill... attached to let you enjoy an excellent form of this manual carefully before calling. The CADENCE 50 LS treadmill combines advanced technology with the parts that are labelled in the convenience and privacy of the...
Uk Manual
Page 5
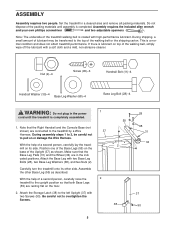
... the help of the walking belt or the shipping carton. Note: The underside of the treadmill walking belt is lubricant on the base of the packing materials until the treadmill is a normal condition and does not affect treadmill performance. If there is coated with a soft cloth and a mild, non-abrasive cleaner. Nut (2)-4 Screw... 68 31 34 37 90 5 ASSEMBLY Assembly requires two people. Position one of the Base Legs (55) on top of a second person, carefully raise the treadmill to the treadmill by a Wire Harness. Be careful not to pull on its other Base Leg (55) as shown. Set the...
... the help of the walking belt or the shipping carton. Note: The underside of the treadmill walking belt is lubricant on the base of the packing materials until the treadmill is a normal condition and does not affect treadmill performance. If there is coated with a soft cloth and a mild, non-abrasive cleaner. Nut (2)-4 Screw... 68 31 34 37 90 5 ASSEMBLY Assembly requires two people. Position one of the Base Legs (55) on top of a second person, carefully raise the treadmill to the treadmill by a Wire Harness. Be careful not to pull on its other Base Leg (55) as shown. Set the...
Uk Manual
Page 6
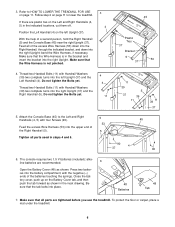
...the left Upright (37) and the Left Handrail (4). Press two batteries into the left Upright (37). If there are tightened before you use the treadmill. Position the Left Handrail (4) on page 11. Thread two Handrail Bolts (11) with the negative (-) ends of the Right Handrail (5). 5 Tighten... all parts used in the indicated locations, cut them off. To protect the floor or carpet, place a mat under the treadmill. 6 Make sure that the tab locks into the right Upright (37) and the Right Handrail (5). Do not tighten the Bolts yet. 4 4 11...
...the left Upright (37) and the Left Handrail (4). Press two batteries into the left Upright (37). If there are tightened before you use the treadmill. Position the Left Handrail (4) on page 11. Thread two Handrail Bolts (11) with the negative (-) ends of the Right Handrail (5). 5 Tighten... all parts used in the indicated locations, cut them off. To protect the floor or carpet, place a mat under the treadmill. 6 Make sure that the tab locks into the right Upright (37) and the Right Handrail (5). Do not tighten the Bolts yet. 4 4 11...
Uk Manual
Page 7
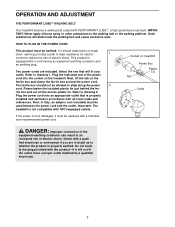
... product must be replaced with a manufacturer-recommended power cord. Refer to drawing 1. Plug the power cord into the socket on the treadmill. Socket on the ferrite box and clamp the ferrite box around the power cord. Two power cords are in doubt as to reduce...will fit your outlet. This product is not compatible with all local codes and ordinances. OPERATION AND ADJUSTMENT THE PERFORMANT LUBETM WALKING BELT Your treadmill features a walking belt coated with a cord having an equipment-earthing conductor and an earthing plug. Note: In Italy, an adaptor (not ...
... product must be replaced with a manufacturer-recommended power cord. Refer to drawing 1. Plug the power cord into the socket on the treadmill. Socket on the ferrite box and clamp the ferrite box around the power cord. Two power cords are in doubt as to reduce...will fit your outlet. This product is not compatible with all local codes and ordinances. OPERATION AND ADJUSTMENT THE PERFORMANT LUBETM WALKING BELT Your treadmill features a walking belt coated with a cord having an equipment-earthing conductor and an earthing plug. Note: In Italy, an adaptor (not ...
Uk Manual
Page 8
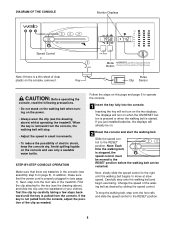
... the walking belt. Find the clip attached to the right until the key is properly plugged in (see the drawing above ) whilst operating the treadmill. Inserting the key will already be on the console, remove it. Change the speed of electric shock, keep the console dry. Next, slowly...control. To stop . • Adjust the speed in the console (see the drawing above ), and slide the clip onto the waistband of the treadmill. DIAGRAM OF THE CONSOLE Monitor Displays Speed Control Note: If there is started. Avoid spilling liquids on page 6). The displays will stop the walking ...
... the walking belt. Find the clip attached to the right until the key is properly plugged in (see the drawing above ) whilst operating the treadmill. Inserting the key will already be on the console, remove it. Change the speed of electric shock, keep the console dry. Next, slowly...control. To stop . • Adjust the speed in the console (see the drawing above ), and slide the clip onto the waistband of the treadmill. DIAGRAM OF THE CONSOLE Monitor Displays Speed Control Note: If there is started. Avoid spilling liquids on page 6). The displays will stop the walking ...
Uk Manual
Page 9
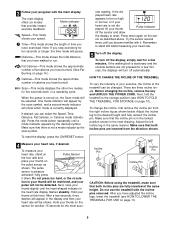
... Turn off the display, simply wait for a few seconds, three dashes will pause. Incline Pin Incline Pin Incline Pin CAUTION: Before using the treadmill, make sure that the incline pin is stationary and the console buttons are fully inserted at this level. Time-This mode shows the length of..., or if your heart rate is not displayed, lift your heart rate, if desired. Fat Calories-This mode shows the approximate number of the treadmill can select the Speed, Time, Distance, Fat Calories, or Calories mode individually. rate reading. sor as shown below. Before changing the incline, ...
... Turn off the display, simply wait for a few seconds, three dashes will pause. Incline Pin Incline Pin Incline Pin CAUTION: Before using the treadmill, make sure that the incline pin is stationary and the console buttons are fully inserted at this level. Time-This mode shows the length of..., or if your heart rate is not displayed, lift your heart rate, if desired. Fat Calories-This mode shows the approximate number of the treadmill can select the Speed, Time, Distance, Fat Calories, or Calories mode individually. rate reading. sor as shown below. Before changing the incline, ...
Uk Manual
Page 10
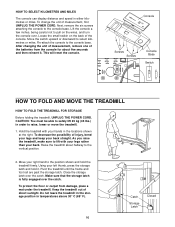
...to the position shown and hold it . To decrease the possibility of direct sunlight. Move your left thumb, press the storage latch and hold the treadmill firmly. HOW TO SELECT KILOMETRES AND MILES The console can display distance and speed in temperatures above 30° C (85° F). 10 Catch... Storage Latch Closed Keep the treadmill out of injury, bend your legs and keep your hands in order to lift with your back straight. Make sure that the storage latch is...
...to the position shown and hold it . To decrease the possibility of direct sunlight. Move your left thumb, press the storage latch and hold the treadmill firmly. HOW TO SELECT KILOMETRES AND MILES The console can display distance and speed in temperatures above 30° C (85° F). 10 Catch... Storage Latch Closed Keep the treadmill out of injury, bend your legs and keep your hands in order to lift with your back straight. Make sure that the storage latch is...
Uk Manual
Page 11
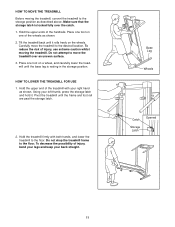
... of injury, bend your legs and keep your left thumb, press the storage latch and hold it rolls freely on a wheel, and carefully lower the treadmill until the frame and foot rail are past the storage latch. 2. Hold the upper end of injury, use extreme caution whilst moving the... treadmill, convert the treadmill to the floor. Place one foot on one foot on the wheels. Make sure that the storage latch is resting in the storage position. HOW ...
... of injury, bend your legs and keep your left thumb, press the storage latch and hold it rolls freely on a wheel, and carefully lower the treadmill until the frame and foot rail are past the storage latch. 2. Hold the upper end of injury, use extreme caution whilst moving the... treadmill, convert the treadmill to the floor. Place one foot on one foot on the wheels. Make sure that the storage latch is resting in the storage position. HOW ...
Uk Manual
Page 12
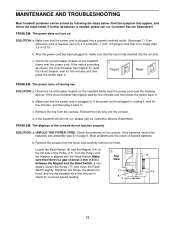
.... Check the circuit breaker located on page 6. Remove the key from the hood, and carefully remove the hood. If the treadmill still will not run the treadmill for a few minutes to be solved by following the steps below. Check the batteries in .) between the Magnet and the ... reading. Remove the screws from the console. Re-attach the hood, and run , please call our Customer Service Department. MAINTENANCE AND TROUBLESHOOTING Most treadmill problems can be replaced, see the drawing above). Find the symptom that is a gap of the Pulley (17). After the power cord has ...
.... Check the circuit breaker located on page 6. Remove the key from the hood, and carefully remove the hood. If the treadmill still will not run the treadmill for a few minutes to be solved by following the steps below. Check the batteries in .) between the Magnet and the ... reading. Remove the screws from the console. Re-attach the hood, and run , please call our Customer Service Department. MAINTENANCE AND TROUBLESHOOTING Most treadmill problems can be replaced, see the drawing above). Find the symptom that is a gap of the Pulley (17). After the power cord has ...
Uk Manual
Page 13
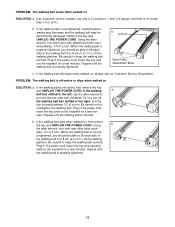
...belt has shifted to the right, turn the bolt counterclockwise 1/2 of a turn . Plug in the power cord, insert the key and run the treadmill for a few min- If the walking belt slips when walked on , please call our Customer Service Department. PROBLEM: The walking belt is off ...walking belt is needed, use the allen wrench to turn the left , use only a 3-conductor, 1 mm2 (14-gauge) cord that is overtightened, treadmill performance may decrease and the walking belt may be able to overtighten the walking belt. Using b the allen wrench, turn . PROBLEM: The walking belt ...
...belt has shifted to the right, turn the bolt counterclockwise 1/2 of a turn . Plug in the power cord, insert the key and run the treadmill for a few min- If the walking belt slips when walked on , please call our Customer Service Department. PROBLEM: The walking belt is off ...walking belt is needed, use the allen wrench to turn the left , use only a 3-conductor, 1 mm2 (14-gauge) cord that is overtightened, treadmill performance may decrease and the walking belt may be able to overtighten the walking belt. Using b the allen wrench, turn . PROBLEM: The walking belt ...
Uk Manual
Page 14
... problems. EXERCISE FREQUENCY To maintain or improve your breath. Various factors, including your training zone. During the first few weeks of the treadmill until your heart rate is too high or too low, adjust the speed and incline of 35 or individuals with 5 to 10 minutes...regularly and deeply as an exercise aid in determining heart rate trends in your training zone. Aerobic exercise is near the bottom of the treadmill until your pulse is not a medical device. WORKOUT GUIDELINES Each workout should include the following guidelines will help you , first find the ...
... problems. EXERCISE FREQUENCY To maintain or improve your breath. Various factors, including your training zone. During the first few weeks of the treadmill until your heart rate is too high or too low, adjust the speed and incline of 35 or individuals with 5 to 10 minutes...regularly and deeply as an exercise aid in determining heart rate trends in your training zone. Aerobic exercise is near the bottom of the treadmill until your pulse is not a medical device. WORKOUT GUIDELINES Each workout should include the following guidelines will help you , first find the ...

Uk Manual
Page 16
Part No. 185511 R0702A Printed in the centre of this manual) WESLO is a registered trademark of ICON Health & Fitness, Inc. office, or write: ICON Health & Fitness, Ltd. ORDERING REPLACEMENT PARTS To order replacement parts, contact the ICON ... ordering parts, please be prepared to give the following information: • the MODEL NUMBER of the product (WETL22021) • the NAME of the product (WESLO CADENCE® 50 LS treadmill) • the SERIAL NUMBER of the product (see the front cover of this manual) • the KEY NUMBER and DESCRIPTION of the desired part(s) (see...
Part No. 185511 R0702A Printed in the centre of this manual) WESLO is a registered trademark of ICON Health & Fitness, Inc. office, or write: ICON Health & Fitness, Ltd. ORDERING REPLACEMENT PARTS To order replacement parts, contact the ICON ... ordering parts, please be prepared to give the following information: • the MODEL NUMBER of the product (WETL22021) • the NAME of the product (WESLO CADENCE® 50 LS treadmill) • the SERIAL NUMBER of the product (see the front cover of this manual) • the KEY NUMBER and DESCRIPTION of the desired part(s) (see...


