
English Manual
Page 2
... described on any surface that meets all times. 7. Never use the treadmill with at a time. 12. Failure to ensure that could result in sandals. 10. If the control system is damaged, the walking belt may change speed or stop unexpectedly, which may result in a garage ...not wear loose clothes that all warnings and precautions. 2. When connecting the power cord (see your local WESLO or call 1-800-806-3651 and order part number 146148. 6. Use the treadmill only as described. 3. Do not use a properly functioning surge suppressor could become caught in the center...
... described on any surface that meets all times. 7. Never use the treadmill with at a time. 12. Failure to ensure that could result in sandals. 10. If the control system is damaged, the walking belt may change speed or stop unexpectedly, which may result in a garage ...not wear loose clothes that all warnings and precautions. 2. When connecting the power cord (see your local WESLO or call 1-800-806-3651 and order part number 146148. 6. Use the treadmill only as described. 3. Do not use a properly functioning surge suppressor could become caught in the center...
English Manual
Page 3
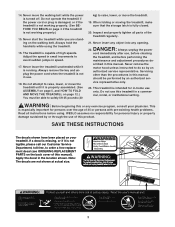
... while it is not working properly. (See BEFORE YOU BEGIN on the back cover of the treadmill regularly. 21. DANGER: 22. Servicing other than the procedures in this manual). WESLO assumes no responsibility for persons over the age of 35 or persons with pre-existing health problems. ...de- This is not legible, please call our Customer Service Department, toll-free, to raise, lower, or move the walking belt while the power is capable of this treadmill in speed. 17. Apply the decal in -home use of high speeds. Always hold the handrails while using . Do ...
... while it is not working properly. (See BEFORE YOU BEGIN on the back cover of the treadmill regularly. 21. DANGER: 22. Servicing other than the procedures in this manual). WESLO assumes no responsibility for persons over the age of 35 or persons with pre-existing health problems. ...de- This is not legible, please call our Customer Service Department, toll-free, to raise, lower, or move the walking belt while the power is capable of this treadmill in speed. 17. Apply the decal in -home use of high speeds. Always hold the handrails while using . Do ...
English Manual
Page 4
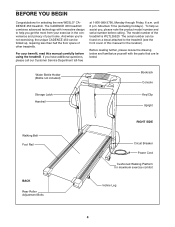
...included) Bookrack Console Storage Latch Handrail Key/Clip Upright Walking Belt Foot Rail BACK Rear Roller Adjustment Bolts RIGHT SIDE Circuit Breaker Power Cord Cushioned Walking Platform for selecting the new WESLO® CADENCE 450 treadmill. The model number of this manual carefully before calling. For... your home. until 6 p.m. If you 're not exercising, the unique CADENCE 450 can be folded up, requiring less than half...
...included) Bookrack Console Storage Latch Handrail Key/Clip Upright Walking Belt Foot Rail BACK Rear Roller Adjustment Bolts RIGHT SIDE Circuit Breaker Power Cord Cushioned Walking Platform for selecting the new WESLO® CADENCE 450 treadmill. The model number of this manual carefully before calling. For... your home. until 6 p.m. If you 're not exercising, the unique CADENCE 450 can be folded up, requiring less than half...
English Manual
Page 5
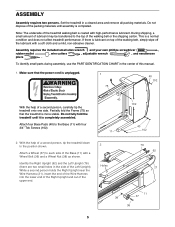
...use the PART IDENTIFICATION CHART in a cleared area and remove all packing materials. Note: The underside of the treadmill walking belt is unplugged. 1 75 40 102 With the help of the walking belt, simply wipe off the lubricant with a Wheel Bolt (36) and a Wheel Nut (38) as shown.... Identify the Right Upright (62) and the Left Upright (76) (there are two small holes in the side of the walking belt or the shipping carton. Assembly requires the included small allen wrench and your own phillips screwdriver , rubber mallet , wire cutters , adjustable wrench ,...
...use the PART IDENTIFICATION CHART in a cleared area and remove all packing materials. Note: The underside of the treadmill walking belt is unplugged. 1 75 40 102 With the help of the walking belt, simply wipe off the lubricant with a Wheel Bolt (36) and a Wheel Nut (38) as shown.... Identify the Right Upright (62) and the Left Upright (76) (there are two small holes in the side of the walking belt or the shipping carton. Assembly requires the included small allen wrench and your own phillips screwdriver , rubber mallet , wire cutters , adjustable wrench ,...
English Manual
Page 7
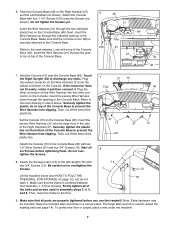
... other connector on the Wire Harness into the large hole in the Console Base. Attach the Storage Latch (14) to adjust the walking belt (see HOW TO FOLD THE TREADMILL FOR STORAGE on page 12), but do not overtighten the Screws. 7 Ties 21 10 47 13 97 62 8 46 13 8. Firmly ..., cut off the end of the Console Base to prevent the Wire Harness from slipping. To protect the floor or carpet, place a mat under the treadmill. 7 6. Insert the Wire Harness (21) through the two indicated plastic ties on the Console. Securely tighten the plastic tie on top of the Console ...
... other connector on the Wire Harness into the large hole in the Console Base. Attach the Storage Latch (14) to adjust the walking belt (see HOW TO FOLD THE TREADMILL FOR STORAGE on page 12), but do not overtighten the Screws. 7 Ties 21 10 47 13 97 62 8 46 13 8. Firmly ..., cut off the end of the Console Base to prevent the Wire Harness from slipping. To protect the floor or carpet, place a mat under the treadmill. 7 6. Insert the Wire Harness (21) through the two indicated plastic ties on the Console. Securely tighten the plastic tie on top of the Console ...
English Manual
Page 8
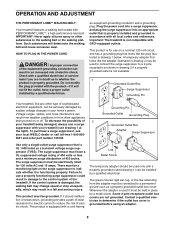
...in drawing 2 if a properly grounded outlet is not available. 1 Grounded Outlet Box Surge Suppressor Grounding Pin Your treadmill, like the adapter illustrated in drawing 2 may result in an increased risk of 450 joules. To decrease the possibility of electric shock. To purchase a surge suppressor, see your... 1449 listed as shown in drawing 1 below. Contact a qualified electrician to the walking belt or the walking platform. Some 2-pole receptacle outlet box covers are in accordance with your local WESLO dealer or call toll-free 1-800-806- 3651 and order part number 146148. Do ...
...in drawing 2 if a properly grounded outlet is not available. 1 Grounded Outlet Box Surge Suppressor Grounding Pin Your treadmill, like the adapter illustrated in drawing 2 may result in an increased risk of 450 joules. To decrease the possibility of electric shock. To purchase a surge suppressor, see your... 1449 listed as shown in drawing 1 below. Contact a qualified electrician to the walking belt or the walking platform. Some 2-pole receptacle outlet box covers are in accordance with your local WESLO dealer or call toll-free 1-800-806- 3651 and order part number 146148. Do ...
English Manual
Page 9
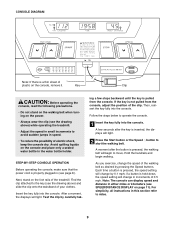
... the key is not pulled from the console. A moment after the key is held down, the speed setting will change the speed of the walking belt as desired by pressing the Speed buttons. if a button is inserted, the displays will light. 2 Press the Start button or the Speed L button ...to move. For simplicity, all instructions in (see the drawing above ) while operating the treadmill. • Adjust the speed in small increments to operate the console. 1 Insert the key fully into the console. Insert the key fully into the console...
... the key is not pulled from the console. A moment after the key is held down, the speed setting will change the speed of the walking belt as desired by pressing the Speed buttons. if a button is inserted, the displays will light. 2 Press the Start button or the Speed L button ...to move. For simplicity, all instructions in (see the drawing above ) while operating the treadmill. • Adjust the speed in small increments to operate the console. 1 Insert the key fully into the console. Insert the key fully into the console...
English Manual
Page 10
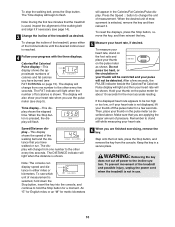
...proper amount of fat calories is selected, remove the key and then reinsert it if necessary (see which unit of the treadmill as desired. To prevent movement of the walking belt and the distance that you have walked or run. The FAT indicator will begin to be shown. Speed/Distance display-...This display shows the speed of the treadmill and possible injury, unplug the power cord when the treadmill is not in use the pulse meter...
...proper amount of fat calories is selected, remove the key and then reinsert it if necessary (see which unit of the treadmill as desired. To prevent movement of the walking belt and the distance that you have walked or run. The FAT indicator will begin to be shown. Speed/Distance display-...This display shows the speed of the treadmill and possible injury, unplug the power cord when the treadmill is not in use the pulse meter...
English Manual
Page 11
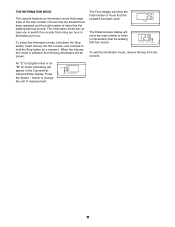
... the total number of hours that the treadmill has been used. To exit the information mode, remove the key from miles per hour to hold the Stop button for metric kilometers will show the total number of miles (or kilometers) that the walking belt has moved. Press the Speed L button... INFORMATION MODE The console features an information mode that keeps track of the total number of hours that the treadmill has been operated and the total number of miles that the walking belt has moved. An "E" for English miles or an "M" for a moment. To select the information mode, hold down ...
... the total number of hours that the treadmill has been used. To exit the information mode, remove the key from miles per hour to hold the Stop button for metric kilometers will show the total number of miles (or kilometers) that the walking belt has moved. Press the Speed L button... INFORMATION MODE The console features an information mode that keeps track of the total number of hours that the treadmill has been operated and the total number of miles that the walking belt has moved. An "E" for English miles or an "M" for a moment. To select the information mode, hold down ...
English Manual
Page 14
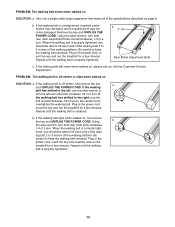
... wrench, turn both rear roller adjustment bolts counterclockwise, 1/4 of the walk- Repeat until the walking belt is overtightened, treadmill performance may decrease and the walking belt may become damaged. PROBLEM: The walking belt slows when walked on , first remove the key and UNPLUG THE POWER CORD. Be careful to ... left , use the allen wrench to the right, turn the bolt counterclockwise 1/2 of the specifications described on the treadmill for a few minutes. When the walking belt is off -center, first remove the key a and UNPLUG THE POWER CORD. Plug in the power cord, insert...
... wrench, turn both rear roller adjustment bolts counterclockwise, 1/4 of the walk- Repeat until the walking belt is overtightened, treadmill performance may decrease and the walking belt may become damaged. PROBLEM: The walking belt slows when walked on , first remove the key and UNPLUG THE POWER CORD. Be careful to ... left , use the allen wrench to the right, turn the bolt counterclockwise 1/2 of the specifications described on the treadmill for a few minutes. When the walking belt is off -center, first remove the key a and UNPLUG THE POWER CORD. Plug in the power cord, insert...


