
English Manual
Page 1
... No. TO AVOID DELAYS, PLEASE CALL DIRECT TO OUR TOLLFREE CUSTOMER HOT LINE. WLTL35520 Serial No. If you . USER'S MANUAL Visit our website at www.weslo.com new products, prizes, fitness tips, and much more! MST CAUTION Read all precautions and instructions in this manual before...
... No. TO AVOID DELAYS, PLEASE CALL DIRECT TO OUR TOLLFREE CUSTOMER HOT LINE. WLTL35520 Serial No. If you . USER'S MANUAL Visit our website at www.weslo.com new products, prizes, fitness tips, and much more! MST CAUTION Read all precautions and instructions in this manual before...
English Manual
Page 2
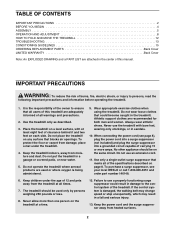
... that blocks air openings. It is being administered. 9. Place the treadmill on page 8. Wear appropriate exercise clothes when using the treadmill. Failure to persons, read the following important precautions and information before operating the treadmill. 1. When connecting the power cord (see your local WESLO or call 1-800-806-3651 and order part number 146148. 6. To...
... that blocks air openings. It is being administered. 9. Place the treadmill on page 8. Wear appropriate exercise clothes when using the treadmill. Failure to persons, read the following important precautions and information before operating the treadmill. 1. When connecting the power cord (see your local WESLO or call 1-800-806-3651 and order part number 146148. 6. To...
English Manual
Page 3
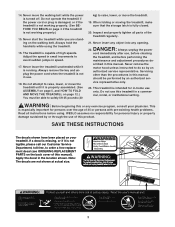
...location shown. Note: The decals are standing on the back cover of this or any opening. Never move the treadmill. 19. Always hold the handrails while using . WESLO assumes no responsibility for persons over the age of 35 or persons with pre-existing health problems. Read all ...parts of high speeds. Never leave the treadmill unattended while it is especially important for personal injury or property damage sustained ...
...location shown. Note: The decals are standing on the back cover of this or any opening. Never move the treadmill. 19. Always hold the handrails while using . WESLO assumes no responsibility for persons over the age of 35 or persons with pre-existing health problems. Read all ...parts of high speeds. Never leave the treadmill unattended while it is especially important for personal injury or property damage sustained ...
English Manual
Page 4
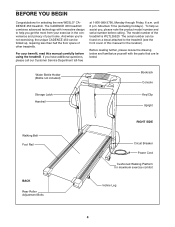
...Bolts RIGHT SIDE Circuit Breaker Power Cord Cushioned Walking Platform for selecting the new WESLO® CADENCE 450 treadmill. For your home. If you 're not exercising, the unique CADENCE 450 can be folded up, requiring less than half the floor space of your... this manual carefully before calling. The CADENCE 450 treadmill combines advanced technology with the parts that are labeled. Mountain Time (excluding holidays). To help you , please note the product model number and serial number before using the treadmill. BEFORE YOU BEGIN Congratulations for maximum exercise...
...Bolts RIGHT SIDE Circuit Breaker Power Cord Cushioned Walking Platform for selecting the new WESLO® CADENCE 450 treadmill. For your home. If you 're not exercising, the unique CADENCE 450 can be folded up, requiring less than half the floor space of your... this manual carefully before calling. The CADENCE 450 treadmill combines advanced technology with the parts that are labeled. Mountain Time (excluding holidays). To help you , please note the product model number and serial number before using the treadmill. BEFORE YOU BEGIN Congratulations for maximum exercise...
English Manual
Page 5
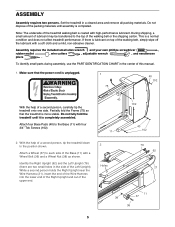
... of a second person, carefully tip the treadmill onto one side. ASSEMBLY Assembly requires two persons. Set the treadmill in the center of the Left Upright). This is completely assembled. If there is completed. To identify small parts during assembly, use the PART IDENTIFICATION CHART in a cleared area... and remove all packing materials. Do not fully fold the treadmill until assembly is lubricant on top of the upper end. 2 Holes 102 40 ...
... of a second person, carefully tip the treadmill onto one side. ASSEMBLY Assembly requires two persons. Set the treadmill in the center of the Left Upright). This is completely assembled. If there is completed. To identify small parts during assembly, use the PART IDENTIFICATION CHART in a cleared area... and remove all packing materials. Do not fully fold the treadmill until assembly is lubricant on top of the upper end. 2 Holes 102 40 ...
English Manual
Page 6
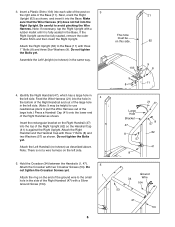
... into the Base. Do not tighten the Bolts yet. Next, orient the Right Upright (62) as shown. If the Right Upright cannot be helpful to use needlenose pliers to the Base (11) with two Crossbar Screws (53). Do not tighten the Crossbar Screws yet. Attach the Left Handrail (not shown) as...
... into the Base. Do not tighten the Bolts yet. Next, orient the Right Upright (62) as shown. If the Right Upright cannot be helpful to use needlenose pliers to the Base (11) with two Crossbar Screws (53). Do not tighten the Crossbar Screws yet. Attach the Left Handrail (not shown) as...
English Manual
Page 7
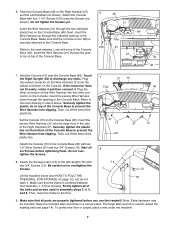
...Wire Harness down through the indicated opening in the Console Base. Start all six Screws before you use the treadmill. Lift the treadmill frame (see page 14). Make sure that the Console Cover (96) is used in a secure place. Note: Extra hardware may be included. To protect the floor or carpet..., place a mat under the treadmill. 7 Touch the Right Upright (62) to the Console Base (46) with two 1/2" Silver Screws (97) and ...
...Wire Harness down through the indicated opening in the Console Base. Start all six Screws before you use the treadmill. Lift the treadmill frame (see page 14). Make sure that the Console Cover (96) is used in a secure place. Note: Extra hardware may be included. To protect the floor or carpet..., place a mat under the treadmill. 7 Touch the Right Upright (62) to the Console Base (46) with two 1/2" Silver Screws (97) and ...
English Manual
Page 8
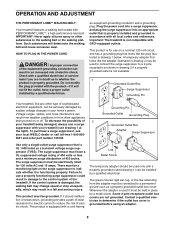
Such substances will not fit the outlet, have a UL suppressed voltage rating of 400 volts or less and a minimum surge dissipation of 450 joules. Plug the power cord into a surge suppressor, and plug the surge suppressor into an appropriate outlet that is properly grounded. ...electrically rated for use a surge suppressor with GFCI-equipped outlets. Whenever the adapter is functioning properly. Important: The treadmill is for 120 volts AC and 15 amps. This product must be grounded. HOW TO PLUG IN THE POWER CORD DANGER: Improper connection of 2 your local WESLO dealer or call...
Such substances will not fit the outlet, have a UL suppressed voltage rating of 400 volts or less and a minimum surge dissipation of 450 joules. Plug the power cord into a surge suppressor, and plug the surge suppressor into an appropriate outlet that is properly grounded. ...electrically rated for use a surge suppressor with GFCI-equipped outlets. Whenever the adapter is functioning properly. Important: The treadmill is for 120 volts AC and 15 amps. This product must be grounded. HOW TO PLUG IN THE POWER CORD DANGER: Improper connection of 2 your local WESLO dealer or call...
English Manual
Page 10
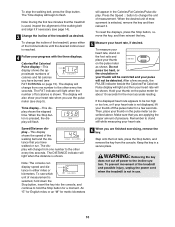
The DISTANCE indicator will change the unit of the treadmill and possible injury, unplug the power cord when the treadmill is not in use the pulse meter (see step 5). To see page 14). 3 Change the incline of the treadmill, press either miles or kilometers. To reset the displays, press the ...moment. Speed/Distance display-This display shows the speed of the walking belt and the distance that the treadmill is pressed, the display will also show your heart rate. 6 When you use . 10 Note: The console can display speed and distance in the Calories/Fat Calories/Pulse display. Press...
The DISTANCE indicator will change the unit of the treadmill and possible injury, unplug the power cord when the treadmill is not in use the pulse meter (see step 5). To see page 14). 3 Change the incline of the treadmill, press either miles or kilometers. To reset the displays, press the ...moment. Speed/Distance display-This display shows the speed of the walking belt and the distance that the treadmill is pressed, the display will also show your heart rate. 6 When you use . 10 Note: The console can display speed and distance in the Calories/Fat Calories/Pulse display. Press...
English Manual
Page 11
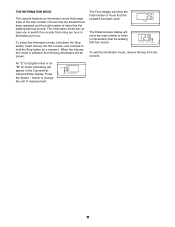
... miles or an "M" for a moment. THE INFORMATION MODE The console features an information mode that keeps track of the total number of hours that the treadmill has been operated and the total number of miles that the walking belt has moved. The Distance/Laps display will appear in the Calories/Fat... the console. The information mode also allows you to hold the Stop button for metric kilometers will show the total number of hours that the treadmill has been used.
... miles or an "M" for a moment. THE INFORMATION MODE The console features an information mode that keeps track of the total number of hours that the treadmill has been operated and the total number of miles that the walking belt has moved. The Distance/Laps display will appear in the Calories/Fat... the console. The information mode also allows you to hold the Stop button for metric kilometers will show the total number of hours that the treadmill has been used.

English Manual
Page 12
...the upper end of injury, use extreme caution while moving the treadmill, convert the treadmill to raise, lower, or move the treadmill. 1. Pivot the treadmill until it . Hold the treadmill firmly with both hands, and lower the treadmill to lift with your back straight. As you raise the treadmill, make sure to the ...one foot on the base as shown. Place one foot on the base, and carefully lower the treadmill until the frame and foot rail are past the storage latch. 2. Using your right hand to the desired location. To decrease the possibility of direct sunlight. Make sure that...
...the upper end of injury, use extreme caution while moving the treadmill, convert the treadmill to raise, lower, or move the treadmill. 1. Pivot the treadmill until it . Hold the treadmill firmly with both hands, and lower the treadmill to lift with your back straight. As you raise the treadmill, make sure to the ...one foot on the base as shown. Place one foot on the base, and carefully lower the treadmill until the frame and foot rail are past the storage latch. 2. Using your right hand to the desired location. To decrease the possibility of direct sunlight. Make sure that...
English Manual
Page 13
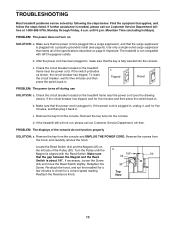
...Knob. b 1/8" 44 33 Top View 50 45 13 c. Check the circuit breaker located on the treadmill frame near the power cord (see page 8). c Tripped Reset PROBLEM: The power turns off during use SOLUTION: a. Remove the key from the hood, and carefully remove the hood. PROBLEM: The displays ...of the specifications described on the treadmill frame near the power cord. Locate the Reed Switch (44) and the Magnet ...
...Knob. b 1/8" 44 33 Top View 50 45 13 c. Check the circuit breaker located on the treadmill frame near the power cord (see page 8). c Tripped Reset PROBLEM: The power turns off during use SOLUTION: a. Remove the key from the hood, and carefully remove the hood. PROBLEM: The displays ...of the specifications described on the treadmill frame near the power cord. Locate the Reed Switch (44) and the Magnet ...
English Manual
Page 14
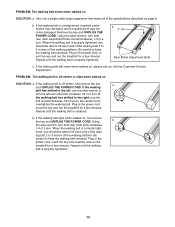
.... b. Be careful to the right, turn the bolt counterclockwise 1/2 of the specifications described on the treadmill for a few minutes. If the walking belt still slows when walked on SOLUTION: a. Use only a single-outlet surge suppressor that meets all of a turn ; Plug in the power cord,... insert the key and run the treadmill for a few minutes. if the walking belt has shifted to keep the...
.... b. Be careful to the right, turn the bolt counterclockwise 1/2 of the specifications described on the treadmill for a few minutes. If the walking belt still slows when walked on SOLUTION: a. Use only a single-outlet surge suppressor that meets all of a turn ; Plug in the power cord,... insert the key and run the treadmill for a few minutes. if the walking belt has shifted to keep the...
English Manual
Page 15
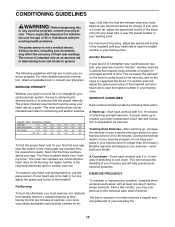
... be "aerobic." If your goal is to burn fat, adjust the speed and incline of the treadmill until your heart rate is to plan your heart rate during exercise, use stored fat calories for energy. WORKOUT GUIDELINES Each workout should include the following guidelines will help you... for prolonged periods of time. Aerobic exercise is intended only as a guide. For aerobic exercise, adjust the speed and incline of the treadmill until your cardiovascular system, the key to exercise with the proper intensity. During the first few months, you , first find the three ...
... be "aerobic." If your goal is to burn fat, adjust the speed and incline of the treadmill until your heart rate is to plan your heart rate during exercise, use stored fat calories for energy. WORKOUT GUIDELINES Each workout should include the following guidelines will help you... for prolonged periods of time. Aerobic exercise is intended only as a guide. For aerobic exercise, adjust the speed and incline of the treadmill until your cardiovascular system, the key to exercise with the proper intensity. During the first few months, you , first find the three ...
English Manual
Page 16
...to freight damage, abuse, misuse, improper or abnormal usage or repairs not provided by an ICON authorized service center; ICON's obligation under normal use and service conditions, for a period of ninety (90) days from the date of ICON Health & Fitness, Inc. Mountain Time (excluding ...please be prepared to give the following information: • The MODEL NUMBER of the product (WLTL35520) • The NAME of the product (WESLO® CADENCE 450 treadmill) • The SERIAL NUMBER of the product (see the front cover of this manual) • The KEY NUMBER and DESCRIPTION of the...
...to freight damage, abuse, misuse, improper or abnormal usage or repairs not provided by an ICON authorized service center; ICON's obligation under normal use and service conditions, for a period of ninety (90) days from the date of ICON Health & Fitness, Inc. Mountain Time (excluding ...please be prepared to give the following information: • The MODEL NUMBER of the product (WLTL35520) • The NAME of the product (WESLO® CADENCE 450 treadmill) • The SERIAL NUMBER of the product (see the front cover of this manual) • The KEY NUMBER and DESCRIPTION of the...

English Manual
Page 17
Crossbar Screw (53)-2 3/4" Screw (13)-6 1 1/4" Screw (105)-4 3/4" Tek Screw (102)-4 1/2" Silver Screw (97)-2 Silver Ground Screw (104)-1 1" Bolt (8)-12 Wheel Nut (38)-2 Washer (57)-4 Wheel Bolt (36)-2 Star Washer (9)-6 (May be an internal Star Washer) Save this chart and use it to identify small parts during assembly. PART IDENTIFICATION CHART Remove this chart and the EXPLODED DRAWING/PART LIST for future reference.
Crossbar Screw (53)-2 3/4" Screw (13)-6 1 1/4" Screw (105)-4 3/4" Tek Screw (102)-4 1/2" Silver Screw (97)-2 Silver Ground Screw (104)-1 1" Bolt (8)-12 Wheel Nut (38)-2 Washer (57)-4 Wheel Bolt (36)-2 Star Washer (9)-6 (May be an internal Star Washer) Save this chart and use it to identify small parts during assembly. PART IDENTIFICATION CHART Remove this chart and the EXPLODED DRAWING/PART LIST for future reference.


