
User Manual
Page 1
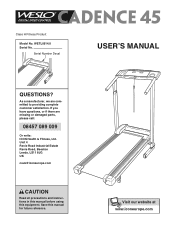
Class H Fitness Product Model No. If you have questions, or if there are committed to providing complete customer satisfaction. Save this equipment. Unit 4 Revie Road Industrial Estate Revie Road, Beeston Leeds, LS11 8JG UK [email protected] CAUTION Read all precautions and instructions in this manual before using this manual for future reference. As a manufacturer, we are missing or damaged parts, please call: 08457 089 009 Or write: ICON Health & Fitness, Ltd. WETL0514.0 Serial No. Serial Number Decal USER'S MANUAL QUESTIONS? Visit our website at www.iconeurope.com
Class H Fitness Product Model No. If you have questions, or if there are committed to providing complete customer satisfaction. Save this equipment. Unit 4 Revie Road Industrial Estate Revie Road, Beeston Leeds, LS11 8JG UK [email protected] CAUTION Read all precautions and instructions in this manual before using this manual for future reference. As a manufacturer, we are missing or damaged parts, please call: 08457 089 009 Or write: ICON Health & Fitness, Ltd. WETL0514.0 Serial No. Serial Number Decal USER'S MANUAL QUESTIONS? Visit our website at www.iconeurope.com
User Manual
Page 2
TABLE OF CONTENTS IMPORTANT PRECAUTIONS 3 BEFORE YOU BEGIN 5 ASSEMBLY 6 OPERATION AND ADJUSTMENT 11 HOW TO FOLD AND MOVE THE TREADMILL 14 MAINTENANCE AND TROUBLESHOOTING 16 CONDITIONING GUIDELINES 18 PART LIST 21 EXPLODED DRAWING 22 ORDERING REPLACEMENT PARTS Back Cover WESLO is a registered trademark of ICON IP, Inc. 2
TABLE OF CONTENTS IMPORTANT PRECAUTIONS 3 BEFORE YOU BEGIN 5 ASSEMBLY 6 OPERATION AND ADJUSTMENT 11 HOW TO FOLD AND MOVE THE TREADMILL 14 MAINTENANCE AND TROUBLESHOOTING 16 CONDITIONING GUIDELINES 18 PART LIST 21 EXPLODED DRAWING 22 ORDERING REPLACEMENT PARTS Back Cover WESLO is a registered trademark of ICON IP, Inc. 2

User Manual
Page 3
... storage latch is properly assembled. (See ASSEMBLY on page 6 and HOW TO FOLD AND MOVE THE TREADMILL on page 14.) You must be able to safely lift 20 kg (45 lbs.) to ensure that is the responsibility of the owner to raise, lower, or move the treadmill until it is fully closed. 10. Use the treadmill only as described in sandals. 16. Keep the power cord...
... storage latch is properly assembled. (See ASSEMBLY on page 6 and HOW TO FOLD AND MOVE THE TREADMILL on page 14.) You must be able to safely lift 20 kg (45 lbs.) to ensure that is the responsibility of the owner to raise, lower, or move the treadmill until it is fully closed. 10. Use the treadmill only as described in sandals. 16. Keep the power cord...
User Manual
Page 4
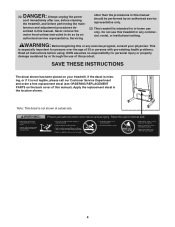
... institutional setting. tenance and adjustment procedures de- Servicing other than the procedures in any exercise program, consult your treadmill. WARNING: Before beginning this manual should be performed by an authorised service representative. ICON assumes no responsibility for in-home use , before cleaning the treadmill, and before using. SAVE THESE INSTRUCTIONS The decal shown has been placed on the back cover of this manual. Apply the replacement decal...
... institutional setting. tenance and adjustment procedures de- Servicing other than the procedures in any exercise program, consult your treadmill. WARNING: Before beginning this manual should be performed by an authorised service representative. ICON assumes no responsibility for in-home use , before cleaning the treadmill, and before using. SAVE THESE INSTRUCTIONS The decal shown has been placed on the back cover of this manual. Apply the replacement decal...
User Manual
Page 5
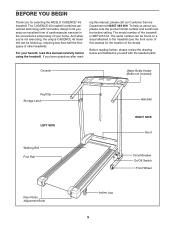
... front cover of this manual for selecting the WESLO CADENCE® 45 treadmill. For your home. Console Water Bottle Holder (Bottle not included) Key/Clip Storage Latch LEFT SIDE Walking Belt Foot Rail Handrail RIGHT SIDE Hood Circuit Breaker On/Off Switch Front Wheel Rear Roller Adjustment Bolts Incline Leg 5 And when you're not exercising, the unique CADENCE 45 treadmill can be folded up, requiring less than half the floor space of your benefit, read - The serial number...
... front cover of this manual for selecting the WESLO CADENCE® 45 treadmill. For your home. Console Water Bottle Holder (Bottle not included) Key/Clip Storage Latch LEFT SIDE Walking Belt Foot Rail Handrail RIGHT SIDE Hood Circuit Breaker On/Off Switch Front Wheel Rear Roller Adjustment Bolts Incline Leg 5 And when you're not exercising, the unique CADENCE 45 treadmill can be folded up, requiring less than half the floor space of your benefit, read - The serial number...
User Manual
Page 6
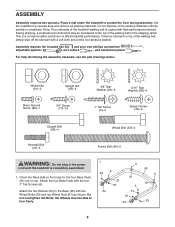
... of the walking belt or the shipping carton. ASSEMBLY Assembly requires two persons. Set the treadmill in the power cord until assembly is coated with two Wheel Bolts (33) and two Wheel Nuts (61) as shown. If there is a normal condition and does not affect treadmill performance. Do not overtighten the Bolts; Wheel Nut (61)-2 Upright Nut (49)-4 Silver Ground Screw (89)-1 3/4" Screw (77)-12...
... of the walking belt or the shipping carton. ASSEMBLY Assembly requires two persons. Set the treadmill in the power cord until assembly is coated with two Wheel Bolts (33) and two Wheel Nuts (61) as shown. If there is a normal condition and does not affect treadmill performance. Do not overtighten the Bolts; Wheel Nut (61)-2 Upright Nut (49)-4 Silver Ground Screw (89)-1 3/4" Screw (77)-12...
User Manual
Page 7
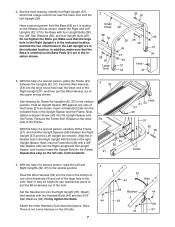
...). Remove the Frame Bolt. Feed the Wire Harness (53) into the indicated hole in the right Upright Spacer. Set the Handrail (4) onto the Right Upright (37). Attach 68 Bracket 44 the Handrail with a 3/8" Star Washer (90) into the Right Upright and the Upright Spacer, and loosely thread the Upright Bolt into the Upright Spacer and the Frame. See drawing 3a. Next, tighten a Spacer Screw...
...). Remove the Frame Bolt. Feed the Wire Harness (53) into the indicated hole in the right Upright Spacer. Set the Handrail (4) onto the Right Upright (37). Attach 68 Bracket 44 the Handrail with a 3/8" Star Washer (90) into the Right Upright and the Upright Spacer, and loosely thread the Upright Bolt into the Upright Spacer and the Frame. See drawing 3a. Next, tighten a Spacer Screw...
User Manual
Page 9
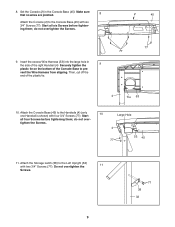
... the Wire Harness from slipping. Start all six Screws before tightening them ; Start all four Screws before tightening them ; do not overtighten the Screws. 9. do not overtighten the Screws. 10 Large Hole 4 53 45 77 11. Insert the excess Wire Harness (53) into the large hole in the Console Base (45). Attach the Console Base (45) to pre- Set the Console (2) in the side of the right Handrail (4) Securely tighten...
... the Wire Harness from slipping. Start all six Screws before tightening them ; Start all four Screws before tightening them ; do not overtighten the Screws. 9. do not overtighten the Screws. 10 Large Hole 4 53 45 77 11. Insert the excess Wire Harness (53) into the large hole in the Console Base (45). Attach the Console Base (45) to pre- Set the Console (2) in the side of the right Handrail (4) Securely tighten...
User Manual
Page 10
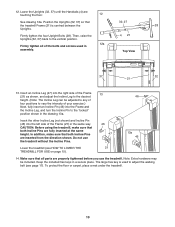
... parts are touching the floor. 12 See drawing 12a. Do not use the treadmill. Make sure that both Incline Pins are inserted from the direction shown. Keep the included hex keys in the drawing 13a. The large hex key is centred between the Uprights. 32, 27 28 Firmly tighten the four Upright Bolts (28). Then, raise the Uprights (32, 37) back to adjust the walking belt...
... parts are touching the floor. 12 See drawing 12a. Do not use the treadmill. Make sure that both Incline Pins are inserted from the direction shown. Keep the included hex keys in the drawing 13a. The large hex key is centred between the Uprights. 32, 27 28 Firmly tighten the four Upright Bolts (28). Then, raise the Uprights (32, 37) back to adjust the walking belt...
User Manual
Page 11
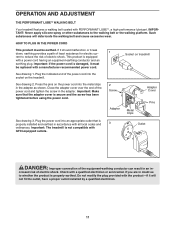
... properly installed and earthed in accordance with all local codes and 3 ordinances. OPERATION AND ADJUSTMENT THE PERFORMANT LUBETM WALKING BELT Your treadmill features a walking belt coated with a power cord having an equipment-earthing conductor and an earthing plug. IMPORTANT: Never apply silicone spray or other substances to whether the product is secure and the screw has been tightened before using the power cord. 2 Screw Adapter Metal Clips Adapter Cover Pins See...
... properly installed and earthed in accordance with all local codes and 3 ordinances. OPERATION AND ADJUSTMENT THE PERFORMANT LUBETM WALKING BELT Your treadmill features a walking belt coated with a power cord having an equipment-earthing conductor and an earthing plug. IMPORTANT: Never apply silicone spray or other substances to whether the product is secure and the screw has been tightened before using the power cord. 2 Screw Adapter Metal Clips Adapter Cover Pins See...
User Manual
Page 12
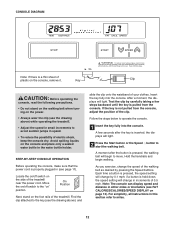
... console dry. Locate the on/off switch to start the walking belt. A moment after the key is inserted, the displays will light. 2 Press the Start button or the Speed L button to the "on page 13). Key Clip CAUTION: Before operating the console, read the following precautions. • Do not stand on the walking belt when turning on the side of the treadmill near the power cord. Move the on/off switch on the power...
... console dry. Locate the on/off switch to start the walking belt. A moment after the key is inserted, the displays will light. 2 Press the Start button or the Speed L button to the "on page 13). Key Clip CAUTION: Before operating the console, read the following precautions. • Do not stand on the walking belt when turning on the side of the treadmill near the power cord. Move the on/off switch on the power...
User Manual
Page 13
... adjusted the incline legs, lower the treadmill (see FAT BURNING on page 15). Make sure that both incline pins are four incline levels. To stop the walking belt, press the Stop button. Incline Pin Right Incline Leg Incline Pin Incline Pin CAUTION: Before using the treadmill, make sure that the incline pin is selected, remove the key and then reinsert it if necessary (see HOW TO FOLD THE TREADMILL FOR STORAGE on page 14). Press the Speed L button to the "off switch near the power cord to change...
... adjusted the incline legs, lower the treadmill (see FAT BURNING on page 15). Make sure that both incline pins are four incline levels. To stop the walking belt, press the Stop button. Incline Pin Right Incline Leg Incline Pin Incline Pin CAUTION: Before using the treadmill, make sure that the incline pin is selected, remove the key and then reinsert it if necessary (see HOW TO FOLD THE TREADMILL FOR STORAGE on page 14). Press the Speed L button to the "off switch near the power cord to change...
User Manual
Page 14
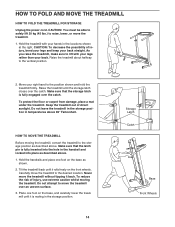
... safely lift 20 kg (45 lbs.) to move the treadmill. 1. Raise the treadmill about halfway to the storage position as described above 85° Fahrenheit. HOW TO FOLD AND MOVE THE TREADMILL HOW TO FOLD THE TREADMILL FOR STORAGE Unplug the power cord. To protect the floor or carpet from damage, place a mat under the treadmill. Make sure that the storage latch is resting in temperatures...
... safely lift 20 kg (45 lbs.) to move the treadmill. 1. Raise the treadmill about halfway to the storage position as described above 85° Fahrenheit. HOW TO FOLD AND MOVE THE TREADMILL HOW TO FOLD THE TREADMILL FOR STORAGE Unplug the power cord. To protect the floor or carpet from damage, place a mat under the treadmill. Make sure that the storage latch is resting in temperatures...
User Manual
Page 15
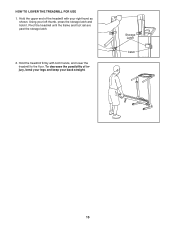
Using your back straight. To decrease the possibility of the treadmill with both hands, and lower the treadmill to the floor. HOW TO LOWER THE TREADMILL FOR USE 1. Storage Latch Catch 15 Hold the treadmill firmly with your right hand as shown. Pivot the treadmill until the frame and foot rail are past the storage latch. 2. Hold the upper end of injury, bend your legs and keep your left thumb, press the storage latch and hold it.
Using your back straight. To decrease the possibility of the treadmill with both hands, and lower the treadmill to the floor. HOW TO LOWER THE TREADMILL FOR USE 1. Storage Latch Catch 15 Hold the treadmill firmly with your right hand as shown. Pivot the treadmill until the frame and foot rail are past the storage latch. 2. Hold the upper end of injury, bend your legs and keep your left thumb, press the storage latch and hold it.
User Manual
Page 16
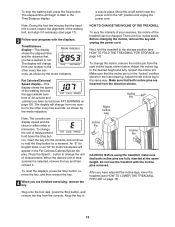
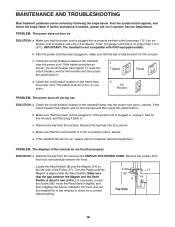
...: The treadmill is aligned with GFCI-equipped outlets. c. d. c Tripped Reset Tripped d On Position Reset PROBLEM: The power turns off switch located on the frame near the power cord. b. Reinsert the key fully into the console. above ). Remove the key from the hood, and carefully remove the hood. Remove the screws from the console and UNPLUG THE POWER CORD. Turn the Pulley until the Magnet is not compatible with the Reed Switch. Make sure that is needed , please...
...: The treadmill is aligned with GFCI-equipped outlets. c. d. c Tripped Reset Tripped d On Position Reset PROBLEM: The power turns off switch located on the frame near the power cord. b. Reinsert the key fully into the console. above ). Remove the key from the hood, and carefully remove the hood. Remove the screws from the console and UNPLUG THE POWER CORD. Turn the Pulley until the Magnet is not compatible with the Reed Switch. Make sure that is needed , please...
User Manual
Page 17
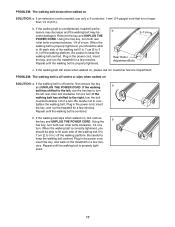
... a turn the left rear roller bolt clockwise 1/2 of the walking belt 5 to 7 cm (2 to keep the walking belt centred. If the walking belt slips when walked on the treadmill for a few min- Repeat until the walking belt is needed, use the hex key to over- Repeat until the walking belt is overtightened, treadmill performance may decrease and the walking belt may become damaged. b. b. b 5-7 cm Rear Roller Adjustment Bolts c. If an extension cord is properly tightened. Plug in the power cord, insert the key...
... a turn the left rear roller bolt clockwise 1/2 of the walking belt 5 to 7 cm (2 to keep the walking belt centred. If the walking belt slips when walked on the treadmill for a few min- Repeat until the walking belt is needed, use the hex key to over- Repeat until the walking belt is overtightened, treadmill performance may decrease and the walking belt may become damaged. b. b. b 5-7 cm Rear Roller Adjustment Bolts c. If an extension cord is properly tightened. Plug in the power cord, insert the key...
User Manual
Page 18
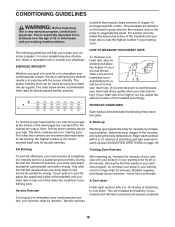
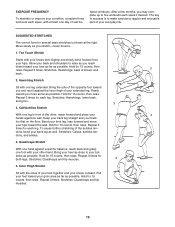
... low, adjust the speed or incline of your exercise program, do not keep your pulse in your body begin to exercise with pre-existing health problems. is the recommended heart rate for longer than 20 minutes.) Breathe regularly and deeply as a guide. Only after the first few minutes does your training zone. Aerobic Exercise If your exercise program. The chart below shows recommended heart rates for exercise by using your heart rate as you...
... low, adjust the speed or incline of your exercise program, do not keep your pulse in your body begin to exercise with pre-existing health problems. is the recommended heart rate for longer than 20 minutes.) Breathe regularly and deeply as a guide. Only after the first few minutes does your training zone. Aerobic Exercise If your exercise program. The chart below shows recommended heart rates for exercise by using your heart rate as you...
User Manual
Page 19
...far as well. Stretches: Hamstrings, lower back, and groin. 3 3. ... exercise a regular and enjoyable part of the opposite foot toward your groin area as far as possible. Keep your back leg...The correct form for each week if desired. Quadriceps Stretch With one hand against a wall for each leg. Allow ...EXERCISE FREQUENCY To maintain or improve your condition, complete three workouts each week, with at the right. Hamstring Stretch Sit with one day of your toes as far as close to relax as you stretch-never bounce. 1. Bend your front leg, lean forward and move...
...far as well. Stretches: Hamstrings, lower back, and groin. 3 3. ... exercise a regular and enjoyable part of the opposite foot toward your groin area as far as possible. Keep your back leg...The correct form for each week if desired. Quadriceps Stretch With one hand against a wall for each leg. Allow ...EXERCISE FREQUENCY To maintain or improve your condition, complete three workouts each week, with at the right. Hamstring Stretch Sit with one day of your toes as far as close to relax as you stretch-never bounce. 1. Bend your front leg, lean forward and move...
User Manual
Page 21
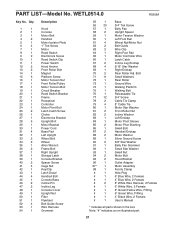
... Reed Switch Electronics Screw Reed Switch Clip Power Switch Hood Anchor Front Roller Bolt Magnet Platform Screw Motor Tension Nut Front Roller/Pulley Motor Tension Bolt Circuit Breaker Reed Switch Bracket Frame Receptical Controller Motor Pivot Bolt Latch Catch Screw Choke Electronics Bracket Upright Bolt Motor Bracket Power Cord Base Pad Left Upright Wheel Bolt Wheel Allen Wrench Frame Bolt Right Upright Storage Latch Console Bracket Spacer Screw Cage Nut Key/Clip Latch Decal Handrail Bolt Console Base Incline Pin Incline Leg Console Cover Upright Nut Filter Flywheel Belt Guide Screw Wire...
... Reed Switch Electronics Screw Reed Switch Clip Power Switch Hood Anchor Front Roller Bolt Magnet Platform Screw Motor Tension Nut Front Roller/Pulley Motor Tension Bolt Circuit Breaker Reed Switch Bracket Frame Receptical Controller Motor Pivot Bolt Latch Catch Screw Choke Electronics Bracket Upright Bolt Motor Bracket Power Cord Base Pad Left Upright Wheel Bolt Wheel Allen Wrench Frame Bolt Right Upright Storage Latch Console Bracket Spacer Screw Cage Nut Key/Clip Latch Decal Handrail Bolt Console Base Incline Pin Incline Leg Console Cover Upright Nut Filter Flywheel Belt Guide Screw Wire...

User Manual
Page 24
... give the following information: • the MODEL NUMBER of the product (WETL0514.0) • the NAME of the product (WESLO CADENCE 45 treadmill) • the SERIAL NUMBER of the product (see the PART LIST and the EXPLODED DRAWING on pages 21 to order replacement parts, contact the ICON Health & Fitness, Ltd. ORDERING REPLACEMENT PARTS If you encounter any problems with this manual) • the KEY NUMBER and DESCRIPTION of the part(s) (see the front...
... give the following information: • the MODEL NUMBER of the product (WETL0514.0) • the NAME of the product (WESLO CADENCE 45 treadmill) • the SERIAL NUMBER of the product (see the PART LIST and the EXPLODED DRAWING on pages 21 to order replacement parts, contact the ICON Health & Fitness, Ltd. ORDERING REPLACEMENT PARTS If you encounter any problems with this manual) • the KEY NUMBER and DESCRIPTION of the part(s) (see the front...


