
Owners Manual
Page 1
... help you complete customer satisfaction. Model No. Save this equipment. WL361700 Serial No. Serial Number Decal NCE4 5 Programmable Speed Auto Incline 'Inc® A Subsidiary of the safety precautions and instructions in this manual carefully before using this manual for reference. If you have questions, or find damaged or missing parts, we are committed to you direct assistance from our factory. For immediate...
... help you complete customer satisfaction. Model No. Save this equipment. WL361700 Serial No. Serial Number Decal NCE4 5 Programmable Speed Auto Incline 'Inc® A Subsidiary of the safety precautions and instructions in this manual carefully before using this manual for reference. If you have questions, or find damaged or missing parts, we are committed to you direct assistance from our factory. For immediate...

Owners Manual
Page 2
... USE, COSTS OF REMOVAL, INSTALLATION OR OTHER CONSEQUENTIAL DAMAGES OF WHATSOEVER NATURE. SOME STATES DO NOT ALLOW LIMITATIONS ON HOW LONG AN IMPLIED WARRANTY LASTS. © Copyright 1990 Weslo, Inc. Weslo's obligation under normal use and service conditions, for which vary from the date of its authorized service centers with all freight and other rights which warranty claim is limited to replacing or repairing...
... USE, COSTS OF REMOVAL, INSTALLATION OR OTHER CONSEQUENTIAL DAMAGES OF WHATSOEVER NATURE. SOME STATES DO NOT ALLOW LIMITATIONS ON HOW LONG AN IMPLIED WARRANTY LASTS. © Copyright 1990 Weslo, Inc. Weslo's obligation under normal use and service conditions, for which vary from the date of its authorized service centers with all freight and other rights which warranty claim is limited to replacing or repairing...

Owners Manual
Page 3
... persons with pre-existing health problems. Read all instructions before using. Programmable Speed Auto Incline TABLE OF CONTENTS Warranty Important Safety Precautions Introduction Assembly Operation and Adjustment Maintenance and Trouble-Shooting Conditioning Guidelines Part List Exploded Drawing Ordering Parts 2 4 5 6 7 10 11 14 15 Back Cover WARNING: Before beginning this product. 3 Weslo assumes no responsibility for individuals over the age of this or any exercise program consult your physician.
... persons with pre-existing health problems. Read all instructions before using. Programmable Speed Auto Incline TABLE OF CONTENTS Warranty Important Safety Precautions Introduction Assembly Operation and Adjustment Maintenance and Trouble-Shooting Conditioning Guidelines Part List Exploded Drawing Ordering Parts 2 4 5 6 7 10 11 14 15 Back Cover WARNING: Before beginning this product. 3 Weslo assumes no responsibility for individuals over the age of this or any exercise program consult your physician.

Owners Manual
Page 4
... motor hood unless instructed to ten feet in sandals. If an extension cord is not working properly.) 4. Always wear appropriate clothing when using the treadmill. Athletic support clothes are standing on thick carpet, near water or outdoors. 2. SAVE THESE INSTRUCTIONS. 4 Never start the treadmill while you are also recommended for proper grounding instructions.) Keep the power cord away from the treadmill during operation. Always adjust the speed control...
... motor hood unless instructed to ten feet in sandals. If an extension cord is not working properly.) 4. Always wear appropriate clothing when using the treadmill. Athletic support clothes are standing on thick carpet, near water or outdoors. 2. SAVE THESE INSTRUCTIONS. 4 Never start the treadmill while you are also recommended for proper grounding instructions.) Keep the power cord away from the treadmill during operation. Always adjust the speed control...

Owners Manual
Page 5
... privacy or your home. Mountain Time (excluding holidays). Electronic Monitor Console Pulse Ear Clip Side Rail Incline Lever Handrail Safety Card Upright Post Walking Belt Foot Rail Back • Belt Adjustment Bo[t Circuit Breaker Left Side Front Lock Knob Motor Hood Power Cord Right Side Frame Walking Platform 5 The model number is recorded on the front cover of cardiovascular exercise at 1-800-99WESLO (9993756), Monday through Friday, 6 a.m. The serial number is printed on...
... privacy or your home. Mountain Time (excluding holidays). Electronic Monitor Console Pulse Ear Clip Side Rail Incline Lever Handrail Safety Card Upright Post Walking Belt Foot Rail Back • Belt Adjustment Bo[t Circuit Breaker Left Side Front Lock Knob Motor Hood Power Cord Right Side Frame Walking Platform 5 The model number is recorded on the front cover of cardiovascular exercise at 1-800-99WESLO (9993756), Monday through Friday, 6 a.m. The serial number is printed on...
Owners Manual
Page 6
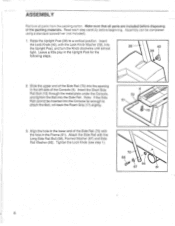
... in the Upright Post for the 39 following steps. 2. ASSEMBLY Remove all parts are included before beginning. Insert the Short Side Rail Bolt (13) through the metal plate under the Console, and tighten the Bolt into the Console far enough to a vertical position. Note: If the Side Rail cannot be completed using a standard screwdriver (not included). 1. Tighten the Lock Knob (see step 1). 68 70...
... in the Upright Post for the 39 following steps. 2. ASSEMBLY Remove all parts are included before beginning. Insert the Short Side Rail Bolt (13) through the metal plate under the Console, and tighten the Bolt into the Console far enough to a vertical position. Note: If the Side Rail cannot be completed using a standard screwdriver (not included). 1. Tighten the Lock Knob (see step 1). 68 70...

Owners Manual
Page 7
... Grounding Plug e 0 Grounding Pin. The plug must be installed by a qualified electrician. Grounded Outlet Adapter • Lug k"o Metal Screw Grounding Pin Grounding Plug SILICONE APPLICATION To maintain the low-friction quality of the walking belt and reduce treadmill wear, a non-oil, non-petroleum base silicone lubricant should also be held in performance is grounded before initial use of the treadmill. OPERATION AND ADJUSTMENT GROUNDING INSTRUCTIONS This...
... Grounding Plug e 0 Grounding Pin. The plug must be installed by a qualified electrician. Grounded Outlet Adapter • Lug k"o Metal Screw Grounding Pin Grounding Plug SILICONE APPLICATION To maintain the low-friction quality of the walking belt and reduce treadmill wear, a non-oil, non-petroleum base silicone lubricant should also be held in performance is grounded before initial use of the treadmill. OPERATION AND ADJUSTMENT GROUNDING INSTRUCTIONS This...

Owners Manual
Page 8
... an incline indicator located above the switch will be, disengaged from the switch, instantly turning the power off , remove the safety card. INCLINE ADJUSTMENT To vary the level of exercise intensity, the incline of the treadmill can be controlled either manually or using the treadmill. To increase the incline of the treadmill, stand toward the front of the console. Auto Speed Controls Manual Speed Control 1 9 E 2 ® 1 3 0 CO Program "START" Key Incline Bubble Incline Lever Timer Manual Mode Indicator Clip Control Power Switch Safety Card TURNING THE POWER ON...
... an incline indicator located above the switch will be, disengaged from the switch, instantly turning the power off , remove the safety card. INCLINE ADJUSTMENT To vary the level of exercise intensity, the incline of the treadmill can be controlled either manually or using the treadmill. To increase the incline of the treadmill, stand toward the front of the console. Auto Speed Controls Manual Speed Control 1 9 E 2 ® 1 3 0 CO Program "START" Key Incline Bubble Incline Lever Timer Manual Mode Indicator Clip Control Power Switch Safety Card TURNING THE POWER ON...

Owners Manual
Page 9
... , move the manual speed control from 5 to exercise, from the "PROGRAM" position. After the power is turned on , the control must be moved to move . 2. MANUAL MODE 1. Move the manual speed control slowly forward until you plan to the desired speeds. Press the program "START" key. IMPORTANT: This treadmill has been designed to greatly differing speeds. Note: The auto speed controls can be operated in speed may stop and the treadmill will then control the speed of the treadmill automatically for instructions. 9 Move the manual speed control...
... , move the manual speed control from 5 to exercise, from the "PROGRAM" position. After the power is turned on , the control must be moved to move . 2. MANUAL MODE 1. Move the manual speed control slowly forward until you plan to the desired speeds. Press the program "START" key. IMPORTANT: This treadmill has been designed to greatly differing speeds. Note: The auto speed controls can be operated in speed may stop and the treadmill will then control the speed of the treadmill automatically for instructions. 9 Move the manual speed control...

Owners Manual
Page 10
Do not overtighten the bolts. The treadmill must be kept centered on the selfadhesive wrench clip included. 10 -3,, wrench clip z alien wrench IF THE WALKING BELT SLIPS DURING USE: Turn both adjustment bolts clockwise until the walking belt is centered. You should remain just at medium speed when adjusting the belt. MAINTENANCE AND TROUBLE-SHOOTING WALKING BELT ADJUSTMENT To prevent damage to the walking belt, the belt must be turned on at the surface...
Do not overtighten the bolts. The treadmill must be kept centered on the selfadhesive wrench clip included. 10 -3,, wrench clip z alien wrench IF THE WALKING BELT SLIPS DURING USE: Turn both adjustment bolts clockwise until the walking belt is centered. You should remain just at medium speed when adjusting the belt. MAINTENANCE AND TROUBLE-SHOOTING WALKING BELT ADJUSTMENT To prevent damage to the walking belt, the belt must be turned on at the surface...
Owners Manual
Page 11
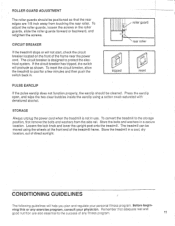
... treadmill in a cool, dry location, out of any exercise program, consult your personal fitness program. Press the earclip open, and wipe the two clear bubbles inside the earclip using the wheels at the front end of the frame near the power cord. Remember that the rear edges are also essential to the success of direct sunlight. To adjust the roller guards, loosen the screws in . To reset...
... treadmill in a cool, dry location, out of any exercise program, consult your personal fitness program. Press the earclip open, and wipe the two clear bubbles inside the earclip using the wheels at the front end of the frame near the power cord. Remember that the rear edges are also essential to the success of direct sunlight. To adjust the roller guards, loosen the screws in . To reset...
Owners Manual
Page 12
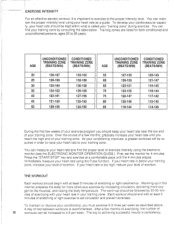
... level. Press the "START/STOP" key and exercise at least 5 minutes of exercise intensity using your heart rate to the muscles, and raising the body temperature. THE WORKOUT Each workout should be increased to 4-5 per week as a guide. EXERCISE INTENSITY For an effective aerobic workout, it is important to achieving successful results is consistency. Over the course of a few months of exercising, the number of 12 workouts can...
... level. Press the "START/STOP" key and exercise at least 5 minutes of exercise intensity using your heart rate to the muscles, and raising the body temperature. THE WORKOUT Each workout should be increased to 4-5 per week as a guide. EXERCISE INTENSITY For an effective aerobic workout, it is important to achieving successful results is consistency. Over the course of a few months of exercising, the number of 12 workouts can...

Owners Manual
Page 13
...and shoulders to the floor as you and pull up . Repeat. then bend the front leg and lean forward by moving your back leg straight and back foot flat on the other and arms forward, lean against the wall. Stretches: Quadriceps, hip muscles. Repeat. Stretches: Hamstrings, back.... CALF/ACHILLES STRETCH With one leg extended. Hold for 15 counts. INNER THIGH STRETCH Sit with one leg in , resting against a wall for balance, reach behind you can and hold for 15 counts. Hold for 15 counts. Stretches: Hamstrings, lower back and groin. STRETCHING The following...
...and shoulders to the floor as you and pull up . Repeat. then bend the front leg and lean forward by moving your back leg straight and back foot flat on the other and arms forward, lean against the wall. Stretches: Quadriceps, hip muscles. Repeat. Stretches: Hamstrings, back.... CALF/ACHILLES STRETCH With one leg extended. Hold for 15 counts. INNER THIGH STRETCH Sit with one leg in , resting against a wall for balance, reach behind you can and hold for 15 counts. Hold for 15 counts. Stretches: Hamstrings, lower back and groin. STRETCHING The following...

Owners Manual
Page 14
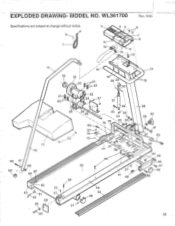
... Front Roller Adjustment Bolt Frame Right Foot Rail Walking Platform Platform Bolt Walking Belt Rear Leg Endcap Roller Guard Right Endcap Adjustment Washer Belt Adjustment Bolt Wrench Clip Allen Wrench Left Endcap Left Foot Rail Rear Roller Side Rail Washer Formed Washer Long Side Rail Bolt Side Rail Endcap Side Rail Motor Hood Motor Hood Screw Magnet Sensor Wire/Reed Switch V-Belt Wire Clip Front Roller/Pulley Safety Cover J-Bolt Leg Bolt Owner's Manual Monitor Operation Guide Note: "#" indicates a non-illustrated part. Model No. Lock Knob Pivot Bolt Key No. Specifications are subject...
... Front Roller Adjustment Bolt Frame Right Foot Rail Walking Platform Platform Bolt Walking Belt Rear Leg Endcap Roller Guard Right Endcap Adjustment Washer Belt Adjustment Bolt Wrench Clip Allen Wrench Left Endcap Left Foot Rail Rear Roller Side Rail Washer Formed Washer Long Side Rail Bolt Side Rail Endcap Side Rail Motor Hood Motor Hood Screw Magnet Sensor Wire/Reed Switch V-Belt Wire Clip Front Roller/Pulley Safety Cover J-Bolt Leg Bolt Owner's Manual Monitor Operation Guide Note: "#" indicates a non-illustrated part. Model No. Lock Knob Pivot Bolt Key No. Specifications are subject...
Owners Manual
Page 15
MODEL NO. WL361700 Specifications are subject to change without notice. 3 4 5 1 11 12 10 Rev. 9/90 6 7 8 17 z i x '16 18 ! 7. 19 l,-' 15 0 14 0 21 28 29 15 20 22 '30 21-4 .-. !,, 22 r• I . 24 z 23 24 27 . .0. 1.1 31 \ \ 32\ i •` 2..26 -. -. - . 75 45--......ek2, -4, 33 -. -.. . 76 35\ 34 4t/k 36 3.7-61 Ni% . 71 70 68 67 69 f, E) 66 57 64 65 27 63 - 61 57 62 58 59 72 55 54 O 21 22 77 78 749v50/ i5 54 27 51 49 53 52 56 27 38 40 39 41 37 42 43 44 45 46 ''zko-47 48 80 60 15 EXPLODED DRAWING-
MODEL NO. WL361700 Specifications are subject to change without notice. 3 4 5 1 11 12 10 Rev. 9/90 6 7 8 17 z i x '16 18 ! 7. 19 l,-' 15 0 14 0 21 28 29 15 20 22 '30 21-4 .-. !,, 22 r• I . 24 z 23 24 27 . .0. 1.1 31 \ \ 32\ i •` 2..26 -. -. - . 75 45--......ek2, -4, 33 -. -.. . 76 35\ 34 4t/k 36 3.7-61 Ni% . 71 70 68 67 69 f, E) 66 57 64 65 27 63 - 61 57 62 58 59 72 55 54 O 21 22 77 78 749v50/ i5 54 27 51 49 53 52 56 27 38 40 39 41 37 42 43 44 45 46 ''zko-47 48 80 60 15 EXPLODED DRAWING-
Owners Manual
Page 16
... (WL361700). 3. The model number of the product (Weslo CADENCE 4350 Treadmill). 2. The serial number of the product, found on a decal on the frame (see the drawing on the front cover for the location of the part from the part list on page 14. 5. The key number of the decal). 4. To help us assist you, please be ordered by calling our Customer Service Department toll-free at 1-80099WESLO...
... (WL361700). 3. The model number of the product (Weslo CADENCE 4350 Treadmill). 2. The serial number of the product, found on a decal on the frame (see the drawing on the front cover for the location of the part from the part list on page 14. 5. The key number of the decal). 4. To help us assist you, please be ordered by calling our Customer Service Department toll-free at 1-80099WESLO...


