
Canadian English Manual
Page 1
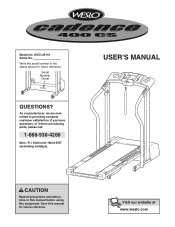
CAUTION Read all precautions and instructions in the space above for future reference. WCTL39110 Serial No. Write the serial number in this manual before using this manual for future reference. ® 400 CS Model No. Serial Number Decal USER'S MANUAL QUESTIONS? Save this equipment. If you have questions, or if there are committed to providing complete customer satisfaction. Visit our website at www.weslo.com As a manufacturer, we are missing parts, please call: 1-888-936-4266 Mon.-Fri. 8h00 until 18h30 EST (excluding holidays).
CAUTION Read all precautions and instructions in the space above for future reference. WCTL39110 Serial No. Write the serial number in this manual before using this manual for future reference. ® 400 CS Model No. Serial Number Decal USER'S MANUAL QUESTIONS? Save this equipment. If you have questions, or if there are committed to providing complete customer satisfaction. Visit our website at www.weslo.com As a manufacturer, we are missing parts, please call: 1-888-936-4266 Mon.-Fri. 8h00 until 18h30 EST (excluding holidays).

Canadian English Manual
Page 2
... use an extension cord. 11. Wear appropriate exercise clothing when using the treadmill. weighing 115 kg (250 lbs.) or less. TABLE OF CONTENTS IMPORTANT PRECAUTIONS 2 BEFORE YOU BEGIN 4 ASSEMBLY 5 OPERATION AND ADJUSTMENT 7 HOW TO FOLD AND MOVE THE TREADMILL 11 TROUBLESHOOTING 12 CONDITIONING GUIDELINES 14 ORDERING REPLACEMENT PARTS 15 LIMITED WARRANTY Back Cover Note: An EXPLODED DRAWING and a PART LIST are attached in the center of this treadmill are adequately informed...
... use an extension cord. 11. Wear appropriate exercise clothing when using the treadmill. weighing 115 kg (250 lbs.) or less. TABLE OF CONTENTS IMPORTANT PRECAUTIONS 2 BEFORE YOU BEGIN 4 ASSEMBLY 5 OPERATION AND ADJUSTMENT 7 HOW TO FOLD AND MOVE THE TREADMILL 11 TROUBLESHOOTING 12 CONDITIONING GUIDELINES 14 ORDERING REPLACEMENT PARTS 15 LIMITED WARRANTY Back Cover Note: An EXPLODED DRAWING and a PART LIST are attached in the center of this treadmill are adequately informed...
Canadian English Manual
Page 3
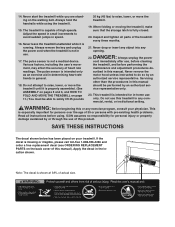
... cover of this treadmill in speed. 16. 14. The pulse sensor is fully closed. 20. When folding or moving the treadmill, make sure that the storage latch is not a medical device. Always unplug the power cord immediately after use this product. ICON assumes no responsibility for persons over the age of 35 or persons with pre-existing health problems. Read all parts of high speeds. Never remove the motor hood unless instructed...
... cover of this treadmill in speed. 16. 14. The pulse sensor is fully closed. 20. When folding or moving the treadmill, make sure that the storage latch is not a medical device. Always unplug the power cord immediately after use this product. ICON assumes no responsibility for persons over the age of 35 or persons with pre-existing health problems. Read all parts of high speeds. Never remove the motor hood unless instructed...
Canadian English Manual
Page 4
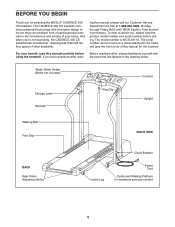
...) Console Storage Latch Handrail Key/Clip Upright Walking Belt Foot Grip RIGHT SIDE BACK Rear Roller Adjustment Bolts Circuit Breaker Incline Leg Power Cord Cushioned Walking Platform for the location). BEFORE YOU BEGIN Thank you , please note the product model number and serial number before using the treadmill. If you have questions after read this manual carefully before calling. The serial number can be found on a decal attached to let you 're not exercising, the CADENCE 400 CS treadmill can...
...) Console Storage Latch Handrail Key/Clip Upright Walking Belt Foot Grip RIGHT SIDE BACK Rear Roller Adjustment Bolts Circuit Breaker Incline Leg Power Cord Cushioned Walking Platform for the location). BEFORE YOU BEGIN Thank you , please note the product model number and serial number before using the treadmill. If you have questions after read this manual carefully before calling. The serial number can be found on a decal attached to let you 're not exercising, the CADENCE 400 CS treadmill can...
Canadian English Manual
Page 5
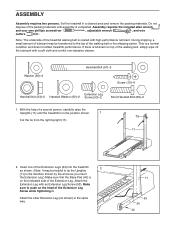
Note: The underside of the treadmill walking belt is lubricant on top of the Extension Leg. Make sure to the top of the Extension Leg Screw while tightening it. Attach the other Extension Leg (not shown) in a cleared area and remove the packing materials. Assembly requires the included allen wrench and your own phillips screwdriver , adjustable wrench , and wire cutters . If there is coated with...
Note: The underside of the treadmill walking belt is lubricant on top of the Extension Leg. Make sure to the top of the Extension Leg Screw while tightening it. Attach the other Extension Leg (not shown) in a cleared area and remove the packing materials. Assembly requires the included allen wrench and your own phillips screwdriver , adjustable wrench , and wire cutters . If there is coated with...
Canadian English Manual
Page 6
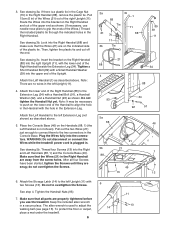
...Console Base (46). After all parts are properly tightened before you use needle-nose pliers to the left Upright (11) with a Small Handrail Washer (39) into the upper end of the right Upright (11). Do not to the two connectors in a secure place. If there is not shown). Attach the lower... (88) to adjust the walking belt (see page 13). WARNING: Do not disconnect or connect the Wires while the treadmill power cord is used to the Extension Leg (34) with the lower end of the Wires.) Thread the included plastic tie through the indicated holes in . Attach the Storage Latch (14) to...
...Console Base (46). After all parts are properly tightened before you use needle-nose pliers to the left Upright (11) with a Small Handrail Washer (39) into the upper end of the right Upright (11). Do not to the two connectors in a secure place. If there is not shown). Attach the lower... (88) to adjust the walking belt (see page 13). WARNING: Do not disconnect or connect the Wires while the treadmill power cord is used to the Extension Leg (34) with the lower end of the Wires.) Thread the included plastic tie through the indicated holes in . Attach the Storage Latch (14) to...

Canadian English Manual
Page 7
.... The surge suppressor must be installed by a metal screw. Plug the power cord into a surge suppressor, and plug the surge suppressor into an appropriate Lug Metal Screw The temporary adapter should malfunction or break down, grounding provides a path of electric shock. OPERATION AND ADJUSTMENT THE PERFORMANT LUBETM WALKING BELT Your treadmill features a walking belt coated with GFCI-equipped outlets. Use only a single-outlet surge suppressor...
.... The surge suppressor must be installed by a metal screw. Plug the power cord into a surge suppressor, and plug the surge suppressor into an appropriate Lug Metal Screw The temporary adapter should malfunction or break down, grounding provides a path of electric shock. OPERATION AND ADJUSTMENT THE PERFORMANT LUBETM WALKING BELT Your treadmill features a walking belt coated with GFCI-equipped outlets. Use only a single-outlet surge suppressor...
Canadian English Manual
Page 8
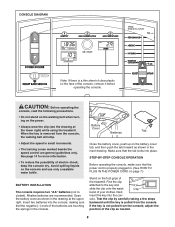
.... Open the battery cover as shown in the inset drawing. When the key is removed from the console, the walking belt will stop. • Adjust the speed in the console. Insert two batteries into the console, making sure that the tab locks into the con- Make sure that the negative (-) ends of the treadmill. STEP-BY-STEP CONSOLE OPERATION Before operating the console, make sure that the power cord is properly plugged...
.... Open the battery cover as shown in the inset drawing. When the key is removed from the console, the walking belt will stop. • Adjust the speed in the console. Insert two batteries into the console, making sure that the tab locks into the con- Make sure that the negative (-) ends of the treadmill. STEP-BY-STEP CONSOLE OPERATION Before operating the console, make sure that the power cord is properly plugged...
Canadian English Manual
Page 9
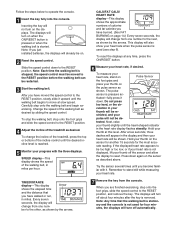
... remove the key. Note: If you are finished exercising, step onto the foot grips, slide the speed control to the next, as desired. CALS/FAT CALS/ HEART RATE display-This display shows the approximate numbers of the incline control until the walking belt begins to the RESET position. 4 Adjust the incline of the walking belt, in the heart rate display flashes steadily. This display will not turn on the pulse sensor as described above. The pulse sensor is started. TIME/DISTANCE display...
... remove the key. Note: If you are finished exercising, step onto the foot grips, slide the speed control to the next, as desired. CALS/FAT CALS/ HEART RATE display-This display shows the approximate numbers of the incline control until the walking belt begins to the RESET position. 4 Adjust the incline of the walking belt, in the heart rate display flashes steadily. This display will not turn on the pulse sensor as described above. The pulse sensor is started. TIME/DISTANCE display...
Canadian English Manual
Page 10
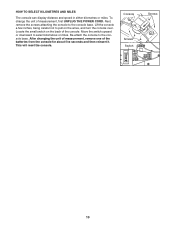
... switch on the wires, and turn the console over. This will reset the console. Next, remove the screws attaching the console to the console base. To change the unit of the console. Lift the console a few inches, being careful not to select kilometres or miles. Re-attach the console to the console base. Move the switch upward or downward to pull on the back of measurement, first UNPLUG THE POWER CORD. After changing...
... switch on the wires, and turn the console over. This will reset the console. Next, remove the screws attaching the console to the console base. To change the unit of the console. Lift the console a few inches, being careful not to select kilometres or miles. Re-attach the console to the console base. Move the switch upward or downward to pull on the back of measurement, first UNPLUG THE POWER CORD. After changing...
Canadian English Manual
Page 11
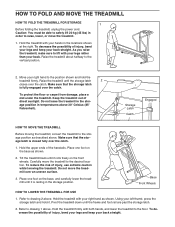
... HOW TO LOWER THE TREADMILL FOR USE 1. Pivot the treadmill down until the storage latch 2 closes over the catch. 1. Keep the treadmill out of direct sunlight. Make sure that the storage latch is closed fully over the catch. Hold the treadmill with your legs rather than your back. HOW TO FOLD AND MOVE THE TREADMILL HOW TO FOLD THE TREADMILL FOR STORAGE 1 Before folding the treadmill, unplug the power cord. Place one...
... HOW TO LOWER THE TREADMILL FOR USE 1. Pivot the treadmill down until the storage latch 2 closes over the catch. 1. Keep the treadmill out of direct sunlight. Make sure that the storage latch is closed fully over the catch. Hold the treadmill with your legs rather than your back. HOW TO FOLD AND MOVE THE TREADMILL HOW TO FOLD THE TREADMILL FOR STORAGE 1 Before folding the treadmill, unplug the power cord. Place one...
Canadian English Manual
Page 12
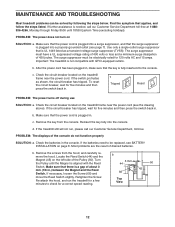
... 7). Remove the key from the hood, and carefully remove the hood. Make sure that the power cord is UL 1449 listed as shown, the circuit breaker has tripped. Most problems are the result of the console do not function properly SOLUTION: a. Remove the screws from the console. Retighten the Screw. Make sure that is plugged into the console. MAINTENANCE AND TROUBLESHOOTING Most treadmill problems can be electrically rated for a correct speed reading...
... 7). Remove the key from the hood, and carefully remove the hood. Make sure that the power cord is UL 1449 listed as shown, the circuit breaker has tripped. Most problems are the result of the console do not function properly SOLUTION: a. Remove the screws from the console. Retighten the Screw. Make sure that is plugged into the console. MAINTENANCE AND TROUBLESHOOTING Most treadmill problems can be electrically rated for a correct speed reading...
Canadian English Manual
Page 13
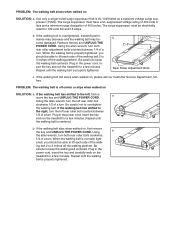
... overtighten the walking belt. Be careful to 3 inches off -center or slips when walked on SOLUTION: a. If the walking belt is off the walking platform. Plug in the power cord, insert the key and run the treadmill for a few minutes. Using the allen wrench, turn both rear roller bolts clockwise, 1/4 of the walk- Repeat until the walking belt is properly tightened. The surge suppressor must have a UL suppressed voltage rating of 400...
... overtighten the walking belt. Be careful to 3 inches off -center or slips when walked on SOLUTION: a. If the walking belt is off the walking platform. Plug in the power cord, insert the key and run the treadmill for a few minutes. Using the allen wrench, turn both rear roller bolts clockwise, 1/4 of the walk- Repeat until the walking belt is properly tightened. The surge suppressor must have a UL suppressed voltage rating of 400...
Canadian English Manual
Page 14
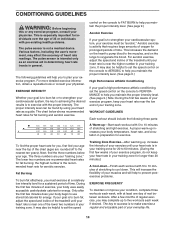
.... The chart below your training zone for prolonged periods of rest between workouts. For aerobic exercise, adjust the speed and incline of the treadmill until your heart rate is activity that requires large amounts of oxygen for longer than 20 minutes.) A Cool-down-Finish each week, with pre-existing health problems. The pulse sensor is to burn fat, adjust the speed and incline of the lower two numbers in...
.... The chart below your training zone for prolonged periods of rest between workouts. For aerobic exercise, adjust the speed and incline of the treadmill until your heart rate is activity that requires large amounts of oxygen for longer than 20 minutes.) A Cool-down-Finish each week, with pre-existing health problems. The pulse sensor is to burn fat, adjust the speed and incline of the lower two numbers in...
Canadian English Manual
Page 15
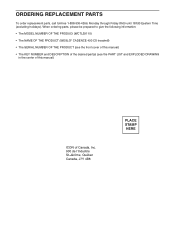
... to give the following information: • The MODEL NUMBER OF THE PRODUCt (WCTL39110) • The NAME OF THE PRODUCT (WESLO® CADENCE 400 CS treadmill) • The SERIAL NUMBER OF THE PRODUCT (see the front cover of this manual) • The KEY NUMBER and DESCRIPTION of the desired part(s) (see the PART LIST and EXPLODED DRAWING in the center of this manual) ICON of Canada, Inc. 900...
... to give the following information: • The MODEL NUMBER OF THE PRODUCt (WCTL39110) • The NAME OF THE PRODUCT (WESLO® CADENCE 400 CS treadmill) • The SERIAL NUMBER OF THE PRODUCT (see the front cover of this manual) • The KEY NUMBER and DESCRIPTION of the desired part(s) (see the PART LIST and EXPLODED DRAWING in the center of this manual) ICON of Canada, Inc. 900...
Canadian English Manual
Page 16
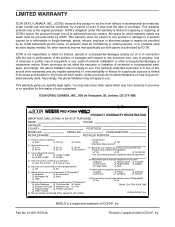
...; 2004 ICON IP, Inc. The warranty extended hereunder is in its authorized service centers. J Yes J No 6) Where did you ever purchased an ICON product before? J Sports J Fitness J Motoring J Business J Computer J General 12) Do you buy another manufacturer? Part No. 211201 R0704A WESLO is limited in lieu of or in Canada © 2004 ICON IP, Inc. ICON's obligation under normal use and service conditions, for...
...; 2004 ICON IP, Inc. The warranty extended hereunder is in its authorized service centers. J Yes J No 6) Where did you ever purchased an ICON product before? J Sports J Fitness J Motoring J Business J Computer J General 12) Do you buy another manufacturer? Part No. 211201 R0704A WESLO is limited in lieu of or in Canada © 2004 ICON IP, Inc. ICON's obligation under normal use and service conditions, for...
Canadian English Manual
Page 17
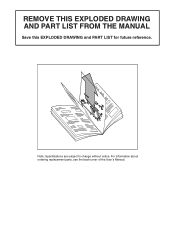
Note: Specifications are subject to change without notice. For information about ordering replacement parts, see the back cover of the User's Manual. 34 REMOVE THIS EXPLODED DRAWING AND PART LIST FROM THE MANUAL Save this EXPLODED DRAWING and PART LIST for future reference.
Note: Specifications are subject to change without notice. For information about ordering replacement parts, see the back cover of the User's Manual. 34 REMOVE THIS EXPLODED DRAWING AND PART LIST FROM THE MANUAL Save this EXPLODED DRAWING and PART LIST for future reference.

Canadian English Manual
Page 18
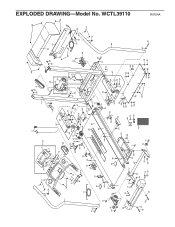
...Lift Motor Rear Roller Speed Potentiometer Speed Control Knob Console Assembly Upright Motor Belt Console Screw Storage Latch Controller Screw 8" Cable Tie Incline Leg Pivot Nut Pulley/Flywheel/Fan Motor Motor/Pulley/Flywheel/Fan Wire Harness Motor Pivot Nut Motor Hood Hood Shield Small Screw Controller Motor Swivel Bolt Motor Tension Nut Motor Tension Star Washer Motor Tension Washer Motor Tension Bolt Incline Stop Bracket Belt Guide Screw Extension Leg Belt Bracket Wheel Bolt Wheel Wheel Nut/Lift Nut Washer Base Pad Frame Spacer (Right) Latch Catch Reed Switch Clip Reed Switch Magnet Console...
...Lift Motor Rear Roller Speed Potentiometer Speed Control Knob Console Assembly Upright Motor Belt Console Screw Storage Latch Controller Screw 8" Cable Tie Incline Leg Pivot Nut Pulley/Flywheel/Fan Motor Motor/Pulley/Flywheel/Fan Wire Harness Motor Pivot Nut Motor Hood Hood Shield Small Screw Controller Motor Swivel Bolt Motor Tension Nut Motor Tension Star Washer Motor Tension Washer Motor Tension Bolt Incline Stop Bracket Belt Guide Screw Extension Leg Belt Bracket Wheel Bolt Wheel Wheel Nut/Lift Nut Washer Base Pad Frame Spacer (Right) Latch Catch Reed Switch Clip Reed Switch Magnet Console...
Canadian English Manual
Page 19
... 24 66 15 26 54 55 56 58 57 53 70 88 39 66 40 96 92 91 66 66 66 13 R0704A EXPLODED DRAWING-Model No.
... 24 66 15 26 54 55 56 58 57 53 70 88 39 66 40 96 92 91 66 66 66 13 R0704A EXPLODED DRAWING-Model No.


