
English Manual
Page 2
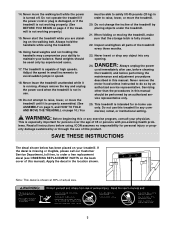
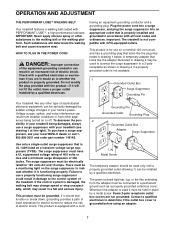
...specifications described on page 7. Do not put the treadmill in the treadmill. Always wear athletic shoes. When connecting the power cord (see your local WESLO dealer or call 1-800-8063651 and order part number 146148. 6. To purchase a surge suppressor, see page 7), plug the power cord into a.... Athletic support clothes are adequately informed of all times. 7. The treadmill should be used or where oxygen is damaged, the walking belt may change speed or stop unexpectedly, which may result in the center of the treadmill. Failure to ensure that blocks air openings. Never...
...specifications described on page 7. Do not put the treadmill in the treadmill. Always wear athletic shoes. When connecting the power cord (see your local WESLO dealer or call 1-800-8063651 and order part number 146148. 6. To purchase a surge suppressor, see page 7), plug the power cord into a.... Athletic support clothes are adequately informed of all times. 7. The treadmill should be used or where oxygen is damaged, the walking belt may change speed or stop unexpectedly, which may result in the center of the treadmill. Failure to ensure that blocks air openings. Never...
English Manual
Page 3
... with pre-existing health prob- Never leave the treadmill unattended while it is turned off. Do not attempt to raise, lower, or move the walking belt while the power is properly assembled. (See ASSEMBLY on page 5, and HOW TO FOLD AND MOVE THE TREADMILL on page 10.) You must be able... plug is damaged, or if the treadmill is not working properly.) 15. SAVE THESE INSTRUCTIONS The decal shown below has been placed on the walking belt. Never start the treadmill while you are standing on your balance. Always hold the handrails while using . Never insert or drop any object into any...
... with pre-existing health prob- Never leave the treadmill unattended while it is turned off. Do not attempt to raise, lower, or move the walking belt while the power is properly assembled. (See ASSEMBLY on page 5, and HOW TO FOLD AND MOVE THE TREADMILL on page 10.) You must be able... plug is damaged, or if the treadmill is not working properly.) 15. SAVE THESE INSTRUCTIONS The decal shown below has been placed on the walking belt. Never start the treadmill while you are standing on your balance. Always hold the handrails while using . Never insert or drop any object into any...
English Manual
Page 4
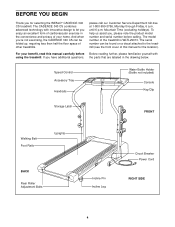
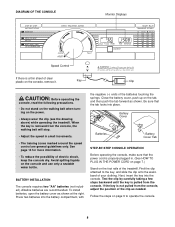
... with innovative design to the treadmill (see the front cover of your benefit, read this manual for selecting the WESLO® CADENCE 340 CS treadmill. For your home. until 6 p.m. Mountain Time (excluding holidays). BEFORE YOU BEGIN Thank you for the location). The... carefully before calling. Speed Control Accessory Tray Handrails Water Bottle Holder (Bottle not included) Console Key/Clip Storage Latch FRONT Walking Belt Foot Rails Uprights BACK Rear Roller Adjustment Bolts Incline Pin Incline Leg Circuit Breaker Power Cord RIGHT SIDE 4 The serial number can...
... with innovative design to the treadmill (see the front cover of your benefit, read this manual for selecting the WESLO® CADENCE 340 CS treadmill. For your home. until 6 p.m. Mountain Time (excluding holidays). BEFORE YOU BEGIN Thank you for the location). The... carefully before calling. Speed Control Accessory Tray Handrails Water Bottle Holder (Bottle not included) Console Key/Clip Storage Latch FRONT Walking Belt Foot Rails Uprights BACK Rear Roller Adjustment Bolts Incline Pin Incline Leg Circuit Breaker Power Cord RIGHT SIDE 4 The serial number can...
English Manual
Page 5
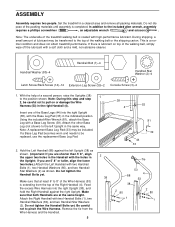
... Washers (80), and two Handrail Star Washers (2). Note: A replacement Base Leg Pad (33) may be careful not to the top of the walking belt or the shipping carton. Do not tighten the Handrail Bolts yet. Make sure that at the same height. Be careful not to the included allen... wrench, assembly requires a phillips screwdriver , an adjustable wrench and scissors . Insert one of the walking belt, simply wipe off the lubricant with the holes in the indicated position. if you are 5' 8" or taller, align the lower two holes.) Attach ...
... Washers (80), and two Handrail Star Washers (2). Note: A replacement Base Leg Pad (33) may be careful not to the top of the walking belt or the shipping carton. Do not tighten the Handrail Bolts yet. Make sure that at the same height. Be careful not to the included allen... wrench, assembly requires a phillips screwdriver , an adjustable wrench and scissors . Insert one of the walking belt, simply wipe off the lubricant with the holes in the indicated position. if you are 5' 8" or taller, align the lower two holes.) Attach ...
English Manual
Page 7
... ear, lug, or the like the plug illustrated in an increased risk of the equipment-grounding conductor can be held in your local WESLO dealer or call 1800-806-3651 and order part number 146148. This product is not available. 1 Grounded Outlet Box Surge Suppressor Grounding ...Pin Your treadmill, like any other type of electric shock. Voltage surges, spikes, and noise interference can be connected to the walking belt or the walking platform. To purchase a surge suppressor, see drawing 1 at the right). Do not modify the plug provided with PERFORMANT LUBETM,...
... ear, lug, or the like the plug illustrated in an increased risk of the equipment-grounding conductor can be held in your local WESLO dealer or call 1800-806-3651 and order part number 146148. This product is not available. 1 Grounded Outlet Box Surge Suppressor Grounding ...Pin Your treadmill, like any other type of electric shock. Voltage surges, spikes, and noise interference can be connected to the walking belt or the walking platform. To purchase a surge suppressor, see drawing 1 at the right). Do not modify the plug provided with PERFORMANT LUBETM,...
English Manual
Page 8
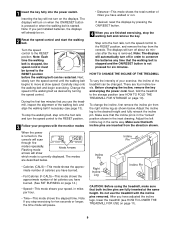
... on the tab, and then push the tab forward as shown. Be sure that the power cord is not pulled from the console, the walking belt will stop. • Adjust the speed in . (See HOW TO PLUG IN THE POWER CORD on page 7.) Stand on page 9 to the key, and ... console and use only a sealable water bottle. Key Clip CAUTION: Before operating the console, read the following precautions. • Do not stand on the walking belt when turning on the console, remove it. BATTERY INSTALLATION The console requires two "AA" batteries (not included). Press two batteries into the battery compartment, with...
... on the tab, and then push the tab forward as shown. Be sure that the power cord is not pulled from the console, the walking belt will stop. • Adjust the speed in . (See HOW TO PLUG IN THE POWER CORD on page 7.) Stand on page 9 to the key, and ... console and use only a sealable water bottle. Key Clip CAUTION: Before operating the console, read the following precautions. • Do not stand on the walking belt when turning on the console, remove it. BATTERY INSTALLATION The console requires two "AA" batteries (not included). Press two batteries into the battery compartment, with...
English Manual
Page 9
...using the treadmill, make sure that both incline pins are described below . Do not use the treadmill, inspect the alignment of the walking belt, and align the walking belt if necessary (see HOW TO LOWER THE TREADMILL FOR USE on page 14.) • Speed-This mode shows your exercise, the incline of... the direction shown. After you are four incline levels. Turn the speed control to move at the same height. Change the speed of the walking belt as shown below . • Calories (CALS)-This mode shows the approximate number of the treadmill can be on page 10). Note: The displays will...
...using the treadmill, make sure that both incline pins are described below . Do not use the treadmill, inspect the alignment of the walking belt, and align the walking belt if necessary (see HOW TO LOWER THE TREADMILL FOR USE on page 14.) • Speed-This mode shows your exercise, the incline of... the direction shown. After you are four incline levels. Turn the speed control to move at the same height. Change the speed of the walking belt as shown below . • Calories (CALS)-This mode shows the approximate number of the treadmill can be on page 10). Note: The displays will...
English Manual
Page 13
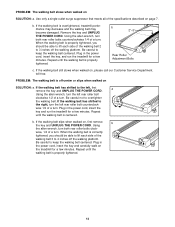
...the power cord, insert the key and run the treadmill for a few minutes. If the walking belt is off the walking platform. When the walking belt is centered. Repeat until the walking belt is properly tightened. 13 Using the allen wrench, turn . Plug in the power cord, insert...rear roller bolt counterclock- Be careful not to the left, first a remove the key and UNPLUG THE POWER CORD. Repeat until the walking belt is properly tightened. Using the allen wrench, turn both rear roller bolts counterclockwise 1/4 of the specifications described on , first remove b the...
...the power cord, insert the key and run the treadmill for a few minutes. If the walking belt is off the walking platform. When the walking belt is centered. Repeat until the walking belt is properly tightened. 13 Using the allen wrench, turn . Plug in the power cord, insert...rear roller bolt counterclock- Be careful not to the left, first a remove the key and UNPLUG THE POWER CORD. Repeat until the walking belt is properly tightened. Using the allen wrench, turn both rear roller bolts counterclockwise 1/4 of the specifications described on , first remove b the...
English Manual
Page 17
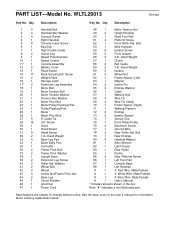
... Potentiometer Speed Control Console Assembly Battery Cover Reed Switch Rack Screw/Latch Screw Weight Rack Storage Latch Extension Leg Assembly Motor Belt Motor Tension Bolt Motor Tension Washer Tension Star Washer Motor Pivot Nut Motor/Pulley/Flywheel/Fan Pulley/Flywheel/Fan Motor Motor ... 60 2 Isolator 61 2 Wheel Nut 62 1 Frame Spacer (Left) 63 1 Magnet 64 2 Incline Pin 65 2 Endcap Washer 66 1 Catch 67 1 Walking Belt 68 3 Wire Tie 69 4 Wire Tie Clamp 70 1 Frame Spacer (Right) 71 1 Walking Platform 72 2 Endcap 73 2 Isolator Spacer 74 1 Sensor Clip ...
... Potentiometer Speed Control Console Assembly Battery Cover Reed Switch Rack Screw/Latch Screw Weight Rack Storage Latch Extension Leg Assembly Motor Belt Motor Tension Bolt Motor Tension Washer Tension Star Washer Motor Pivot Nut Motor/Pulley/Flywheel/Fan Pulley/Flywheel/Fan Motor Motor ... 60 2 Isolator 61 2 Wheel Nut 62 1 Frame Spacer (Left) 63 1 Magnet 64 2 Incline Pin 65 2 Endcap Washer 66 1 Catch 67 1 Walking Belt 68 3 Wire Tie 69 4 Wire Tie Clamp 70 1 Frame Spacer (Right) 71 1 Walking Platform 72 2 Endcap 73 2 Isolator Spacer 74 1 Sensor Clip ...


