
English Manual
Page 1
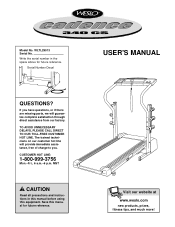
...; Model No. If you . TO AVOID UNNECESSARY DELAYS, PLEASE CALL DIRECT TO OUR TOLL-FREE CUSTOMER HOT LINE. Save this equipment. WLTL29013 Serial No. MST CAUTION Read all precautions and instructions in the space above for future reference. Serial Number Decal QUESTIONS? USER'S MANUAL Visit our website at www.weslo.com new products, prizes, fitness tips, and much more! Write the serial number in...
...; Model No. If you . TO AVOID UNNECESSARY DELAYS, PLEASE CALL DIRECT TO OUR TOLL-FREE CUSTOMER HOT LINE. Save this equipment. WLTL29013 Serial No. MST CAUTION Read all precautions and instructions in the space above for future reference. Serial Number Decal QUESTIONS? USER'S MANUAL Visit our website at www.weslo.com new products, prizes, fitness tips, and much more! Write the serial number in...
English Manual
Page 2
... of this manual. 3. Do not place the treadmill on page 7. Keep children under the treadmill. 4. Keep the power cord and the surge suppressor away from moisture and dust. TABLE OF CONTENTS IMPORTANT PRECAUTIONS 2 BEFORE YOU BEGIN 4 ASSEMBLY 5 OPERATION AND ADJUSTMENT 7 HOW TO FOLD AND MOVE THE TREADMILL 10 MAINTENANCE AND TROUBLE-SHOOTING 12 CONDITIONING GUIDELINES 14 ORDERING REPLACEMENT PARTS Back Cover LIMITED WARRANTY Back Cover Note: A PART LIST and an...
... of this manual. 3. Do not place the treadmill on page 7. Keep children under the treadmill. 4. Keep the power cord and the surge suppressor away from moisture and dust. TABLE OF CONTENTS IMPORTANT PRECAUTIONS 2 BEFORE YOU BEGIN 4 ASSEMBLY 5 OPERATION AND ADJUSTMENT 7 HOW TO FOLD AND MOVE THE TREADMILL 10 MAINTENANCE AND TROUBLE-SHOOTING 12 CONDITIONING GUIDELINES 14 ORDERING REPLACEMENT PARTS Back Cover LIMITED WARRANTY Back Cover Note: A PART LIST and an...
English Manual
Page 3
... any exercise program, consult your treadmill. Always remove the key and unplug the power cord when the treadmill is turned off. When folding or moving the treadmill, make sure that the storage latch is shown at 38% of the treadmill by an authorized ser- This treadmill is missing or illegible, please call our Customer Service Department, toll-free, to maintain your ability to order a free replacement decal (see ORDERING REPLACEMENT PARTS on...
... any exercise program, consult your treadmill. Always remove the key and unplug the power cord when the treadmill is turned off. When folding or moving the treadmill, make sure that the storage latch is shown at 38% of the treadmill by an authorized ser- This treadmill is missing or illegible, please call our Customer Service Department, toll-free, to maintain your ability to order a free replacement decal (see ORDERING REPLACEMENT PARTS on...
English Manual
Page 4
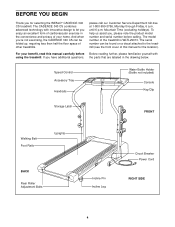
... home. And when you're not exercising, the CADENCE 340 CS can be folded up, requiring less than half the floor space of the treadmill is WLTL29013. until 6 p.m. Speed Control Accessory Tray Handrails Water Bottle Holder (Bottle not included) Console Key/Clip Storage Latch FRONT Walking Belt Foot Rails Uprights BACK Rear Roller Adjustment Bolts Incline Pin Incline Leg Circuit Breaker Power Cord RIGHT SIDE 4 To help us assist you, please note the product model number and serial number...
... home. And when you're not exercising, the CADENCE 340 CS can be folded up, requiring less than half the floor space of the treadmill is WLTL29013. until 6 p.m. Speed Control Accessory Tray Handrails Water Bottle Holder (Bottle not included) Console Key/Clip Storage Latch FRONT Walking Belt Foot Rails Uprights BACK Rear Roller Adjustment Bolts Incline Pin Incline Leg Circuit Breaker Power Cord RIGHT SIDE 4 To help us assist you, please note the product model number and serial number...
English Manual
Page 5
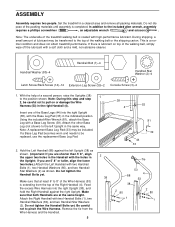
... Bolt (1)-4 Handrail Star Washer (2)-4 Latch Screw/Rack Screw (14)-14 Extension Leg Screw (39)-2 Console Screw (3)-4 1. Using the included Allen Wrench (81), attach the Base Leg with two Handrail Bolts (1), two Handrail Washers (80), and two Handrail Star Washers (2). Note: A replacement Base Leg Pad (33) may be included. Feed the excess Wire Harness into the right Upright (38), with high-performance lubricant. Note: The underside of the walking belt...
... Bolt (1)-4 Handrail Star Washer (2)-4 Latch Screw/Rack Screw (14)-14 Extension Leg Screw (39)-2 Console Screw (3)-4 1. Using the included Allen Wrench (81), attach the Base Leg with two Handrail Bolts (1), two Handrail Washers (80), and two Handrail Star Washers (2). Note: A replacement Base Leg Pad (33) may be included. Feed the excess Wire Harness into the right Upright (38), with high-performance lubricant. Note: The underside of the walking belt...

English Manual
Page 6
... other four holes. WARNING: Do not disconnect or connect the Wires while the treadmill power cord is plugged in the position shown. Attach the Storage Latch (16) to the left Upright (38) with the indicated plastic tie, and insert the two Wires (53) through the loop. Weight on the top hanger. do not overtighten the Screws. Refer to the two connectors in the...
... other four holes. WARNING: Do not disconnect or connect the Wires while the treadmill power cord is plugged in the position shown. Attach the Storage Latch (16) to the left Upright (38) with the indicated plastic tie, and insert the two Wires (53) through the loop. Weight on the top hanger. do not overtighten the Screws. Refer to the two connectors in the...
English Manual
Page 7
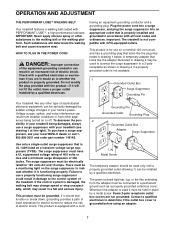
... the plug illustrated in accordance with a cord Lug Metal Screw The temporary adapter should malfunction or break down, grounding provides a path of least resistance for 120 volts AC and 15 amps. To decrease the possibility of electric shock. If the control system is damaged, the walking belt may change speed or stop unexpectedly, which may be used it is grounded before using an adapter...
... the plug illustrated in accordance with a cord Lug Metal Screw The temporary adapter should malfunction or break down, grounding provides a path of least resistance for 120 volts AC and 15 amps. To decrease the possibility of electric shock. If the control system is damaged, the walking belt may change speed or stop unexpectedly, which may be used it is grounded before using an adapter...
English Manual
Page 8
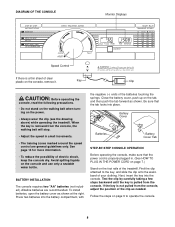
... clip attached to operate the console. 8 DIAGRAM OF THE CONSOLE Monitor Displays Speed Control If there is pulled from the console. To install batteries, open the battery cover as shown. Be sure that the power cord is properly plugged in small increments. • The training zones marked around the speed control are recommended. Test the clip by carefully taking a few steps backward until the key is a thin sheet of the treadmill. Alkaline batteries are...
... clip attached to operate the console. 8 DIAGRAM OF THE CONSOLE Monitor Displays Speed Control If there is pulled from the console. To install batteries, open the battery cover as shown. Be sure that the power cord is properly plugged in small increments. • The training zones marked around the speed control are recommended. Test the clip by carefully taking a few steps backward until the key is a thin sheet of the treadmill. Alkaline batteries are...
English Manual
Page 9
... step onto the walking belt and begin exercising. To stop the walking belt and remove the key. Step onto the foot rails, turn on page 10). The displays will turn the speed control to the desired height and fully reinsert the incline pin. Before changing the incline, remove the key and unplug the power cord. To change the incline, first remove the incline pin from the right incline leg as desired by pressing the ON/RESET button. 4 When you have walked or run. Adjust the incline leg...
... step onto the walking belt and begin exercising. To stop the walking belt and remove the key. Step onto the foot rails, turn on page 10). The displays will turn the speed control to the desired height and fully reinsert the incline pin. Before changing the incline, remove the key and unplug the power cord. To change the incline, first remove the incline pin from the right incline leg as desired by pressing the ON/RESET button. 4 When you have walked or run. Adjust the incline leg...
English Manual
Page 10
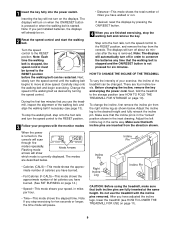
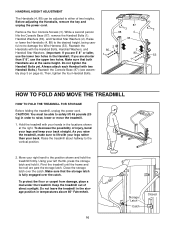
... your hands in the locations shown at the same height. Make sure that both 80 53 1 Handrails are past the storage latch. To decrease the possibility of injury, bend your legs and keep your left thumb, press the storage latch and hold the treadmill firmly. Before adjusting the Handrails, remove the key and unplug the power cord. 87 Remove the four Console Screws (3). While a second person...
... your hands in the locations shown at the same height. Make sure that both 80 53 1 Handrails are past the storage latch. To decrease the possibility of injury, bend your legs and keep your left thumb, press the storage latch and hold the treadmill firmly. Before adjusting the Handrails, remove the key and unplug the power cord. 87 Remove the four Console Screws (3). While a second person...
English Manual
Page 11
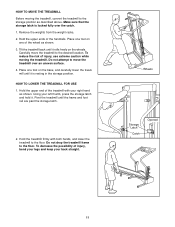
... your legs and keep your left thumb, press the storage latch and hold it rolls freely on the base, and carefully lower the treadmill until it is locked fully over an uneven surface. 4. Wheels Storage Latch Catch Opened 11 Do not attempt to move the treadmill to the floor. Do not drop the treadmill frame to the storage position as shown. 3. Carefully move the treadmill...
... your legs and keep your left thumb, press the storage latch and hold it rolls freely on the base, and carefully lower the treadmill until it is locked fully over an uneven surface. 4. Wheels Storage Latch Catch Opened 11 Do not attempt to move the treadmill to the floor. Do not drop the treadmill frame to the storage position as shown. 3. Carefully move the treadmill...
English Manual
Page 12
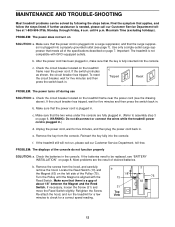
... or connect the wires while the treadmill power cord is aligned with GFCI-equipped outlets. f. If the batteries need to be solved by following the steps below. Most problems are fully plugged in. (Refer to check for five minutes and then press the switch back in . Turn the Pulley until 6 p.m. Make sure that there is plugged in . Re-attach the hood, and run , please call our Customer Service...
... or connect the wires while the treadmill power cord is aligned with GFCI-equipped outlets. f. If the batteries need to be solved by following the steps below. Most problems are fully plugged in. (Refer to check for five minutes and then press the switch back in . Turn the Pulley until 6 p.m. Make sure that there is plugged in . Re-attach the hood, and run , please call our Customer Service...
English Manual
Page 13
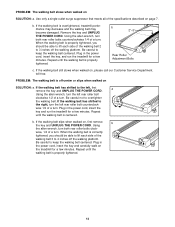
... the walking belt centered. When the walking belt is properly tightened. b 2"-3" Rear Roller Adjustment Bolts c. Repeat until the walking belt is correctly tightened, you should be able to lift each side of a turn . If the walking belt slips when walked on SOLUTION: a. If the walking belt is overtightened, treadmill performance may decrease and the walking belt may become damaged. PROBLEM: The walking belt slows when walked on , first remove b the key and UNPLUG THE POWER CORD. Plug in the power cord, insert the key...
... the walking belt centered. When the walking belt is properly tightened. b 2"-3" Rear Roller Adjustment Bolts c. Repeat until the walking belt is correctly tightened, you should be able to lift each side of a turn . If the walking belt slips when walked on SOLUTION: a. If the walking belt is overtightened, treadmill performance may decrease and the walking belt may become damaged. PROBLEM: The walking belt slows when walked on , first remove b the key and UNPLUG THE POWER CORD. Plug in the power cord, insert the key...
English Manual
Page 14
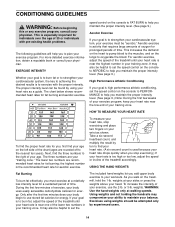
... cardiovascular system, your exercise must exercise at a relatively low intensity level for aerobic exercise. To measure your heart rate, stop exercising.) If your heart rate is too high or too low, adjust the speed or incline of your training zone. As you must be found by using weights should be helpful to set the speed control on the console to PERFORMANCE to help you , first find your heart rate. (A six-second...
... cardiovascular system, your exercise must exercise at a relatively low intensity level for aerobic exercise. To measure your heart rate, stop exercising.) If your heart rate is too high or too low, adjust the speed or incline of your training zone. As you must be found by using weights should be helpful to set the speed control on the console to PERFORMANCE to help you , first find your heart rate. (A six-second...
English Manual
Page 15
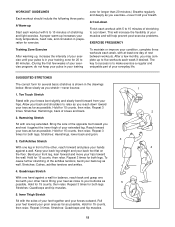
...2. Hold for exercise. Repeat 3 times. Reach toward your body temperature, heart rate, and circulation in your training zone for longer than 20 minutes.) Breathe regularly and deeply as possible. WORKOUT GUIDELINES Each workout should include the following three parts: A Warm-up Start each week,... workouts. Repeat 3 times. A Cool-down Finish each week if desired. Stretches: Hamstrings, lower back and groin. 3 3. After a few weeks of your exercise program, do not keep your pulse in your training To maintain or improve your condition, complete three workouts each workout ...
...2. Hold for exercise. Repeat 3 times. Reach toward your body temperature, heart rate, and circulation in your training zone for longer than 20 minutes.) Breathe regularly and deeply as possible. WORKOUT GUIDELINES Each workout should include the following three parts: A Warm-up Start each week,... workouts. Repeat 3 times. A Cool-down Finish each week if desired. Stretches: Hamstrings, lower back and groin. 3 3. After a few weeks of your exercise program, do not keep your pulse in your training To maintain or improve your condition, complete three workouts each workout ...

English Manual
Page 16
REMOVE THIS EXPLODED DRAWING AND PART LIST FROM THE MANUAL Save this EXPLODED DRAWING and PART LIST for future reference. For information about ordering replacement parts, see the back cover of the User's Manual. 34 Note: Specifications are subject to change without notice.
REMOVE THIS EXPLODED DRAWING AND PART LIST FROM THE MANUAL Save this EXPLODED DRAWING and PART LIST for future reference. For information about ordering replacement parts, see the back cover of the User's Manual. 34 Note: Specifications are subject to change without notice.
English Manual
Page 17
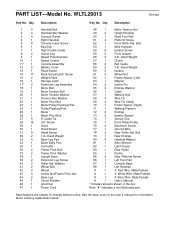
... Roller/Pulley 76 4 Electronic Screw 77 1 Ground Wire 78 2 Rear Roller Adj. Bolt 53 1 Wire Harness 54 6 Isolator Screw 55 2 Front Isolator 56 2 2-lb. Specifications are subject to change without notice. See the back cover of the user's manual for information about ordering replacement parts. PART LIST-Model No. WLTL29013 R0102A Key No. Qty. Description Key No. Washer Wheel Bolt Wheel Incline Nut/Frame Pivot Nut Base Leg Circuit Breaker Grommet Power Cord 48 1 Motor Tension Nut 49 2 Upright...
... Roller/Pulley 76 4 Electronic Screw 77 1 Ground Wire 78 2 Rear Roller Adj. Bolt 53 1 Wire Harness 54 6 Isolator Screw 55 2 Front Isolator 56 2 2-lb. Specifications are subject to change without notice. See the back cover of the user's manual for information about ordering replacement parts. PART LIST-Model No. WLTL29013 R0102A Key No. Qty. Description Key No. Washer Wheel Bolt Wheel Incline Nut/Frame Pivot Nut Base Leg Circuit Breaker Grommet Power Cord 48 1 Motor Tension Nut 49 2 Upright...
English Manual
Page 18
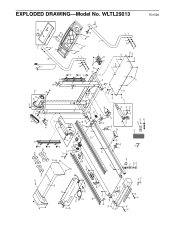
EXPLODED DRAWING-Model No. WLTL29013 22 18 28 56 15 20 21 24 23* 25 11* 10 28 14 19 32 49 6 9 59 29 30 14 28 14 36 37 16 14 17* 44 26 49 15 88 3 12 87 28 28 47 46 45 28 86 66 60 28 54 51 73 55 54 41 42 51 43 62 63 13 61 31 74 75 67 71 33 28 51 50 40 52 48 43 39 70 31 53 14 14 14 1 2 80 37 36 76 5 5 5 53 3 64 85 79 84 83 8 14 65 72 40 78 82 40 78 31 77 51 85 64 8 65 72 54 7 23 81 55 54 76 73 3 58 57 38 33 39 28 31 60 61 42 44 31 17* 34 33 41 28 27 31 68 28 4 35 31 31 33 28 31 1 2 80 69 R0102A
EXPLODED DRAWING-Model No. WLTL29013 22 18 28 56 15 20 21 24 23* 25 11* 10 28 14 19 32 49 6 9 59 29 30 14 28 14 36 37 16 14 17* 44 26 49 15 88 3 12 87 28 28 47 46 45 28 86 66 60 28 54 51 73 55 54 41 42 51 43 62 63 13 61 31 74 75 67 71 33 28 51 50 40 52 48 43 39 70 31 53 14 14 14 1 2 80 37 36 76 5 5 5 53 3 64 85 79 84 83 8 14 65 72 40 78 82 40 78 31 77 51 85 64 8 65 72 54 7 23 81 55 54 76 73 3 58 57 38 33 39 28 31 60 61 42 44 31 17* 34 33 41 28 27 31 68 28 4 35 31 31 33 28 31 1 2 80 69 R0102A

English Manual
Page 19
... product (WESLO CADENCE® 340 CS treadmill) • The SERIAL NUMBER of merchantability or fitness for a particular purpose is not responsible or liable for commercial or rental purposes, or products used as store display models. ICON is limited in the center of this manual) • The KEY NUMBER and DESCRIPTION of the desired part(s) (see the front cover of whatsoever nature. This warranty gives you . The warranty extended...
... product (WESLO CADENCE® 340 CS treadmill) • The SERIAL NUMBER of merchantability or fitness for a particular purpose is not responsible or liable for commercial or rental purposes, or products used as store display models. ICON is limited in the center of this manual) • The KEY NUMBER and DESCRIPTION of the desired part(s) (see the front cover of whatsoever nature. This warranty gives you . The warranty extended...


