

English Manual
Page 1
... 6 Model No. CAUTION: Read all safety precautions and instructions in the space above for future reference. , 4111■111 Part No. 104032 12/90 PATENTED Let our trained technicians help you , at 1-800-999-3756, Mon. - Write the serial number in this manual carefully before using this manual for reference. Programmable Speed Auto Incline I I Serial Number Decal fol neshinco A Subsidiary of Weider Health and Fitness, Inc...
... 6 Model No. CAUTION: Read all safety precautions and instructions in the space above for future reference. , 4111■111 Part No. 104032 12/90 PATENTED Let our trained technicians help you , at 1-800-999-3756, Mon. - Write the serial number in this manual carefully before using this manual for reference. Programmable Speed Auto Incline I I Serial Number Decal fol neshinco A Subsidiary of Weider Health and Fitness, Inc...

English Manual
Page 2
... this product to be preauthorized by Weslo. ©Weslo, Inc. 1990 LIMITED WARRANTY Weslo, Inc. ("Weslo") warrants this Warranty is limited to replacing or repairing, at Weslo's option, the product at 1-800-99WESLO. This warranty extends only to freight damage, abuse, misuse, improper or abnormal usage or repairs not provided by a Weslo authorized service center or for products used for which vary from the date of...
... this product to be preauthorized by Weslo. ©Weslo, Inc. 1990 LIMITED WARRANTY Weslo, Inc. ("Weslo") warrants this Warranty is limited to replacing or repairing, at Weslo's option, the product at 1-800-99WESLO. This warranty extends only to freight damage, abuse, misuse, improper or abnormal usage or repairs not provided by a Weslo authorized service center or for products used for which vary from the date of...

English Manual
Page 3
... persons with pre-existing health problems. Read all instructions before using. Weslo assumes no responsibility for individuals over the age of this or any exercise program consult your physician. CADENCE3350 Programmable Speed Auto Incline TABLE OF CONTENTS Warranty • Important Safety Precautions Introduction Assembly Operation and Adjustment Maintenance and Trouble-Shooting Conditioning Guidelines Part List Exploded Drawing Ordering Parts 2 4 5 6 7 10 11 14 15 Back Cover WARNING: Before beginning...
... persons with pre-existing health problems. Read all instructions before using. Weslo assumes no responsibility for individuals over the age of this or any exercise program consult your physician. CADENCE3350 Programmable Speed Auto Incline TABLE OF CONTENTS Warranty • Important Safety Precautions Introduction Assembly Operation and Adjustment Maintenance and Trouble-Shooting Conditioning Guidelines Part List Exploded Drawing Ordering Parts 2 4 5 6 7 10 11 14 15 Back Cover WARNING: Before beginning...

English Manual
Page 4
... six to ten feet in length with a three-wire conductor. 3. Always turn the treadmill off when not in the treadmill. Always unplug the power cord before operating the treadmill. 1. Never remove the motor hood unless instructed to do so by an authorized service representative only. SAVE THESE INSTRUCTIONS 4 Do not place the treadmill on the walking belt. Do not operate where aerosol products are standing on...
... six to ten feet in length with a three-wire conductor. 3. Always turn the treadmill off when not in the treadmill. Always unplug the power cord before operating the treadmill. 1. Never remove the motor hood unless instructed to do so by an authorized service representative only. SAVE THESE INSTRUCTIONS 4 Do not place the treadmill on the walking belt. Do not operate where aerosol products are standing on...

English Manual
Page 5
... our Customer Service Department toll-free at your convenience, in the privacy of your own home. Electronic Monitor Console Pulse Ear Clip Side Rail Incline Lever Handrail Safety Card Upright Post Walking Belt Foot Rail Roller Guard Back Rear Roller Adjustment Bolt Circuit Breaker Left Side Front Lock Knob Motor Hood Power Cord Right Side Frame Walking Platform 5 Please mention the treadmill model number and serial number when calling. INTRODUCTION Thank you understand the simple assembly and operation...
... our Customer Service Department toll-free at your convenience, in the privacy of your own home. Electronic Monitor Console Pulse Ear Clip Side Rail Incline Lever Handrail Safety Card Upright Post Walking Belt Foot Rail Roller Guard Back Rear Roller Adjustment Bolt Circuit Breaker Left Side Front Lock Knob Motor Hood Power Cord Right Side Frame Walking Platform 5 Please mention the treadmill model number and serial number when calling. INTRODUCTION Thank you understand the simple assembly and operation...

English Manual
Page 6
... Console (4). ASSEMBLY Remove all parts are included before beginning. Raise the Upright Post (38) to attach the Bolt, roll back the Foam Grip (17) slightly. 4 72 17 3. Insert the Lock Knob (40), with the Lock Knob Washer (39), into the Side Rail. Leave a little play in the side of the Side Rail (72) with the Long Side Rail Bolt (69), Formed...
... Console (4). ASSEMBLY Remove all parts are included before beginning. Raise the Upright Post (38) to attach the Bolt, roll back the Foam Grip (17) slightly. 4 72 17 3. Insert the Lock Knob (40), with the Lock Knob Washer (39), into the Side Rail. Leave a little play in the side of the Side Rail (72) with the Long Side Rail Bolt (69), Formed...

English Manual
Page 7
... grounded outlet box cover. OPERATION AND ADJUSTMENT GROUNDING INSTRUCTIONS This product must be applied after every 10 hours of use or whenever a decrease in performance is noticed. Grounding Plug GI Lug 1, 142 Metal Screw Grounding Pin SILICONE APPLICATION To maintain the low-friction quality of the walking belt and reduce treadmill wear, a non-oil, non-petroleum base silicone lubricant should malfunction...
... grounded outlet box cover. OPERATION AND ADJUSTMENT GROUNDING INSTRUCTIONS This product must be applied after every 10 hours of use or whenever a decrease in performance is noticed. Grounding Plug GI Lug 1, 142 Metal Screw Grounding Pin SILICONE APPLICATION To maintain the low-friction quality of the walking belt and reduce treadmill wear, a non-oil, non-petroleum base silicone lubricant should malfunction...

English Manual
Page 8
... exercising, the card will be controlled either manually or using the programmable mode. 8 Note: The manual mode indicator will light. To turn the power off . 3. Auto Speed Controls7 Manual Speed Control Program "START" Key 3 Timer Control L 0 Manual Mode Indicator Power Switch Safety Card ./\ Incline Indicator Incline Lever Clip TURNING THE POWER ON AND OFF 1. To decrease the incline, stand toward the back of the foot rails and pull back the lever. To turn the power on the treadmill. SPEED ADJUSTMENT The speed of the treadmill...
... exercising, the card will be controlled either manually or using the programmable mode. 8 Note: The manual mode indicator will light. To turn the power off . 3. Auto Speed Controls7 Manual Speed Control Program "START" Key 3 Timer Control L 0 Manual Mode Indicator Power Switch Safety Card ./\ Incline Indicator Incline Lever Clip TURNING THE POWER ON AND OFF 1. To decrease the incline, stand toward the back of the foot rails and pull back the lever. To turn the power on the treadmill. SPEED ADJUSTMENT The speed of the treadmill...

English Manual
Page 9
... move . 2. Move the manual speed control slowly forward or backward until you are recommended until the desired speed is turned on, move at the first speed setting. Press the program "START" key. Important Note: Low speed settings are familiar with the monitor removed, the incline, power and manual speed mode can be controlled as described above. Sudden jumps in the manual mode. After the power is reached. Move the manual speed control slowly forward until the walking belt begins to move the manual speed control to the "Reset...
... move . 2. Move the manual speed control slowly forward or backward until you are recommended until the desired speed is turned on, move at the first speed setting. Press the program "START" key. Important Note: Low speed settings are familiar with the monitor removed, the incline, power and manual speed mode can be controlled as described above. Sudden jumps in the manual mode. After the power is reached. Move the manual speed control slowly forward until the walking belt begins to move the manual speed control to the "Reset...

English Manual
Page 10
... adjusting the belt. IF THE WALKING BELT SLIPS DURING USE: Turn both adjustment bolts clockwise until the walking belt is centered. CAUTION: Keep your hands away from the moving walking belt or serious injury could result. If the belt shifts toward the right or left adjustment bolt counterclockwise, and the right adjustment bolt clockwise, 1/8 of the treadmill can be adjusted with the electronic monitor. Do not overtighten the bolts. MAINTENANCE AND TROUBLE-SHOOTING Check all parts...
... adjusting the belt. IF THE WALKING BELT SLIPS DURING USE: Turn both adjustment bolts clockwise until the walking belt is centered. CAUTION: Keep your hands away from the moving walking belt or serious injury could result. If the belt shifts toward the right or left adjustment bolt counterclockwise, and the right adjustment bolt clockwise, 1/8 of the treadmill can be adjusted with the electronic monitor. Do not overtighten the bolts. MAINTENANCE AND TROUBLE-SHOOTING Check all parts...

English Manual
Page 11
... not start, check the circuit breaker located on the front of the frame. To adjust the roller guards, loosen the screws in a secure location. Roller Guard Rear Roller 0 CIRCUIT BREAKER If the treadmill stops, or will help you plan and regulate your heart rate as shown. To reset the circuit breaker, allow the treadmill to the success of the side rail. Tripped Reset STORAGE Always unplug the power cord...
... not start, check the circuit breaker located on the front of the frame. To adjust the roller guards, loosen the screws in a secure location. Roller Guard Rear Roller 0 CIRCUIT BREAKER If the treadmill stops, or will help you plan and regulate your heart rate as shown. To reset the circuit breaker, allow the treadmill to the success of the side rail. Tripped Reset STORAGE Always unplug the power cord...
English Manual
Page 12
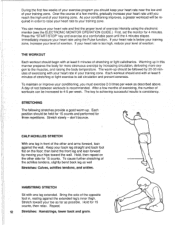
... the course of a few months of exercising, the number of exertion. Immediately measure your heart rate near the low end of exercise intensity using the Pulse function. CALF/ACHILLES STRETCH With one leg extended. Hold for three repetitions. THE WORKOUT Each workout should keep your heart rate using the electronic monitor (see the ELECTRONIC MONITOR OPERATION GUIDE.) First, set the monitor for more oxygen to aid circulation and...
... the course of a few months of exercising, the number of exertion. Immediately measure your heart rate near the low end of exercise intensity using the Pulse function. CALF/ACHILLES STRETCH With one leg extended. Hold for three repetitions. THE WORKOUT Each workout should keep your heart rate using the electronic monitor (see the ELECTRONIC MONITOR OPERATION GUIDE.) First, set the monitor for more oxygen to aid circulation and...
English Manual
Page 14
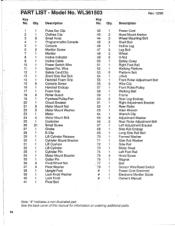
... Bolt Incline Leg Leg Bolt Wheel U-Nut Safety Cover Right Foot Rail Walking Platform Platform Bolt J-Bolt Front Roller Adjustment Bolt Wire Clip Front Roller/Pulley Walking Belt Frame Rear Leg Endcap Right Adjustment Bracket Rear Roller Allen Wrench Wrench Clip Adjustment Washer Rear Roller Adjustment Bolt Left Adjustment Bracket Side Rail Endcap Long Side Rail Bolt Formed Washer Side Rail Washer Side Rail Motor Hood Left Foot Rail Hood Screw Magnet Belt Sensor Wire/Reed Switch Power Cord Grommet Electronic Monitor Guide Owner's Manual Note: "#" indicates a non-illustrated part. Controller...
... Bolt Incline Leg Leg Bolt Wheel U-Nut Safety Cover Right Foot Rail Walking Platform Platform Bolt J-Bolt Front Roller Adjustment Bolt Wire Clip Front Roller/Pulley Walking Belt Frame Rear Leg Endcap Right Adjustment Bracket Rear Roller Allen Wrench Wrench Clip Adjustment Washer Rear Roller Adjustment Bolt Left Adjustment Bracket Side Rail Endcap Long Side Rail Bolt Formed Washer Side Rail Washer Side Rail Motor Hood Left Foot Rail Hood Screw Magnet Belt Sensor Wire/Reed Switch Power Cord Grommet Electronic Monitor Guide Owner's Manual Note: "#" indicates a non-illustrated part. Controller...

English Manual
Page 15
Model No. L33 9'>36\ 45 ''34 -.,-3.•:5.).1.„I .\ 32\ k, . WL361503 Rev. 12/90 3 4 5 6 2 O 8 1 11 4t1 12 \ 10 6 0 17 v.' 16 19 21 15 28 29 22 26\ 23 27 30 21 22 r- • 24 24 25 0_26 i \ r I1 31 I .n..,37i1ils,t41 -, 4 26 Nez4a, 56' 78-. 1 77 i 75 7 14 15 38 40 39 41 37 42 43 73 72 74 57 2 50 26 45 6%70 71 68 r. 67 66 65 64 26 18 . 63 62 61 53 58 5 3 Vi 59 60 26- 26 52 9 51 3 48 46 47 Specifications are subject to change without notice. 15 EXPLODED DRAWING -
Model No. L33 9'>36\ 45 ''34 -.,-3.•:5.).1.„I .\ 32\ k, . WL361503 Rev. 12/90 3 4 5 6 2 O 8 1 11 4t1 12 \ 10 6 0 17 v.' 16 19 21 15 28 29 22 26\ 23 27 30 21 22 r- • 24 24 25 0_26 i \ r I1 31 I .n..,37i1ils,t41 -, 4 26 Nez4a, 56' 78-. 1 77 i 75 7 14 15 38 40 39 41 37 42 43 73 72 74 57 2 50 26 45 6%70 71 68 r. 67 66 65 64 26 18 . 63 62 61 53 58 5 3 Vi 59 60 26- 26 52 9 51 3 48 46 47 Specifications are subject to change without notice. 15 EXPLODED DRAWING -

English Manual
Page 16
... SERIAL NUMBER of the product (see the front cover of the product (Weslo CADENCE 3350 Treadmill). 3. The MODEL NUMBER of this manual. The KEY NUMBER of the part(s) from page 14 of this manual. 5. The DESCRIPTION of the part(s) from page 14 of the product (WL361503). 2. Part No. 104032 12/90 Printed in USA When ordering parts, please be ordered by calling our Customer Service Department toll-free at...
... SERIAL NUMBER of the product (see the front cover of the product (Weslo CADENCE 3350 Treadmill). 3. The MODEL NUMBER of this manual. The KEY NUMBER of the part(s) from page 14 of this manual. 5. The DESCRIPTION of the part(s) from page 14 of the product (WL361503). 2. Part No. 104032 12/90 Printed in USA When ordering parts, please be ordered by calling our Customer Service Department toll-free at...


