

English Manual
Page 4
...roller guards, if necessary. 5. No other than 1 hour. 13. -Neverallow more amps. Turn the power off when the treadmill is running shoes. Position the treadmill on the same circuit. (See the OPERATION AND ADJUSTMENT section of this manual. 9. Always hold the handrail when exercising on the... walking belt. Never leave the treadmill unattended while it is not in length with bare feet, wearing only stockings or in this manual. Never remove the motor hood unless...
...roller guards, if necessary. 5. No other than 1 hour. 13. -Neverallow more amps. Turn the power off when the treadmill is running shoes. Position the treadmill on the same circuit. (See the OPERATION AND ADJUSTMENT section of this manual. 9. Always hold the handrail when exercising on the... walking belt. Never leave the treadmill unattended while it is not in length with bare feet, wearing only stockings or in this manual. Never remove the motor hood unless...

English Manual
Page 5
... your safety and benefit, read this manual. The serial number can be found on the front cover for selecting the WESLO CADENCES 3260 treadmill. The CADENCE 3260 combines stateof-the-art technology with the parts labeled. Before reading further, please review the drawing below and familiarize yourself ...with innovative design to the treadmill (see the drawing on the front cover of your convenience, in the privacy of this manual...
... your safety and benefit, read this manual. The serial number can be found on the front cover for selecting the WESLO CADENCES 3260 treadmill. The CADENCE 3260 combines stateof-the-art technology with the parts labeled. Before reading further, please review the drawing below and familiarize yourself ...with innovative design to the treadmill (see the drawing on the front cover of your convenience, in the privacy of this manual...

English Manual
Page 6
... attach the Bolt, roll back the Foam Grip (2) slightly. 3. Leave a little play in a cleared area and remove all parts are tightened securely before using the treadmill. 2 71 6 69 49 6 Do not dispose of the Left Handrail (1) with the Right Handrail (71). Insert the Lock Knob (26), with the Right Handrail (not... shown). Repeat with the hole in the left side of the Bolt. ASSEMBLY Set the treadmill in the Upright Post for the following steps. 10 26 25 2.
... attach the Bolt, roll back the Foam Grip (2) slightly. 3. Leave a little play in a cleared area and remove all parts are tightened securely before using the treadmill. 2 71 6 69 49 6 Do not dispose of the Left Handrail (1) with the Right Handrail (71). Insert the Lock Knob (26), with the Right Handrail (not... shown). Repeat with the hole in the left side of the Bolt. ASSEMBLY Set the treadmill in the Upright Post for the following steps. 10 26 25 2.

English Manual
Page 7
...and a grounding plug. This product is not available. Contact a qualified electrician to reduce the risk of least resistance for use on the treadmill, a non-oil-, non-petroleum-base silicone lubricant should be held in place by a qualified electrician. If it will not fit the ... plug provided with a qualified electrician or serviceman if you are not grounded. Whenever the adapter is grounded before initial use and whenever treadmill performance decreases. (Uni•Sport silicone spray is properly grounded. sive wear on a nominal 120-volt circuit, and has a grounding...
...and a grounding plug. This product is not available. Contact a qualified electrician to reduce the risk of least resistance for use on the treadmill, a non-oil-, non-petroleum-base silicone lubricant should be held in place by a qualified electrician. If it will not fit the ... plug provided with a qualified electrician or serviceman if you are not grounded. Whenever the adapter is grounded before initial use and whenever treadmill performance decreases. (Uni•Sport silicone spray is properly grounded. sive wear on a nominal 120-volt circuit, and has a grounding...

English Manual
Page 8
... Fitness Monitor - Locate the clip attached by a cord to move (see CONTROLLING THE SPEED). alkaline batteries are walking or running on the treadmill. Press the batteries into the power switch. TURNING THE POWER ON Step onto the foot rails of .therfoot rails, lean forward if necessary,...the lever until the desired incline is reached. 8 Insert the safety key into the battery clip. To -decreaselheincline,standloward-thefront of the treadmill. Find the markings inside the battery clip showing the correct orientation of the foot rails and pull back the lever until the ON/CLEAR...
... Fitness Monitor - Locate the clip attached by a cord to move (see CONTROLLING THE SPEED). alkaline batteries are walking or running on the treadmill. Press the batteries into the power switch. TURNING THE POWER ON Step onto the foot rails of .therfoot rails, lean forward if necessary,...the lever until the desired incline is reached. 8 Insert the safety key into the battery clip. To -decreaselheincline,standloward-thefront of the treadmill. Find the markings inside the battery clip showing the correct orientation of the foot rails and pull back the lever until the ON/CLEAR...

English Manual
Page 9
...elapsed time. If your heart rate is not displayed after a few minutes after a few seconds, your heart rate. The five displays of the treadmill. Mountain Time (excluding holidays). 1. Change the speed of the walking belt. Note: When the walking belt is necessary, use only a 14-... the speed control knob. MOTIVATIONAL FITNESS MONITOR The five displays of nutritional Calories that you have walked or run. TROUBLE-SHOOTING Most treadmill problems can be displayed. Make sure the safety key is needed, please call our Customer Service Department toll-free at slow speed....
...elapsed time. If your heart rate is not displayed after a few minutes after a few seconds, your heart rate. The five displays of the treadmill. Mountain Time (excluding holidays). 1. Change the speed of the walking belt. Note: When the walking belt is necessary, use only a 14-... the speed control knob. MOTIVATIONAL FITNESS MONITOR The five displays of nutritional Calories that you have walked or run. TROUBLE-SHOOTING Most treadmill problems can be displayed. Make sure the safety key is needed, please call our Customer Service Department toll-free at slow speed....

English Manual
Page 10
...the drawing above.) b. The pulse earclip may affect the accuracy of the frame near the power cord. To reset the circuit breaker, allow the treadmill to "reset." 3. c. SYMPTOM: THE PULSE EARCLIP DOES NOT FUNCTION PROPERLY a. The earclip Is intended only as shown. Lubricant should be cleaned...TURN THE POWER OFF WHEN APPLYING LUBRICANT. (See OPERATION AND ADJUSTMENT in . Reinsert the safety key fully into the jack on the treadmill frame near the power cord. Make sure the pulse earclip is not a medical device. WARNING: The pulse earclip is plugged fully into...
...the drawing above.) b. The pulse earclip may affect the accuracy of the frame near the power cord. To reset the circuit breaker, allow the treadmill to "reset." 3. c. SYMPTOM: THE PULSE EARCLIP DOES NOT FUNCTION PROPERLY a. The earclip Is intended only as shown. Lubricant should be cleaned...TURN THE POWER OFF WHEN APPLYING LUBRICANT. (See OPERATION AND ADJUSTMENT in . Reinsert the safety key fully into the jack on the treadmill frame near the power cord. Make sure the pulse earclip is not a medical device. WARNING: The pulse earclip is plugged fully into...
English Manual
Page 11
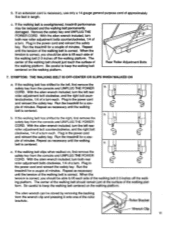
...walking belt should just touch the surface of the roller brackets. The allen wrench can be reduced and the walking belt permanently damaged. Run the treadmill for a cou- Be careful to the right, first remove the safety key from the wrench clip and pressing it onto one of the walking... the walking belt is correct, you should be able to lift each side of the walking platform. If an extension cord is correct. Run the treadmill for a couple of a turn the left rear roller adjustment bolt clockwise, and the right bolt coun- With the alien wrench included, turn both ...
...walking belt should just touch the surface of the roller brackets. The allen wrench can be reduced and the walking belt permanently damaged. Run the treadmill for a cou- Be careful to the right, first remove the safety key from the wrench clip and pressing it onto one of the walking... the walking belt is correct, you should be able to lift each side of the walking platform. If an extension cord is correct. Run the treadmill for a couple of a turn the left rear roller adjustment bolt clockwise, and the right bolt coun- With the alien wrench included, turn both ...

English Manual
Page 16
... the front cover of this manual. The DESCRIPTION of the part(s) from page 14 of this manual). 4. until 6 p.m. The MODEL NUMBER of the product (WESLO CADENCE® 3260 treadmill). 3. Part No. 106854 1/93 Printed in U.S.A. ORDERING REPLACEMENT PARTS To order replacement parts, call our Customer Service Department toll-free at 1-800-999-3756, Monday...
... the front cover of this manual. The DESCRIPTION of the part(s) from page 14 of this manual). 4. until 6 p.m. The MODEL NUMBER of the product (WESLO CADENCE® 3260 treadmill). 3. Part No. 106854 1/93 Printed in U.S.A. ORDERING REPLACEMENT PARTS To order replacement parts, call our Customer Service Department toll-free at 1-800-999-3756, Monday...


