
English Manual
Page 1
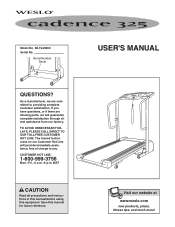
...Model No. Save this equipment. USER'S MANUAL Visit our website at www.weslo.com new products, prizes, fitness tips, and much more! If you . TO AVOID UNNECESSARY DELAYS, PLEASE CALL DIRECT TO OUR TOLL-FREE CUSTOMER HOT LINE. As a manufacturer, we are missing parts, we will provide immediate assistance, free...The trained technicians on our Customer Hot Line will guarantee complete satisfaction through direct assistance from our factory. Serial Number Decal QUESTIONS? WLTL29400 Serial No. MST CAUTION Read all precautions and instructions in this manual before using this manual for...
...Model No. Save this equipment. USER'S MANUAL Visit our website at www.weslo.com new products, prizes, fitness tips, and much more! If you . TO AVOID UNNECESSARY DELAYS, PLEASE CALL DIRECT TO OUR TOLL-FREE CUSTOMER HOT LINE. As a manufacturer, we are missing parts, we will provide immediate assistance, free...The trained technicians on our Customer Hot Line will guarantee complete satisfaction through direct assistance from our factory. Serial Number Decal QUESTIONS? WLTL29400 Serial No. MST CAUTION Read all precautions and instructions in this manual before using this manual for...

English Manual
Page 2
... is the responsibility of the owner to persons, read the following important precautions and information before operating the treadmill. 1. Wear appropriate exercise clothing when using the treadmill. Never move the walking belt while the power is not working properly. (See BEFORE YOU BEGIN on page 4 if the treadmill is turned off. Do not operate the treadmill if the power cord or plug is damaged, or if the...
... is the responsibility of the owner to persons, read the following important precautions and information before operating the treadmill. 1. Wear appropriate exercise clothing when using the treadmill. Never move the walking belt while the power is not working properly. (See BEFORE YOU BEGIN on page 4 if the treadmill is turned off. Do not operate the treadmill if the power cord or plug is damaged, or if the...
English Manual
Page 3
...% of high speeds. Never remove the motor hood unless instructed to order a free replacement decal (see ORDERING REPLACEMENT PARTS on page 10.) You must be performed by an authorized service representative. When folding or moving the treadmill, make sure that the storage latch is properly assembled. (See ASSEMBLY on page 5, and HOW TO FOLD AND MOVE THE TREADMILL on the back cover of the treadmill every three months. 20. The treadmill is not...
...% of high speeds. Never remove the motor hood unless instructed to order a free replacement decal (see ORDERING REPLACEMENT PARTS on page 10.) You must be performed by an authorized service representative. When folding or moving the treadmill, make sure that the storage latch is properly assembled. (See ASSEMBLY on page 5, and HOW TO FOLD AND MOVE THE TREADMILL on the back cover of the treadmill every three months. 20. The treadmill is not...
English Manual
Page 4
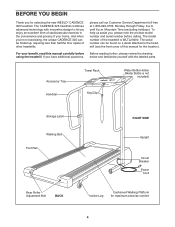
... the treadmill (see the front cover of this manual carefully before calling. The CADENCE 325 treadmill combines advanced technology with the labeled parts. until 6 p.m. Accessory Tray Handrail Towel Rack Key/Clip Water Bottle Holder (Water Bottle is WLTL29400. For your home. The model number of the treadmill is not included) Storage Latch Walking Belt Foot Rail Rear Roller Adjustment Bolt BACK RIGHT SIDE Upright Circuit Breaker Power Cord Incline Leg Cushioned Walking Platform for maximum exercise comfort...
... the treadmill (see the front cover of this manual carefully before calling. The CADENCE 325 treadmill combines advanced technology with the labeled parts. until 6 p.m. Accessory Tray Handrail Towel Rack Key/Clip Water Bottle Holder (Water Bottle is WLTL29400. For your home. The model number of the treadmill is not included) Storage Latch Walking Belt Foot Rail Rear Roller Adjustment Bolt BACK RIGHT SIDE Upright Circuit Breaker Power Cord Incline Leg Cushioned Walking Platform for maximum exercise comfort...
English Manual
Page 5
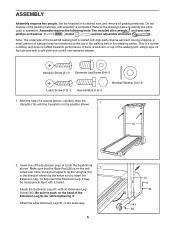
... of the Extension Leg Screw while tightening it. Note: The underside of the Extension Legs (41) into the treadmill as you insert the Extension Leg. Insert one of the treadmill walking belt is in assembly. Handrail Screw (4)-2 Extension Leg Screw (34)-2 Latch Screw (13)-2 Handrail Bolt (15)-2 Handrail Washer (16)-2 1. Note: It may be transferred to identify the parts used in the position shown. 1 14 2. Set the treadmill in the...
... of the Extension Leg Screw while tightening it. Note: The underside of the Extension Legs (41) into the treadmill as you insert the Extension Leg. Insert one of the treadmill walking belt is in assembly. Handrail Screw (4)-2 Extension Leg Screw (34)-2 Latch Screw (13)-2 Handrail Bolt (15)-2 Handrail Washer (16)-2 1. Note: It may be transferred to identify the parts used in the position shown. 1 14 2. Set the treadmill in the...
English Manual
Page 6
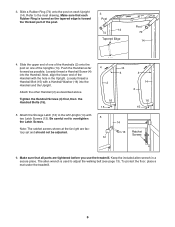
... with the hole in a secure place. Note: The ratchet screws shown at the far right are tightened before you use the treadmill. The allen wrench is toward the thickest part of the Uprights (14). Make sure that all parts are factory set and should not be adjusted. 4 2 14 4 4 14 2 16 15 16 15...Slide a Rubber Ring (74) onto the post on one of the Handrails (2) onto the post on each Rubber Ring is turned so the tapered edge is used to the left Upright (14) with a Handrail Washer (16) into the Handrail. Attach the Storage Latch (12) to adjust the walking belt (see page 13).
... with the hole in a secure place. Note: The ratchet screws shown at the far right are tightened before you use the treadmill. The allen wrench is toward the thickest part of the Uprights (14). Make sure that all parts are factory set and should not be adjusted. 4 2 14 4 4 14 2 16 15 16 15...Slide a Rubber Ring (74) onto the post on one of the Handrails (2) onto the post on each Rubber Ring is turned so the tapered edge is used to the left Upright (14) with a Handrail Washer (16) into the Handrail. Attach the Storage Latch (12) to adjust the walking belt (see page 13).
English Manual
Page 7
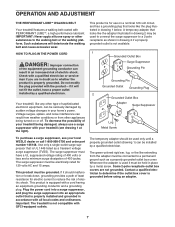
... box covers are in accordance with all local codes and ordinances. Check with the product-if it will deteriorate the walking belt and cause excessive wear. A temporary adapter that is properly installed and grounded in doubt as to a 2-pole receptacle as shown in an increased risk of your treadmill (see your homeʼs power. Do not modify the plug provided...
... box covers are in accordance with all local codes and ordinances. Check with the product-if it will deteriorate the walking belt and cause excessive wear. A temporary adapter that is properly installed and grounded in doubt as to a 2-pole receptacle as shown in an increased risk of your treadmill (see your homeʼs power. Do not modify the plug provided...
English Manual
Page 8
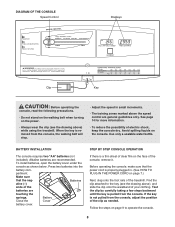
... 14 for more information. • To reduce the possibility of your clothing. Use only a sealable water bottle. BATTERY INSTALLATION The console requires two "AA" batteries (not included). partment. If the key is pulled from the console, the walking belt will stop. • Adjust the speed in . (See HOW TO PLUG IN THE POWER CORD on page 7.) Next, step onto the foot rails of the console, remove it. Batteries ative (-) ends...
... 14 for more information. • To reduce the possibility of your clothing. Use only a sealable water bottle. BATTERY INSTALLATION The console requires two "AA" batteries (not included). partment. If the key is pulled from the console, the walking belt will stop. • Adjust the speed in . (See HOW TO PLUG IN THE POWER CORD on page 7.) Next, step onto the foot rails of the console, remove it. Batteries ative (-) ends...
English Manual
Page 9
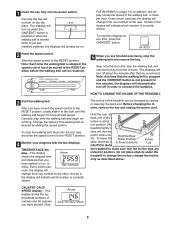
... on when the ON/RESET button is pressed or when the walking belt is currently shown. Step onto the foot rails, stop the walking belt and remove the key. After you just installed batteries, the displays will indicate which number is started. TIME/DISTANCE display-This display Arrow shows the elapsed time and distance that it clicks into the power switch. When the back end of the walking belt, in miles. Raise the back end...
... on when the ON/RESET button is pressed or when the walking belt is currently shown. Step onto the foot rails, stop the walking belt and remove the key. After you just installed batteries, the displays will indicate which number is started. TIME/DISTANCE display-This display Arrow shows the elapsed time and distance that it clicks into the power switch. When the back end of the walking belt, in miles. Raise the back end...
English Manual
Page 10
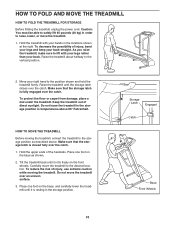
... the upper ends of injury, use extreme caution while moving the treadmill, convert the treadmill to lift with your back. Storage Latch Engaged Catch Base Front Wheels 10 Do not move the treadmill to the vertical position. 2. HOW TO FOLD AND MOVE THE TREADMILL HOW TO FOLD THE TREADMILL FOR STORAGE Before folding the treadmill, unplug the power cord. Make sure that the storage latch is fully engaged over the...
... the upper ends of injury, use extreme caution while moving the treadmill, convert the treadmill to lift with your back. Storage Latch Engaged Catch Base Front Wheels 10 Do not move the treadmill to the vertical position. 2. HOW TO FOLD AND MOVE THE TREADMILL HOW TO FOLD THE TREADMILL FOR STORAGE Before folding the treadmill, unplug the power cord. Make sure that the storage latch is fully engaged over the...
English Manual
Page 11
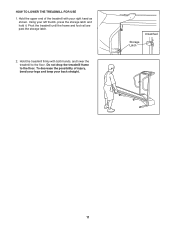
Pivot the treadmill until the frame and foot rail are past the storage latch. 2. Do not drop the treadmill frame to the floor. Hold the treadmill firmly with your right hand as shown. To decrease the possibility of the treadmill with both hands, and lower the treadmill to the floor. Unlatched Storage Latch 11 Using your back straight. HOW TO LOWER THE TREADMILL FOR USE 1. Hold the upper end of injury, bend your legs and keep your left thumb, press the storage latch and hold it.
Pivot the treadmill until the frame and foot rail are past the storage latch. 2. Do not drop the treadmill frame to the floor. Hold the treadmill firmly with your right hand as shown. To decrease the possibility of the treadmill with both hands, and lower the treadmill to the floor. Unlatched Storage Latch 11 Using your back straight. HOW TO LOWER THE TREADMILL FOR USE 1. Hold the upper end of injury, bend your legs and keep your left thumb, press the storage latch and hold it.

English Manual
Page 12
... the circuit breaker located on page 9. Make sure that the power cord is plugged in , make sure that the key is plugged into the console. c. See step 1 on the treadmill frame near the power cord. SYMPTOM: THE DISPLAYS OF THE CONSOLE DO NOT FUNCTION PROPERLY a. See BATTERY INSTALLATION on the left side of the Pulley (50). Remove the key from the console. Retighten the Screw. TROUBLE-SHOOTING Most treadmill problems can be electrically...
... the circuit breaker located on page 9. Make sure that the power cord is plugged in , make sure that the key is plugged into the console. c. See step 1 on the treadmill frame near the power cord. SYMPTOM: THE DISPLAYS OF THE CONSOLE DO NOT FUNCTION PROPERLY a. See BATTERY INSTALLATION on the left side of the Pulley (50). Remove the key from the console. Retighten the Screw. TROUBLE-SHOOTING Most treadmill problems can be electrically...
English Manual
Page 13
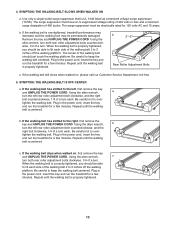
... THE POWER CORD. When the walking belt is overtightened, treadmill performance may decrease and the walking belt may be electrically rated for 120 volts AC and 15 amps. SYMPTOM: THE WALKING BELT IS OFF-CENTER a. Plug in the power cord, insert the key and run the treadmill for a few minutes. tighten the walking belt. Using the allen wrench, c turn both rear roller adjustment bolts counterclockwise, 1/4 of the walking belt 2 to keep the walking belt centered. Repeat until the walking belt...
... THE POWER CORD. When the walking belt is overtightened, treadmill performance may decrease and the walking belt may be electrically rated for 120 volts AC and 15 amps. SYMPTOM: THE WALKING BELT IS OFF-CENTER a. Plug in the power cord, insert the key and run the treadmill for a few minutes. tighten the walking belt. Using the allen wrench, c turn both rear roller adjustment bolts counterclockwise, 1/4 of the walking belt 2 to keep the walking belt centered. Repeat until the walking belt...
English Manual
Page 14
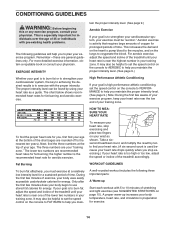
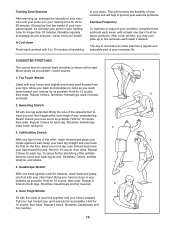
... Start each workout with pre-existing health problems. The following three important parts: A Warm-up increases your heart rate is the recommended heart rate for energy. If your goal is to burn fat, adjust the speed and incline of exercise, your body begin to the nearest ten years). CONDITIONING GUIDELINES WARNING: Before beginning this or any exercise program, consult your wrist as a guide. Remember-these are your training...
... Start each workout with pre-existing health problems. The following three important parts: A Warm-up increases your heart rate is the recommended heart rate for energy. If your goal is to burn fat, adjust the speed and incline of exercise, your body begin to the nearest ten years). CONDITIONING GUIDELINES WARNING: Before beginning this or any exercise program, consult your wrist as a guide. Remember-these are your training...
English Manual
Page 15
...exercise program, do not keep your pulse in front of the other hand. Allow your back and shoulders to relax as you may complete up , increase the intensity of your exercise until your pulse is in your training... form for several basic stretches is to make exercise a regular and enjoyable part of your back leg...leg. Repeat 3 times for 15 counts, then relax. Stretches: Hamstrings, lower back, and groin. 3 3. Hold for both legs. Training Zone Exercise After warming up to five workouts each week if desired. Repeat 3 times for 15 counts, then relax. Move slowly as you exercise...
...exercise program, do not keep your pulse in front of the other hand. Allow your back and shoulders to relax as you may complete up , increase the intensity of your exercise until your pulse is in your training... form for several basic stretches is to make exercise a regular and enjoyable part of your back leg...leg. Repeat 3 times for 15 counts, then relax. Stretches: Hamstrings, lower back, and groin. 3 3. Hold for both legs. Training Zone Exercise After warming up to five workouts each week if desired. Repeat 3 times for 15 counts, then relax. Move slowly as you exercise...
English Manual
Page 16
... Control Knob Speed Potentiometer Battery Cover Foot Rail (Left) Console Assembly Storage Latch/Console Base Screw Latch Screw/Console Screw Upright Handrail Bolt Washer Motor Belt Motor Pivot Nut Motor/Pulley/Flywheel/Fan Pulley/Flywheel/Fan Motor Motor Tension Bolt/Incline Bolt Right Frame Guide Motor Tension Star Washer Motor Swivel Bolt Wire Harness Ground Wire Screw Hood Hood Shield Screw Latch Decal Frame Pivot Washer Frame Pivot Bolt Extension Leg Screw Belt Guide Screw Base Pad Wheel Bolt Wheel Wheel Nut/Base Pivot Nut Controller Extension Leg Circuit Breaker Power Cord Grommet Power...
... Control Knob Speed Potentiometer Battery Cover Foot Rail (Left) Console Assembly Storage Latch/Console Base Screw Latch Screw/Console Screw Upright Handrail Bolt Washer Motor Belt Motor Pivot Nut Motor/Pulley/Flywheel/Fan Pulley/Flywheel/Fan Motor Motor Tension Bolt/Incline Bolt Right Frame Guide Motor Tension Star Washer Motor Swivel Bolt Wire Harness Ground Wire Screw Hood Hood Shield Screw Latch Decal Frame Pivot Washer Frame Pivot Bolt Extension Leg Screw Belt Guide Screw Base Pad Wheel Bolt Wheel Wheel Nut/Base Pivot Nut Controller Extension Leg Circuit Breaker Power Cord Grommet Power...

English Manual
Page 17
WLTL29400 6 9 7 8 1 11* 2 4 15 16 74 14 63* 41 67 4 17 26 19* 18 74 20 21 28 13 13 13 13 22 5 73 72 70 76 47 31 64 88 16 71 71 16 65 39 37 16 25 38 45 39 87 86 36 12 30 13 39 49 22 10 77 24 82 32 46 67 85 84 66 78 35 50 77 46 30 67 77 81 16 3 75 80 39 34 59 79 77 5 39 69 47 39 27 68 39 65 67 51 47 61 47 62 88 83 61 58 57 89 22 64 46 67 47 50 67 35 23 46 48 39 38 36 30 67 52 3 16 53 67 54 56 55 3 41 63* 36 37 30 67 16 67 30 3 40 33 32 34 67 36 30 67 67 29 43 44 42 30 4 2 15 16 67 67 R0800A EXPLODED DRAWING-Model No.
WLTL29400 6 9 7 8 1 11* 2 4 15 16 74 14 63* 41 67 4 17 26 19* 18 74 20 21 28 13 13 13 13 22 5 73 72 70 76 47 31 64 88 16 71 71 16 65 39 37 16 25 38 45 39 87 86 36 12 30 13 39 49 22 10 77 24 82 32 46 67 85 84 66 78 35 50 77 46 30 67 77 81 16 3 75 80 39 34 59 79 77 5 39 69 47 39 27 68 39 65 67 51 47 61 47 62 88 83 61 58 57 89 22 64 46 67 47 50 67 35 23 46 48 39 38 36 30 67 52 3 16 53 67 54 56 55 3 41 63* 36 37 30 67 16 67 30 3 40 33 32 34 67 36 30 67 67 29 43 44 42 30 4 2 15 16 67 67 R0800A EXPLODED DRAWING-Model No.
English Manual
Page 18
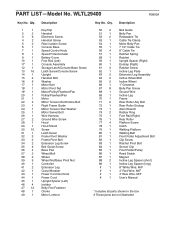
... THE PRODUCT (WESLO® CADENCE 325 treadmill). • The SERIAL NUMBER OF THE PRODUCT (see the front cover of this manual). • The KEY NUMBER AND DESCRIPTION OF THE PART(S) (see the EXPLODED DRAWING and PART LIST attached to the center of purchase. The warranty extended hereunder is a registered trademark of incidental or consequential damages. Some states do not allow the exclusion or limitation of ICON Health & Fitness, Inc.
... THE PRODUCT (WESLO® CADENCE 325 treadmill). • The SERIAL NUMBER OF THE PRODUCT (see the front cover of this manual). • The KEY NUMBER AND DESCRIPTION OF THE PART(S) (see the EXPLODED DRAWING and PART LIST attached to the center of purchase. The warranty extended hereunder is a registered trademark of incidental or consequential damages. Some states do not allow the exclusion or limitation of ICON Health & Fitness, Inc.


