

Uk Manual
Page 1
If you have questions, or if there are missing parts, please contact us: UK Call: 08457 089 009 From Ireland: 053 92 36102 Website: www.iconsupport.eu Write: ICON Health & Fitness, Ltd. c/o HI Group PLC, ...
If you have questions, or if there are missing parts, please contact us: UK Call: 08457 089 009 From Ireland: 053 92 36102 Website: www.iconsupport.eu Write: ICON Health & Fitness, Ltd. c/o HI Group PLC, ...

Uk Manual
Page 2
... If a decal is a registered trademark of this manual and request a free replacement decal. Apply the decal in the location shown. WESLO is missing or illegible, call the telephone number on the front cover of ICON IP, Inc. 2 TABLE OF CONTENTS WARNING DECAL PLACEMENT... 3 BEFORE YOU BEGIN 5 ASSEMBLY 6 OPERATION AND ADJUSTMENT 9 HOW TO FOLD AND MOVE THE TREADMILL 15 TROUBLESHOOTING 16 EXERCISE GUIDELINES 19 PART LIST 20 EXPLODED DRAWING 21 ORDERING REPLACEMENT PARTS Back Cover RECYCLING INFORMATION Back Cover WARNING DECAL PLACEMENT This drawing shows the location(s) of the warning...
... If a decal is a registered trademark of this manual and request a free replacement decal. Apply the decal in the location shown. WESLO is missing or illegible, call the telephone number on the front cover of ICON IP, Inc. 2 TABLE OF CONTENTS WARNING DECAL PLACEMENT... 3 BEFORE YOU BEGIN 5 ASSEMBLY 6 OPERATION AND ADJUSTMENT 9 HOW TO FOLD AND MOVE THE TREADMILL 15 TROUBLESHOOTING 16 EXERCISE GUIDELINES 19 PART LIST 20 EXPLODED DRAWING 21 ORDERING REPLACEMENT PARTS Back Cover RECYCLING INFORMATION Back Cover WARNING DECAL PLACEMENT This drawing shows the location(s) of the warning...

Uk Manual
Page 4
... the frame securely in this manual should be able to safely lift 45 lbs. (20 kg) to raise, lower, or move the treadmill. 21. Inspect and properly tighten all parts of the power switch.) 20. DANGER: 25. Always unplug the power cord immediately after use . (See the drawing on the... treadmill. Do not use only. Never leave the treadmill unattended while it is running. Never drop or insert any object into any commercial, rental, or ...
... the frame securely in this manual should be able to safely lift 45 lbs. (20 kg) to raise, lower, or move the treadmill. 21. Inspect and properly tighten all parts of the power switch.) 20. DANGER: 25. Always unplug the power cord immediately after use . (See the drawing on the... treadmill. Do not use only. Never leave the treadmill unattended while it is running. Never drop or insert any object into any commercial, rental, or ...

Uk Manual
Page 5
...drawing below and familiarize yourself with the labeled parts. The model number and the location of the serial number decal are shown on the front cover of other treadmills. To help us assist you for selecting the new WESLO® CADENCE 21.0 treadmill. BEFORE YOU BEGIN Thank you , note the... product model number and serial number before using the treadmill. And when you have questions after read this manual...
...drawing below and familiarize yourself with the labeled parts. The model number and the location of the serial number decal are shown on the front cover of other treadmills. To help us assist you for selecting the new WESLO® CADENCE 21.0 treadmill. BEFORE YOU BEGIN Thank you , note the... product model number and serial number before using the treadmill. And when you have questions after read this manual...

Uk Manual
Page 6
... screwdriver screwdriver , and needlenose pliers . , standard Use the drawings below each of this manual. Note: Some small parts may be transferred to the top of a second person, carefully tip the treadmill onto its left side. With the help of the walking belt or the shipping carton. Unfold the Frame (50...) away from the PART LIST near the end of them. Orient the Base (80) as shown. During shipping, some...
... screwdriver screwdriver , and needlenose pliers . , standard Use the drawings below each of this manual. Note: Some small parts may be transferred to the top of a second person, carefully tip the treadmill onto its left side. With the help of the walking belt or the shipping carton. Unfold the Frame (50...) away from the PART LIST near the end of them. Orient the Base (80) as shown. During shipping, some...
Uk Manual
Page 8
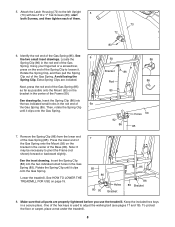
...the end of the Base (80). To protect the floor or carpet, place a mat under the treadmill. 8 Using your fingernail or a screwdriver, press on page 15. 7 85 86 80 92 Holes... into the two indicated small holes in the rod end of the Gas Spring (85). Make sure that all parts are included. start 5 both Screws, and then tighten each of 6a the Gas Spring (85). Rotate the ...of the Frame (50). See the inset drawing. Extra Spring Clips are properly tightened before you use the treadmill. Insert the Spring Clip (86) into the two indicated small holes in the center of the Spring ...
...the end of the Base (80). To protect the floor or carpet, place a mat under the treadmill. 8 Using your fingernail or a screwdriver, press on page 15. 7 85 86 80 92 Holes... into the two indicated small holes in the rod end of the Gas Spring (85). Make sure that all parts are included. start 5 both Screws, and then tighten each of 6a the Gas Spring (85). Rotate the ...of the Frame (50). See the inset drawing. Extra Spring Clips are properly tightened before you use the treadmill. Insert the Spring Clip (86) into the two indicated small holes in the center of the Spring ...

Uk Manual
Page 19
... your heart rate is near the middle number in general. Remember, proper nutrition and adequate rest are rounded off to make exercise a regular and enjoyable part of your exercise until your everyday life. 19 If your training zone for longer than 20 minutes.) Breathe regularly and deeply as you must exercise...
... your heart rate is near the middle number in general. Remember, proper nutrition and adequate rest are rounded off to make exercise a regular and enjoyable part of your exercise until your everyday life. 19 If your training zone for longer than 20 minutes.) Breathe regularly and deeply as you must exercise...

Uk Manual
Page 20
... 6 6 7 1 8 4 9 5 10 1 11 9 12 4 13 4 14 2 15 2 16 1 17 2 18 2 19 2 20 2 21 4 22 2 23 4 24 2 25 14 26 4 27 2 28 2 29 6 30 1 31 1 32 4 33 3 34 1 35 1 36 1 37 1 38 1 39 1 40 2 41 2 42 1 43 1 44 1 45 ... Spring Clip Filter Receptacle Power Cord Adapter Transformer 5/16" Nut Mount 3/8" x 1 3/4" Bolt 3/8" x 1 1/4" Bolt Caution Decal Userʼs Manual Note: Specifications are not illustrated. 20 PART LIST-Model No. For information about ordering replacement parts, see the EXPLODED DRAWING near the end of this manual. WETL49710.0 R0610A To locate the...
... 6 6 7 1 8 4 9 5 10 1 11 9 12 4 13 4 14 2 15 2 16 1 17 2 18 2 19 2 20 2 21 4 22 2 23 4 24 2 25 14 26 4 27 2 28 2 29 6 30 1 31 1 32 4 33 3 34 1 35 1 36 1 37 1 38 1 39 1 40 2 41 2 42 1 43 1 44 1 45 ... Spring Clip Filter Receptacle Power Cord Adapter Transformer 5/16" Nut Mount 3/8" x 1 3/4" Bolt 3/8" x 1 1/4" Bolt Caution Decal Userʼs Manual Note: Specifications are not illustrated. 20 PART LIST-Model No. For information about ordering replacement parts, see the EXPLODED DRAWING near the end of this manual. WETL49710.0 R0610A To locate the...

Uk Manual
Page 24
...manual) • the name of the product (see the front cover of this manual) • the key number and description of the replacement part(s) (see the front cover of this product must not be recycled after its useful life as required by law. To preserve the environment, this ...manual. ORDERING REPLACEMENT PARTS To order replacement parts, see the PART LIST and the EXPLODED DRAWING near the end of this manual) RECYCLING INFORMATION This electronic product must be disposed of in ...
...manual) • the name of the product (see the front cover of this manual) • the key number and description of the replacement part(s) (see the front cover of this product must not be recycled after its useful life as required by law. To preserve the environment, this ...manual. ORDERING REPLACEMENT PARTS To order replacement parts, see the PART LIST and the EXPLODED DRAWING near the end of this manual) RECYCLING INFORMATION This electronic product must be disposed of in ...


