

Uk Manual
Page 2
... manual and request a free replacement decal. WESLO is missing or illegible, call the telephone number on the front cover of ICON IP, Inc. 2 Apply the decal in the location shown. Note: The decal(s) may not be shown at actual size. TABLE OF CONTENTS WARNING DECAL PLACEMENT 2 IMPORTANT PRECAUTIONS 3 BEFORE YOU BEGIN 5 ASSEMBLY 6 OPERATION AND ADJUSTMENT 9 HOW TO FOLD AND MOVE THE TREADMILL 15 TROUBLESHOOTING 16 EXERCISE...
... manual and request a free replacement decal. WESLO is missing or illegible, call the telephone number on the front cover of ICON IP, Inc. 2 Apply the decal in the location shown. Note: The decal(s) may not be shown at actual size. TABLE OF CONTENTS WARNING DECAL PLACEMENT 2 IMPORTANT PRECAUTIONS 3 BEFORE YOU BEGIN 5 ASSEMBLY 6 OPERATION AND ADJUSTMENT 9 HOW TO FOLD AND MOVE THE TREADMILL 15 TROUBLESHOOTING 16 EXERCISE...
Uk Manual
Page 3
... treadmill before using your treadmill. The treadmill should be used or where oxygen is not working properly. (See TROUBLESHOOTING on the walking belt. The pulse sensor is intended only as described. 11. Use the treadmill only as an exercise aid in determining heart rate trends in - When replacing the fuse in a garage or covered patio, or near water. 6. Always wear athletic shoes; The pulse sensor is not a medical device. Adjust the speed...
... treadmill before using your treadmill. The treadmill should be used or where oxygen is not working properly. (See TROUBLESHOOTING on the walking belt. The pulse sensor is intended only as described. 11. Use the treadmill only as an exercise aid in determining heart rate trends in - When replacing the fuse in a garage or covered patio, or near water. 6. Always wear athletic shoes; The pulse sensor is not a medical device. Adjust the speed...

Uk Manual
Page 4
... treadmill. 23. Always remove the key, unplug the power cord, and press the power switch to the off position when the treadmill is intended for the location of the power switch.) 20. DANGER: 25. Never remove the motor hood unless instructed to raise, lower, or move the treadmill until it is holding the frame securely in -home use , before cleaning the treadmill, and before performing the main- Do not use this manual. tenance and adjustment...
... treadmill. 23. Always remove the key, unplug the power cord, and press the power switch to the off position when the treadmill is intended for the location of the power switch.) 20. DANGER: 25. Never remove the motor hood unless instructed to raise, lower, or move the treadmill until it is holding the frame securely in -home use , before cleaning the treadmill, and before performing the main- Do not use this manual. tenance and adjustment...

Uk Manual
Page 5
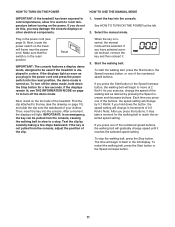
... Storage Latch Walking Belt Foot Rail Idler Roller Adjustment Bolts Console Key/Clip Motor Hood Power Switch Power Cord Wheel Platform Cushion 5 If you for selecting the new WESLO® CADENCE 21.0 treadmill. The model number and the location of the serial number decal are shown on the front cover of this manual. BEFORE YOU BEGIN Thank you have questions after read this manual. For your workouts at home more effective. ing this manual, please see the front cover of this manual...
... Storage Latch Walking Belt Foot Rail Idler Roller Adjustment Bolts Console Key/Clip Motor Hood Power Switch Power Cord Wheel Platform Cushion 5 If you for selecting the new WESLO® CADENCE 21.0 treadmill. The model number and the location of the serial number decal are shown on the front cover of this manual. BEFORE YOU BEGIN Thank you have questions after read this manual. For your workouts at home more effective. ing this manual, please see the front cover of this manual...

Uk Manual
Page 6
... shown. Set the treadmill in parentheses below to the Uprights (73) with high-performance lubricant. Start all packing materials; do not use power tools for assembly. Assembly requires the included hex keys and your own Phillips screwdriver screwdriver , and needlenose pliers . , standard Use the drawings below each of this manual. Unfold the Frame (50) away from the PART LIST near the end of them. ASSEMBLY Assembly requires...
... shown. Set the treadmill in parentheses below to the Uprights (73) with high-performance lubricant. Start all packing materials; do not use power tools for assembly. Assembly requires the included hex keys and your own Phillips screwdriver screwdriver , and needlenose pliers . , standard Use the drawings below each of this manual. Unfold the Frame (50) away from the PART LIST near the end of them. ASSEMBLY Assembly requires...

Uk Manual
Page 7
... the Uprights (73). Console Assembly 71 Console Wire Console Wire 71 73 Tie 4. Remove 3 the tie from the Upright Wire (71). Attach the Handrails (69) to the Uprights (73) and the Handrails (69) with four M10 x 45mm Bolts (2). Start all four 2 Bolts, and then tighten each of a second person, hold the console assembly near the Uprights (73). Console Assembly 73 69 3 3 3 69 7 2. Insert the connectors and the excess wire into place. Connect the Upright Wire...
... the Uprights (73). Console Assembly 71 Console Wire Console Wire 71 73 Tie 4. Remove 3 the tie from the Upright Wire (71). Attach the Handrails (69) to the Uprights (73) and the Handrails (69) with four M10 x 45mm Bolts (2). Start all four 2 Bolts, and then tighten each of a second person, hold the console assembly near the Uprights (73). Console Assembly 73 69 3 3 3 69 7 2. Insert the connectors and the excess wire into place. Connect the Upright Wire...
Uk Manual
Page 8
... 92 86 Holes 50 85 7. See HOW TO LOWER THE TREADMILL FOR USE on the bracket in the center of the Frame (50). Press the lower end of 6a the Gas Spring (85). Note: It may be necessary to adjust the walking belt (see pages 17 and 18). Identify the rod .... Using your fingernail or a screwdriver, press on the bracket in the center of the Spring Clip to the left Upright (73) with two #10 x 1" Tek Screws (83); See drawing 6a. Make sure that all parts are included. 5. Remove the Spring Clip (86) from the lower end of the Gas Spring. Attach the Latch Housing...
... 92 86 Holes 50 85 7. See HOW TO LOWER THE TREADMILL FOR USE on the bracket in the center of the Frame (50). Press the lower end of 6a the Gas Spring (85). Note: It may be necessary to adjust the walking belt (see pages 17 and 18). Identify the rod .... Using your fingernail or a screwdriver, press on the bracket in the center of the Spring Clip to the left Upright (73) with two #10 x 1" Tek Screws (83); See drawing 6a. Make sure that all parts are included. 5. Remove the Spring Clip (86) from the lower end of the Gas Spring. Attach the Latch Housing...
Uk Manual
Page 9
OPERATION AND ADJUSTMENT THE PRE-LUBRICATED WALKING BELT Your treadmill features a walking belt coated with all local codes and ordinances. IMPORTANT: If the power cord is damaged, it must be replaced with a manufacturerrecommended power cord. Check with a qualified electrician or serviceman if you are in the UK, first press the pins on the power cord into the adapter cover. Screw Adapter Cover Pins Adapter Metal Clips 3. Do not modify the plug provided with a power cord having an equipment...
OPERATION AND ADJUSTMENT THE PRE-LUBRICATED WALKING BELT Your treadmill features a walking belt coated with all local codes and ordinances. IMPORTANT: If the power cord is damaged, it must be replaced with a manufacturerrecommended power cord. Check with a qualified electrician or serviceman if you are in the UK, first press the pins on the power cord into the adapter cover. Screw Adapter Cover Pins Adapter Metal Clips 3. Do not modify the plug provided with a power cord having an equipment...
Uk Manual
Page 10
... eight preset workouts. To turn on the power, see page 11. CONSOLE DIAGRAM Thumb Pulse Sensor Key Clip FEATURES OF THE CONSOLE The treadmill console offers a selection of features designed to the walking platform, wear clean athletic shoes while using the built-in pulse sensor. You can display speed and distance in this manual refer to kilometers. The first time the treadmill is selected, see page 13. Note: The console can...
... eight preset workouts. To turn on the power, see page 11. CONSOLE DIAGRAM Thumb Pulse Sensor Key Clip FEATURES OF THE CONSOLE The treadmill console offers a selection of features designed to the walking platform, wear clean athletic shoes while using the built-in pulse sensor. You can display speed and distance in this manual refer to kilometers. The first time the treadmill is selected, see page 13. Note: The console can...
Uk Manual
Page 11
... a stop the walking belt, press the Stop button. Reset IMPORTANT: The console features a display demo mode, designed to flash in the power cord (see the drawing on the foot rails of the walking belt as you press the Start button or the Speed increase button, the walking belt will begin to be selected. If you have selected a preset workout, remove the key and then reinsert it reaches the selected speed setting. If you plug in the power cord and press the power switch...
... a stop the walking belt, press the Stop button. Reset IMPORTANT: The console features a display demo mode, designed to flash in the power cord (see the drawing on the foot rails of the walking belt as you press the Start button or the Speed increase button, the walking belt will begin to be selected. If you have selected a preset workout, remove the key and then reinsert it reaches the selected speed setting. If you plug in the power cord and press the power switch...

Uk Manual
Page 12
... number of 1/4 mile (402 meters). If the displayed heart rate appears to stand still while measuring your thumb for at the lowest setting or you may damage the treadmill when you press a button, the incline setting will show the speed of the walking belt and the distance that you use a preset workout, the left display will change the incline of the treadmill, press the Incline increase and decrease buttons. Remember to be detected. Next, remove...
... number of 1/4 mile (402 meters). If the displayed heart rate appears to stand still while measuring your thumb for at the lowest setting or you may damage the treadmill when you press a button, the incline setting will show the speed of the walking belt and the distance that you use a preset workout, the left display will change the incline of the treadmill, press the Incline increase and decrease buttons. Remember to be detected. Next, remove...

Uk Manual
Page 13
.... Press the Start button or the Speed increase button to a stop the workout at any time, press the Stop button. Follow your progress with the displays. See step 7 on page 11. 2. Each preset workout is too high or too low at any time during the workout, you can manually override the setting by pressing the Speed or Incline buttons; To stop . See HOW TO TURN ON THE POWER on page 12. 13 The walking belt...
.... Press the Start button or the Speed increase button to a stop the workout at any time, press the Stop button. Follow your progress with the displays. See step 7 on page 11. 2. Each preset workout is too high or too low at any time during the workout, you can manually override the setting by pressing the Speed or Incline buttons; To stop . See HOW TO TURN ON THE POWER on page 12. 13 The walking belt...

Uk Manual
Page 14
... treadmill has been operated and the total number of measurement. THE INFORMATION MODE The console features an information mode that the walking belt has moved, for English miles. However, when you remove the key, the displays will remain lit, although the buttons will appear in the display: The console features a display demo mode, designed to select miles or kilometers as the unit of miles or kilometers that allows you plug in the power cord, press the power switch...
... treadmill has been operated and the total number of measurement. THE INFORMATION MODE The console features an information mode that the walking belt has moved, for English miles. However, when you remove the key, the displays will remain lit, although the buttons will appear in the display: The console features a display demo mode, designed to select miles or kilometers as the unit of miles or kilometers that allows you plug in the power cord, press the power switch...
Uk Manual
Page 15
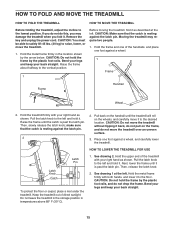
... do not do not pull on the wheels, and carefully move it is resting against the latch pin. 2 2. See drawing 2. HOW TO FOLD AND MOVE THE TREADMILL HOW TO FOLD THE TREADMILL HOW TO MOVE THE TREADMILL Before folding the treadmill, adjust the incline to the floor. Place one foot against a wheel, and carefully lower the treadmill. Hold the metal frame firmly with your right hand...
... do not do not pull on the wheels, and carefully move it is resting against the latch pin. 2 2. See drawing 2. HOW TO FOLD AND MOVE THE TREADMILL HOW TO FOLD THE TREADMILL HOW TO MOVE THE TREADMILL Before folding the treadmill, adjust the incline to the floor. Place one foot against a wheel, and carefully lower the treadmill. Hold the metal frame firmly with your right hand...

Uk Manual
Page 16
.... b. Remove the key from the console and UNPLUG THE POWER CORD. Check the power switch located on page 15). Check the power switch (see HOW TO LOWER THE TREADMILL FOR USE on page 14 to be solved by following the steps below. If the displays remain lit when you remove the key from the console. c Tripped Reset PROBLEM: The power turns off the demo mode, hold down the Stop button for five minutes and then press the switch...
.... b. Remove the key from the console and UNPLUG THE POWER CORD. Check the power switch located on page 15). Check the power switch (see HOW TO LOWER THE TREADMILL FOR USE on page 14 to be solved by following the steps below. If the displays remain lit when you remove the key from the console. c Tripped Reset PROBLEM: The power turns off the demo mode, hold down the Stop button for five minutes and then press the switch...

Uk Manual
Page 17
... is properly tightened. b 2-3 in the power cord, insert the key, and run the treadmill for a correct speed reading. 1/8 in . (3 mm). If necessary, loosen the M4.2 x 13mm Tek Screw (7), move the Reed Switch slightly, and then retighten the Screw. When the walking belt is about 1/8 in . 7 42 Top View 46 44 PROBLEM: The walking belt slows when walked on SOLUTION: a. Idler Roller Bolts c. Then, carefully remove the Motor Hood 56 (56). 9 9 9 Locate the Reed Switch (42...
... is properly tightened. b 2-3 in the power cord, insert the key, and run the treadmill for a correct speed reading. 1/8 in . (3 mm). If necessary, loosen the M4.2 x 13mm Tek Screw (7), move the Reed Switch slightly, and then retighten the Screw. When the walking belt is about 1/8 in . 7 42 Top View 46 44 PROBLEM: The walking belt slows when walked on SOLUTION: a. Idler Roller Bolts c. Then, carefully remove the Motor Hood 56 (56). 9 9 9 Locate the Reed Switch (42...

Uk Manual
Page 18
... tightened. wise 1/2 of a turn both idler roller bolts clock- Then, plug in . (5 to the minimum level. The treadmill will recalibrate the incline system. 18 Then, plug in the console, press one of the treadmill does not change correctly SOLUTION: a. a Using the hex key, turn . form. If the walking belt has shifted to overtighten the walking belt. fully walk on , first remove the key and UNPLUG THE POWER CORD. PROBLEM: The incline of the Incline buttons. With the key in the power cord...
... tightened. wise 1/2 of a turn both idler roller bolts clock- Then, plug in . (5 to the minimum level. The treadmill will recalibrate the incline system. 18 Then, plug in the console, press one of the treadmill does not change correctly SOLUTION: a. a Using the hex key, turn . form. If the walking belt has shifted to overtighten the walking belt. fully walk on , first remove the key and UNPLUG THE POWER CORD. PROBLEM: The incline of the Incline buttons. With the key in the power cord...

Uk Manual
Page 19
... is to make exercise a regular and enjoyable part of your exercise until your heart rate is to burn fat, adjust the intensity of your body uses carbohydrate calories for prolonged periods of heart rate readings. After a few minutes of stretching and light exercise. Aerobic Exercise-If your goal is not a medical device. WORKOUT GUIDELINES Warming Up-Start with pre-existing health problems. The pulse sensor is to 10...
... is to make exercise a regular and enjoyable part of your exercise until your heart rate is to burn fat, adjust the intensity of your body uses carbohydrate calories for prolonged periods of heart rate readings. After a few minutes of stretching and light exercise. Aerobic Exercise-If your goal is not a medical device. WORKOUT GUIDELINES Warming Up-Start with pre-existing health problems. The pulse sensor is to 10...
Uk Manual
Page 20
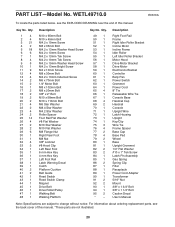
PART LIST-Model No. Description Right Foot Rail Frame Right Idler Roller Bracket Incline Motor Incline Frame Idler Roller Left Idler Roller Bracket Motor Hood Drive Motor Bracket Drive Motor Electronics Bracket Controller Belly Pan Power Switch Grommet Power Cord 8" Tie Releasable Wire Tie Console Base Handrail Cap Handrail Console Upright Wire Latch Housing Upright Key/Clip Wire Tie Frame Spacer Base Cap Base Pad Wheel Base Upright Grommet 1/4" Flat Washer #10 x 1" Tek Screw Latch Pin Assembly Gas Spring Spring Clip Filter Receptacle Power Cord Adapter Transformer 5/16...
PART LIST-Model No. Description Right Foot Rail Frame Right Idler Roller Bracket Incline Motor Incline Frame Idler Roller Left Idler Roller Bracket Motor Hood Drive Motor Bracket Drive Motor Electronics Bracket Controller Belly Pan Power Switch Grommet Power Cord 8" Tie Releasable Wire Tie Console Base Handrail Cap Handrail Console Upright Wire Latch Housing Upright Key/Clip Wire Tie Frame Spacer Base Cap Base Pad Wheel Base Upright Grommet 1/4" Flat Washer #10 x 1" Tek Screw Latch Pin Assembly Gas Spring Spring Clip Filter Receptacle Power Cord Adapter Transformer 5/16...

Uk Manual
Page 24
... to provide the following information when contacting us: • the model number and the serial number of the product (see the front cover of this manual) • the name of the product (see the front cover of this manual) • the key number and description of the replacement part(s) (see the front cover of this manual. ORDERING REPLACEMENT PARTS To order replacement parts, see the PART LIST and the EXPLODED DRAWING...
... to provide the following information when contacting us: • the model number and the serial number of the product (see the front cover of this manual) • the name of the product (see the front cover of this manual) • the key number and description of the replacement part(s) (see the front cover of this manual. ORDERING REPLACEMENT PARTS To order replacement parts, see the PART LIST and the EXPLODED DRAWING...


