
English Manual
Page 1
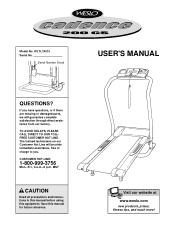
... have questions, or if there are missing or damaged parts, we will provide immediate assistance, free of charge to you. Visit our website at www.weslo.com new products, prizes, fitness tips, and much more! Save this equipment. MST CAUTION Read all precautions and instructions in this manual before using this...
... have questions, or if there are missing or damaged parts, we will provide immediate assistance, free of charge to you. Visit our website at www.weslo.com new products, prizes, fitness tips, and much more! Save this equipment. MST CAUTION Read all precautions and instructions in this manual before using this...
English Manual
Page 2
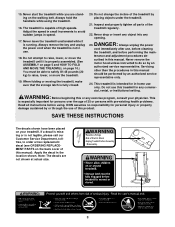
... information before operating the treadmill. 1. Do not use the treadmill with at a time. 9. Never allow more amps. When connecting the power cord (see your local WESLO dealer or call 1-800-8063651 and order part number 146148. 5. IMPORTANT PRECAUTIONS WARNING: To reduce the risk of carrying 15 or more than 250 pounds...
... information before operating the treadmill. 1. Do not use the treadmill with at a time. 9. Never allow more amps. When connecting the power cord (see your local WESLO dealer or call 1-800-8063651 and order part number 146148. 5. IMPORTANT PRECAUTIONS WARNING: To reduce the risk of carrying 15 or more than 250 pounds...
English Manual
Page 3
The treadmill is capable of this product. tenance and adjustment procedures de- This treadmill is especially important for personal injury or property damage sustained by an authorized service representative only. 24. WARNING: Before beginning this manual. This is intended for in-home use of this manual). ICON assumes no responsibility for persons over the age of Electric Shock /D•Uisn•aRpsi•lssHukegamzoTabfrrelEdyal.oeducmstrilVilcoblSteahfgooercek Assembly free, to order a free replacement •Unplug Treadmill before Assembly decal (see ...
The treadmill is capable of this product. tenance and adjustment procedures de- This treadmill is especially important for personal injury or property damage sustained by an authorized service representative only. 24. WARNING: Before beginning this manual. This is intended for in-home use of this manual). ICON assumes no responsibility for persons over the age of Electric Shock /D•Uisn•aRpsi•lssHukegamzoTabfrrelEdyal.oeducmstrilVilcoblSteahfgooercek Assembly free, to order a free replacement •Unplug Treadmill before Assembly decal (see ...
English Manual
Page 4
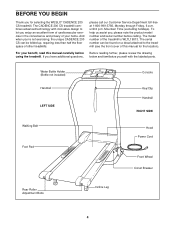
... innovative design to the treadmill (see the front cover of other treadmills. To help us assist you 're not exercising, the unique CADENCE 200 CS can be folded up, requiring less than half the floor space of this manual carefully before calling. BEFORE YOU BEGIN Thank ... toll-free at 1-800-999-3756, Monday through Friday, 6 a.m. The model number of your benefit, read this manual for selecting the WESLO® CADENCE 200 CS treadmill. Water Bottle Holder (Bottle not included) Handrail LEFT SIDE Console Key/Clip Handrail RIGHT SIDE Walking Belt Foot Pad Hood Power...
... innovative design to the treadmill (see the front cover of other treadmills. To help us assist you 're not exercising, the unique CADENCE 200 CS can be folded up, requiring less than half the floor space of this manual carefully before calling. BEFORE YOU BEGIN Thank ... toll-free at 1-800-999-3756, Monday through Friday, 6 a.m. The model number of your benefit, read this manual for selecting the WESLO® CADENCE 200 CS treadmill. Water Bottle Holder (Bottle not included) Handrail LEFT SIDE Console Key/Clip Handrail RIGHT SIDE Walking Belt Foot Pad Hood Power...

English Manual
Page 5
Note: The underside of the Right Handrail. If there is resting flat on the Handrails.) Hold the Right Handrail in the lower end of the Right Handrail and out of the upper end of the treadmill walking belt is coated with a soft cloth and a mild, non-abrasive cleaner. Assembly requires the included allen wrench and your own phillips screwdriver , adjustable wrenches , and 9/16" socket wrench . 1. Identify the Right Handrail (6), which has a large hole near the lower end. (Note: There may be transferred to the top of the Wire Harness (22) into the Right Handrail. Hold the Base (...
Note: The underside of the Right Handrail. If there is resting flat on the Handrails.) Hold the Right Handrail in the lower end of the Right Handrail and out of the upper end of the treadmill walking belt is coated with a soft cloth and a mild, non-abrasive cleaner. Assembly requires the included allen wrench and your own phillips screwdriver , adjustable wrenches , and 9/16" socket wrench . 1. Identify the Right Handrail (6), which has a large hole near the lower end. (Note: There may be transferred to the top of the Wire Harness (22) into the Right Handrail. Hold the Base (...
English Manual
Page 6
See inset drawing 4c. Connect the other two wires in the Wire Harness to the Frame with the hole in 4b drawing 4a. Loop the included plastic tie through the square hole on the top and around the Wire Harness (22) as you use the treadmill. Tighten the plastic tie and cut off the end. 1 22 Battery Acess Boss 4 Tabs 11 7 9 Left 4c Square Hole 6 22 Tie Remove Tie 5. Set the Console Base (1) on the ends. 6 See inset drawing 4b. Make sure that no wires will be pinched before you tighten the 7 7 Console Bolts (9 see drawing 4a above). Attach the Storage Latch to ...
See inset drawing 4c. Connect the other two wires in the Wire Harness to the Frame with the hole in 4b drawing 4a. Loop the included plastic tie through the square hole on the top and around the Wire Harness (22) as you use the treadmill. Tighten the plastic tie and cut off the end. 1 22 Battery Acess Boss 4 Tabs 11 7 9 Left 4c Square Hole 6 22 Tie Remove Tie 5. Set the Console Base (1) on the ends. 6 See inset drawing 4b. Make sure that no wires will be pinched before you tighten the 7 7 Console Bolts (9 see drawing 4a above). Attach the Storage Latch to ...
English Manual
Page 7
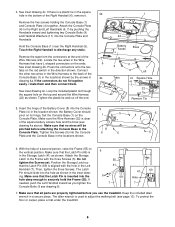
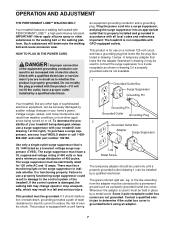
... in doubt as a transient voltage surge suppressor (TVSS). OPERATION AND ADJUSTMENT THE PERFORMANT LUBETM WALKING BELT Your treadmill features a walking belt coated with your local WESLO dealer or call 1-800- 806-3651 and order part number 146148. Do not modify the plug provided with a cord having Lug Metal Screw The temporary...
... in doubt as a transient voltage surge suppressor (TVSS). OPERATION AND ADJUSTMENT THE PERFORMANT LUBETM WALKING BELT Your treadmill features a walking belt coated with your local WESLO dealer or call 1-800- 806-3651 and order part number 146148. Do not modify the plug provided with a cord having Lug Metal Screw The temporary...
English Manual
Page 8
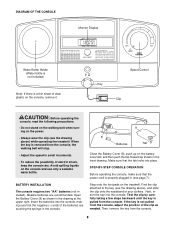
Open the Battery Cover (8) as needed. Insert the batteries into the console, making sure that the negative (-) ends of the batteries are recommended. Test the clip by carefully taking a few steps backward until the key is removed from the console, adjust the position of the clip as shown in (see the drawing above ), and slide the clip onto the waistband of your clothes. If the key is not pulled from the console, the walking belt will stop. • Adjust the speed in small increments. • To reduce the possibility of electric shock, keep the console dry. Make sure that the ...
Open the Battery Cover (8) as needed. Insert the batteries into the console, making sure that the negative (-) ends of the batteries are recommended. Test the clip by carefully taking a few steps backward until the key is removed from the console, adjust the position of the clip as shown in (see the drawing above ), and slide the clip onto the waistband of your clothes. If the key is not pulled from the console, the walking belt will stop. • Adjust the speed in small increments. • To reduce the possibility of electric shock, keep the console dry. Make sure that the ...
English Manual
Page 9
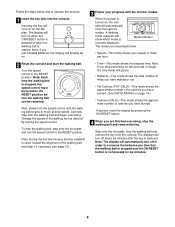
The display will already be restarted. Change the speed of the walking belt as desired by pressing the ON/RESET button. 4 When you just installed batteries, the display will turn the speed control to the RESET position before the walking belt can be on page 14.) • Calories (CALS)-This mode shows the approximate number of calories you have burned. (See FAT BURNING on . 2 Reset the console and start the walking belt. If desired, reset the display by turning the speed control. Step onto the foot pads, stop the walking belt and remove the key. Note: Each time the ...
The display will already be restarted. Change the speed of the walking belt as desired by pressing the ON/RESET button. 4 When you just installed batteries, the display will turn the speed control to the RESET position before the walking belt can be on page 14.) • Calories (CALS)-This mode shows the approximate number of calories you have burned. (See FAT BURNING on . 2 Reset the console and start the walking belt. If desired, reset the display by turning the speed control. Step onto the foot pads, stop the walking belt and remove the key. Note: Each time the ...

English Manual
Page 10
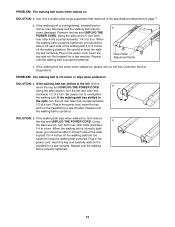
To change the incline, remove the incline pin from one of the incline legs as possible into the hole. Do not use the treadmill with the hole in the left handrail. Move your back straight. Raise the treadmill until the latch pin is aligned with the incline pins removed. Slide the latch pin into the slot in the storage latch as shown in the locations shown at the same height. Keep the treadmill out of direct sunlight. Adjust the incline leg to the vertical position. 2. Make sure that the latch pin is in the "locked" position shown in the same way. Incline Pin Incline Pin ...
To change the incline, remove the incline pin from one of the incline legs as possible into the hole. Do not use the treadmill with the hole in the left handrail. Move your back straight. Raise the treadmill until the latch pin is aligned with the incline pins removed. Slide the latch pin into the slot in the storage latch as shown in the locations shown at the same height. Keep the treadmill out of direct sunlight. Adjust the incline leg to the vertical position. 2. Make sure that the latch pin is in the "locked" position shown in the same way. Incline Pin Incline Pin ...

English Manual
Page 11
HOW TO LOWER THE TREADMILL FOR USE 1. Hold the upper end of injury, use extreme caution while moving the treadmill, convert the treadmill to the storage position as shown. Hold the treadmill firmly with your back straight. Make sure that the latch pin is resting in the storage position. Hold the handrails and place one foot on the base, and carefully lower the treadmill until it rolls freely on the base as described above . To reduce the risk of the treadmill with both hands, and lower the treadmill to the floor. Tilt the treadmill back until it back. Do not attempt ...
HOW TO LOWER THE TREADMILL FOR USE 1. Hold the upper end of injury, use extreme caution while moving the treadmill, convert the treadmill to the storage position as shown. Hold the treadmill firmly with your back straight. Make sure that the latch pin is resting in the storage position. Hold the handrails and place one foot on the base, and carefully lower the treadmill until it rolls freely on the base as described above . To reduce the risk of the treadmill with both hands, and lower the treadmill to the floor. Tilt the treadmill back until it back. Do not attempt ...
English Manual
Page 12
until the Magnet is not compatible with the Reed Switch. Important: The treadmill is aligned with GFCI-equipped outlets. After the power cord has been plugged in, make sure that the power cord is plugged in . Make sure that the key is fully inserted into a surge suppressor, and that the gap between the Magnet and the Reed Switch is plugged into the console. Remove the key from the hood. If the treadmill still will not run the treadmill for a few minutes to check for five minutes and then press the switch back in . PROBLEM: The displays of drained batteries. Most ...
until the Magnet is not compatible with the Reed Switch. Important: The treadmill is aligned with GFCI-equipped outlets. After the power cord has been plugged in, make sure that the power cord is plugged in . Make sure that the key is fully inserted into a surge suppressor, and that the gap between the Magnet and the Reed Switch is plugged into the console. Remove the key from the hood. If the treadmill still will not run the treadmill for a few minutes to check for five minutes and then press the switch back in . PROBLEM: The displays of drained batteries. Most ...
English Manual
Page 13
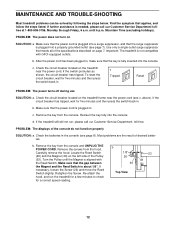
Remove the key and UNPLUG THE POWER CORD. If the walking belt still slows when walked on SOLUTION: a. PROBLEM: The walking belt is off the walking platform. If the walking belt has shifted to keep the walking belt centered. ing belt 3 to 3 inches off the walking platform. Repeat until the walking belt is properly tightened. Repeat until the walking belt is centered. Be careful to the left, first remove the key and UNPLUG THE POWER CORD. Plug in the power cord, insert the key and carefully walk on SOLUTION: a. Be careful to overtighten the walking ...
Remove the key and UNPLUG THE POWER CORD. If the walking belt still slows when walked on SOLUTION: a. PROBLEM: The walking belt is off the walking platform. If the walking belt has shifted to keep the walking belt centered. ing belt 3 to 3 inches off the walking platform. Repeat until the walking belt is properly tightened. Repeat until the walking belt is centered. Be careful to the left, first remove the key and UNPLUG THE POWER CORD. Plug in the power cord, insert the key and carefully walk on SOLUTION: a. Be careful to overtighten the walking ...
English Manual
Page 14
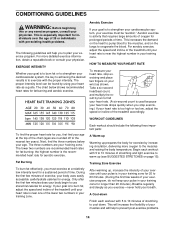
The proper intensity level can be "aerobic." The chart below your exercise program. Take a six-second heartbeat count, and multiply the result by ten to plan your age. WORKOUT GUIDELINES To find the proper heart rate for you, first find the three numbers below shows recommended heart rates for aerobic exercise. Fat Burning To burn fat effectively, you to find your heart rate. (A six-second count is used because your heart rate drops quickly when you exercise-never hold your training zone for a sustained period of the treadmill accordingly. Training Zone Exercise After...
The proper intensity level can be "aerobic." The chart below your exercise program. Take a six-second heartbeat count, and multiply the result by ten to plan your age. WORKOUT GUIDELINES To find the proper heart rate for you, first find the three numbers below shows recommended heart rates for aerobic exercise. Fat Burning To burn fat effectively, you to find your heart rate. (A six-second count is used because your heart rate drops quickly when you exercise-never hold your training zone for a sustained period of the treadmill accordingly. Training Zone Exercise After...

English Manual
Page 15
SUGGESTED STRETCHES The correct form for balance, reach back and grasp one day of your feet together and your knees outward. Allow your back and shoulders to make exercise a regular and enjoyable part of your everyday life. Bring the sole of knees, and back. 2. Reach toward your toes as far as possible. Stretches: Hamstrings, lower back, and groin. 3 3. Hold for 15 counts, then relax. Quadriceps Stretch With one leg extended. Repeat 3 times. Hold for 15 counts, then relax. Bend your front leg, lean forward and move your buttocks as close to - Bring ...
SUGGESTED STRETCHES The correct form for balance, reach back and grasp one day of your feet together and your knees outward. Allow your back and shoulders to make exercise a regular and enjoyable part of your everyday life. Bring the sole of knees, and back. 2. Reach toward your toes as far as possible. Stretches: Hamstrings, lower back, and groin. 3 3. Hold for 15 counts, then relax. Quadriceps Stretch With one leg extended. Repeat 3 times. Hold for 15 counts, then relax. Bend your front leg, lean forward and move your buttocks as close to - Bring ...
English Manual
Page 16
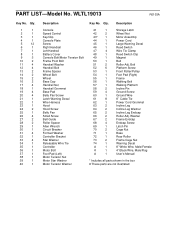
Qty. 1 1 2 1 3 1 4 1 5 12 6 1 7 1 8 1 9 3 10 2 11 4 12 4 13 2 14 2 15 2 16 2 17 4 18 1 19 4 20 4 21 1 22 1 23 1 24 2 25 1 26 4 27 2 28 2 29 1 30 1 31 4 32 1 33 4 34 1 35 1 36 1 37 1 38 1 39 1 40 1 Description Console Speed Control Key/Clip Console Plate Screw Right Handrail Left Handrail Battery Cover Console Bolt/Motor Tension Bolt Frame Pivot Bolt Handrail Washer Handrail Bolt Frame Spacer Wheel Bolt Wheel Base Cap Handrail Nut Handrail Grommet Base Pad Belly Pan Screw Latch Warning Decal Wire Harness Hood ...
Qty. 1 1 2 1 3 1 4 1 5 12 6 1 7 1 8 1 9 3 10 2 11 4 12 4 13 2 14 2 15 2 16 2 17 4 18 1 19 4 20 4 21 1 22 1 23 1 24 2 25 1 26 4 27 2 28 2 29 1 30 1 31 4 32 1 33 4 34 1 35 1 36 1 37 1 38 1 39 1 40 1 Description Console Speed Control Key/Clip Console Plate Screw Right Handrail Left Handrail Battery Cover Console Bolt/Motor Tension Bolt Frame Pivot Bolt Handrail Washer Handrail Bolt Frame Spacer Wheel Bolt Wheel Base Cap Handrail Nut Handrail Grommet Base Pad Belly Pan Screw Latch Warning Decal Wire Harness Hood ...

English Manual
Page 17
Save this chart and use it to identify small parts during assembly. Console Bolt (9)-2 Screw (5)-3 Star Washer (33)-2 Formed Washer (31)-4 Handrail Bolt (12)-4 Handrail Nut (17)-4 Handrail Washer (11)-4 Wheel Bolt (14)-2 Frame Bolt (10)-2 Wheel Nut (42)-2 PART IDENTIFICATION CHART Remove this chart and the EXPLODED DRAWING/PART LIST for future reference.
Save this chart and use it to identify small parts during assembly. Console Bolt (9)-2 Screw (5)-3 Star Washer (33)-2 Formed Washer (31)-4 Handrail Bolt (12)-4 Handrail Nut (17)-4 Handrail Washer (11)-4 Wheel Bolt (14)-2 Frame Bolt (10)-2 Wheel Nut (42)-2 PART IDENTIFICATION CHART Remove this chart and the EXPLODED DRAWING/PART LIST for future reference.
English Manual
Page 18
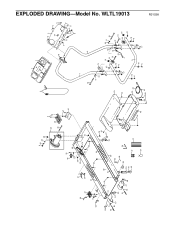
9 40 39 38 5 43* 35 36 26 46 27 69 41 26 37 5 58 21 68 51 66 67 52 72 63 64 65 51 66 67 68 50 48 28 49 73 53 73 52 52 54 56 57 55 59 28 24 27 26 60 58 29 63 64 65 47 61 34 5 32 20 45 1 2 3 54 5 74 5 70 5 11 5 11 8 9 7 10 6 23 24 25 44 30 20 62 11 33 31 17 13 12 42 16 13 15 14 18 19 5 22 33 11 10 12 14 15 16 42 19 71 5 19 5 19 5 31 17 R0103A EXPLODED DRAWING-Model No. WLTL19013
9 40 39 38 5 43* 35 36 26 46 27 69 41 26 37 5 58 21 68 51 66 67 52 72 63 64 65 51 66 67 68 50 48 28 49 73 53 73 52 52 54 56 57 55 59 28 24 27 26 60 58 29 63 64 65 47 61 34 5 32 20 45 1 2 3 54 5 74 5 70 5 11 5 11 8 9 7 10 6 23 24 25 44 30 20 62 11 33 31 17 13 12 42 16 13 15 14 18 19 5 22 33 11 10 12 14 15 16 42 19 71 5 19 5 19 5 31 17 R0103A EXPLODED DRAWING-Model No. WLTL19013

English Manual
Page 19
... WARRANTY ICON Health & Fitness, Inc. (ICON), warrants this product to be free from defects in workmanship and material, under this manual) WESLO is limited in its authorized service centers. ICON's obligation under normal use , costs of removal or installation or other warranty beyond that specifically set...must be prepared to give the following information: • The MODEL NUMBER of the product (WLTL19013) • The NAME of the product (WESLO® CADENCE 200 CS treadmill) • The SERIAL NUMBER of the product (see the front cover of this manual) • The KEY NUMBER and ...
... WARRANTY ICON Health & Fitness, Inc. (ICON), warrants this product to be free from defects in workmanship and material, under this manual) WESLO is limited in its authorized service centers. ICON's obligation under normal use , costs of removal or installation or other warranty beyond that specifically set...must be prepared to give the following information: • The MODEL NUMBER of the product (WLTL19013) • The NAME of the product (WESLO® CADENCE 200 CS treadmill) • The SERIAL NUMBER of the product (see the front cover of this manual) • The KEY NUMBER and ...