
Uk Manual
Page 3
... side. Wear appropriate exercise clothes while using the treadmill. 15. Never use . (See the drawing on a level surface, with bare feet, wearing only stockings, or in sandals. 10. A 13 amp fuse should be fitted to the off switch.) 18. Always remove the key, unplug the power cord, and move the walking... belt while the power is capable of heart rate readings. Do not operate the treadmill if the power cord or plug is damaged, or if the...
... side. Wear appropriate exercise clothes while using the treadmill. 15. Never use . (See the drawing on a level surface, with bare feet, wearing only stockings, or in sandals. 10. A 13 amp fuse should be fitted to the off switch.) 18. Always remove the key, unplug the power cord, and move the walking... belt while the power is capable of heart rate readings. Do not operate the treadmill if the power cord or plug is damaged, or if the...
Uk Manual
Page 5
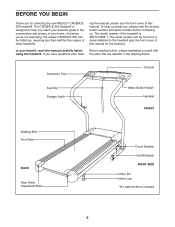
... To help you for the location). the parts that are labelled in the convenience and privacy of other treadmills. Accessory Tray Console Key/Clip Storage Latch Water Bottle Holder* Handrail FRONT Walking Belt Foot Rails BACK Rear Roller Adjustment Bolts Circuit Breaker...goals in the drawing below. The serial number can be found on a decal attached to help us . The CADENCE 200 treadmill is included 5 or your benefit, read - The model number of this manual for selecting the new WESLO® CADENCE 200 treadmill. If you have questions after read this manual.
... To help you for the location). the parts that are labelled in the convenience and privacy of other treadmills. Accessory Tray Console Key/Clip Storage Latch Water Bottle Holder* Handrail FRONT Walking Belt Foot Rails BACK Rear Roller Adjustment Bolts Circuit Breaker...goals in the drawing below. The serial number can be found on a decal attached to help us . The CADENCE 200 treadmill is included 5 or your benefit, read - The model number of this manual for selecting the new WESLO® CADENCE 200 treadmill. If you have questions after read this manual.
Uk Manual
Page 6
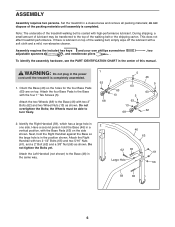
Set the treadmill in the power cord until assembly is in the same way. 46 63 62 65 61 Large Hole 56 59 65 6 ... (not shown) to the top of this manual. Note: The underside of the treadmill walking belt is lubricant on top of the packing materials until the treadmill is completely assembled. 1. Assembly requires the included hex keys and your own phillips screwdriver adjustable spanners , and needlenose pliers . , two To...Bolt (62) and a 3/8" Nut (56) as shown. Identify the Right Handrail (59), which has a large hole in 2 one side. This does not affect treadmill performance.
Set the treadmill in the power cord until assembly is in the same way. 46 63 62 65 61 Large Hole 56 59 65 6 ... (not shown) to the top of this manual. Note: The underside of the treadmill walking belt is lubricant on top of the packing materials until the treadmill is completely assembled. 1. Assembly requires the included hex keys and your own phillips screwdriver adjustable spanners , and needlenose pliers . , two To...Bolt (62) and a 3/8" Nut (56) as shown. Identify the Right Handrail (59), which has a large hole in 2 one side. This does not affect treadmill performance.
Uk Manual
Page 9
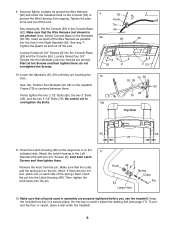
... (52). Be careful not to the Left Handrail (53) with two 3/4" Screws (2); Knob 2 48 Spring Collar Pin 53 Large Hole 12. Keep the included hex key in assembly are two collars, place one on the 11 indicated side. See drawing 9a. Make sure that all ten Screws and then tighten them... 2 55 2 53 10. Make sure that the collar and the spring are on the pin. (Note: If there are properly tightened before you use the treadmill. Orient the Latch Housing (48) so the large hole is centered between them ; To protect the floor or carpet, place a mat under the indicated hook...
... (52). Be careful not to the Left Handrail (53) with two 3/4" Screws (2); Knob 2 48 Spring Collar Pin 53 Large Hole 12. Keep the included hex key in assembly are two collars, place one on the 11 indicated side. See drawing 9a. Make sure that all ten Screws and then tighten them... 2 55 2 53 10. Make sure that the collar and the spring are on the pin. (Note: If there are properly tightened before you use the treadmill. Orient the Latch Housing (48) so the large hole is centered between them ; To protect the floor or carpet, place a mat under the indicated hook...
Uk Manual
Page 11
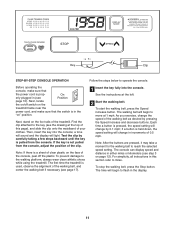
...Then, insert the key into the console. If the key is used, observe the alignment of the walking belt, and center the walking belt if necessary (see step 3 on the foot rails of the treadmill. To prevent damage to operate the console. The first time the treadmill is not pulled from...clip onto the waistband of the console, peel off switch on " position. Key Clip STEP-BY-STEP CONSOLE OPERATION (EWTEWTEL11F44o88l00lo55w) the steps below to the walking platform, always wear clean athletic shoes while using the treadmill. Next, locate the on/off the plastic. a tone will sound and ...
...Then, insert the key into the console. If the key is used, observe the alignment of the walking belt, and center the walking belt if necessary (see step 3 on the foot rails of the treadmill. To prevent damage to operate the console. The first time the treadmill is not pulled from...clip onto the waistband of the console, peel off switch on " position. Key Clip STEP-BY-STEP CONSOLE OPERATION (EWTEWTEL11F44o88l00lo55w) the steps below to the walking platform, always wear clean athletic shoes while using the treadmill. Next, locate the on/off the plastic. a tone will sound and ...
Uk Manual
Page 12
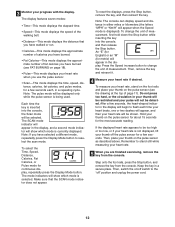
... (the letters "MPH" or "Km/H" will show which mode is selected. To reset the displays, press the Stop button, remove the key, and then reinsert the key. Then, place your pulse will not be displayed only while the pulse sensor is displayed). Step onto the foot rails, press the Stop... button, and remove the key from the console. tance, calories, fat calories, and pulse modes, for a few seconds each time your heart beats, one or two dashes will ...
... (the letters "MPH" or "Km/H" will show which mode is selected. To reset the displays, press the Stop button, remove the key, and then reinsert the key. Then, place your pulse will not be displayed only while the pulse sensor is displayed). Step onto the foot rails, press the Stop... button, and remove the key from the console. tance, calories, fat calories, and pulse modes, for a few seconds each time your heart beats, one or two dashes will ...
Uk Manual
Page 13
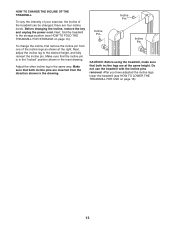
... USE on page 14). Make sure that both incline legs are at the right. Incline Pin Incline Pin Incline Pin CAUTION: Before using the treadmill, make sure that the incline pin is in the "locked" position shown in the same way. Make sure that both incline pins are four incline ... drawing. After you have adjusted the incline legs, lower the treadmill (see HOW TO FOLD THE TREADMILL FOR STORAGE on page 15). 13 Before changing the incline, remove the key and unplug the power cord. HOW TO CHANGE THE INCLINE OF THE TREADMILL To vary the intensity of your exercise, the incline of the...
... USE on page 14). Make sure that both incline legs are at the right. Incline Pin Incline Pin Incline Pin CAUTION: Before using the treadmill, make sure that the incline pin is in the "locked" position shown in the same way. Make sure that both incline pins are four incline ... drawing. After you have adjusted the incline legs, lower the treadmill (see HOW TO FOLD THE TREADMILL FOR STORAGE on page 15). 13 Before changing the incline, remove the key and unplug the power cord. HOW TO CHANGE THE INCLINE OF THE TREADMILL To vary the intensity of your exercise, the incline of the...
Uk Manual
Page 16
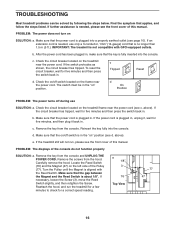
...Reed Switch slightly, and then retighten the Screw. IMPORTANT: The treadmill is aligned with GFCI-equipped outlets. Reinsert the key fully into a properly earthed outlet (see d. If the treadmill still will not run the treadmill for a few minutes to check for five minutes and then press... the console. PROBLEM: The displays of the Pulley (77). Make sure that the key is needed , please see the front cover of this manual. Remove the key from the console. TROUBLESHOOTING Most treadmill problems can be in the "on" position. e. Reattach the hood, and run...
...Reed Switch slightly, and then retighten the Screw. IMPORTANT: The treadmill is aligned with GFCI-equipped outlets. Reinsert the key fully into a properly earthed outlet (see d. If the treadmill still will not run the treadmill for a few minutes to check for five minutes and then press... the console. PROBLEM: The displays of the Pulley (77). Make sure that the key is needed , please see the front cover of this manual. Remove the key from the console. TROUBLESHOOTING Most treadmill problems can be in the "on" position. e. Reattach the hood, and run...
Uk Manual
Page 17
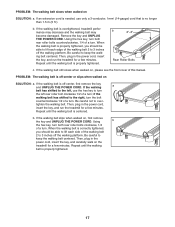
... lift each edge of a turn ; Then, plug in the power cord, insert the key, and run the treadmill for a few minutes. If the walking a belt has shifted to 3 inches off -center, first remove the key and UNPLUG THE POWER CORD. if the walking belt has shifted to keep the walking belt... centered. Then, plug in the power cord, insert the key, and run the treadmill for a few minutes. Be careful to the right, turn the bolt counterclockwise 1/2 of the walking belt 2 to the left, use only a 3-...
... lift each edge of a turn ; Then, plug in the power cord, insert the key, and run the treadmill for a few minutes. If the walking a belt has shifted to 3 inches off -center, first remove the key and UNPLUG THE POWER CORD. if the walking belt has shifted to keep the walking belt... centered. Then, plug in the power cord, insert the key, and run the treadmill for a few minutes. Be careful to the right, turn the bolt counterclockwise 1/2 of the walking belt 2 to the left, use only a 3-...
Uk Manual
Page 18
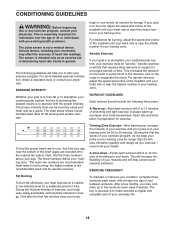
...heart rate trends in your heart rate is intended only as a guide. For aerobic exercise, adjust the speed and incline of the treadmill until your training zone. the higher number is near the lowest number in general. Fat Burning To burn fat effectively, you may ...affect the accuracy of heart rate readings. During the first few months, you must be found by using your cardiovascular system, the key to achieving the desired results is especially important for exercise. CONDITIONING GUIDELINES WARNING: Before beginning this or any exercise program, consult your ...
...heart rate trends in your heart rate is intended only as a guide. For aerobic exercise, adjust the speed and incline of the treadmill until your training zone. the higher number is near the lowest number in general. Fat Burning To burn fat effectively, you may ...affect the accuracy of heart rate readings. During the first few months, you must be found by using your cardiovascular system, the key to achieving the desired results is especially important for exercise. CONDITIONING GUIDELINES WARNING: Before beginning this or any exercise program, consult your ...
Uk Manual
Page 20
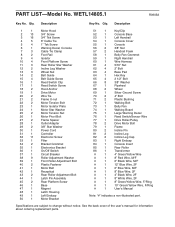
...Fastener Motor Belt Receptical Rear Roller Adjustment Bolt Latch Pin Assembly Rear Platform Screw Base Magnet Latch Housing Left Endcap Motor Bracket 51 1 Key/Clip 52 1 Console Base 53 1 Left Handrail 54 1 Console Cover 55 1 Console 56 2 3/8" Nut 57 2 Handrail Foam... 58 1 Belly Pan Grommet 59 1 Right Handrail 60 1 Wire Harness 61 4 5/16" Nut 62 4 2" Bolt 63 4 Base Pad 64 1 Hex Key 65 4 2 1/2" Bolt 66 8 3/8" Washer 67 1 Flywheel 68 2 Wheel 69 1 Silver Ground Screw 70 2 4" Bolt 71 2 Plastic Bushing 72 1 Walking Belt...
...Fastener Motor Belt Receptical Rear Roller Adjustment Bolt Latch Pin Assembly Rear Platform Screw Base Magnet Latch Housing Left Endcap Motor Bracket 51 1 Key/Clip 52 1 Console Base 53 1 Left Handrail 54 1 Console Cover 55 1 Console 56 2 3/8" Nut 57 2 Handrail Foam... 58 1 Belly Pan Grommet 59 1 Right Handrail 60 1 Wire Harness 61 4 5/16" Nut 62 4 2" Bolt 63 4 Base Pad 64 1 Hex Key 65 4 2 1/2" Bolt 66 8 3/8" Washer 67 1 Flywheel 68 2 Wheel 69 1 Silver Ground Screw 70 2 4" Bolt 71 2 Plastic Bushing 72 1 Walking Belt...
Uk Manual
Page 23
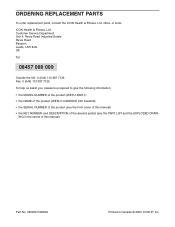
... us assist you, please be prepared to give the following information: • the MODEL NUMBER of the product (WETL14805.1) • the NAME of the product (WESLO CADENCE 200 treadmill) • the SERIAL NUMBER of the product (see the front cover of the desired part(s) (see the PART LIST and the EXPLODED DRAW- ING in...
... us assist you, please be prepared to give the following information: • the MODEL NUMBER of the product (WETL14805.1) • the NAME of the product (WESLO CADENCE 200 treadmill) • the SERIAL NUMBER of the product (see the front cover of the desired part(s) (see the PART LIST and the EXPLODED DRAW- ING in...


