
Uk Manual
Page 2
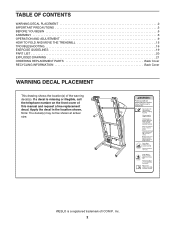
... PRECAUTIONS 3 BEFORE YOU BEGIN 5 ASSEMBLY 6 OPERATION AND ADJUSTMENT 9 HOW TO FOLD AND MOVE THE TREADMILL 15 TROUBLESHOOTING 16 EXERCISE GUIDELINES 19 PART LIST 20 EXPLODED DRAWING 21 ORDERING REPLACEMENT PARTS Back Cover RECYCLING INFORMATION Back Cover WARNING DECAL PLACEMENT This drawing shows the location(s) of ICON IP, Inc. 2 Note: The decal(s) may not be shown at actual size. Apply the decal in the location shown. WESLO is missing or illegible...
... PRECAUTIONS 3 BEFORE YOU BEGIN 5 ASSEMBLY 6 OPERATION AND ADJUSTMENT 9 HOW TO FOLD AND MOVE THE TREADMILL 15 TROUBLESHOOTING 16 EXERCISE GUIDELINES 19 PART LIST 20 EXPLODED DRAWING 21 ORDERING REPLACEMENT PARTS Back Cover RECYCLING INFORMATION Back Cover WARNING DECAL PLACEMENT This drawing shows the location(s) of ICON IP, Inc. 2 Note: The decal(s) may not be shown at actual size. Apply the decal in the location shown. WESLO is missing or illegible...
Uk Manual
Page 3
...-existing health problems. 2. Keep children under the treadmill. 5. Never move the walking belt while the power is being administered. 7. Always wear athletic shoes; The pulse sensor is capable of high speeds. The treadmill is intended only as described. 11. Before beginning this manual and all important precautions and in the treadmill. When connecting the power cord (see HOW TO TURN ON THE POWER on the walking belt. Never start the treadmill while...
...-existing health problems. 2. Keep children under the treadmill. 5. Never move the walking belt while the power is being administered. 7. Always wear athletic shoes; The pulse sensor is capable of high speeds. The treadmill is intended only as described. 11. Before beginning this manual and all important precautions and in the treadmill. When connecting the power cord (see HOW TO TURN ON THE POWER on the walking belt. Never start the treadmill while...
Uk Manual
Page 4
... running. This treadmill is intended for the location of the power switch.) 20. Always remove the key, unplug the power cord, and press the power switch to raise, lower, or move the treadmill. 21. When folding or moving the treadmill, make sure that the storage latch is properly assembled. (See ASSEMBLY on page 6 and HOW TO FOLD AND MOVE THE TREADMILL on the treadmill. tenance and adjustment procedures de- Do not change the incline of the treadmill regularly. 27...
... running. This treadmill is intended for the location of the power switch.) 20. Always remove the key, unplug the power cord, and press the power switch to raise, lower, or move the treadmill. 21. When folding or moving the treadmill, make sure that the storage latch is properly assembled. (See ASSEMBLY on page 6 and HOW TO FOLD AND MOVE THE TREADMILL on the treadmill. tenance and adjustment procedures de- Do not change the incline of the treadmill regularly. 27...
Uk Manual
Page 5
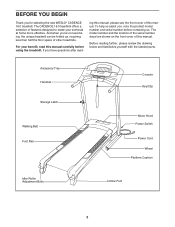
... front cover of this manual. ing this manual, please see the front cover of this manual. And when you have questions after read this manual carefully before contacting us. To help us assist you for selecting the new WESLO® CADENCE 16.0 treadmill. For your workouts at home more effective. Accessory Tray Handrail Storage Latch Walking Belt Foot Rail Console Key/Clip Motor Hood Power Switch Power Cord Wheel Platform Cushion Idler Roller Adjustment Bolts Incline Foot 5 The CADENCE 16.0 treadmill...
... front cover of this manual. ing this manual, please see the front cover of this manual. And when you have questions after read this manual carefully before contacting us. To help us assist you for selecting the new WESLO® CADENCE 16.0 treadmill. For your workouts at home more effective. Accessory Tray Handrail Storage Latch Walking Belt Foot Rail Console Key/Clip Motor Hood Power Switch Power Cord Wheel Platform Cushion Idler Roller Adjustment Bolts Incline Foot 5 The CADENCE 16.0 treadmill...
Uk Manual
Page 6
... 1 1 6 Raise the Uprights (73), so that the power cord is the key number of the walking belt, simply wipe off the lubricant with a soft cloth and a mild, non-abrasive cleaner. Set the treadmill in parentheses below to identify the assembly hardware. The number after the parentheses is completed. Unfold the Frame (50) away from the PART LIST near the end of this manual. ASSEMBLY Assembly requires two persons...
... 1 1 6 Raise the Uprights (73), so that the power cord is the key number of the walking belt, simply wipe off the lubricant with a soft cloth and a mild, non-abrasive cleaner. Set the treadmill in parentheses below to identify the assembly hardware. The number after the parentheses is completed. Unfold the Frame (50) away from the PART LIST near the end of this manual. ASSEMBLY Assembly requires two persons...

Uk Manual
Page 7
... inset drawing. Console Assembly 71 Console Wire Console Wire 71 73 Tie 4. IF YOU DO NOT CONNECT THE CONNECTORS PROPERLY, THE CONSOLE MAY BECOME DAMAGED WHEN YOU TURN ON THE POWER. Insert the connectors and the excess wire into place. Console Assembly 73 69 3 3 3 69 7 Be careful not to the console wire. Attach the console assembly to the Uprights (73) with six M4.2 x 4 19mm Screws (3). Remove 3 the tie from the Upright Wire (71...
... inset drawing. Console Assembly 71 Console Wire Console Wire 71 73 Tie 4. IF YOU DO NOT CONNECT THE CONNECTORS PROPERLY, THE CONSOLE MAY BECOME DAMAGED WHEN YOU TURN ON THE POWER. Insert the connectors and the excess wire into place. Console Assembly 73 69 3 3 3 69 7 Be careful not to the console wire. Attach the console assembly to the Uprights (73) with six M4.2 x 4 19mm Screws (3). Remove 3 the tie from the Upright Wire (71...

Uk Manual
Page 8
... HOW TO LOWER THE TREADMILL FOR USE on the bracket in a secure place. Lower the treadmill. Make sure that all parts are included. Keep the included hex keys in the center of the Spring Clip to adjust the walking belt (see pages 17 and 18). To protect the floor or carpet, place a mat under the treadmill. 8 Using your fingernail or a screwdriver, press on...
... HOW TO LOWER THE TREADMILL FOR USE on the bracket in a secure place. Lower the treadmill. Make sure that all parts are included. Keep the included hex keys in the center of the Spring Clip to adjust the walking belt (see pages 17 and 18). To protect the floor or carpet, place a mat under the treadmill. 8 Using your fingernail or a screwdriver, press on...

Uk Manual
Page 9
... plugging in the power cord in the UK, first press the pins on the power cord into the adapter cover. Close the adapter cover over the end of the power cord and tighten the screw in an increased risk of electric shock. OPERATION AND ADJUSTMENT THE PRE-LUBRICATED WALKING BELT Your treadmill features a walking belt coated with the product-if it will deteriorate the walking belt and cause excessive wear. If it must be replaced...
... plugging in the power cord in the UK, first press the pins on the power cord into the adapter cover. Close the adapter cover over the end of the power cord and tighten the screw in an increased risk of electric shock. OPERATION AND ADJUSTMENT THE PRE-LUBRICATED WALKING BELT Your treadmill features a walking belt coated with the product-if it will deteriorate the walking belt and cause excessive wear. If it must be replaced...
Uk Manual
Page 10
... effective exercise session. To turn on the power, see page 18). When you select the manual mode of the console, you can display speed and distance in either kilometers or miles. The console also offers six preset workouts. You can even measure your workouts more effective. Note: The console can change the speed of the treadmill with the touch of a button. CONSOLE DIAGRAM Thumb Pulse Sensor Key Clip FEATURES OF THE CONSOLE The treadmill console offers...
... effective exercise session. To turn on the power, see page 18). When you select the manual mode of the console, you can display speed and distance in either kilometers or miles. The console also offers six preset workouts. You can even measure your workouts more effective. Note: The console can change the speed of the treadmill with the touch of a button. CONSOLE DIAGRAM Thumb Pulse Sensor Key Clip FEATURES OF THE CONSOLE The treadmill console offers...
Uk Manual
Page 11
... this, you press the buttons, it reaches the selected speed setting. After a moment, the displays will change speed until it may damage the console displays or other electrical components. 1. if the key is displayed in the power cord and press the power switch into the reset position, the demo mode is inserted, the manual mode will be selected. To stop . HOW TO TURN ON THE POWER HOW TO USE THE MANUAL MODE IMPORTANT: If the treadmill has been...
... this, you press the buttons, it reaches the selected speed setting. After a moment, the displays will change speed until it may damage the console displays or other electrical components. 1. if the key is displayed in the power cord and press the power switch into the reset position, the demo mode is inserted, the manual mode will be selected. To stop . HOW TO TURN ON THE POWER HOW TO USE THE MANUAL MODE IMPORTANT: If the treadmill has been...

Uk Manual
Page 12
... heart rate when you use a preset workout, the left display can show the elapsed time and the approximate number of the walking belt and the distance that you are finished exercising, remove the key from the console, and put it in succession. Remember to appear in a secure place. As you are finished using the treadmill, press the power switch into the off position and unplug the power cord. The left display...
... heart rate when you use a preset workout, the left display can show the elapsed time and the approximate number of the walking belt and the distance that you are finished exercising, remove the key from the console, and put it in succession. Remember to appear in a secure place. As you are finished using the treadmill, press the power switch into the off position and unplug the power cord. The left display...
Uk Manual
Page 13
To select a preset workout, press the Weight Loss Workouts button or the Intensity Training Workouts button repeatedly until the last segment of the profile flashes in the display to move at any time, press the Stop button. If a different speed setting is divided into the console. The walking belt will begin to alert you press the button, the treadmill will show your progress. At the end of the workout. See step 5 on page 12...
To select a preset workout, press the Weight Loss Workouts button or the Intensity Training Workouts button repeatedly until the last segment of the profile flashes in the display to move at any time, press the Stop button. If a different speed setting is divided into the console. The walking belt will begin to alert you press the button, the treadmill will show your progress. At the end of the workout. See step 5 on page 12...

Uk Manual
Page 14
... when you plug in the power cord, press the power switch into the reset position, and insert the key into the console, and then release the Stop button. After you have adjusted the incline feet, lower the treadmill (see page 15). To change the incline of miles or kilometers that the walking belt has moved, for English miles. The right display will not function. The information mode also keeps track of measurement. When the information mode is selected...
... when you plug in the power cord, press the power switch into the reset position, and insert the key into the console, and then release the Stop button. After you have adjusted the incline feet, lower the treadmill (see page 15). To change the incline of miles or kilometers that the walking belt has moved, for English miles. The right display will not function. The information mode also keeps track of measurement. When the information mode is selected...

Uk Manual
Page 15
... until the catch is past the latch pin. CAUTION: You must be able to safely lift 45 lbs. (20 kg) to the floor. HOW TO MOVE THE TREADMILL Before moving the treadmill, fold it to the vertical position. HOW TO FOLD AND MOVE THE TREADMILL HOW TO FOLD THE TREADMILL Before folding the treadmill, remove the key and unplug the power cord. CAUTION: Do not hold the frame...
... until the catch is past the latch pin. CAUTION: You must be able to safely lift 45 lbs. (20 kg) to the floor. HOW TO MOVE THE TREADMILL Before moving the treadmill, fold it to the vertical position. HOW TO FOLD AND MOVE THE TREADMILL HOW TO FOLD THE TREADMILL Before folding the treadmill, remove the key and unplug the power cord. CAUTION: Do not hold the frame...
Uk Manual
Page 16
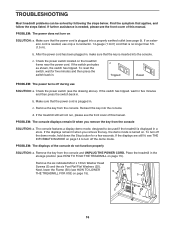
... a display demo mode, designed to turn off the demo mode, hold down the Stop button for five minutes and then press the switch back in. If the displays are still lit, see the drawing above). Make sure that applies, and follow the steps listed. PROBLEM: The displays of this manual. Remove the key from the console. After the power cord has been plugged in, make sure that the power cord is plugged in. Check the power switch...
... a display demo mode, designed to turn off the demo mode, hold down the Stop button for five minutes and then press the switch back in. If the displays are still lit, see the drawing above). Make sure that applies, and follow the steps listed. PROBLEM: The displays of this manual. Remove the key from the console. After the power cord has been plugged in, make sure that the power cord is plugged in. Check the power switch...
Uk Manual
Page 17
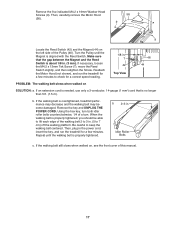
... Tek Screw (7), move the Reed Switch slightly, and then retighten the Screw. b. If the walking belt is properly tightened. When the walking belt is about 1/8 in . Be careful to 7 cm) off the walking platform. Repeat until the Magnet is no longer than 5 ft. (1.5 m). Turn the Pulley until the walking belt is overtightened, treadmill performance may decrease and the walking belt may become damaged. Remove the key and UNPLUG THE POWER CORD. Then, plug...
... Tek Screw (7), move the Reed Switch slightly, and then retighten the Screw. b. If the walking belt is properly tightened. When the walking belt is about 1/8 in . Be careful to 7 cm) off the walking platform. Repeat until the Magnet is no longer than 5 ft. (1.5 m). Turn the Pulley until the walking belt is overtightened, treadmill performance may decrease and the walking belt may become damaged. Remove the key and UNPLUG THE POWER CORD. Then, plug...
Uk Manual
Page 18
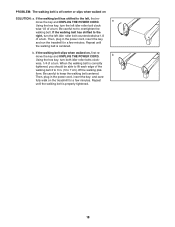
... POWER CORD. wise, 1/4 of the walking belt 2 to 3 in. (5 to overtighten the walking belt. form. If the walking belt has shifted to keep the walking belt centered. wise 1/2 of a turn the left , first remove the key and UNPLUG THE POWER CORD. b. Be careful to the left idler roller bolt counterclockwise 1/2 of a turn the left idler roller bolt clock- Then, plug in the power cord, insert the key, and care- Repeat until the walking belt is centered. PROBLEM: The walking belt...
... POWER CORD. wise, 1/4 of the walking belt 2 to 3 in. (5 to overtighten the walking belt. form. If the walking belt has shifted to keep the walking belt centered. wise 1/2 of a turn the left , first remove the key and UNPLUG THE POWER CORD. b. Be careful to the left idler roller bolt counterclockwise 1/2 of a turn the left idler roller bolt clock- Then, plug in the power cord, insert the key, and care- Repeat until the walking belt is centered. PROBLEM: The walking belt...

Uk Manual
Page 19
... workouts each week, with 5 to make exercise a regular and enjoyable part of time. Remember, proper nutrition and adequate rest are rounded off to prevent post-exercise problems. EXERCISE FREQUENCY To maintain or improve your training zone. The chart below shows recommended heart rates for exercise. For maximum fat burning, exercise with pre-existing health problems. The pulse sensor is intended only as an exercise aid in determining heart rate...
... workouts each week, with 5 to make exercise a regular and enjoyable part of time. Remember, proper nutrition and adequate rest are rounded off to prevent post-exercise problems. EXERCISE FREQUENCY To maintain or improve your training zone. The chart below shows recommended heart rates for exercise. For maximum fat burning, exercise with pre-existing health problems. The pulse sensor is intended only as an exercise aid in determining heart rate...
Uk Manual
Page 20
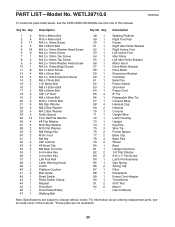
... Roller Left Idler Roller Bracket Motor Hood Drive Motor Bracket Drive Motor Electronics Bracket Controller Belly Pan Power Switch Grommet Power Cord 8" Tie Releasable Wire Tie Console Base Handrail Cap Handrail Console Upright Wire Latch Housing Upright Key/Clip Wire Tie Frame Spacer Base Cap Base Pad Wheel Base Upright Grommet 1/4" Flat Washer #10 x 1" Tek Screw Latch Pin Assembly Gas Spring Spring Clip Filter Receptacle Power Cord Adapter Transformer 5/16" Nut Mount Userʼs Manual Note: Specifications are not illustrated. 20 For information about ordering replacement parts...
... Roller Left Idler Roller Bracket Motor Hood Drive Motor Bracket Drive Motor Electronics Bracket Controller Belly Pan Power Switch Grommet Power Cord 8" Tie Releasable Wire Tie Console Base Handrail Cap Handrail Console Upright Wire Latch Housing Upright Key/Clip Wire Tie Frame Spacer Base Cap Base Pad Wheel Base Upright Grommet 1/4" Flat Washer #10 x 1" Tek Screw Latch Pin Assembly Gas Spring Spring Clip Filter Receptacle Power Cord Adapter Transformer 5/16" Nut Mount Userʼs Manual Note: Specifications are not illustrated. 20 For information about ordering replacement parts...
Uk Manual
Page 24
... order replacement parts, see the PART LIST and the EXPLODED DRAWING near the end of this product. If you purchased this manual) RECYCLING INFORMATION This electronic product must be disposed of in China © 2010 ICON IP, Inc. To help to provide the following information when contacting us: • the model number and the serial number of the product (see the front cover...
... order replacement parts, see the PART LIST and the EXPLODED DRAWING near the end of this product. If you purchased this manual) RECYCLING INFORMATION This electronic product must be disposed of in China © 2010 ICON IP, Inc. To help to provide the following information when contacting us: • the model number and the serial number of the product (see the front cover...


