
English Manual
Page 2
...damage, place a mat under the age of five feet or less in length. Athletic support clothes are standing on the walking belt. The treadmill should be used or where oxygen is the responsibility of the owner to persons, read the following important precautions and information before beginning assembly. Never...CORD on a level surface, with eight feet of burns, fire, electric shock, or injury to ensure that could become caught in the treadmill. Do not use the treadmill with a 14-gauge cord of 12 and pets away from heated surfaces. 13. Never allow more than 250 pounds. 8. Do not...
...damage, place a mat under the age of five feet or less in length. Athletic support clothes are standing on the walking belt. The treadmill should be used or where oxygen is the responsibility of the owner to persons, read the following important precautions and information before beginning assembly. Never...CORD on a level surface, with eight feet of burns, fire, electric shock, or injury to ensure that could become caught in the treadmill. Do not use the treadmill with a 14-gauge cord of 12 and pets away from heated surfaces. 13. Never allow more than 250 pounds. 8. Do not...

English Manual
Page 3
... pulse sensor is fully closed. 22. Always unplug the power cord before using. 15. This is not in use this manual. When storing the treadmill, make sure that the storage latch is not a medical device. The pulse sensor is intended for longer than the procedures in this product. To reduce... INSTRUCTIONS The decal shown at the right has been placed on page 10.) You must be performed by or through the use only. This treadmill is intended only as an exercise aid in determining heart rate trends in the location shown. 3 ICON assumes no responsibility for persons over the...
... pulse sensor is fully closed. 22. Always unplug the power cord before using. 15. This is not in use this manual. When storing the treadmill, make sure that the storage latch is not a medical device. The pulse sensor is intended for longer than the procedures in this product. To reduce... INSTRUCTIONS The decal shown at the right has been placed on page 10.) You must be performed by or through the use only. This treadmill is intended only as an exercise aid in determining heart rate trends in the location shown. 3 ICON assumes no responsibility for persons over the...
English Manual
Page 4
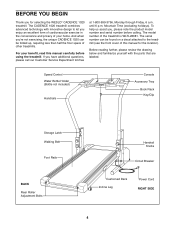
... 4 And when youÕre not exercising, the unique CADENCE 1020 can be folded up, requiring less than half the floor space of the treadmill is WLTL28081. The model number of other treadmills. The CADENCE 1020 treadmill combines advanced technology with the parts that are labeled. To...further, please review the drawing below and familiarize yourself with innovative design to the treadmill (see the front cover of your benefit, read this manual for selecting the WESLO¨ CADENCE 1020 treadmill. If you enjoy an excellent form of cardiovascular exercise in the convenience and ...
... 4 And when youÕre not exercising, the unique CADENCE 1020 can be folded up, requiring less than half the floor space of the treadmill is WLTL28081. The model number of other treadmills. The CADENCE 1020 treadmill combines advanced technology with the parts that are labeled. To...further, please review the drawing below and familiarize yourself with innovative design to the treadmill (see the front cover of your benefit, read this manual for selecting the WESLO¨ CADENCE 1020 treadmill. If you enjoy an excellent form of cardiovascular exercise in the convenience and ...

English Manual
Page 5
... the same way. Attach the other Base Leg (44) in a cleared area and remove all packing materials. Carefully lower the treadmill. Make sure that the Base Leg Pad (33) is completed. Remove the two remaining Latch Screws (8) from 3 the left Upright (38). 17 ... the included Allen Wrench (81), attach the Base Leg with the four Latch Screws (8). With the help of a second person, carefully lay the treadmill onto one of a second person, carefully raise the treadmill to the treadmill by the Wire Harness (53). Make sure that both parts to avoid pulling on the floor. 2.
... the same way. Attach the other Base Leg (44) in a cleared area and remove all packing materials. Carefully lower the treadmill. Make sure that the Base Leg Pad (33) is completed. Remove the two remaining Latch Screws (8) from 3 the left Upright (38). 17 ... the included Allen Wrench (81), attach the Base Leg with the four Latch Screws (8). With the help of a second person, carefully lay the treadmill onto one of a second person, carefully raise the treadmill to the treadmill by the Wire Harness (53). Make sure that both parts to avoid pulling on the floor. 2.

English Manual
Page 6
... are tight, but do not overtighten them. Make sure that the Handrail Screws are properly tightened before you are 5Õ 8Ó or taller, use the treadmill. 81 80 6 Set the Console Base (87) on the inner sides as shown in each Upright (38) with two Handrail Knobs (1). Insert a Handrail Plug (70...
... are tight, but do not overtighten them. Make sure that the Handrail Screws are properly tightened before you are 5Õ 8Ó or taller, use the treadmill. 81 80 6 Set the Console Base (87) on the inner sides as shown in each Upright (38) with two Handrail Knobs (1). Insert a Handrail Plug (70...

English Manual
Page 7
... ground such as to determine if the outlet box cover is equipped with a cord having an equipment-grounding conductor and a Your treadmill features a walking belt coated with a qualified electrician or serviceman if you are in an increased risk of electric shock. Contact a...excessive wear. To decrease the possibility of sophisticated electronic equipment, can result in doubt as a properly grounded outlet box cover. Your treadmill, like the adapter illustrated in drawing 2 may be held in drawing 1 below. Grounding Plug Grounding Plug Surge protectors are not ...
... ground such as to determine if the outlet box cover is equipped with a cord having an equipment-grounding conductor and a Your treadmill features a walking belt coated with a qualified electrician or serviceman if you are in an increased risk of electric shock. Contact a...excessive wear. To decrease the possibility of sophisticated electronic equipment, can result in doubt as a properly grounded outlet box cover. Your treadmill, like the adapter illustrated in drawing 2 may be held in drawing 1 below. Grounding Plug Grounding Plug Surge protectors are not ...

English Manual
Page 8
...can be restarted. Note: Each time the walking belt is a thin sheet of electric shock, keep the console dry. Change the speed of the treadmill. Next, slowly slide the speed control until the walking belt begins to the key (see the drawing above ). DIAGRAM OF THE CONSOLE Displays Incline ... Do not stand on the walking belt when turning on the power. ¥ Always wear the clip (see the drawing above ) while operating the treadmill. See page 14 or more information. ¥ To reduce the possibility of clear plastic on the console, remove it. STEP BY STEP CONSOLE OPERATION Before...
...can be restarted. Note: Each time the walking belt is a thin sheet of electric shock, keep the console dry. Change the speed of the treadmill. Next, slowly slide the speed control until the walking belt begins to the key (see the drawing above ). DIAGRAM OF THE CONSOLE Displays Incline ... Do not stand on the walking belt when turning on the power. ¥ Always wear the clip (see the drawing above ) while operating the treadmill. See page 14 or more information. ¥ To reduce the possibility of clear plastic on the console, remove it. STEP BY STEP CONSOLE OPERATION Before...

English Manual
Page 9
... not press too hard, or the cir- If the walking belt is positioned as shown, and that you are applying the proper amount of the treadmill as desired. HANDRAIL ADJUSTMENT The Handrails (4, 32) can be too high or too low, or if your pulse is used (see assembly step 5 on page...
... not press too hard, or the cir- If the walking belt is positioned as shown, and that you are applying the proper amount of the treadmill as desired. HANDRAIL ADJUSTMENT The Handrails (4, 32) can be too high or too low, or if your pulse is used (see assembly step 5 on page...

English Manual
Page 10
...the vertical position. 2. Move your back straight. Make sure that the storage latch closes fully over the frame guide. Carefully move the treadmill. 1. Place one of the front wheels as described above 85¡ Fahrenheit. Storage Latch Frame Guide Closed Base Leg Front Wheels 10... You must be able to the position shown at the right. Raise the treadmill until it back. Keep the treadmill out of injury, use extreme caution while moving the treadmill, convert the treadmill to move the treadmill without tipping it is locked fully over an uneven surface. 3. HOW TO ...
...the vertical position. 2. Move your back straight. Make sure that the storage latch closes fully over the frame guide. Carefully move the treadmill. 1. Place one of the front wheels as described above 85¡ Fahrenheit. Storage Latch Frame Guide Closed Base Leg Front Wheels 10... You must be able to the position shown at the right. Raise the treadmill until it back. Keep the treadmill out of injury, use extreme caution while moving the treadmill, convert the treadmill to move the treadmill without tipping it is locked fully over an uneven surface. 3. HOW TO ...

English Manual
Page 11
Hold the upper end of injury, bend your legs and keep your back straight. Storage Latch Frame Guide Opened 11 Pivot the treadmill until the frame is past the storage latch. 2. Hold the treadmill firmly with your left thumb, slide open the storage latch and hold it open. Using your right hand as shown. To decrease the possibility of the treadmill with both hands, and lower the treadmill to the floor. HOW TO LOWER THE TREADMILL FOR USE 1.
Hold the upper end of injury, bend your legs and keep your back straight. Storage Latch Frame Guide Opened 11 Pivot the treadmill until the frame is past the storage latch. 2. Hold the treadmill firmly with your left thumb, slide open the storage latch and hold it open. Using your right hand as shown. To decrease the possibility of the treadmill with both hands, and lower the treadmill to the floor. HOW TO LOWER THE TREADMILL FOR USE 1.

English Manual
Page 12
...surge protector is fully inserted into the console. b. After the power cord has been plugged in . Check the circuit breaker located on the treadmill frame near the power cord (see assembly step 6 on page 6. c Tripped Tripped Reset Reset PROBLEM: The power turns off during use ... 1-800-999-3756, Monday through Friday, 6 a.m. Make sure that applies, and follow the steps listed. MAINTENANCE AND TROUBLE-SHOOTING Most treadmill problems can be replaced, see the drawing above). Find the symptom that the gap between the Magnet and the Reed Switch is needed, ...
...surge protector is fully inserted into the console. b. After the power cord has been plugged in . Check the circuit breaker located on the treadmill frame near the power cord (see assembly step 6 on page 6. c Tripped Tripped Reset Reset PROBLEM: The power turns off during use ... 1-800-999-3756, Monday through Friday, 6 a.m. Make sure that applies, and follow the steps listed. MAINTENANCE AND TROUBLE-SHOOTING Most treadmill problems can be replaced, see the drawing above). Find the symptom that the gap between the Magnet and the Reed Switch is needed, ...

English Manual
Page 13
... turn . Repeat until the walking belt is centered. Repeat until the walking belt is properly tightened. If the walking belt is overtightened, treadmill performance may decrease and the walking belt may be able to lift each side of a turn each . Be careful to the left rear... counterclockwise, 1/4 of the walking belt 2 to 3 inches off the walking platform. Plug in the power cord, insert the key and run the treadmill for a few minutes. b. b 2ÓÐ3Ó Rear Roller Adjustment Bolts c. ment bolt clockwise, and the right bolt counterclock- Be careful ...
... turn . Repeat until the walking belt is centered. Repeat until the walking belt is properly tightened. If the walking belt is overtightened, treadmill performance may decrease and the walking belt may be able to lift each side of a turn each . Be careful to the left rear... counterclockwise, 1/4 of the walking belt 2 to 3 inches off the walking platform. Plug in the power cord, insert the key and run the treadmill for a few minutes. b. b 2ÓÐ3Ó Rear Roller Adjustment Bolts c. ment bolt clockwise, and the right bolt counterclock- Be careful ...

English Manual
Page 14
... The proper intensity level can be Òaerobic.Ó Aerobic exercise Cool-down . For aerobic exercise, adjust the speed and incline of the treadmill until your heart rate is near the middle of your training zone. (See pages 8 and 9.) High Performance Athletic Conditioning If your training zone...use stored fat calories for exercise. During the first few minutes does your everyday life. 14 Only after the first few minutes of the treadmill as an exercise aid in determining heart rate trends in general. The key to success is not a medical device. Next, find your...
... The proper intensity level can be Òaerobic.Ó Aerobic exercise Cool-down . For aerobic exercise, adjust the speed and incline of the treadmill until your heart rate is near the middle of your training zone. (See pages 8 and 9.) High Performance Athletic Conditioning If your training zone...use stored fat calories for exercise. During the first few minutes does your everyday life. 14 Only after the first few minutes of the treadmill as an exercise aid in determining heart rate trends in general. The key to success is not a medical device. Next, find your...

English Manual
Page 18
...be prepared to give the following information when calling: ¥ The MODEL NUMBER of the product (WLTL28081). ¥ The NAME of the product (WESLO CADENCE¨ 1020 treadmill). ¥ The SERIAL NUMBER of the product (see the front cover of this manual). ¥ The KEY NUMBER and DESCRIPTION of the desired...or limitation of merchantability or fitness for commercial or rental purposes, or products used as store display models. Mountain Time (excluding holidays). WESLO is in lieu of any and all other warranties and any economic loss, loss of property, loss of revenues or profits, loss ...
...be prepared to give the following information when calling: ¥ The MODEL NUMBER of the product (WLTL28081). ¥ The NAME of the product (WESLO CADENCE¨ 1020 treadmill). ¥ The SERIAL NUMBER of the product (see the front cover of this manual). ¥ The KEY NUMBER and DESCRIPTION of the desired...or limitation of merchantability or fitness for commercial or rental purposes, or products used as store display models. Mountain Time (excluding holidays). WESLO is in lieu of any and all other warranties and any economic loss, loss of property, loss of revenues or profits, loss ...


