

Canadian English Manual
Page 2
..., rated at 15 amps, with bare feet, wearing only stockings, or in the treadmill. Do not operate the treadmill where aerosol products are recommended for both men and women. Never move the walking belt while the power is not working properly.) 14. No other appliance should not be ... RECORD 15 LIMITED WARRANTY Back Cover Note: A PART LIST and an EXPLODED DRAWING are standing on the walking belt. Wear appropriate exercise clothing when using the treadmill. 2 Do not use the treadmill with a 14-gauge cord of 12 and pets away from damage, place a mat under the age of...
..., rated at 15 amps, with bare feet, wearing only stockings, or in the treadmill. Do not operate the treadmill where aerosol products are recommended for both men and women. Never move the walking belt while the power is not working properly.) 14. No other appliance should not be ... RECORD 15 LIMITED WARRANTY Back Cover Note: A PART LIST and an EXPLODED DRAWING are standing on the walking belt. Wear appropriate exercise clothing when using the treadmill. 2 Do not use the treadmill with a 14-gauge cord of 12 and pets away from damage, place a mat under the age of...
Canadian English Manual
Page 4
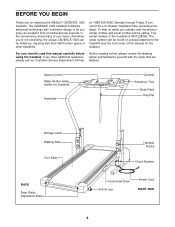
...Storage Latch Walking Belt Foot Rails BACK Rear Roller Adjustment Bolts Handrail Knobs Circuit Breaker Cushioned Deck Incline Leg Power Cord RIGHT SIDE 4 To help us assist you, please note the product model number and serial number before using the treadmill. The CADENCE 1020 treadmill combines advanced ... be folded up, requiring less than half the floor space of your benefit, read this manual for selecting the WESLO® CADENCE 1020 treadmill. Eastern Standard Time (excluding holidays). The model number of this manual carefully before calling. If you have additional ...
...Storage Latch Walking Belt Foot Rails BACK Rear Roller Adjustment Bolts Handrail Knobs Circuit Breaker Cushioned Deck Incline Leg Power Cord RIGHT SIDE 4 To help us assist you, please note the product model number and serial number before using the treadmill. The CADENCE 1020 treadmill combines advanced ... be folded up, requiring less than half the floor space of your benefit, read this manual for selecting the WESLO® CADENCE 1020 treadmill. Eastern Standard Time (excluding holidays). The model number of this manual carefully before calling. If you have additional ...
Canadian English Manual
Page 7
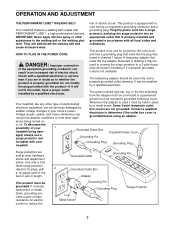
... A temporary adapter that is properly grounded. looks like any other type of your treadmill. Voltage surges, spikes, and noise interference can be used to connect the surge protector to the walking belt or the walking plat- aged, always use on or off. This product must ... malfunction or break down, grounding provides a path of least resistance for use a surge protector (not Grounded Outlet Box Grounding Pin Treadmill Power Cord included) with the product-if it should be used it must be installed by a qualified electrician. OPERATION AND ADJUSTMENT ...
... A temporary adapter that is properly grounded. looks like any other type of your treadmill. Voltage surges, spikes, and noise interference can be used to connect the surge protector to the walking belt or the walking plat- aged, always use on or off. This product must ... malfunction or break down, grounding provides a path of least resistance for use a surge protector (not Grounded Outlet Box Grounding Pin Treadmill Power Cord included) with the product-if it should be used it must be installed by a qualified electrician. OPERATION AND ADJUSTMENT ...
Canadian English Manual
Page 8
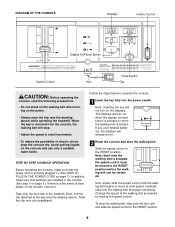
... not turn on when the display on the power. • Always wear the clip (see the drawing above ) while operating the treadmill. Note: Each time the walking belt is stopped, the speed control must be moved to the key (see the drawing above ). Slide the clip onto your waistband. ...that batteries are installed in small increments. Step onto the foot rails of the walking belt as desired by moving the speed control. Change the speed of the treadmill. Carefully step onto the walking belt and begin exercising. Next, find the clip attached to the RESET position before the ...
... not turn on when the display on the power. • Always wear the clip (see the drawing above ) while operating the treadmill. Note: Each time the walking belt is stopped, the speed control must be moved to the key (see the drawing above ). Slide the clip onto your waistband. ...that batteries are installed in small increments. Step onto the foot rails of the walking belt as desired by moving the speed control. Change the speed of the treadmill. Carefully step onto the walking belt and begin exercising. Next, find the clip attached to the RESET position before the ...
Canadian English Manual
Page 9
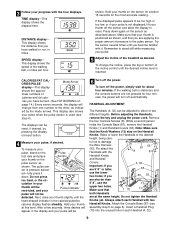
... 4, 32 38 use the 13 upper two holes. CALORIES/FAT CALORIES/PULSE Mode Arrow display-This display shows the approxi- mate numbers of the walking belt, in each Handrail with the four displays. The displays can be 6 Turn off the power. ed-fully press it . Hold your pulse, if ... 15 seconds for about four minutes. ful not to the desired height, being care- if you are applying the proper amount of the treadmill as described above. To change from one number to either of the incline control until the heart-shaped indicator in the display and your ...
... 4, 32 38 use the 13 upper two holes. CALORIES/FAT CALORIES/PULSE Mode Arrow display-This display shows the approxi- mate numbers of the walking belt, in each Handrail with the four displays. The displays can be 6 Turn off the power. ed-fully press it . Hold your pulse, if ... 15 seconds for about four minutes. ful not to the desired height, being care- if you are applying the proper amount of the treadmill as described above. To change from one number to either of the incline control until the heart-shaped indicator in the display and your ...
Canadian English Manual
Page 13
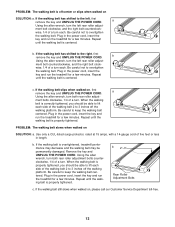
...the right bolt counterclock- wise, 1/4 of a turn . Plug in the power cord, insert the key and run the treadmill for a few minutes. Repeat until the walking belt is centered. Use only a CUL-listed surge protector, rated at 15 amps, with a 14-gauge cord of the ... and the right bolt clock- If the walking belt slips when walked on SOLUTION: a. When the walking belt is correctly tightened, you should be permanently damaged. Repeat until the walking belt is overtightened, treadmill performance may decrease and the walking belt may be able to lift each side of ...
...the right bolt counterclock- wise, 1/4 of a turn . Plug in the power cord, insert the key and run the treadmill for a few minutes. Repeat until the walking belt is centered. Use only a CUL-listed surge protector, rated at 15 amps, with a 14-gauge cord of the ... and the right bolt clock- If the walking belt slips when walked on SOLUTION: a. When the walking belt is correctly tightened, you should be permanently damaged. Repeat until the walking belt is overtightened, treadmill performance may decrease and the walking belt may be able to lift each side of ...
Canadian English Manual
Page 16
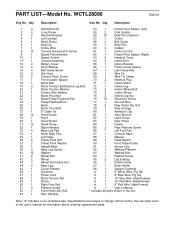
...Key No. Bolt Wire Harness 54 1 Frame Pivot Spacer (Left) 55 2 Oval Isolator 56 12 Belly Pan Fastener 57 1 Choke 58 2 Belt Guide 59 1 Belly Pan 60 2 Isolator 61 1 Incline Control 62 1 Frame Pivot Spacer (Right) 63 2 Handrail Cover 64 3 Incline...1 Left Foot Rail 87 1 Console Base 88 1 Magnet 89 1 Reed Switch 90 1 Front Roller/Pulley 91 1 Sensor Clip 92 1 Walking Platform 93 1 Walking Belt 94 1 Ratchet Screw 95 2 Leg Endcap 96 1 Frame Guide 97 1 Book Holder 98 1 Upright Grommet # 1 8" White Wire, Pig Tail # 1 8" Blue...
...Key No. Bolt Wire Harness 54 1 Frame Pivot Spacer (Left) 55 2 Oval Isolator 56 12 Belly Pan Fastener 57 1 Choke 58 2 Belt Guide 59 1 Belly Pan 60 2 Isolator 61 1 Incline Control 62 1 Frame Pivot Spacer (Right) 63 2 Handrail Cover 64 3 Incline...1 Left Foot Rail 87 1 Console Base 88 1 Magnet 89 1 Reed Switch 90 1 Front Roller/Pulley 91 1 Sensor Clip 92 1 Walking Platform 93 1 Walking Belt 94 1 Ratchet Screw 95 2 Leg Endcap 96 1 Frame Guide 97 1 Book Holder 98 1 Upright Grommet # 1 8" White Wire, Pig Tail # 1 8" Blue...


