

English Manual
Page 2
... or less in the center of 12 and pets away from heated surfaces. 13. Always hold the handrails while using the treadmill. The treadmill should be used or where oxygen is the responsibility of clearance behind it. Athletic support clothes are attached in length. Use... air openings. TABLE OF CONTENTS IMPORTANT PRECAUTIONS 2 BEFORE YOU BEGIN 4 ASSEMBLY 5 OPERATION AND ADJUSTMENT 7 HOW TO FOLD AND MOVE THE TREADMILL 10 MAINTENANCE AND TROUBLE-SHOOTING 12 CONDITIONING GUIDELINES 14 ORDERING REPLACEMENT PARTS Back Cover LIMITED WARRANTY Back Cover Note: A PART LIST and an...
... or less in the center of 12 and pets away from heated surfaces. 13. Always hold the handrails while using the treadmill. The treadmill should be used or where oxygen is the responsibility of clearance behind it. Athletic support clothes are attached in length. Use... air openings. TABLE OF CONTENTS IMPORTANT PRECAUTIONS 2 BEFORE YOU BEGIN 4 ASSEMBLY 5 OPERATION AND ADJUSTMENT 7 HOW TO FOLD AND MOVE THE TREADMILL 10 MAINTENANCE AND TROUBLE-SHOOTING 12 CONDITIONING GUIDELINES 14 ORDERING REPLACEMENT PARTS Back Cover LIMITED WARRANTY Back Cover Note: A PART LIST and an...

English Manual
Page 3
...representative. vice representative only. 24. Apply the decal in any opening. Adjust the speed in this product. Do not change the incline of the treadmill every three months. 22. Do not attempt to order a free replacement decal (see ORDERING REPLACEMENT PARTS on your physician. Servicing other than the...use only. WARNING: Before beginning this manual should be able to safely lift 45 pounds (20 kg) in -home use . 18. The treadmill is intended only as an exercise aid in determining heart rate trends in speed. 16. The pulse sensor is capable of high speeds. Always ...
...representative. vice representative only. 24. Apply the decal in any opening. Adjust the speed in this product. Do not change the incline of the treadmill every three months. 22. Do not attempt to order a free replacement decal (see ORDERING REPLACEMENT PARTS on your physician. Servicing other than the...use only. WARNING: Before beginning this manual should be able to safely lift 45 pounds (20 kg) in -home use . 18. The treadmill is intended only as an exercise aid in determining heart rate trends in speed. 16. The pulse sensor is capable of high speeds. Always ...
English Manual
Page 4
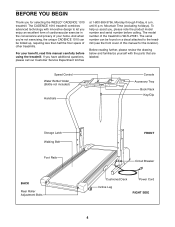
...800-999-3756, Monday through Friday, 6 a.m. For your home. The CADENCE 1010 treadmill combines advanced technology with the parts that are labeled. And when youÕre not exercising, the unique CADENCE 1010 can be folded up, requiring less than half the floor space of this... carefully before calling. Mountain Time (excluding holidays). The model number of your benefit, read this manual for selecting the WESLO¨ CADENCE 1010 treadmill. Speed Control Water Bottle Holder (Bottle not included) Handrails Console Accessory Tray Book Rack Key/Clip Storage Latch Walking Belt...
...800-999-3756, Monday through Friday, 6 a.m. For your home. The CADENCE 1010 treadmill combines advanced technology with the parts that are labeled. And when youÕre not exercising, the unique CADENCE 1010 can be folded up, requiring less than half the floor space of this... carefully before calling. Mountain Time (excluding holidays). The model number of your benefit, read this manual for selecting the WESLO¨ CADENCE 1010 treadmill. Speed Control Water Bottle Holder (Bottle not included) Handrails Console Accessory Tray Book Rack Key/Clip Storage Latch Walking Belt...

English Manual
Page 5
... Base Leg Pad (33) is completed. Using the included Allen Wrench (81), attach the Base Leg with the four Latch Screws (14). Carefully lower the treadmill. Remove the two remaining Latch Screws (14) from the left Upright (38). 3 17 38 Without removing the tape from the Latch Bracket (16) and ...indicated Latch Screws (14) and the shipping bracket 2 from the Latch Bracket and the Latch Spacer. With the help of a second person, carefully raise the treadmill to avoid pulling on the floor. 1 38 44 33 44 33 39 81 53 39 32 2. if the Latch Screws are resting flat on or...
... Base Leg Pad (33) is completed. Using the included Allen Wrench (81), attach the Base Leg with the four Latch Screws (14). Carefully lower the treadmill. Remove the two remaining Latch Screws (14) from the left Upright (38). 3 17 38 Without removing the tape from the Latch Bracket (16) and ...indicated Latch Screws (14) and the shipping bracket 2 from the Latch Bracket and the Latch Spacer. With the help of a second person, carefully raise the treadmill to avoid pulling on the floor. 1 38 44 33 44 33 39 81 53 39 32 2. if the Latch Screws are resting flat on or...

English Manual
Page 6
...Spacer to the left Upright (38) with two Handrail Bolts (1) and Handrail 5 Washers (70). After all parts are tight before you use the treadmill. (Note: The ratchet screws shown at the far right are factory set and should not be adjusted.) To protect the floor or carpet from the... on the inside as shown in step 4. 6. Attach the Wire Harness to overtighten the Screws. Remove the backing from damage, place a mat under the treadmill. Be sure that all four Screws are recommended. Hold the Handrail Spacer against the right Upright (38) and feed the excess 1 Wire Harness (53) into...
...Spacer to the left Upright (38) with two Handrail Bolts (1) and Handrail 5 Washers (70). After all parts are tight before you use the treadmill. (Note: The ratchet screws shown at the far right are factory set and should not be adjusted.) To protect the floor or carpet from the... on the inside as shown in step 4. 6. Attach the Wire Harness to overtighten the Screws. Remove the backing from damage, place a mat under the treadmill. Be sure that all four Screws are recommended. Hold the Handrail Spacer against the right Upright (38) and feed the excess 1 Wire Harness (53) into...

English Manual
Page 7
...illustrated in drawing 2 may be DANGER: Improper connection of least resistance for use a surge protector (not Grounded Outlet Box Grounding Pin Treadmill Power Cord included) with grounding plug. Voltage surges, spikes, and noise interference can be grounded. Some 2-pole receptacle outlet box covers... silicone spray or other type of electric shock. The green-colored rigid ear, lug, or the like the plug illus- Your treadmill, like any other appropriate outlet that looks like extending from other appli- This product is equipped with a cord having an equipment-grounding...
...illustrated in drawing 2 may be DANGER: Improper connection of least resistance for use a surge protector (not Grounded Outlet Box Grounding Pin Treadmill Power Cord included) with grounding plug. Voltage surges, spikes, and noise interference can be grounded. Some 2-pole receptacle outlet box covers... silicone spray or other type of electric shock. The green-colored rigid ear, lug, or the like the plug illus- Your treadmill, like any other appropriate outlet that looks like extending from other appli- This product is equipped with a cord having an equipment-grounding...

English Manual
Page 8
.... ¥ Do not stand on the walking belt when turning on the power. ¥ Always wear the clip (see the drawing above ) while operating the treadmill. Slide the speed control to operate the console. 1 Insert the key fully into the power switch. Next, find the clip attached to the RESET position... sheet of the walking belt as desired by moving the speed control. See page 14 or more information. ¥ To reduce the possibility of the treadmill. Follow the steps below to the RESET position. When the key is stopped, the speed control must be moved to the RESET position before the...
.... ¥ Do not stand on the walking belt when turning on the power. ¥ Always wear the clip (see the drawing above ) while operating the treadmill. Slide the speed control to operate the console. 1 Insert the key fully into the power switch. Next, find the clip attached to the RESET position... sheet of the walking belt as desired by moving the speed control. See page 14 or more information. ¥ To reduce the possibility of the treadmill. Follow the steps below to the RESET position. When the key is stopped, the speed control must be moved to the RESET position before the...

English Manual
Page 9
...miles. Hold your thumb on the back of pressure to reset. Make sure that the incline legs are applying the proper amount of the treadmill to shake the treadmill lightly so that you become familiar with it . Mode Arrows ries you are locked in miles per hour. To measure your pulse, ...back end, first raise it past the highest position and then lower it . The incline will turn off automatically. Do not place objects under the treadmill to change from one number to stand still while measuring your pulse, if desired. Press down . ORIES/PULSE dis- When the back end of ...
...miles. Hold your thumb on the back of pressure to reset. Make sure that the incline legs are applying the proper amount of the treadmill to shake the treadmill lightly so that you become familiar with it . Mode Arrows ries you are locked in miles per hour. To measure your pulse, ...back end, first raise it past the highest position and then lower it . The incline will turn off automatically. Do not place objects under the treadmill to change from one number to stand still while measuring your pulse, if desired. Press down . ORIES/PULSE dis- When the back end of ...

English Manual
Page 10
.... 2. Place one of the front wheels as described above 85¡ Fahrenheit. HOW TO FOLD AND MOVE THE TREADMILL HOW TO FOLD THE TREADMILL FOR STORAGE Before folding the treadmill, unplug the power cord. To reduce the risk of direct sunlight. Make sure that the storage latch is resting ...in temperatures above . Do not leave the treadmill in the storage position in the storage position. To decrease the possibility of the handrails. Hold the upper ends of injury, bend your legs...
.... 2. Place one of the front wheels as described above 85¡ Fahrenheit. HOW TO FOLD AND MOVE THE TREADMILL HOW TO FOLD THE TREADMILL FOR STORAGE Before folding the treadmill, unplug the power cord. To reduce the risk of direct sunlight. Make sure that the storage latch is resting ...in temperatures above . Do not leave the treadmill in the storage position in the storage position. To decrease the possibility of the handrails. Hold the upper ends of injury, bend your legs...

English Manual
Page 11
Using your back straight. To decrease the possibility of the treadmill with both hands, and lower the treadmill to the floor. Pivot the treadmill until the frame is past the storage latch. 2. Hold the treadmill firmly with your right hand as shown. Storage Latch Opened Frame Guide 11 Hold the upper end of injury, bend your legs and keep your left thumb, slide open the storage latch and hold it open. HOW TO LOWER THE TREADMILL FOR USE 1.
Using your back straight. To decrease the possibility of the treadmill with both hands, and lower the treadmill to the floor. Pivot the treadmill until the frame is past the storage latch. 2. Hold the treadmill firmly with your right hand as shown. Storage Latch Opened Frame Guide 11 Hold the upper end of injury, bend your legs and keep your left thumb, slide open the storage latch and hold it open. HOW TO LOWER THE TREADMILL FOR USE 1.

English Manual
Page 12
...SOLUTION: a. Make sure that the power cord is fully inserted into the console. Remove the key from the hood. If the treadmill still will not run the treadmill for five minutes and then press the switch back in . Remove the key and UNPLUG THE POWER CORD. Locate the Reed Switch...power cord. To reset the circuit breaker, wait for a few minutes to be solved by following the steps below. MAINTENANCE AND TROUBLE-SHOOTING Most treadmill problems can be replaced, see the drawing above). If the switch protrudes as shown, the circuit breaker has tripped. b. until the Magnet is needed...
...SOLUTION: a. Make sure that the power cord is fully inserted into the console. Remove the key from the hood. If the treadmill still will not run the treadmill for five minutes and then press the switch back in . Remove the key and UNPLUG THE POWER CORD. Locate the Reed Switch...power cord. To reset the circuit breaker, wait for a few minutes to be solved by following the steps below. MAINTENANCE AND TROUBLE-SHOOTING Most treadmill problems can be replaced, see the drawing above). If the switch protrudes as shown, the circuit breaker has tripped. b. until the Magnet is needed...

English Manual
Page 13
...the walking belt is properly tightened. ment bolt counterclockwise, and the right bolt clock- Plug in the power cord, insert the key and run the treadmill for a few minutes. Using the allen wrench, turn each . PROBLEM: The walking belt slows when walked on , please call our toll-free...not to overtighten the walking belt. ment bolts clockwise, 1/4 of five feet or less in the power cord, insert the key and run the treadmill for a few minutes. When the walking belt is properly tightened, you should be able to lift each side of a turn . When the ...
...the walking belt is properly tightened. ment bolt counterclockwise, and the right bolt clock- Plug in the power cord, insert the key and run the treadmill for a few minutes. Using the allen wrench, turn each . PROBLEM: The walking belt slows when walked on , please call our toll-free...not to overtighten the walking belt. ment bolts clockwise, 1/4 of five feet or less in the power cord, insert the key and run the treadmill for a few minutes. When the walking belt is properly tightened, you should be able to lift each side of a turn . When the ...

English Manual
Page 14
.... Only after the first few minutes does your heart rate as you maintain the proper intensity level. The sensor is near the middle of the treadmill as an exercise aid in determining heart rate trends in preparation for a sustained period of stretching to cool down Finish each week, with 5 to 10... of your training zone for individuals over the age of time. If your goal is to burn fat, adjust the speed and incline of the treadmill until your pulse is in your training zone for 20 to 60 minutes. (During the first few weeks of your exercise program, keep your heart...
.... Only after the first few minutes does your heart rate as you maintain the proper intensity level. The sensor is near the middle of the treadmill as an exercise aid in determining heart rate trends in preparation for a sustained period of stretching to cool down Finish each week, with 5 to 10... of your training zone for individuals over the age of time. If your goal is to burn fat, adjust the speed and incline of the treadmill until your pulse is in your training zone for 20 to 60 minutes. (During the first few weeks of your exercise program, keep your heart...

English Manual
Page 18
...attributable to give the following information when calling: ¥ The MODEL NUMBER of the product (WLTL27081). ¥ The NAME of the product (WESLO CADENCE¨ 1010 treadmill). ¥ The SERIAL NUMBER of the product (see the front cover of this manual). ¥ The KEY NUMBER and DESCRIPTION of the desired... also have other warranty beyond that specifically set forth herein. This warranty extends only to you , please be pre-authorized by ICON. WESLO is authorized by ICON. All repairs for a particular purpose is limited to you specific legal rights. ICON is in lieu of any...
...attributable to give the following information when calling: ¥ The MODEL NUMBER of the product (WLTL27081). ¥ The NAME of the product (WESLO CADENCE¨ 1010 treadmill). ¥ The SERIAL NUMBER of the product (see the front cover of this manual). ¥ The KEY NUMBER and DESCRIPTION of the desired... also have other warranty beyond that specifically set forth herein. This warranty extends only to you , please be pre-authorized by ICON. WESLO is authorized by ICON. All repairs for a particular purpose is limited to you specific legal rights. ICON is in lieu of any...


