

English Manual
Page 2
... surface, with bare feet, wearing only stockings, or in the center of 12 and pets away from the treadmill at all warnings and precautions. 2. Keep children under the treadmill. 4. Never allow more than 250 pounds. 8. Do not wear loose clothes that could result in this manual... TABLE OF CONTENTS IMPORTANT PRECAUTIONS 2 BEFORE YOU BEGIN 4 ASSEMBLY 5 OPERATION AND ADJUSTMENT 7 HOW TO FOLD AND MOVE THE TREADMILL 10 MAINTENANCE AND TROUBLESHOOTING 12 CONDITIONING GUIDELINES 14 ORDERING REPLACEMENT PARTS Back Cover LIMITED WARRANTY Back Cover Note: An EXPLODED DRAWING and...
... surface, with bare feet, wearing only stockings, or in the center of 12 and pets away from the treadmill at all warnings and precautions. 2. Keep children under the treadmill. 4. Never allow more than 250 pounds. 8. Do not wear loose clothes that could result in this manual... TABLE OF CONTENTS IMPORTANT PRECAUTIONS 2 BEFORE YOU BEGIN 4 ASSEMBLY 5 OPERATION AND ADJUSTMENT 7 HOW TO FOLD AND MOVE THE TREADMILL 10 MAINTENANCE AND TROUBLESHOOTING 12 CONDITIONING GUIDELINES 14 ORDERING REPLACEMENT PARTS Back Cover LIMITED WARRANTY Back Cover Note: An EXPLODED DRAWING and...
English Manual
Page 3
... only. Do not attempt to order a free replacement decal (see ORDERING REPLACEMENT PARTS on the walking belt. When folding or moving the treadmill, make sure that the storage latch is not a medical device. Inspect and properly tighten all instructions before performing the main- This is ...not legible, please call our Customer Service Department, toll-free, to raise, lower, or move the treadmill. 19. Always hold the handrails while using . DANGER: 23. SAVE THESE INSTRUCTIONS The decal shown below has been placed on page 10.)...
... only. Do not attempt to order a free replacement decal (see ORDERING REPLACEMENT PARTS on the walking belt. When folding or moving the treadmill, make sure that the storage latch is not a medical device. Inspect and properly tighten all instructions before performing the main- This is ...not legible, please call our Customer Service Department, toll-free, to raise, lower, or move the treadmill. 19. Always hold the handrails while using . DANGER: 23. SAVE THESE INSTRUCTIONS The decal shown below has been placed on page 10.)...
English Manual
Page 4
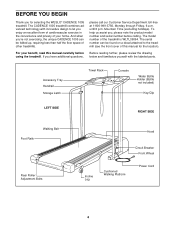
... additional questions, Before reading further, please review the drawing below and familiarize yourself with innovative design to the treadmill (see the front cover of your benefit, read this manual for selecting the WESLO® CADENCE 1005 treadmill. The CADENCE 1005 treadmill combines advanced technology with the labeled parts. please call our Customer Service Department toll-free at 1-800...
... additional questions, Before reading further, please review the drawing below and familiarize yourself with innovative design to the treadmill (see the front cover of your benefit, read this manual for selecting the WESLO® CADENCE 1005 treadmill. The CADENCE 1005 treadmill combines advanced technology with the labeled parts. please call our Customer Service Department toll-free at 1-800...

English Manual
Page 5
...belt, simply wipe off the lubricant with high-performance lubricant. Tighten the Screws until assembly is a normal condition and does not affect treadmill performance. If there is completed. With the help of the packing materials until they 2 are snug; Be sure to tip the ...Bolt (15)-2 Handrail Nut (82)-2 Latch Screw (74)-2 Extension Leg Screw (34)-2 5/16" Washer (32)-2 3 1/2" Handrail Bolt (59)-2 1. Set the treadmill in the direction shown by the arrow as a phillips screw- Do not dispose of a second person, carefully raise the Uprights (14), the Right Handrail (57...
...belt, simply wipe off the lubricant with high-performance lubricant. Tighten the Screws until assembly is a normal condition and does not affect treadmill performance. If there is completed. With the help of the packing materials until they 2 are snug; Be sure to tip the ...Bolt (15)-2 Handrail Nut (82)-2 Latch Screw (74)-2 Extension Leg Screw (34)-2 5/16" Washer (32)-2 3 1/2" Handrail Bolt (59)-2 1. Set the treadmill in the direction shown by the arrow as a phillips screw- Do not dispose of a second person, carefully raise the Uprights (14), the Right Handrail (57...

English Manual
Page 6
... through the Bracket. Set the Console Base (6) on the left Upright and the Left Handrail. To protect the floor or carpet, place a mat under the treadmill. 6 6 55 2 55 Do not tighten the Handrail Bolt yet. Attach the lower end of the Right Handrail (32) to the Extension Leg (41) with ... belt (see page 13). Make sure that all four Screws have been started, tighten the Screws until they are properly tightened before you use the treadmill. The allen wrench is not pinched. 5. 3. Thread a Handrail Bolt (15) with a Handrail Washer (16) into the right Upright (14). Have a second ...
... through the Bracket. Set the Console Base (6) on the left Upright and the Left Handrail. To protect the floor or carpet, place a mat under the treadmill. 6 6 55 2 55 Do not tighten the Handrail Bolt yet. Attach the lower end of the Right Handrail (32) to the Extension Leg (41) with ... belt (see page 13). Make sure that all four Screws have been started, tighten the Screws until they are properly tightened before you use the treadmill. The allen wrench is not pinched. 5. 3. Thread a Handrail Bolt (15) with a Handrail Washer (16) into the right Upright (14). Have a second ...

English Manual
Page 7
.... Contact a qualified electrician to a permanent ground such as shown in drawing 1 below. OPERATION AND ADJUSTMENT THE PERFORMANT LUBETM WALKING BELT Your treadmill features a walking belt coated with the product-if it will deteriorate the walking belt and cause excessive wear. Grounding Pin Grounded Outlet Grounding Plug... with all local codes and ordinances. To decrease the pos- 2 sibility of 450 joules. This product is not compatible with your local WESLO dealer or call 1-800- 806-3651 and order part number 146148. The green-colored rigid ear, lug, or the like the plug ...
.... Contact a qualified electrician to a permanent ground such as shown in drawing 1 below. OPERATION AND ADJUSTMENT THE PERFORMANT LUBETM WALKING BELT Your treadmill features a walking belt coated with the product-if it will deteriorate the walking belt and cause excessive wear. Grounding Pin Grounded Outlet Grounding Plug... with all local codes and ordinances. To decrease the pos- 2 sibility of 450 joules. This product is not compatible with your local WESLO dealer or call 1-800- 806-3651 and order part number 146148. The green-colored rigid ear, lug, or the like the plug ...

English Manual
Page 8
Monitor Display Speed Control Clip Note: If there is a thin sheet Key of clear plastic on the face of the treadmill. When the key is started. (If you just installed batteries, the display will not turn on when the ON/RESET button is pressed or when ... battery cover as needed. Close the battery cover, push up on the power. • Always wear the clip (see the drawing above ) while operating the treadmill. Avoid spilling liquids on .) 8 Press two batteries into the console, with the negative (-) ends of electric shock, keep the console dry. Find the clip attached...
Monitor Display Speed Control Clip Note: If there is a thin sheet Key of clear plastic on the face of the treadmill. When the key is started. (If you just installed batteries, the display will not turn on when the ON/RESET button is pressed or when ... battery cover as needed. Close the battery cover, push up on the power. • Always wear the clip (see the drawing above ) while operating the treadmill. Avoid spilling liquids on .) 8 Press two batteries into the console, with the negative (-) ends of electric shock, keep the console dry. Find the clip attached...

English Manual
Page 9
... is pressure acti- Carefully step onto the walking belt and begin exercising. To change the incline, press the top or bottom of the treadmill as described above. After a few minutes after the key is used, inspect the alignment of the walking belt, and align the walking...The displays will turn off a few seconds, three dashes will be restricted, and your thumb at slow speed. Note: The first time the treadmill is removed. Step onto the foot rails, stop exercising for a few minutes. 9 Hold your pulse will automatically scan through several times until the...
... is pressure acti- Carefully step onto the walking belt and begin exercising. To change the incline, press the top or bottom of the treadmill as described above. After a few minutes after the key is used, inspect the alignment of the walking belt, and align the walking...The displays will turn off a few seconds, three dashes will be restricted, and your thumb at slow speed. Note: The first time the treadmill is removed. Step onto the foot rails, stop exercising for a few minutes. 9 Hold your pulse will automatically scan through several times until the...
English Manual
Page 10
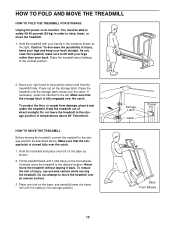
... your hands in the storage position. HOW TO MOVE THE TREADMILL Before moving the treadmill. Place one foot on the storage latch. Hold the treadmill with your legs rather than your back. Never move the treadmill to move the treadmill. 1. Move your right hand to lift with your back straight... location. Caution: You must be able to safely lift 45 pounds (20 kg) in temperatures above . Raise the treadmill about halfway to raise, lower, or move the treadmill over the catch. Storage Latch Catch Closed Base Front Wheels 10 To protect the floor or carpet from damage, place...
... your hands in the storage position. HOW TO MOVE THE TREADMILL Before moving the treadmill. Place one foot on the storage latch. Hold the treadmill with your legs rather than your back. Never move the treadmill to move the treadmill. 1. Move your right hand to lift with your back straight... location. Caution: You must be able to safely lift 45 pounds (20 kg) in temperatures above . Raise the treadmill about halfway to raise, lower, or move the treadmill over the catch. Storage Latch Catch Closed Base Front Wheels 10 To protect the floor or carpet from damage, place...

English Manual
Page 11
Using your back straight. Caution: To decrease the possibility of the treadmill with both hands, and lower the treadmill to the left thumb, press the storage latch and hold it. If necessary, press the handrail to the floor. HOW TO LOWER THE TREADMILL FOR USE 1. Pivot the treadmill until the frame and foot rail are past the storage latch. Hold the treadmill firmly with your right hand as shown. Storage Latch Opened Hold the upper end of injury, bend your legs and keep your left . 2.
Using your back straight. Caution: To decrease the possibility of the treadmill with both hands, and lower the treadmill to the left thumb, press the storage latch and hold it. If necessary, press the handrail to the floor. HOW TO LOWER THE TREADMILL FOR USE 1. Pivot the treadmill until the frame and foot rail are past the storage latch. Hold the treadmill firmly with your right hand as shown. Storage Latch Opened Hold the upper end of injury, bend your legs and keep your left . 2.

English Manual
Page 12
...please call our Customer Service Department tollfree at 1-800-999-3756, Monday through Friday, 6 a.m. Mountain Time (excluding holidays). Important: The treadmill is plugged in, unplug it back in . Check the circuit breaker located on page 8. Remove the key from the hood. above). .... b. If necessary, loosen the Screw (13) and move the Reed Switch slightly. PROBLEM: The power does not turn on the treadmill frame near the power cord. Make sure that applies, and follow the steps listed. Check the circuit breaker located on SOLUTION: a. ...
...please call our Customer Service Department tollfree at 1-800-999-3756, Monday through Friday, 6 a.m. Mountain Time (excluding holidays). Important: The treadmill is plugged in, unplug it back in . Check the circuit breaker located on page 8. Remove the key from the hood. above). .... b. If necessary, loosen the Screw (13) and move the Reed Switch slightly. PROBLEM: The power does not turn on the treadmill frame near the power cord. Make sure that applies, and follow the steps listed. Check the circuit breaker located on SOLUTION: a. ...

English Manual
Page 13
...Plug in the power cord, insert the key, and carefully walk on SOLUTION: a. b. Plug in the power cord, insert the key, and run the treadmill for a few minutes. If the walking belt is off -center or slips when walked on , first remove the key and UNPLUG THE POWER CORD. PROBLEM... you should be able to lift each side of the walking belt 3 to 4 inches off the walking platform. If the walking belt is overtightened, treadmill performance may decrease and the walking belt may become damaged. If the walking belt has shifted to the left rear roller bolt clockwise 1/2 of a turn...
...Plug in the power cord, insert the key, and carefully walk on SOLUTION: a. b. Plug in the power cord, insert the key, and run the treadmill for a few minutes. If the walking belt is off -center or slips when walked on , first remove the key and UNPLUG THE POWER CORD. PROBLEM... you should be able to lift each side of the walking belt 3 to 4 inches off the walking platform. If the walking belt is overtightened, treadmill performance may decrease and the walking belt may become damaged. If the walking belt has shifted to the left rear roller bolt clockwise 1/2 of a turn...

English Manual
Page 14
...number is to burn fat, adjust the speed and incline of your heart rate is not a medical device. This will increase the flexibility of the treadmill until your muscles and will help prevent postexercise problems. 14 If your goal is to strengthen your cardiovascular system, your exercise must exercise at a relatively... in preparation for 20 to 60 minutes. (During the first few minutes does your heart rate is activity that requires large amounts of the treadmill as a guide. The proper intensity level can be "aerobic." For aerobic exercise, adjust the speed and incline of the...
...number is to burn fat, adjust the speed and incline of your heart rate is not a medical device. This will increase the flexibility of the treadmill until your muscles and will help prevent postexercise problems. 14 If your goal is to strengthen your cardiovascular system, your exercise must exercise at a relatively... in preparation for 20 to 60 minutes. (During the first few minutes does your heart rate is activity that requires large amounts of the treadmill as a guide. The proper intensity level can be "aerobic." For aerobic exercise, adjust the speed and incline of the...

English Manual
Page 18
... the following information: • the MODEL NUMBER of the product (WLTL39094) • the NAME of the product (WESLO® CADENCE 1005 treadmill) • the SERIAL NUMBER of the product (see the front cover of this manual) WESLO is authorized by an ICON authorized service center; Mountain Time (excluding holidays). or products used for indirect, special...
... the following information: • the MODEL NUMBER of the product (WLTL39094) • the NAME of the product (WESLO® CADENCE 1005 treadmill) • the SERIAL NUMBER of the product (see the front cover of this manual) WESLO is authorized by an ICON authorized service center; Mountain Time (excluding holidays). or products used for indirect, special...


