

English Manual
Page 2
... of approximately five feet in this manual. Weslo assumes no responsibility for personal injury or property damage sustained by or through the use . 10. Position the treadmill on the treadmill at least 8 feet of high speeds. Do not place the treadmill on the walking belt. The roller guards ...must be 1/8 inch from the treadmill during operation. Never use only a 14-gauge general...
... of approximately five feet in this manual. Weslo assumes no responsibility for personal injury or property damage sustained by or through the use . 10. Position the treadmill on the treadmill at least 8 feet of high speeds. Do not place the treadmill on the walking belt. The roller guards ...must be 1/8 inch from the treadmill during operation. Never use only a 14-gauge general...

English Manual
Page 3
... Operation and Adjustment Trouble-Shooting and Storage Conditioning Guidelines Part List Exploded Drawing Ordering Replacement Parts Limited Warranty 3 4 5 6 9 10 11 Back Cover Back Cover BEFORE YOU BEGIN Thank you , please mention your product model number and serial number when calling. until...Friday, 6 a.m. For your convenience, in the privacy of this equipment. To help us assist you for selecting the Weslo Cadence 10mph treadmill. Incline Control Side Rail Safety Key/Clip Handrail FRONT Walking Belt Roller Guards BACK Rear Roller Adjustment Bolts Circuit Breaker ...
... Operation and Adjustment Trouble-Shooting and Storage Conditioning Guidelines Part List Exploded Drawing Ordering Replacement Parts Limited Warranty 3 4 5 6 9 10 11 Back Cover Back Cover BEFORE YOU BEGIN Thank you , please mention your product model number and serial number when calling. until...Friday, 6 a.m. For your convenience, in the privacy of this equipment. To help us assist you for selecting the Weslo Cadence 10mph treadmill. Incline Control Side Rail Safety Key/Clip Handrail FRONT Walking Belt Roller Guards BACK Rear Roller Adjustment Bolts Circuit Breaker ...

English Manual
Page 4
... the Side Rail and Frame. Make sure that all parts are tightened securely before beginning. 1. Please read each step carefully before using the treadmill. 1 7 O 2 10-- Note: If the Side Rail cannot be inserted into the opening in the Frame (57). Slide the upper end of the Side Rail (1) with the ... Bolt (72) through the metal plate under the Frame and thread the Side Rail Nut (71) onto the end of the Console (7). ASSEMBLY Set the treadmill in the Upright Post for the following steps. 31 ,tt& 33 32 2.
... the Side Rail and Frame. Make sure that all parts are tightened securely before beginning. 1. Please read each step carefully before using the treadmill. 1 7 O 2 10-- Note: If the Side Rail cannot be inserted into the opening in the Frame (57). Slide the upper end of the Side Rail (1) with the ... Bolt (72) through the metal plate under the Frame and thread the Side Rail Nut (71) onto the end of the Console (7). ASSEMBLY Set the treadmill in the Upright Post for the following steps. 31 ,tt& 33 32 2.
English Manual
Page 5
...electric current to determine if the outlet box cover is used to connect this break-in a risk of least resistance for 10 minutes to slow. TREADMILL OPERATION L / Read the instructions below before using an adapter. 1 Grounded Outlet Box 2 Grounded Outlet Box fl u Grounding...• 0 90 Grounding Pin • 0• Grounding Plug Grounding Pin Grounded Outlet Lug Metal Screw MAINTENANCE-FREE WALKING PLATFORM This treadmill features a walking platform coated with a qualified electrician or serviceman if you are not grounded. Such substances will not fit the outlet,...
...electric current to determine if the outlet box cover is used to connect this break-in a risk of least resistance for 10 minutes to slow. TREADMILL OPERATION L / Read the instructions below before using an adapter. 1 Grounded Outlet Box 2 Grounded Outlet Box fl u Grounding...• 0 90 Grounding Pin • 0• Grounding Plug Grounding Pin Grounded Outlet Lug Metal Screw MAINTENANCE-FREE WALKING PLATFORM This treadmill features a walking platform coated with a qualified electrician or serviceman if you are not grounded. Such substances will not fit the outlet,...

English Manual
Page 6
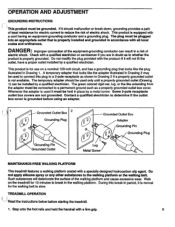
...the safety key to the waistband of the control furthest from you until the walking belt begins to measure the incline of the treadmill can be turned to the Electronic Monitor Operation Guide accompanying this manual. If you . Mountain Time (excluding holidays). Turning the... right. MANUAL INCUNE ADJUSTMENT To vary the intensity of your clothing. IMPORTANT: Always wear the clip when operating the treadmill. TROUBLE-SHOOTING AND STORAGE Most treadmill problems can be pulled from the console. Note: The knob must first be solved by following the simple steps below...
...the safety key to the waistband of the control furthest from you until the walking belt begins to measure the incline of the treadmill can be turned to the Electronic Monitor Operation Guide accompanying this manual. If you . Mountain Time (excluding holidays). Turning the... right. MANUAL INCUNE ADJUSTMENT To vary the intensity of your clothing. IMPORTANT: Always wear the clip when operating the treadmill. TROUBLE-SHOOTING AND STORAGE Most treadmill problems can be pulled from the console. Note: The knob must first be solved by following the simple steps below...
English Manual
Page 7
... Insert the safety key into the console and move ) the key to your collar. To reset the circuit breaker, allow the treadmill to cool for 10 minutes to cool for incline adjustment instructions.) Gently press the ends of the frame near the power cord. Reset 2. If the ...object, until the bubble in . (See the drawing above.) b. SYMPTOM: THE INCLINE INDICATOR NEEDS ADJUSTMENT a. Check the circuit breaker located on the treadmill frame near the power cord. Check the circuit breaker located on the front of the indicator, using a cotton swab saturated with denatured alcohol. 5. ...
... Insert the safety key into the console and move ) the key to your collar. To reset the circuit breaker, allow the treadmill to cool for 10 minutes to cool for incline adjustment instructions.) Gently press the ends of the frame near the power cord. Reset 2. If the ...object, until the bubble in . (See the drawing above.) b. SYMPTOM: THE INCLINE INDICATOR NEEDS ADJUSTMENT a. Check the circuit breaker located on the treadmill frame near the power cord. Check the circuit breaker located on the front of the indicator, using a cotton swab saturated with denatured alcohol. 5. ...

English Manual
Page 8
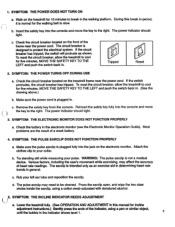
.... SYMPTOM: THE WALKING BELT IS OFF-CENTER OR SLIPS WHEN WALKED ON a. Repeat as necessary until the tension of the walking belt is overtightened, treadmill performance may be reduced and the walking belt permanently damaged. The center of the walking belt should be able to break in period, it is... normal for 10 minutes to lift each . Remove the bolts and nut from the electronic monitor when storing. 8 Lay the side rail on , first TURN THE POWER...
.... SYMPTOM: THE WALKING BELT IS OFF-CENTER OR SLIPS WHEN WALKED ON a. Repeat as necessary until the tension of the walking belt is overtightened, treadmill performance may be reduced and the walking belt permanently damaged. The center of the walking belt should be able to break in period, it is... normal for 10 minutes to lift each . Remove the bolts and nut from the electronic monitor when storing. 8 Lay the side rail on , first TURN THE POWER...
English Manual
Page 12
...). All products for a period of ninety (90) days from the date of this manual. ^ (162-7 on51 LIMITED WARRANTY WESLO, Inc. ("WESLO"), warrants this product to be free from page 10 of the product (Weslo Cadence 10mph treadmill). 3. This warranty gives you specific legal rights. This warranty extends only to give the following information: 1. No other warranty...
...). All products for a period of ninety (90) days from the date of this manual. ^ (162-7 on51 LIMITED WARRANTY WESLO, Inc. ("WESLO"), warrants this product to be free from page 10 of the product (Weslo Cadence 10mph treadmill). 3. This warranty gives you specific legal rights. This warranty extends only to give the following information: 1. No other warranty...


