

English Manual
Page 4
... surfaces. wear athletic shoes. Athletic support clothes are used only by an authorized service representative only. 10. The pulse earclip is intended only as described in this the treadmill. No other than the procedures in use the treadmill with a three-wire conductor. 9 Never move the on/off switch to the "off" position when...
... surfaces. wear athletic shoes. Athletic support clothes are used only by an authorized service representative only. 10. The pulse earclip is intended only as described in this the treadmill. No other than the procedures in use the treadmill with a three-wire conductor. 9 Never move the on/off switch to the "off" position when...

English Manual
Page 5
If you have made them the most popular way to the treadmill (see the front cover of the 10.0xt, you , please note the product model number and serial number before using the treadmill. Mountain Time (excluding holidays). To help us assist you can be found on a decal... review the drawing below and familiarize yourself with the parts that the 10.0xt offers. BEFORE YOU BEGIN Thank you 'll enjoy the performance and uncompromising quality that are a beginner or a seasoned athlete, you for selecting the WESLO CADENCE® 10.0xt treadmill. The natural motion and versatility of the...
If you have made them the most popular way to the treadmill (see the front cover of the 10.0xt, you , please note the product model number and serial number before using the treadmill. Mountain Time (excluding holidays). To help us assist you can be found on a decal... review the drawing below and familiarize yourself with the parts that the 10.0xt offers. BEFORE YOU BEGIN Thank you 'll enjoy the performance and uncompromising quality that are a beginner or a seasoned athlete, you for selecting the WESLO CADENCE® 10.0xt treadmill. The natural motion and versatility of the...

English Manual
Page 6
... the side of the Frame (75). Using the 7/32" Allen Wrench (17), tighten the 3/8" x 1" Bolt (5) in a cleared area and remove all packing materials. Set the treadmill in each Upright. 6 2. Insert a 3/8" x 3 1/2" Bolt (42), with an Upright Washer (41), into the side of the Frame (75). 3. Tighten the Bolt into the other hole...
... the side of the Frame (75). Using the 7/32" Allen Wrench (17), tighten the 3/8" x 1" Bolt (5) in a cleared area and remove all packing materials. Set the treadmill in each Upright. 6 2. Insert a 3/8" x 3 1/2" Bolt (42), with an Upright Washer (41), into the side of the Frame (75). 3. Tighten the Bolt into the other hole...

English Manual
Page 7
The use of the Pulse Earclip is explained in the indicated location. Press the 3/16" Allen Wrench (94) into the Wrench Clip. Remove the paper backing from the Wrench Clip (95). Press the Wrench Clip onto the Frame (75) in the section titled OPERATING THE MONITOR MODES on page 11. 5 Pulse Earclip Clothes Clip 6. Slide the metal Clothes Clip onto the Pulse Earclip in the indicated location. Note: To protect the floor, a covering should be placed under the treadmill. 6 95 75 4 7 Make sure that all parts are tightened before using the treadmill. 5.
The use of the Pulse Earclip is explained in the indicated location. Press the 3/16" Allen Wrench (94) into the Wrench Clip. Remove the paper backing from the Wrench Clip (95). Press the Wrench Clip onto the Frame (75) in the section titled OPERATING THE MONITOR MODES on page 11. 5 Pulse Earclip Clothes Clip 6. Slide the metal Clothes Clip onto the Pulse Earclip in the indicated location. Note: To protect the floor, a covering should be placed under the treadmill. 6 95 75 4 7 Make sure that all parts are tightened before using the treadmill. 5.
English Manual
Page 8
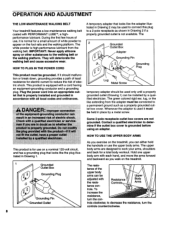
... lubricant from the adapter must be connected to determine if the outlet box cover is normal for a small amount of use on the treadmill. The 2 Grounded Outlet Box Adapter • • Grounding Pin 0 Grounding Plug This product must be grounded. trols clockwise; HOW... outlet is for use , it should be installed by a metal screw. The resis- OPERATION AND ADJUSTMENT THE LOW-MAINTENANCE WALKING BELT Your treadmill features a low-maintenance walking belt coated with all local codes and ordinances. • 'A:7M:MMOMPOW:§V:WW:M.Va Lug Metal Screw temporary ...
... lubricant from the adapter must be connected to determine if the outlet box cover is normal for a small amount of use on the treadmill. The 2 Grounded Outlet Box Adapter • • Grounding Pin 0 Grounding Plug This product must be grounded. trols clockwise; HOW... outlet is for use , it should be installed by a metal screw. The resis- OPERATION AND ADJUSTMENT THE LOW-MAINTENANCE WALKING BELT Your treadmill features a low-maintenance walking belt coated with all local codes and ordinances. • 'A:7M:MMOMPOW:§V:WW:M.Va Lug Metal Screw temporary ...

English Manual
Page 9
... it off switch located near the power "On" 6 Position cord is pressed, the speed will increase by a cord to 10 mph. Always wear the clip while operating the treadmill .4VAPV For your clothing. it . If this occurs, remove the SAFEKEY, wait for five seconds and then reinsert it w...:,the SeleCt.- Plug in the speed display. The speed of the walking belt is a thin sheet of clear plastic on the frame rails of the treadmill.' . Find the clip ARNIN : After the SPEED attached by 0.1 mile per hour (mph), w OHIO SPEED A beginning at the right). VIII A. 11...
... it off switch located near the power "On" 6 Position cord is pressed, the speed will increase by a cord to 10 mph. Always wear the clip while operating the treadmill .4VAPV For your clothing. it . If this occurs, remove the SAFEKEY, wait for five seconds and then reinsert it w...:,the SeleCt.- Plug in the speed display. The speed of the walking belt is a thin sheet of clear plastic on the frame rails of the treadmill.' . Find the clip ARNIN : After the SPEED attached by 0.1 mile per hour (mph), w OHIO SPEED A beginning at the right). VIII A. 11...

English Manual
Page 10
.... When the first segment is pressed, the incline will continue in the left column show 10% when the incline is set to last for the treadmill to reach the selected incline setting. The program will change by 0.5 mph each segment. and... handrails, step carefully onto the walking belt and begin exercis- If you select the RUN mode, the speed range will control the speed of the treadmill automatically according to preset programs you have U CIOCIOCI u 0 0 0000 U 0 0 0 0 0 0 V U 00000 0 18 0 0 0 0 0 V V 00000 V L. 00000 u LI 0 0 0 0 0 0 0 0 0000 ti O 0 0000...
.... When the first segment is pressed, the incline will continue in the left column show 10% when the incline is set to last for the treadmill to reach the selected incline setting. The program will change by 0.5 mph each segment. and... handrails, step carefully onto the walking belt and begin exercis- If you select the RUN mode, the speed range will control the speed of the treadmill automatically according to preset programs you have U CIOCIOCI u 0 0 0000 U 0 0 0 0 0 0 V U 00000 0 18 0 0 0 0 0 V V 00000 V L. 00000 u LI 0 0 0 0 0 0 0 0 0000 ti O 0 0000...

English Manual
Page 11
... off " position. (See the drawing near the bottom of page 9.) INFORMATION MODE The console features an information mode that keeps track of 10 seconds up to stand still while measuring your pulse will be helpful to 99,999 miles. The DISTANCE and PULSE/CALORIES displays together will show...displays together will show the trip time, up to set . To exit the information mode, remove the SAFEKEY. 11 This safety feature prevents the-treadmill from the console. Plug the pulse earclip into the console. In addition, move the on the CALORIES button will light. A time goal can ...
... off " position. (See the drawing near the bottom of page 9.) INFORMATION MODE The console features an information mode that keeps track of 10 seconds up to stand still while measuring your pulse will be helpful to 99,999 miles. The DISTANCE and PULSE/CALORIES displays together will show...displays together will show the trip time, up to set . To exit the information mode, remove the SAFEKEY. 11 This safety feature prevents the-treadmill from the console. Plug the pulse earclip into the console. In addition, move the on the CALORIES button will light. A time goal can ...
English Manual
Page 12
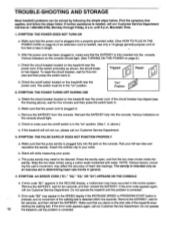
...aid in determining heart rate trends in general. 4. If the circuit breaker has tripped (see the drawing above .) e. c. Do not operate 12 the treadmill until the problem is corrected. b. Tripped Reset d. Check the circuit breaker located on page 8.) If an extension cord is needed , use only a...your left ear lobe and reposition the earclip. If the error code appears again, call our Customer Service Department. 3. Do not operate the treadmill until 6 p.m. Error code "E2" may affect the accuracy of five feet or less in length. If the error code appears again, ...
...aid in determining heart rate trends in general. 4. If the circuit breaker has tripped (see the drawing above .) e. c. Do not operate 12 the treadmill until the problem is corrected. b. Tripped Reset d. Check the circuit breaker located on page 8.) If an extension cord is needed , use only a...your left ear lobe and reposition the earclip. If the error code appears again, call our Customer Service Department. 3. Do not operate the treadmill until 6 p.m. Error code "E2" may affect the accuracy of five feet or less in length. If the error code appears again, ...
English Manual
Page 13
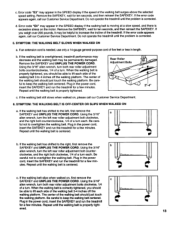
...If the walking belt still slows when walked on , first remove the SAFEKEY and UNPLUG THE POWER CORD. c. Do not operate the treadmill until the walking belt is correctly tightened, you should be able to 4 inches off the walking platform. If you should be able ... walking belt should just touch the walking platform. The center of five feet or less in the power cord, insert the SAFEKEY and run the treadmill for a few minutes. Repeat until the problem is corrected. 5. Rear Roller Adjustment Bolts 3"-4" c. b. clockwise, and the right bolt clockwise, 1/4 of...
...If the walking belt still slows when walked on , first remove the SAFEKEY and UNPLUG THE POWER CORD. c. Do not operate the treadmill until the walking belt is correctly tightened, you should be able to 4 inches off the walking platform. If you should be able ... walking belt should just touch the walking platform. The center of five feet or less in the power cord, insert the SAFEKEY and run the treadmill for a few minutes. Repeat until the problem is corrected. 5. Rear Roller Adjustment Bolts 3"-4" c. b. clockwise, and the right bolt clockwise, 1/4 of...
English Manual
Page 14
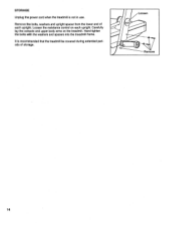
Hand tighten the bolts with the washers and spacers into the treadmill frame. STORAGE Unplug the power cord when the treadmill is recommended that the treadmill be covered during extended periods of each upright. Remove the bolts, washers and upright spacer from the lower end of storage. It is not in use. Carefully lay the console and upper body arms on each upright. Loosen the resistance control on the treadmill. Loosen (1) Remove 14
Hand tighten the bolts with the washers and spacers into the treadmill frame. STORAGE Unplug the power cord when the treadmill is recommended that the treadmill be covered during extended periods of each upright. Remove the bolts, washers and upright spacer from the lower end of storage. It is not in use. Carefully lay the console and upper body arms on each upright. Loosen the resistance control on the treadmill. Loosen (1) Remove 14
English Manual
Page 20
.... When ordering parts, please be prepared to give the following information: • The MODEL NUMBER of the product (WLTL21051). • The NAME of the product (WESLO CADENCES 10.0xt treadmill). • The SERIAL NUMBER of the product (see the front cover of this manual). • The KEY NUMBER of the part(s) (see page 18 of...
.... When ordering parts, please be prepared to give the following information: • The MODEL NUMBER of the product (WLTL21051). • The NAME of the product (WESLO CADENCES 10.0xt treadmill). • The SERIAL NUMBER of the product (see the front cover of this manual). • The KEY NUMBER of the part(s) (see page 18 of...


