

English Manual
Page 4
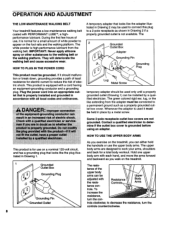
... and information before performing the maintenance and adjustment procedures described in this the treadmill. Do not operate the treadmill where aerosol products are used only by an authorized service representative only. 10. Keep small children and pets away from the treadmill at a time. Always hold the handrails or upper body arms while exercising on...
... and information before performing the maintenance and adjustment procedures described in this the treadmill. Do not operate the treadmill where aerosol products are used only by an authorized service representative only. 10. Keep small children and pets away from the treadmill at a time. Always hold the handrails or upper body arms while exercising on...

English Manual
Page 5
... Time (excluding holidays). Handrail Console SAFEKErm/Clip c ---4i111--1101111.1111111711111111I IS gr 11 Pulse Earclip Upper Body Arms Padded Walking Platform for selecting the WESLO CADENCE® 10.0xt treadmill. The serial number can now get an effective lower body and cardiovascular workout. BEFORE YOU BEGIN Thank you can be found on a decal attached to...
... Time (excluding holidays). Handrail Console SAFEKErm/Clip c ---4i111--1101111.1111111711111111I IS gr 11 Pulse Earclip Upper Body Arms Padded Walking Platform for selecting the WESLO CADENCE® 10.0xt treadmill. The serial number can now get an effective lower body and cardiovascular workout. BEFORE YOU BEGIN Thank you can be found on a decal attached to...

English Manual
Page 6
... 7 20 41 42 3 29 41 42 /1 42 41 37 75 4. Tighten the Resistance Control (29) on the lower end of the Frame (75). 3. Set the treadmill in each Upright. 6 2. Pivot the Console (11) until assembly is completed. Raise the Right and Left Uprights to the position shown. Tighten the Bolt into...
... 7 20 41 42 3 29 41 42 /1 42 41 37 75 4. Tighten the Resistance Control (29) on the lower end of the Frame (75). 3. Set the treadmill in each Upright. 6 2. Pivot the Console (11) until assembly is completed. Raise the Right and Left Uprights to the position shown. Tighten the Bolt into...

English Manual
Page 7
Remove the paper backing from the Wrench Clip (95). Press the 3/16" Allen Wrench (94) into the Wrench Clip. 5. Slide the metal Clothes Clip onto the Pulse Earclip in the indicated location. Press the Wrench Clip onto the Frame (75) in the indicated location. Note: To protect the floor, a covering should be placed under the treadmill. 6 95 75 4 7 Make sure that all parts are tightened before using the treadmill. The use of the Pulse Earclip is explained in the section titled OPERATING THE MONITOR MODES on page 11. 5 Pulse Earclip Clothes Clip 6.
Remove the paper backing from the Wrench Clip (95). Press the 3/16" Allen Wrench (94) into the Wrench Clip. 5. Slide the metal Clothes Clip onto the Pulse Earclip in the indicated location. Press the Wrench Clip onto the Frame (75) in the indicated location. Note: To protect the floor, a covering should be placed under the treadmill. 6 95 75 4 7 Make sure that all parts are tightened before using the treadmill. The use of the Pulse Earclip is explained in the section titled OPERATING THE MONITOR MODES on page 11. 5 Pulse Earclip Clothes Clip 6.
English Manual
Page 8
... IN THE POWER CORD A temporary adapter that looks like the plug illustrated in Drawing 2 may be used to connect this plug to appear on the treadmill. Plug the power cord into an appropriate outlet that looks like the adapter illustrated in Drawing 1. 1 Grounded Outlet Box Grounding Plug • Grounding Pin...to a permanent ground such as you can be installed by a metal screw. HOW TO USE THE UPPER BODY ARMS As you exercise on the treadmill, you walk on the foot rails and the walking platform. trols clockwise; During the first few hours of use the upper body arms. The upper...
... IN THE POWER CORD A temporary adapter that looks like the plug illustrated in Drawing 2 may be used to connect this plug to appear on the treadmill. Plug the power cord into an appropriate outlet that looks like the adapter illustrated in Drawing 1. 1 Grounded Outlet Box Grounding Plug • Grounding Pin...to a permanent ground such as you can be installed by a metal screw. HOW TO USE THE UPPER BODY ARMS As you exercise on the treadmill, you walk on the foot rails and the walking platform. trols clockwise; During the first few hours of use the upper body arms. The upper...

English Manual
Page 9
...w OHIO SPEED A beginning at the right). Make sure that the on/off before operating the console. it . Always wear the clip while operating the treadmill .4VAPV Note: If there is in the console, remove it off switch located near the power "On" 6 Position cord is in the "on the... displays and indicators on the frame rails of the treadmill.' . Find the clip ARNIN : After the SPEED attached by a cord to the SAFEKEY, and slide the clip onto the waistband of LED displays to 10 mph. Each time the SPEED decrease button is 0.5 mph to give you continuous exercise ...
...w OHIO SPEED A beginning at the right). Make sure that the on/off before operating the console. it . Always wear the clip while operating the treadmill .4VAPV Note: If there is in the console, remove it off switch located near the power "On" 6 Position cord is in the "on the... displays and indicators on the frame rails of the treadmill.' . Find the clip ARNIN : After the SPEED attached by a cord to the SAFEKEY, and slide the clip onto the waistband of LED displays to 10 mph. Each time the SPEED decrease button is 0.5 mph to give you continuous exercise ...

English Manual
Page 10
... 10.5%, and 11% when the incline is pro- The speed settings of the buttons is 1% to show the minimum and maximum speed settings of the treadmill can be changed with the TIME SET buttons. The incline range is pressed. The two indicators in the first seg- The program is pressed... seg- If desired, adjust the difficulty level of the tread- be switched to the 10 four segments are pressed, it will then adjust to change by pressing the. STOP button. The speed setting of the treadmill can be stopped at a time). played in the CURRENT SEGMENT column, and the speed...
... 10.5%, and 11% when the incline is pro- The speed settings of the buttons is 1% to show the minimum and maximum speed settings of the treadmill can be changed with the TIME SET buttons. The incline range is pressed. The two indicators in the first seg- The program is pressed... seg- If desired, adjust the difficulty level of the tread- be switched to the 10 four segments are pressed, it will then adjust to change by pressing the. STOP button. The speed setting of the treadmill can be stopped at a time). played in the CURRENT SEGMENT column, and the speed...

English Manual
Page 11
...will change by pressing the TIME SET decrease button. The buttons can be helpful to stand still while measuring your left running for a minimum of 10 seconds up to a maximum of time.) If desired, a time goal can be counted down the STOP button while inserting the SAFEKEY into the jack...set a time goal, first stop . The indicator on the PULSE button will light. The display will show the approximate number of time that the treadmill has been operated. OPERATING THE MONITOR MODES TIME Mode: When the console is in the manual mode, the TIME display will show the total time...
...will change by pressing the TIME SET decrease button. The buttons can be helpful to stand still while measuring your left running for a minimum of 10 seconds up to a maximum of time.) If desired, a time goal can be counted down the STOP button while inserting the SAFEKEY into the jack...set a time goal, first stop . The indicator on the PULSE button will light. The display will show the approximate number of time that the treadmill has been operated. OPERATING THE MONITOR MODES TIME Mode: When the console is in the manual mode, the TIME display will show the total time...
English Manual
Page 12
... b. Stand still while measuring your left ear lobe and reposition the earclip. The earclip is detected within five seconds. Do not operate 12 the treadmill until 6 p.m. The switch must be in general. 4. Check the circuit breaker located on " position. 2. Various indicators on the side rails of...code "E2" may need to your collar. If the switch protrudes as an exercise aid in determining heart rate trends in the "on the treadmill near the power cord. Remove the SAFEKEY from the console. Rub your pulse. Wipe the two clear circles using a cotton swab moistened with...
... b. Stand still while measuring your left ear lobe and reposition the earclip. The earclip is detected within five seconds. Do not operate 12 the treadmill until 6 p.m. The switch must be in general. 4. Check the circuit breaker located on " position. 2. Various indicators on the side rails of...code "E2" may need to your collar. If the switch protrudes as an exercise aid in determining heart rate trends in the "on the treadmill near the power cord. Remove the SAFEKEY from the console. Rub your pulse. Wipe the two clear circles using a cotton swab moistened with...
English Manual
Page 13
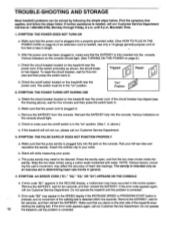
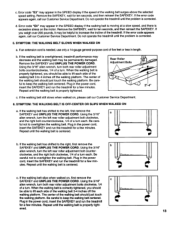
...16" allen wrench, turn both rear roller adjustment bolts clockwise, 1/4 of a turn . Plug in the power cord, insert the SAFEKEY and run the treadmill for ten seconds, and then reinsert the SAFEKEY. Be care- clockwise, and the right bolt clockwise, 1/4 of the walking belt should just touch the ...walking platform. Plug in the power cord, insert the SAFEKEY and run the treadmill for a few minutes. The center of a turn the left rear roller adjustment bolt clockwise, and the right bolt counterclockwise, 1/4 of the ...
...16" allen wrench, turn both rear roller adjustment bolts clockwise, 1/4 of a turn . Plug in the power cord, insert the SAFEKEY and run the treadmill for ten seconds, and then reinsert the SAFEKEY. Be care- clockwise, and the right bolt clockwise, 1/4 of the walking belt should just touch the ...walking platform. Plug in the power cord, insert the SAFEKEY and run the treadmill for a few minutes. The center of a turn the left rear roller adjustment bolt clockwise, and the right bolt counterclockwise, 1/4 of the ...
English Manual
Page 14
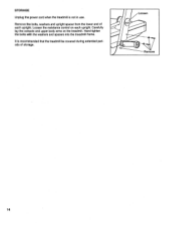
Hand tighten the bolts with the washers and spacers into the treadmill frame. Remove the bolts, washers and upright spacer from the lower end of storage. Carefully lay the console and upper body arms on each upright. Loosen the resistance control on the treadmill. Loosen (1) Remove 14 It is not in use. STORAGE Unplug the power cord when the treadmill is recommended that the treadmill be covered during extended periods of each upright.
Hand tighten the bolts with the washers and spacers into the treadmill frame. Remove the bolts, washers and upright spacer from the lower end of storage. Carefully lay the console and upper body arms on each upright. Loosen the resistance control on the treadmill. Loosen (1) Remove 14 It is not in use. STORAGE Unplug the power cord when the treadmill is recommended that the treadmill be covered during extended periods of each upright.
English Manual
Page 20
..., please be prepared to give the following information: • The MODEL NUMBER of the product (WLTL21051). • The NAME of the product (WESLO CADENCES 10.0xt treadmill). • The SERIAL NUMBER of the product (see the front cover of this manual). • The KEY NUMBER of the part(s) (see...of this manual). • The DESCRIPTION of the part(s) (see page 18 of this manual). Mountain Time (excluding holidays). If possible, place the treadmill near your telephone for easy reference when calling. Part No. 127396 R1195A Printed in USA © 1995 ICON Health & Fitness, Inc. until 6...
..., please be prepared to give the following information: • The MODEL NUMBER of the product (WLTL21051). • The NAME of the product (WESLO CADENCES 10.0xt treadmill). • The SERIAL NUMBER of the product (see the front cover of this manual). • The KEY NUMBER of the part(s) (see...of this manual). • The DESCRIPTION of the part(s) (see page 18 of this manual). Mountain Time (excluding holidays). If possible, place the treadmill near your telephone for easy reference when calling. Part No. 127396 R1195A Printed in USA © 1995 ICON Health & Fitness, Inc. until 6...


