
Uk Manual
Page 2
Table of Contents Important Precautions 3 Before You Begin 4 Part Identification Chart 5 Assembly 6 Adjustments 10 Exercise Guidelines 12 Part List 14 Exploded Drawing 15 Ordering Replacement Parts Back Cover WESLO is a registered trademark of ICON Health & Fitness, Inc. 2
Table of Contents Important Precautions 3 Before You Begin 4 Part Identification Chart 5 Assembly 6 Adjustments 10 Exercise Guidelines 12 Part List 14 Exploded Drawing 15 Ordering Replacement Parts Back Cover WESLO is a registered trademark of ICON Health & Fitness, Inc. 2
Uk Manual
Page 3
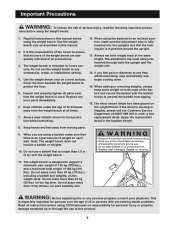
It is intended for persons over the age of 12 and pets away from the weight bench at the same height. Keep children under the age of 35 or persons with pre-existing health problems. Read all precautions. 3. When adding or ...and properly tighten all instructions in any time whilst exercising, stop immediately and begin cooling down. 15. When using the weight bench. 1. ICON assumes no responsibility for foot protection whilst exercising. 12. Read all parts each side. The decal shown below has been placed on a level surface. The adjustment clip must always...
It is intended for persons over the age of 12 and pets away from the weight bench at the same height. Keep children under the age of 35 or persons with pre-existing health problems. Read all precautions. 3. When adding or ...and properly tighten all instructions in any time whilst exercising, stop immediately and begin cooling down. 15. When using the weight bench. 1. ICON assumes no responsibility for foot protection whilst exercising. 12. Read all parts each side. The decal shown below has been placed on a level surface. The adjustment clip must always...
Uk Manual
Page 9
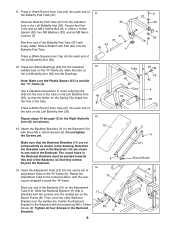
...M6 x 16mm Screws (9). Note that the threaded nuts in the Backrest Brackets must be pointed towards this end of the Left Butterfly Arm (36). 12. Tube 42 Tube 33 49 43 42 5 36 Press a 22mm Round Inner Cap (41) into the hole in the Backrest Brackets. The ...yet. 9 9 Make sure that is outside the "H"-frame (5). Insert the Adjustment Tube (12) into the centre set of the Backrest (10) on the Left Butterfly Arm (36) into the indicated 12 welded tube on the Bench Frame (8). Fasten the Backrest Bracket to one end of adjustment holes in the "H"-frame (5).
...M6 x 16mm Screws (9). Note that the threaded nuts in the Backrest Brackets must be pointed towards this end of the Left Butterfly Arm (36). 12. Tube 42 Tube 33 49 43 42 5 36 Press a 22mm Round Inner Cap (41) into the hole in the Backrest Brackets. The ...yet. 9 9 Make sure that is outside the "H"-frame (5). Insert the Adjustment Tube (12) into the centre set of the Backrest (10) on the Left Butterfly Arm (36) into the indicated 12 welded tube on the Bench Frame (8). Fasten the Backrest Bracket to one end of adjustment holes in the "H"-frame (5).

Uk Manual
Page 10
...parts each exercise. 15. Inspect and tighten all parts are properly tightened before the weight bench is inserted in one hand, remove the Adjustment Clip (16) from the Weight Rests. If the Adjustment Tube (12) is used . The Adjustment Clips (16) must always be inserted through both the... Upright and the Weight Rest. See the Exercise Guidelines on the Bench Frame (8) with a damp cloth and a mild, non-abrasive detergent. The ...
...parts each exercise. 15. Inspect and tighten all parts are properly tightened before the weight bench is inserted in one hand, remove the Adjustment Clip (16) from the Weight Rests. If the Adjustment Tube (12) is used . The Adjustment Clips (16) must always be inserted through both the... Upright and the Weight Rest. See the Exercise Guidelines on the Bench Frame (8) with a damp cloth and a mild, non-abrasive detergent. The ...
Uk Manual
Page 11
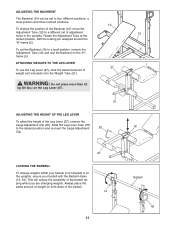
.... To set the Backrest (10) to the desired position and re-insert the Large Adjustment 20 Clip. 12 5 18 27 LOCKING THE BARBELL To change the position of the Backrest (10), move the Adjustment Tube (12) to the locked position, with the Barbell Hooks (14, 40). ADJUSTING THE BACKREST The Backrest (10... LEVER To adjust the height of the barbell. 14 11 Barbell 40 Slide the Leg Lever Tube (18) to a level position, remove the Adjustment Tube (12) and rest the Backrest on both sides of the Leg Lever (27), remove the Large Adjustment Clip (20).
.... To set the Backrest (10) to the desired position and re-insert the Large Adjustment 20 Clip. 12 5 18 27 LOCKING THE BARBELL To change the position of the Backrest (10), move the Adjustment Tube (12) to the locked position, with the Barbell Hooks (14, 40). ADJUSTING THE BACKREST The Backrest (10... LEVER To adjust the height of the barbell. 14 11 Barbell 40 Slide the Leg Lever Tube (18) to a level position, remove the Adjustment Tube (12) and rest the Backrest on both sides of the Leg Lever (27), remove the Large Adjustment Clip (20).

Uk Manual
Page 12
...from session to session. An example of a balanced program is the highest. Exhale during the return stroke. You can complete 3 sets of 12 repetitions without difficulty, increase the amount of weight. You should be performed smoothly and without discomfort. Find out what is right for you ... the number of repetitions in each set " is right for you . WORKING OUT Each workout should be sensitive to your breath. 12 If you want to develop most. Each workout should include 6 to 10 different exercises. Once you find photographs showing the correct form...
...from session to session. An example of a balanced program is the highest. Exhale during the return stroke. You can complete 3 sets of 12 repetitions without difficulty, increase the amount of weight. You should be performed smoothly and without discomfort. Find out what is right for you ... the number of repetitions in each set " is right for you . WORKING OUT Each workout should be sensitive to your breath. 12 If you want to develop most. Each workout should include 6 to 10 different exercises. Once you find photographs showing the correct form...
Uk Manual
Page 14
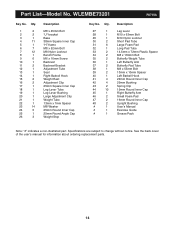
... the user's manual for information about ordering replacement parts. 14 Specifications are subject to change without notice. Qty. 1 2 2 2 3 1 4 11 5 1 6 7 7 12 8 1 9 6 10 1 11 2 12 1 13 1 14 1 15 2 16 2 17 1 18 1 19 1 20 1 21 1 22 1 23 14 24 5 25 1 26 3 Description M8 x 45mm ...Bolt "U"-bracket Base 38mm Square Inner Cap "H"-frame M8 x 52mm Bolt M8 Nylon Locknut Bench Frame M6 x 16mm Screw Backrest ...
... the user's manual for information about ordering replacement parts. 14 Specifications are subject to change without notice. Qty. 1 2 2 2 3 1 4 11 5 1 6 7 7 12 8 1 9 6 10 1 11 2 12 1 13 1 14 1 15 2 16 2 17 1 18 1 19 1 20 1 21 1 22 1 23 14 24 5 25 1 26 3 Description M8 x 45mm ...Bolt "U"-bracket Base 38mm Square Inner Cap "H"-frame M8 x 52mm Bolt M8 Nylon Locknut Bench Frame M6 x 16mm Screw Backrest ...

Uk Manual
Page 15
Exploded Drawing-Model No. WLEMBE73201 R0703A 14 7 10 9 7 15 40 48 15 11 16 6 23 5 48 4 39 47 12 16 31 26 23 45 41 44 7 43 42 47 9 37 41 46 24 42 23 7 41 44 17 44 35 23 33 7 42 13 24 32 44 6 34 4 43 28 6 7 42 8 18 29 31 23 6 7 19 2 4 6 23 20 9 1 2 4 4 31 27 7 7 4 4 38 23 4 21 44 25 22 23 6 44 30 24 26 44 4 30 44 31 3 41 24 1 36 33 7 6 23 39 4 23 23 34 7 44 35 37 4 44 46 24 26 15
Exploded Drawing-Model No. WLEMBE73201 R0703A 14 7 10 9 7 15 40 48 15 11 16 6 23 5 48 4 39 47 12 16 31 26 23 45 41 44 7 43 42 47 9 37 41 46 24 42 23 7 41 44 17 44 35 23 33 7 42 13 24 32 44 6 34 4 43 28 6 7 42 8 18 29 31 23 6 7 19 2 4 6 23 20 9 1 2 4 4 31 27 7 7 4 4 38 23 4 21 44 25 22 23 6 44 30 24 26 44 4 30 44 31 3 41 24 1 36 33 7 6 23 39 4 23 23 34 7 44 35 37 4 44 46 24 26 15