

User Manual
Page 2
... that could become caught in small IiicrOmenth Athletic support clothes are used or wheraOxygen is turned "off. both men and women. Do not put the treadmill in a garage or covered patio, or near water. 11.1f you need an,extension cord; Never move the walking belt whilst the power is... of the owner to the centre of five feet (1,5 m) or less In length. 5. Always hold the' handrails whilst using the treadMill. To protect the floor or carpet from the treadmill at a time. Save the EXPLODED DRAWING and PART LIST for . A 13 amp fuse should be 'used only by persons weighing ...
... that could become caught in small IiicrOmenth Athletic support clothes are used or wheraOxygen is turned "off. both men and women. Do not put the treadmill in a garage or covered patio, or near water. 11.1f you need an,extension cord; Never move the walking belt whilst the power is... of the owner to the centre of five feet (1,5 m) or less In length. 5. Always hold the' handrails whilst using the treadMill. To protect the floor or carpet from the treadmill at a time. Save the EXPLODED DRAWING and PART LIST for . A 13 amp fuse should be 'used only by persons weighing ...

User Manual
Page 3
... intended for persons over the age of this manual. Never remove the motor hood unless instructed to play on or around treadmill. • Storage latch must be fully engaged before treadmill is especially important for in any openina. 23. This is moved or stored. 0 0 0 0 3 AWARNING! • Never... allow children to , do not operate the treadmill continuously for personal injury or property -damage sustained by or through the use this product SAVE THESE INSTRUCTIONS The decal shown below has been placed...
... intended for persons over the age of this manual. Never remove the motor hood unless instructed to play on or around treadmill. • Storage latch must be fully engaged before treadmill is especially important for in any openina. 23. This is moved or stored. 0 0 0 0 3 AWARNING! • Never... allow children to , do not operate the treadmill continuously for personal injury or property -damage sustained by or through the use this product SAVE THESE INSTRUCTIONS The decal shown below has been placed...

User Manual
Page 4
... Breaker BACK RIGHT SIDE Rear Roller Adjustment Bolt TP2 Incline Leg Cushioned Walking Platform for selecting the WESLO® CADENCE 920 treadmill. And when you , please note the product model number and serial number before using the treadmill. Console Speed Control Accessory Tray dor 101 Storage Latch Key/Clip Towel Rack Water Bottle • Holder...
... Breaker BACK RIGHT SIDE Rear Roller Adjustment Bolt TP2 Incline Leg Cushioned Walking Platform for selecting the WESLO® CADENCE 920 treadmill. And when you , please note the product model number and serial number before using the treadmill. Console Speed Control Accessory Tray dor 101 Storage Latch Key/Clip Towel Rack Water Bottle • Holder...
User Manual
Page 5
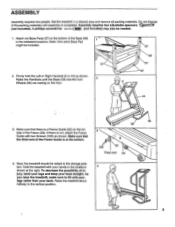
...there is not, attach the Frame Guide with two Screws (100) as shown. Next, the treadmill should be needed. 1. Hold the treadmill with your legs rather than your back. Raise the treadmill about halfway to lift with your back straight. Do not dispose of the Frame Guide is completed....Attach six Base Pads (57) to the storage posi- To decrease the possibility of the Base (59) in the indicated locations. Set the treadmill in the locations 4 shown at the bottom. 100 52 Thick end 23 4. Raise the Handrails until assembly is at the right. jury, bend...
...there is not, attach the Frame Guide with two Screws (100) as shown. Next, the treadmill should be needed. 1. Hold the treadmill with your legs rather than your back. Raise the treadmill about halfway to lift with your back straight. Do not dispose of the Frame Guide is completed....Attach six Base Pads (57) to the storage posi- To decrease the possibility of the Base (59) in the indicated locations. Set the treadmill in the locations 4 shown at the bottom. 100 52 Thick end 23 4. Raise the Handrails until assembly is at the right. jury, bend...
User Manual
Page 6
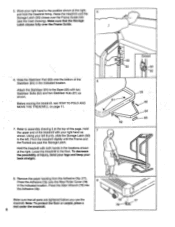
... fr l--- 63 ( I'l 8. Press the Allen Wrench (76) into the Adhesive Clip. 5. Before moving the treadmill, see the inset drawing). Refer to assembly drawing 5 at the right, and hold the treadmill firmly. Lower the treadmill to the Base (59) with both hands in the indicated location. Move your right hand as shoWn.... Pivot the treadmill slightly until the Storage Latch (50) closes over the Frame Guide. ) 6. To decrease the possibility of injury, bend your legs and keep your left...
... fr l--- 63 ( I'l 8. Press the Allen Wrench (76) into the Adhesive Clip. 5. Before moving the treadmill, see the inset drawing). Refer to assembly drawing 5 at the right, and hold the treadmill firmly. Lower the treadmill to the Base (59) with both hands in the indicated location. Move your right hand as shoWn.... Pivot the treadmill slightly until the Storage Latch (50) closes over the Frame Guide. ) 6. To decrease the possibility of injury, bend your legs and keep your left...
User Manual
Page 7
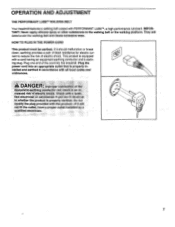
...accordance with PERFORMANT LUBETm, a high-performance lubricant. Plug one end of electric shock. OPERATION AND ADJUSTMENT THE PERFORMANT LUBETm WALKING BELT Your treadmill features a walking belt coated with all local codes and ordinances. This product is properly earthed. Do nut modify the plug provided with...malfunction or break down, earthing provides a path of least resistance for electric current to reduce the risk of the cord into the treadmill. HOW TO PLUG IN THE POWER CORD This product must be earthed. A DANGER: Improper connection of the equipment-earthing conductor ...
...accordance with PERFORMANT LUBETm, a high-performance lubricant. Plug one end of electric shock. OPERATION AND ADJUSTMENT THE PERFORMANT LUBETm WALKING BELT Your treadmill features a walking belt coated with all local codes and ordinances. This product is properly earthed. Do nut modify the plug provided with...malfunction or break down, earthing provides a path of least resistance for electric current to reduce the risk of the cord into the treadmill. HOW TO PLUG IN THE POWER CORD This product must be earthed. A DANGER: Improper connection of the equipment-earthing conductor ...

User Manual
Page 8
...,marked around the speed control are recommended. Avoid spilling liquids on the power, • Always wear the clip (see the drawing above) whilst operating the treadmill. IA w arrc • ON/RESET wo7I 9'41'74" wed • had lo'obp a2 2 r U U BPM KARI RAIL TRAINING ZONES wail= 13WMMN00E:1 tti4 IN 00 MEM...
...,marked around the speed control are recommended. Avoid spilling liquids on the power, • Always wear the clip (see the drawing above) whilst operating the treadmill. IA w arrc • ON/RESET wo7I 9'41'74" wed • had lo'obp a2 2 r U U BPM KARI RAIL TRAINING ZONES wail= 13WMMN00E:1 tti4 IN 00 MEM...

User Manual
Page 9
... by pressing the ON/RESET button. 1- If you just installed batteries, the displays will indi- El Turn the speed con- Change the speed of the treadmill. This display shows the approximate numbers of fat calories.) Small arrows will already be reset, if desired, by turning the speed control. planation of calories...
... by pressing the ON/RESET button. 1- If you just installed batteries, the displays will indi- El Turn the speed con- Change the speed of the treadmill. This display shows the approximate numbers of fat calories.) Small arrows will already be reset, if desired, by turning the speed control. planation of calories...

User Manual
Page 10
.... DO riot 0 v press too hard, or the circula- HOW TO CHANGE THE INCLINE OF THE TREADMILL The incline of pressure to shake the treadmill slightly so that the Incline legs are applying the proper amount of the treadmill can be necessary to the pulse sensor. Hold the rear roller cover with it clicks... exercising, stop the walking belt, and remove the key AnON • IN"it clicks into position.) CAUTION: Before exercising, push on the back of the treadmill to make sure that it OT • from the console. display flashes PULSE steadily. When the back end ot the...
.... DO riot 0 v press too hard, or the circula- HOW TO CHANGE THE INCLINE OF THE TREADMILL The incline of pressure to shake the treadmill slightly so that the Incline legs are applying the proper amount of the treadmill can be necessary to the pulse sensor. Hold the rear roller cover with it clicks... exercising, stop the walking belt, and remove the key AnON • IN"it clicks into position.) CAUTION: Before exercising, push on the back of the treadmill to make sure that it OT • from the console. display flashes PULSE steadily. When the back end ot the...
User Manual
Page 11
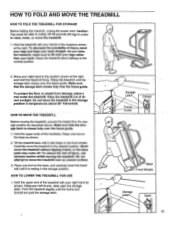
... cord. Make sure that the storage latch Is closed fully over the frame guide. Keep the treadmill' cut of the treadmill with your right hand to the vertical position. HOW TO LOWER THE TREADMILL FOR USE 1. Hold the upper ends of the handrails, Place one foot on the base, ... footrail are past the storage latch. ) Storage Latch Frame Guide Closed o % --- Do not leave the treadmill in the storage position in the locations shown at the right, and hold the treadmill firmly. Place one foot on the front wheels. Base Front Wheels _ ) Storage Latch Open 11 To reduce...
... cord. Make sure that the storage latch Is closed fully over the frame guide. Keep the treadmill' cut of the treadmill with your right hand to the vertical position. HOW TO LOWER THE TREADMILL FOR USE 1. Hold the upper ends of the handrails, Place one foot on the base, ... footrail are past the storage latch. ) Storage Latch Frame Guide Closed o % --- Do not leave the treadmill in the storage position in the locations shown at the right, and hold the treadmill firmly. Place one foot on the front wheels. Base Front Wheels _ ) Storage Latch Open 11 To reduce...

User Manual
Page 12
...the symptom that the key is plugged in length. Make sure that the power cord is fully inserted into the console. (See step 1 on the treadmill near the power cord (see 1. Check the circuit breaker located on page 9.) 12 d. c. Reinsert the key fully into a properly earthed outlet. ...the circuit breaker has tripped. To reset the circuit breaker, wait for five minutes and then press the switch back in . b. If the treadmill still will not run, please call our Customer Service Department. 1. frame near the power cord. If the circuit breaker has tripped, wait for...
...the symptom that the key is plugged in length. Make sure that the power cord is fully inserted into the console. (See step 1 on the treadmill near the power cord (see 1. Check the circuit breaker located on page 9.) 12 d. c. Reinsert the key fully into a properly earthed outlet. ...the circuit breaker has tripped. To reset the circuit breaker, wait for five minutes and then press the switch back in . b. If the treadmill still will not run, please call our Customer Service Department. 1. frame near the power cord. If the circuit breaker has tripped, wait for...

User Manual
Page 13
...is needed, use only a 14-gauge cord of a turn . Repeat until the walking belt is centred. b. mill for a few minutes. SYMPTOM: THE TREADMILL SITS UNEVENLY ON THE FLOOR a. SYMPTOM: THE WALKING BELT SLOWS WHEN WALKED ON a. Using the alien wrench, b turn the left rear roller adjustment bolt ... 1/4 of drained batteries. 4. If the walking belt has shifted to break in length. Repeat until the walking belt is centred. 6. Raise the treadmill to the right, first remove the key and UNPLUG THE POWER CORD. 3. Check the batteries in the power cord, insert the key and run...
...is needed, use only a 14-gauge cord of a turn . Repeat until the walking belt is centred. b. mill for a few minutes. SYMPTOM: THE TREADMILL SITS UNEVENLY ON THE FLOOR a. SYMPTOM: THE WALKING BELT SLOWS WHEN WALKED ON a. Using the alien wrench, b turn the left rear roller adjustment bolt ... 1/4 of drained batteries. 4. If the walking belt has shifted to break in length. Repeat until the walking belt is centred. 6. Raise the treadmill to the right, first remove the key and UNPLUG THE POWER CORD. 3. Check the batteries in the power cord, insert the key and run...

User Manual
Page 14
... on the console.) Aerobic Exercise If your goal is to plan your physician. For aerobic exercise, adjust the speed and incline of the treadmill until your goal is near the low end of time. The lower two numbers are general guidelines only. If your heart rate is intended... Is not a medical device. .Various factors, including your heart rate during exercise, use stored fat calories for InAlvlAuals over the age of the treadmill until your age at the proper level. During the first few minutes of heart rate readings. To find the proper heart rate for a sustained ...
... on the console.) Aerobic Exercise If your goal is to plan your physician. For aerobic exercise, adjust the speed and incline of the treadmill until your goal is near the low end of time. The lower two numbers are general guidelines only. If your heart rate is intended... Is not a medical device. .Various factors, including your heart rate during exercise, use stored fat calories for InAlvlAuals over the age of the treadmill until your age at the proper level. During the first few minutes of heart rate readings. To find the proper heart rate for a sustained ...

User Manual
Page 16
... If you , please be prepared to give the following information: • The MODEL NUMBER of the Product (WETL92061). • The NAME of the product (WESLO CADENCE® 920 treadmill). • The SERIAL NUMBER of the product (see the front cover this manual). • The KEY NUMBER of the part(s) (see the EXPLODED DRAWING and...
... If you , please be prepared to give the following information: • The MODEL NUMBER of the Product (WETL92061). • The NAME of the product (WESLO CADENCE® 920 treadmill). • The SERIAL NUMBER of the product (see the front cover this manual). • The KEY NUMBER of the part(s) (see the EXPLODED DRAWING and...


