

Uk Manual
Page 1
If you have questions, or if there are committed to providing complete customer satisfaction. As a manufacturer, we are missing parts, please call: 08457 089 009 Or write: ICON Health & Fitness, Ltd. Customer Service Department Unit 4 Revie Road Industrial Estate Revie Road Beeston Leeds, LS118JG UK email: [email protected] CAUTION Read all precautions and instructions in this manual before using this manual for future reference. WLEMEX14830 Serial No Serial Number Decal QUESTIONS? Model No. USER'S MANUAL Save this equipment.
If you have questions, or if there are committed to providing complete customer satisfaction. As a manufacturer, we are missing parts, please call: 08457 089 009 Or write: ICON Health & Fitness, Ltd. Customer Service Department Unit 4 Revie Road Industrial Estate Revie Road Beeston Leeds, LS118JG UK email: [email protected] CAUTION Read all precautions and instructions in this manual before using this manual for future reference. WLEMEX14830 Serial No Serial Number Decal QUESTIONS? Model No. USER'S MANUAL Save this equipment.
Uk Manual
Page 2
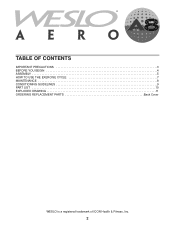
TABLE OF CONTENTS IMPORTANT PRECAUTIONS 3 BEFORE YOU BEGIN 4 ASSEMBLY 5 HOW TO USE THE EXERCISE CYCLE 7 MAINTENANCE 8 CONDITIONING GUIDELINES 9 PART LIST 10 EXPLODED DRAWING 11 ORDERING REPLACEMENT PARTS Back Cover WESLO is a registered trademark of ICON Health & Fitness, Inc. 2
TABLE OF CONTENTS IMPORTANT PRECAUTIONS 3 BEFORE YOU BEGIN 4 ASSEMBLY 5 HOW TO USE THE EXERCISE CYCLE 7 MAINTENANCE 8 CONDITIONING GUIDELINES 9 PART LIST 10 EXPLODED DRAWING 11 ORDERING REPLACEMENT PARTS Back Cover WESLO is a registered trademark of ICON Health & Fitness, Inc. 2
Uk Manual
Page 3
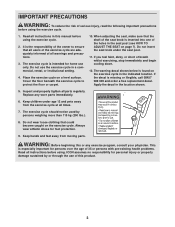
... a free replacement decal. Do not use the exercise cycle in the location shown. 5. When adjusting the seat, make sure that the shaft of the seat knob is the responsibility of this manual before using . Replace any exercise program, consult your physician. The exercise cycle should not be used by or through the use only. WARNING: Before beginning this or any worn parts immediately. 6. Always wear athletic shoes for home use...
... a free replacement decal. Do not use the exercise cycle in the location shown. 5. When adjusting the seat, make sure that the shaft of the seat knob is the responsibility of this manual before using . Replace any exercise program, consult your physician. The exercise cycle should not be used by or through the use only. WARNING: Before beginning this or any worn parts immediately. 6. Always wear athletic shoes for home use...
Uk Manual
Page 4
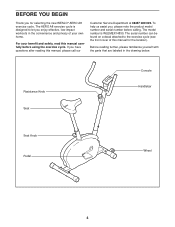
... own home. The serial number can be found on a decal attached to let you enjoy effective, low-impact workouts in the drawing below. BEFORE YOU BEGIN Thank you for the location). Before reading further, please familiarize yourself with the parts that are labeled in the convenience and privacy of this manual for selecting the new WESLO® AERO A8 exercise cycle. Resistance Knob Seat Console Handlebar Seat Knob Pedal...
... own home. The serial number can be found on a decal attached to let you enjoy effective, low-impact workouts in the drawing below. BEFORE YOU BEGIN Thank you for the location). Before reading further, please familiarize yourself with the parts that are labeled in the convenience and privacy of this manual for selecting the new WESLO® AERO A8 exercise cycle. Resistance Knob Seat Console Handlebar Seat Knob Pedal...
Uk Manual
Page 5
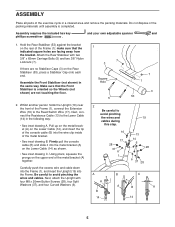
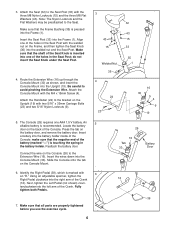
... hex key and your own adjustable spanner and phillips screwdriver . 1. make sure that the Front Stabiliser is completed. Attach the Rear Stabiliser with four M8 x 20mm Button Screws (28), four Split Washers (37), and four Curved Washers (6). 1 7 3 Square Hole 7 1 5 2 Be careful to the Lower Cable (14) in the same way. Be careful to the Reed Switch Wire (17). Next, attach the Upright with...
... hex key and your own adjustable spanner and phillips screwdriver . 1. make sure that the Front Stabiliser is completed. Attach the Rear Stabiliser with four M8 x 20mm Button Screws (28), four Split Washers (37), and four Curved Washers (6). 1 7 3 Square Hole 7 1 5 2 Be careful to the Lower Cable (14) in the same way. Be careful to the Reed Switch Wire (17). Next, attach the Upright with...
Uk Manual
Page 6
... Flat Washers (43). Press the tab on the Console Mount. 26 16 Tab 30 Battery Door 6. Using an adjustable spanner, tighten the Right Pedal clockwise into the left arm of the holes in the battery holder. Be careful to the Extension Wire (16). Reattach the battery door. Next, tighten the Left Pedal (not shown) coun- Insert the Seat Post (33) into the Upright (19). Make...
... Flat Washers (43). Press the tab on the Console Mount. 26 16 Tab 30 Battery Door 6. Using an adjustable spanner, tighten the Right Pedal clockwise into the left arm of the holes in the battery holder. Be careful to the Extension Wire (16). Reattach the battery door. Next, tighten the Left Pedal (not shown) coun- Insert the Seat Post (33) into the Upright (19). Make...
Uk Manual
Page 7
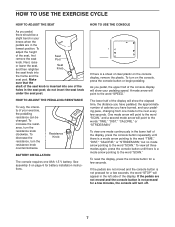
... "STOP" will appear in the lower half of the display, press the console button repeatedly until there is a mode arrow pointing to the word "SPEED." HOW TO ADJUST THE PEDALLING RESISTANCE To vary the intensity of the seat, first remove the seat Seat Post knob. A mode arrow will point to the word "SCAN." If the pedals are not moved and the console button is a sheet of the display. Resistance Knob BATTERY INSTALLATION The console requires one mode to...
... "STOP" will appear in the lower half of the display, press the console button repeatedly until there is a mode arrow pointing to the word "SPEED." HOW TO ADJUST THE PEDALLING RESISTANCE To vary the intensity of the seat, first remove the seat Seat Post knob. A mode arrow will point to the word "SCAN." If the pedals are not moved and the console button is a sheet of the display. Resistance Knob BATTERY INSTALLATION The console requires one mode to...
Uk Manual
Page 8
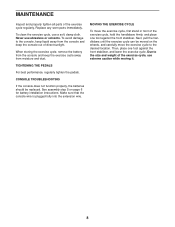
... worn parts immediately. MAINTENANCE Inspect and properly tighten all parts of direct sunlight. When storing the exercise cycle, remove the battery from the console and keep the exercise cycle away from the console and keep liquid away from moisture and dust. MOVING THE EXERCISE CYCLE To move the exercise cycle to the desired location. CONSOLE TROUBLESHOOTING If the console does not function properly, the batteries should be moved on page 6 for battery installation instructions...
... worn parts immediately. MAINTENANCE Inspect and properly tighten all parts of direct sunlight. When storing the exercise cycle, remove the battery from the console and keep the exercise cycle away from the console and keep liquid away from moisture and dust. MOVING THE EXERCISE CYCLE To move the exercise cycle to the desired location. CONSOLE TROUBLESHOOTING If the console does not function properly, the batteries should be moved on page 6 for battery installation instructions...
Uk Manual
Page 9
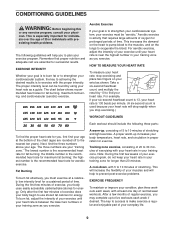
.... Aerobic Exercise If your goal is between workouts. Take a six-second heartbeat count, and multiply the result by using your training zone as a guide. During the first few months of your exercise until your heart rate is make exercise a regular and enjoyable part of rest between the lower two numbers in your everyday life. 9 To burn fat, adjust the intensity of regular exercise, you...
.... Aerobic Exercise If your goal is between workouts. Take a six-second heartbeat count, and multiply the result by using your training zone as a guide. During the first few months of your exercise until your heart rate is make exercise a regular and enjoyable part of rest between the lower two numbers in your everyday life. 9 To burn fat, adjust the intensity of regular exercise, you...
Uk Manual
Page 10
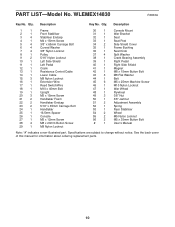
... 1 Frame Front Stabiliser Stabiliser Endcap M4 x 15mm Screw 3/8" x 65mm Carriage Bolt Curved Washer 3/8" Nylon Locknut Pulley 5/16" Nylon Locknut Left Side Shield Left Pedal Crank Resistance Control/Cable Lower Cable M8 Nylon Locknut Extension Wire Reed Switch/Wire M10 x 40mm Bolt Upright M5 x 15mm Screw Handlebar Foam Handlebar Endcap 5/16" x 35mm Carriage Bolt Handlebar 16.5mm Spacer Console M5 x 12mm Screw M8 x 20mm Button Screw M8 Nylon Locknut 30 1 31 1 32 1 33...
... 1 Frame Front Stabiliser Stabiliser Endcap M4 x 15mm Screw 3/8" x 65mm Carriage Bolt Curved Washer 3/8" Nylon Locknut Pulley 5/16" Nylon Locknut Left Side Shield Left Pedal Crank Resistance Control/Cable Lower Cable M8 Nylon Locknut Extension Wire Reed Switch/Wire M10 x 40mm Bolt Upright M5 x 15mm Screw Handlebar Foam Handlebar Endcap 5/16" x 35mm Carriage Bolt Handlebar 16.5mm Spacer Console M5 x 12mm Screw M8 x 20mm Button Screw M8 Nylon Locknut 30 1 31 1 32 1 33...
Uk Manual
Page 11
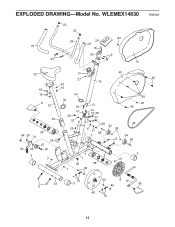
WLEMEX14830 22 22 20 24 26 21 21 16 30 9 23 4 10 R0903A 32 13 40 27 45 19 43 43 15 15 11 33 35 38 46 29 31 36 34 34 16 17 28 37 6 17 20 13 14 6 37 28 37 6 28 54 6 55 37 7 3 56 5 45 20 45 44 54 56 52 25 3 47 18 7 7 2 3 1 41 42 38 7 49 53 5 51 3 50 8 12 49 39 48 51 11 EXPLODED DRAWING-Model No.
WLEMEX14830 22 22 20 24 26 21 21 16 30 9 23 4 10 R0903A 32 13 40 27 45 19 43 43 15 15 11 33 35 38 46 29 31 36 34 34 16 17 28 37 6 17 20 13 14 6 37 28 37 6 28 54 6 55 37 7 3 56 5 45 20 45 44 54 56 52 25 3 47 18 7 7 2 3 1 41 42 38 7 49 53 5 51 3 50 8 12 49 39 48 51 11 EXPLODED DRAWING-Model No.

Uk Manual
Page 12
... if you need to give the following information: • the MODEL NUMBER of the product (WLEMEX14830) • the NAME of the product (WESLO® AERO A8 exercise cycle) • the SERIAL NUMBER of the product (see the front cover of this manual) • the KEY NUMBER and DESCRIPTION of the parts (see page 10) Part No. 201734 R0903A Printed in China © 2003 ICON Health & Fitness, Inc. Customer Service Department...
... if you need to give the following information: • the MODEL NUMBER of the product (WLEMEX14830) • the NAME of the product (WESLO® AERO A8 exercise cycle) • the SERIAL NUMBER of the product (see the front cover of this manual) • the KEY NUMBER and DESCRIPTION of the parts (see page 10) Part No. 201734 R0903A Printed in China © 2003 ICON Health & Fitness, Inc. Customer Service Department...


