
Owners Manual
Page 3
... this exercise bike during use of 35 or persons with pre-existing health problems. Read all parts are tight each time you use . 4. Keep your physician. Make sure that could become caught in this product. 3 Weslo assumes no responsibility for individuals over the age of this exercise bike. ac°tion calorie...
... this exercise bike during use of 35 or persons with pre-existing health problems. Read all parts are tight each time you use . 4. Keep your physician. Make sure that could become caught in this product. 3 Weslo assumes no responsibility for individuals over the age of this exercise bike. ac°tion calorie...
Owners Manual
Page 4
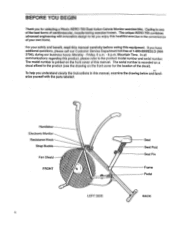
...this manual carefully before using this manual. In all communications regarding this manual, examine the drawing below and familarize yourself with the parts labeled. Mountain Time. To help you enjoy this healthful exercise in this product, please refer to the product model number and...: Monday - For your own home. The serial number is printed on the front cover for selecting a Weslo AERO 750 Dual Action Calorie Monitor exercise bike. The unique AERO 750 combines advanced engineering with innovative design to the product (see the drawing on the front cover of cardiovascular, ...
...this manual carefully before using this manual. In all communications regarding this manual, examine the drawing below and familarize yourself with the parts labeled. Mountain Time. To help you enjoy this healthful exercise in this product, please refer to the product model number and...: Monday - For your own home. The serial number is printed on the front cover for selecting a Weslo AERO 750 Dual Action Calorie Monitor exercise bike. The unique AERO 750 combines advanced engineering with innovative design to the product (see the drawing on the front cover of cardiovascular, ...
Owners Manual
Page 5
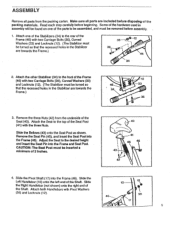
Attach one of the parts to be assembled, and must be turned so that the recessed holes in the Stabilizer are towards the Frame.)...33) and Locknuts (12). (The Stabilizer must be inserted a minimum of 2 inches. 40 -41 46 45 43 42 4. Make sure all parts from the underside of the Shaft. Attach the other Stabilizer (34) to the rear of the Seat Post (41) with Pivot Washers (56)... Remove the Seat Pin (45), and insert the Seat Post into the Frame (46). ASSEMBLY Remove all parts are towards the 34 Frame.) 12 33 36 3. Slide the Bellows (43) onto the Seat Post as shown.
Attach one of the parts to be assembled, and must be turned so that the recessed holes in the Stabilizer are towards the Frame.)...33) and Locknuts (12). (The Stabilizer must be inserted a minimum of 2 inches. 40 -41 46 45 43 42 4. Make sure all parts from the underside of the Shaft. Attach the other Stabilizer (34) to the rear of the Seat Post (41) with Pivot Washers (56)... Remove the Seat Pin (45), and insert the Seat Post into the Frame (46). ASSEMBLY Remove all parts are towards the 34 Frame.) 12 33 36 3. Slide the Bellows (43) onto the Seat Post as shown.
Owners Manual
Page 9
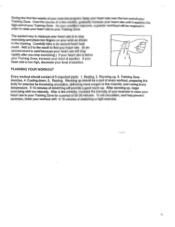
... increase your heart rate until it reaches the high end of your level of exertion. Resting. Warming up . After warming up should consist of 5 important parts: 1. To aid circulation, and help prevent soreness, finish your heart rate will provide a good warm-up , 3. Add a 0 to the result to the muscles, and raising... rapidly after you stop exercising and place two fingers on your level of stretching or light exercise. - 9 As your condition improves, a greater workload will be a part of every workout, preparing the body for a period of 20-30 minutes.
... increase your heart rate until it reaches the high end of your level of exertion. Resting. Warming up . After warming up should consist of 5 important parts: 1. To aid circulation, and help prevent soreness, finish your heart rate will provide a good warm-up , 3. Add a 0 to the result to the muscles, and raising... rapidly after you stop exercising and place two fingers on your level of stretching or light exercise. - 9 As your condition improves, a greater workload will be a part of every workout, preparing the body for a period of 20-30 minutes.
Owners Manual
Page 10
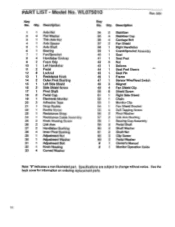
... 59 2 Pedal Shaft 60 2 Shaft Washer 61 2 Shaft Nut 62 2 Clip Screw 63 2 Pedal Washer # 1 Owner's Manual # 1 Monitor Operation Guide Note: "#" indicates a non-illustrated part. Description 1 1 Axle Nut 2 4 Flat Washer 3 1 Thin Axle Nut 4 1 Axle Spacer 5 1 Axle Shaft 6 1 Bearing 7 1 Fan/Sprocket 8 4 Handlebar Endcap 9 2 Foam... Adjustment Washer 31 1 Adjustment Bolt 32 1 Knob Housing 33 4 Curved Washer Key No. WL075010 Rev. 5/91 Key No. PART LIST - Model No. Specifications are subject to change without notice. Qty. See the back cover for information on ordering replacement...
... 59 2 Pedal Shaft 60 2 Shaft Washer 61 2 Shaft Nut 62 2 Clip Screw 63 2 Pedal Washer # 1 Owner's Manual # 1 Monitor Operation Guide Note: "#" indicates a non-illustrated part. Description 1 1 Axle Nut 2 4 Flat Washer 3 1 Thin Axle Nut 4 1 Axle Spacer 5 1 Axle Shaft 6 1 Bearing 7 1 Fan/Sprocket 8 4 Handlebar Endcap 9 2 Foam... Adjustment Washer 31 1 Adjustment Bolt 32 1 Knob Housing 33 4 Curved Washer Key No. WL075010 Rev. 5/91 Key No. PART LIST - Model No. Specifications are subject to change without notice. Qty. See the back cover for information on ordering replacement...
Owners Manual
Page 12
... of the product (WL075010). 2. If possible, place the bike near your telephone for easy reference when calling. 77: Part No. 104917 5/91 © 1991 Weslo, Inc. The MODEL NUMBER of the product (AERO 750). 3. When ordering parts, please be ordered by calling our Customer Service Department toll-free at 1-800-99WESLO (999-3756), during our...
... of the product (WL075010). 2. If possible, place the bike near your telephone for easy reference when calling. 77: Part No. 104917 5/91 © 1991 Weslo, Inc. The MODEL NUMBER of the product (AERO 750). 3. When ordering parts, please be ordered by calling our Customer Service Department toll-free at 1-800-99WESLO (999-3756), during our...


