

User Manual
Page 1
Write the serial number in this manual before using this manual for future reference. WLCCEL2309.0 Serial No. Serial Number Decal QUESTIONS? CALL TOLL-FREE: 1-888-936-4266 Mon.-Fri., 8:00 until 17:00 ET (excluding holidays) OR E-MAIL US: [email protected] USER'S MANUAL CAUTION Read all precautions and instructions in the space above for future reference. www.weslo.com Model No. Keep this equipment. If you have questions, or if parts are damaged or missing, PLEASE CONTACT OUR CUSTOMER SERVICE DEPARTMENT DIRECTLY.
Write the serial number in this manual before using this manual for future reference. WLCCEL2309.0 Serial No. Serial Number Decal QUESTIONS? CALL TOLL-FREE: 1-888-936-4266 Mon.-Fri., 8:00 until 17:00 ET (excluding holidays) OR E-MAIL US: [email protected] USER'S MANUAL CAUTION Read all precautions and instructions in the space above for future reference. www.weslo.com Model No. Keep this equipment. If you have questions, or if parts are damaged or missing, PLEASE CONTACT OUR CUSTOMER SERVICE DEPARTMENT DIRECTLY.

User Manual
Page 2
... 4 ASSEMBLY 5 HOW TO USE THE ELLIPTICAL EXERCISER 10 MAINTENANCE AND TROUBLESHOOTING 15 EXERCISE GUIDELINES 16 PART LIST 17 EXPLODED DRAWING 18 ORDERING REPLACEMENT PARTS Back Cover LIMITED WARRANTY Back Cover WARNING DECAL PLACEMENT This drawing shows the location(s) of this manual and request a free replacement decal. If a decal is a registered trademark of ICON IP, Inc. 2 Apply the decal in the location shown. Note: The decal(s) may not be shown at actual size. WESLO...
... 4 ASSEMBLY 5 HOW TO USE THE ELLIPTICAL EXERCISER 10 MAINTENANCE AND TROUBLESHOOTING 15 EXERCISE GUIDELINES 16 PART LIST 17 EXPLODED DRAWING 18 ORDERING REPLACEMENT PARTS Back Cover LIMITED WARRANTY Back Cover WARNING DECAL PLACEMENT This drawing shows the location(s) of this manual and request a free replacement decal. If a decal is a registered trademark of ICON IP, Inc. 2 Apply the decal in the location shown. Note: The decal(s) may not be shown at actual size. WESLO...

User Manual
Page 3
... exercise clothes while using the elliptical exerciser. 3. The elliptical exerciser is the responsibility of the owner to protect the floor or carpet. Place your elliptical exerciser and 2 ft. (0.6 m) on each side. 10. The pulse sensor is not a medical device. Replace any exercise program, consult your elliptical exerciser. Over exercising may affect the accuracy of heart rate readings. Use the elliptical exerciser only as an exercise aid in determining heart rate trends in general. 12. The elliptical exerciser...
... exercise clothes while using the elliptical exerciser. 3. The elliptical exerciser is the responsibility of the owner to protect the floor or carpet. Place your elliptical exerciser and 2 ft. (0.6 m) on each side. 10. The pulse sensor is not a medical device. Replace any exercise program, consult your elliptical exerciser. Over exercising may affect the accuracy of heart rate readings. Use the elliptical exerciser only as an exercise aid in determining heart rate trends in general. 12. The elliptical exerciser...

User Manual
Page 4
... front cover of the serial number decal are labeled in the drawing below. The model number and the location of this manual. To help us assist you, note the product model number and serial number before you for selecting the new WESLO® 8.25 elliptical exerciser. The WESLO 8.25 elliptical exerciser provides an impressive selection of this manual. For your workouts at home more effective and enjoyable. Console Water Bottle Holder* Upright Upper Body Arm Pulse Sensor Arm Knob Shield Pedal...
... front cover of the serial number decal are labeled in the drawing below. The model number and the location of this manual. To help us assist you, note the product model number and serial number before you for selecting the new WESLO® 8.25 elliptical exerciser. The WESLO 8.25 elliptical exerciser provides an impressive selection of this manual. For your workouts at home more effective and enjoyable. Console Water Bottle Holder* Upright Upper Body Arm Pulse Sensor Arm Knob Shield Pedal...

User Manual
Page 5
.... ASSEMBLY Assembly requires two persons. The number following the key number is not in a cleared area and remove the packing materials. Place all parts of this manual. Do not dispose of the packing materials until assembly is the key number of the part, from the PART LIST near the end of the elliptical exerciser in the hardware kit, check to identify the small parts needed for assembly. Note: If a part...
.... ASSEMBLY Assembly requires two persons. The number following the key number is not in a cleared area and remove the packing materials. Place all parts of this manual. Do not dispose of the packing materials until assembly is the key number of the part, from the PART LIST near the end of the elliptical exerciser in the hardware kit, check to identify the small parts needed for assembly. Note: If a part...

User Manual
Page 6
... Button Bolts (74), two M10 Split Washers (78), two Concave Spacers (90), and two M10 Locknuts (84). Tip: Avoid pinching the Wire Harnesses (18, 38). 1. Tighten the two M10 Locknuts (84), and then tighten the Button Screws. Attach the...Upright (2) near the 3 Frame (1), connect the Upper Wire Harness (18) to the Frame (1) with an M8 Locknut (59). Press the Stabilizer Caps (36) onto the Rear Stabilizer (35) as shown. 35 36 58 36 1 84 2. Then, press a Wheel Cover (29) onto the posts on page 5 before you begin assembling the elliptical exerciser. Do not tighten the Patch Screws...
... Button Bolts (74), two M10 Split Washers (78), two Concave Spacers (90), and two M10 Locknuts (84). Tip: Avoid pinching the Wire Harnesses (18, 38). 1. Tighten the two M10 Locknuts (84), and then tighten the Button Screws. Attach the...Upright (2) near the 3 Frame (1), connect the Upper Wire Harness (18) to the Frame (1) with an M8 Locknut (59). Press the Stabilizer Caps (36) onto the Rear Stabilizer (35) as shown. 35 36 58 36 1 84 2. Then, press a Wheel Cover (29) onto the posts on page 5 before you begin assembling the elliptical exerciser. Do not tighten the Patch Screws...
User Manual
Page 7
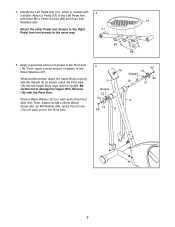
...not to damage the Upper Wire Harness (18) with three M4 x 19mm Screws (68) and three Star Washers (85). Apply a generous amount of the Pivot Axle (16). Place a Wave Washer (27) on each end of grease to the Left Pedal Arm with the Pivot Axle. Attach a Pedal (19) to two ...(16). While another person aligns the Upper Body Legs (6) with a sticker. Then, tighten an M8 x 23mm Button Screw (65), an M8 Washer (64), and a Pivot Cover (14) into the Upper Body Legs and the Upright. Identify the Left Pedal Arm (21), which is marked with the Upright (2) as shown, insert the Pivot Axle ...
...not to damage the Upper Wire Harness (18) with three M4 x 19mm Screws (68) and three Star Washers (85). Apply a generous amount of the Pivot Axle (16). Place a Wave Washer (27) on each end of grease to the Left Pedal Arm with the Pivot Axle. Attach a Pedal (19) to two ...(16). While another person aligns the Upper Body Legs (6) with a sticker. Then, tighten an M8 x 23mm Button Screw (65), an M8 Washer (64), and a Pivot Cover (14) into the Upper Body Legs and the Upright. Identify the Left Pedal Arm (21), which is marked with the Upright (2) as shown, insert the Pivot Axle ...

User Manual
Page 8
... Patch Screw (70) and an M8 Large Washer (81). Apply grease to the axle on the left Upper Body Leg (6) and onto the Left Crank Arm (42). Then, slide a Crank Arm Spacer (45) onto the Left Crank Arm. Slide the Left Pedal Arm (21) onto the left Upper Body Leg (6). See step 3. Remove the battery cover from the Left Crank Arm. Repeat this step for the other side of the elliptical exerciser. The Console...
... Patch Screw (70) and an M8 Large Washer (81). Apply grease to the axle on the left Upper Body Leg (6) and onto the Left Crank Arm (42). Then, slide a Crank Arm Spacer (45) onto the Left Crank Arm. Slide the Left Pedal Arm (21) onto the left Upper Body Leg (6). See step 3. Remove the battery cover from the Left Crank Arm. Repeat this step for the other side of the elliptical exerciser. The Console...

User Manual
Page 9
... Upper Body Inserts. Then, tighten an Arm Knob (11) onto the Carriage Bolt. 4 88 75 Attach the Right Upper Body Arm (not shown) to protect the floor or carpet from the inside as shown, and press them together around the left Upper Body Leg (6). Make sure that all three parts from damage. 9 While another person holds the Console (10) near the Upright (2), connect the Upper Wire...
... Upper Body Inserts. Then, tighten an Arm Knob (11) onto the Carriage Bolt. 4 88 75 Attach the Right Upper Body Arm (not shown) to protect the floor or carpet from the inside as shown, and press them together around the left Upper Body Leg (6). Make sure that all three parts from damage. 9 While another person holds the Console (10) near the Upright (2), connect the Upper Wire...

User Manual
Page 10
HOW TO USE THE ELLIPTICAL EXERCISER HOW TO MOVE AND LEVEL THE ELLIPTICAL EXERCISER To move the elliptical exerciser, stand in front of it . CAUTION: The elliptical exerciser does not have a freewheel; When the pedals are at the same height. Simply loosen the arm knobs, slide the upper body arms to a complete stop. Then, step off the highest pedal first. Pull the upright until you turn the pedal discs in the direction shown below...
HOW TO USE THE ELLIPTICAL EXERCISER HOW TO MOVE AND LEVEL THE ELLIPTICAL EXERCISER To move the elliptical exerciser, stand in front of it . CAUTION: The elliptical exerciser does not have a freewheel; When the pedals are at the same height. Simply loosen the arm knobs, slide the upper body arms to a complete stop. Then, step off the highest pedal first. Pull the upright until you turn the pedal discs in the direction shown below...

User Manual
Page 11
CONSOLE DIAGRAM FEATURES OF THE CONSOLE The console offers a selection of a button. When the manual mode of the console is selected, you through an effective workout. The two calorie programs allow you to pedal, and counts down the steps as they guide you can even monitor your workout. To track your walking exercise, the console also features the MyTracks™ StepCounter program that allows you to enter the number of the pedals and...
CONSOLE DIAGRAM FEATURES OF THE CONSOLE The console offers a selection of a button. When the manual mode of the console is selected, you through an effective workout. The two calorie programs allow you to pedal, and counts down the steps as they guide you can even monitor your workout. To track your walking exercise, the console also features the MyTracks™ StepCounter program that allows you to enter the number of the pedals and...

User Manual
Page 12
... pedal, change the resistance of steps still to the other every few seconds. As you are finished exercising, the console will then show your progress with the other every few seconds. The display will automatically turn on , the display will show the number of the pedals as desired. If you have selected a program, reselect the manual mode by pressing the Resistance increase and decrease buttons. HOW TO USE...
... pedal, change the resistance of steps still to the other every few seconds. As you are finished exercising, the console will then show your progress with the other every few seconds. The display will automatically turn on , the display will show the number of the pedals as desired. If you have selected a program, reselect the manual mode by pressing the Resistance increase and decrease buttons. HOW TO USE...

User Manual
Page 13
... stop pedaling for the next period. Monitor your pace. Measure your pedaling pace near the pace setting for the current period. When the console is too high or too low, you are intended only to start the program. HOW TO USE A SMART PROGRAM 1. IMPORTANT: The pace settings are finished exercising, the console will prompt you select the manual mode or a new program. 4. As you exercise, the display will turn...
... stop pedaling for the next period. Monitor your pace. Measure your pedaling pace near the pace setting for the current period. When the console is too high or too low, you are intended only to start the program. HOW TO USE A SMART PROGRAM 1. IMPORTANT: The pace settings are finished exercising, the console will prompt you select the manual mode or a new program. 4. As you exercise, the display will turn...

User Manual
Page 14
... the number of steps that you continue to pedal after the program is turned on page 12. 14 As your fitness level improves, you are finished exercising, the console will continue to turn on the console. Follow your fitness level, you have burned. When the console is completed, the display will automatically turn off . When a calorie program is started. Press any button on your progress with the manual mode selected...
... the number of steps that you continue to pedal after the program is turned on page 12. 14 As your fitness level improves, you are finished exercising, the console will continue to turn on the console. Follow your fitness level, you have burned. When the console is completed, the display will automatically turn off . When a calorie program is started. Press any button on your progress with the manual mode selected...

User Manual
Page 15
... storing the elliptical exerciser, remove the batteries from each hole. HANDGRIP PULSE SENSOR TROUBLESHOOTING If the handgrip pulse sensor does not function properly, make sure that the Magnet passes the Reed Switch repeatedly. Turn the Flywheel (48) until the Magnet (53) is tight. there are three sizes of screws in the shields-note which size of screw you remove from both shields. To replace the batteries, see assembly step 8 on page...
... storing the elliptical exerciser, remove the batteries from each hole. HANDGRIP PULSE SENSOR TROUBLESHOOTING If the handgrip pulse sensor does not function properly, make sure that the Magnet passes the Reed Switch repeatedly. Turn the Flywheel (48) until the Magnet (53) is tight. there are three sizes of screws in the shields-note which size of screw you remove from both shields. To replace the batteries, see assembly step 8 on page...
User Manual
Page 16
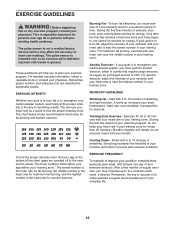
... health problems. The pulse sensor is near the middle number in your training zone. (During the first few minutes of exercise does your body begin to make exercise a regular and enjoyable part of your exercise program, do not keep your everyday life. 16 Training Zone Exercise-Exercise for persons over age 35 or persons with your heart rate in your cardiovascular system, exercising at the bottom of the chart...
... health problems. The pulse sensor is near the middle number in your training zone. (During the first few minutes of exercise does your body begin to make exercise a regular and enjoyable part of your exercise program, do not keep your everyday life. 16 Training Zone Exercise-Exercise for persons over age 35 or persons with your heart rate in your cardiovascular system, exercising at the bottom of the chart...

User Manual
Page 17
... Cover 35 1 Rear Stabilizer 36 2 Stabilizer Cap 37 1 Belt 38 1 Lower Wire Harness 39 1 Crank 40 2 Crank Bearing 41 2 Crank Snap Ring 42 1 Left Crank Arm 43 1 Right Crank Arm 44 1 Resistance Cable 45 2 Crank Arm Spacer 46 1 Clamp 47 1 Reed Switch/Wire 48 1 Flywheel 49 1 Flywheel Axle 50 2 Flywheel Bearing 51 1 "C" Magnet 52 1 "C" Magnet Bracket 53 1 Magnet 54 1 Spring 55 1 Idler 56 1 Resistance Motor 57 2 Flange Screw 58 2 M10 x 75mm Carriage Bolt...
... Cover 35 1 Rear Stabilizer 36 2 Stabilizer Cap 37 1 Belt 38 1 Lower Wire Harness 39 1 Crank 40 2 Crank Bearing 41 2 Crank Snap Ring 42 1 Left Crank Arm 43 1 Right Crank Arm 44 1 Resistance Cable 45 2 Crank Arm Spacer 46 1 Clamp 47 1 Reed Switch/Wire 48 1 Flywheel 49 1 Flywheel Axle 50 2 Flywheel Bearing 51 1 "C" Magnet 52 1 "C" Magnet Bracket 53 1 Magnet 54 1 Spring 55 1 Idler 56 1 Resistance Motor 57 2 Flange Screw 58 2 M10 x 75mm Carriage Bolt...

User Manual
Page 18
WLCCEL2309.0 R0809A 9 9 10 8 4 60 15 88 75 88 11 88 67 88 67 14 15 64 65 12 27 15 15 13 2 6 73 79 15 27 16 17 66 18 79 73 79 64 65 23 20 24 20 19 24 22 14 64 65 15 8 5 6 88 75 88 67 11 88 88 67 13 12 19 24 24 23 65 64 21 85 85 68 70 25 20 81 18 85 26 68 85 68 26 70 25 20 81 EXPLODED DRAWING A-Model No.
WLCCEL2309.0 R0809A 9 9 10 8 4 60 15 88 75 88 11 88 67 88 67 14 15 64 65 12 27 15 15 13 2 6 73 79 15 27 16 17 66 18 79 73 79 64 65 23 20 24 20 19 24 22 14 64 65 15 8 5 6 88 75 88 67 11 88 88 67 13 12 19 24 24 23 65 64 21 85 85 68 70 25 20 81 18 85 26 68 85 68 26 70 25 20 81 EXPLODED DRAWING A-Model No.

User Manual
Page 19
WLCCEL2309.0 R0809A 29 28 59 60 80 31 72 28 29 59 78 90 7 60 74 78 90 60 60 72 32 45 34 7 3 90 78 89 84 90 78 89 59 50 53 64 52 84 60 63 76 83 50 64 51 77 49 60 47 46 55 59 69 48 54 44 87 71 82 82 41 40 57 38 61 56 40 41 39 87 71 43 58 86 87 87 86 62 35 1 86 87 57 87 86 42 84 36 80 30 60 33 34 45 36 37 19 EXPLODED DRAWING B-Model No.
WLCCEL2309.0 R0809A 29 28 59 60 80 31 72 28 29 59 78 90 7 60 74 78 90 60 60 72 32 45 34 7 3 90 78 89 84 90 78 89 59 50 53 64 52 84 60 63 76 83 50 64 51 77 49 60 47 46 55 59 69 48 54 44 87 71 82 82 41 40 57 38 61 56 40 41 39 87 71 43 58 86 87 87 86 62 35 1 86 87 57 87 86 42 84 36 80 30 60 33 34 45 36 37 19 EXPLODED DRAWING B-Model No.
User Manual
Page 20
... REPLACEMENT PARTS To order replacement parts, please see the PART LIST and the EXPLODED DRAWING near the end of this manual) LIMITED WARRANTY ICON of Canada, Inc. (ICON) warrants this manual. ICONʼs obligation under normal use and service conditions. All repairs for ninety (90) days from defects in connection with respect to be free from the date of purchase. No other warranties, and any implied warranties of merchantability or fitness...
... REPLACEMENT PARTS To order replacement parts, please see the PART LIST and the EXPLODED DRAWING near the end of this manual) LIMITED WARRANTY ICON of Canada, Inc. (ICON) warrants this manual. ICONʼs obligation under normal use and service conditions. All repairs for ninety (90) days from defects in connection with respect to be free from the date of purchase. No other warranties, and any implied warranties of merchantability or fitness...


