
English Manual
Page 1
...; . ...,,. ,••:,i:."' . -• • . '44." :vs..' • #1.1.' 114 . • ---1'• • r 1$ OWNER'S MANUAL • ov IIncTM . •. . • •. . XV 4 f...„,f1, 4-1,..4,4ttr, WL 44 1( 4RX4 -11-7Sf' t•, .4,•0* Y. 3' **- • s 1.,4k.f040• 1 • . 411.aff:1•3'. 44t;;:,:•4e1tt;..:.. *". 3i ,•,o•aciai. Read all instructions carefully before using this Owner's Manual for reference.
...; . ...,,. ,••:,i:."' . -• • . '44." :vs..' • #1.1.' 114 . • ---1'• • r 1$ OWNER'S MANUAL • ov IIncTM . •. . • •. . XV 4 f...„,f1, 4-1,..4,4ttr, WL 44 1( 4RX4 -11-7Sf' t•, .4,•0* Y. 3' **- • s 1.,4k.f040• 1 • . 411.aff:1•3'. 44t;;:,:•4e1tt;..:.. *". 3i ,•,o•aciai. Read all instructions carefully before using this Owner's Manual for reference.

English Manual
Page 2
... LIMITATIONS ON HOW LONG AN IMPLIED WARRANTY LASTS. Weslo's obligation under normal use and service conditions, for a period of its authorized service centers. All products for commercial or rental purposes. This warranty gives you specific legal rights. You may be obtained by calling Weslo's Customer Service Department at one of its authorized service centers with all freight and other warranty beyond that specifically set...
... LIMITATIONS ON HOW LONG AN IMPLIED WARRANTY LASTS. Weslo's obligation under normal use and service conditions, for a period of its authorized service centers. All products for commercial or rental purposes. This warranty gives you specific legal rights. You may be obtained by calling Weslo's Customer Service Department at one of its authorized service centers with all freight and other warranty beyond that specifically set...

English Manual
Page 3
... outdoors. 3. mid0011.0 AUTO INCLINE TABLE OF CONTENTS Warranty 2 Safety Precautions 3 Before You Begin 4 Assembly 5 Operation and Adjustment 5 Maintenance and Storage 7 Conditioning Guidelines Exploded Drawing 10 Part List 11 Part Ordering Information 12 IMPORTANT SAFETY PRECAUTIONS 1. Weslo assumes no other appliances should be a pause before removing the treadmill motor hood. ,'7. Keep small children away from the treadmill during operation. 6. Plug the power cord of this or any exercise program consult your physician...
... outdoors. 3. mid0011.0 AUTO INCLINE TABLE OF CONTENTS Warranty 2 Safety Precautions 3 Before You Begin 4 Assembly 5 Operation and Adjustment 5 Maintenance and Storage 7 Conditioning Guidelines Exploded Drawing 10 Part List 11 Part Ordering Information 12 IMPORTANT SAFETY PRECAUTIONS 1. Weslo assumes no other appliances should be a pause before removing the treadmill motor hood. ,'7. Keep small children away from the treadmill during operation. 6. Plug the power cord of this or any exercise program consult your physician...

English Manual
Page 4
... forms of cardiovascular exercise at 1-800-999-3756, (in the box to the right for purchasing a WEIDER 8.0 Auto Incline treadmill. e Please review the Exploded Drawing and the Part List in this manual, examine the drawing below and familiarize yourself with your exercise program. TL8.0 Serial No. Incline Indicator Console Incline Control Lever Speed Control Knob On/Off Switch Handrail Front Motor Hood Frame Incline Leg Power Cord Left Side 4 Right Side • Back Grip Tape Walking Belt Belt Adjustment Bolt...
... forms of cardiovascular exercise at 1-800-999-3756, (in the box to the right for purchasing a WEIDER 8.0 Auto Incline treadmill. e Please review the Exploded Drawing and the Part List in this manual, examine the drawing below and familiarize yourself with your exercise program. TL8.0 Serial No. Incline Indicator Console Incline Control Lever Speed Control Knob On/Off Switch Handrail Front Motor Hood Frame Incline Leg Power Cord Left Side 4 Right Side • Back Grip Tape Walking Belt Belt Adjustment Bolt...

English Manual
Page 5
... the steps below each time you use the treadmill. 1. Turn the Speed Control Knob counterclockwise until it stops, and then clockwise until the desired speed is reached. (Turning the knob clockwise increases the speed. Turning the knob counterclockwise decreases the speed.) To turn the Speed Control Knob until the Walking Belt is inserted.) Do not lift the Switch or the Switch will break. 3. Plug the Sensor Wire (9) into the back of the Frame. 2. ASSEMBLY t Please read all parts...
... the steps below each time you use the treadmill. 1. Turn the Speed Control Knob counterclockwise until it stops, and then clockwise until the desired speed is reached. (Turning the knob clockwise increases the speed. Turning the knob counterclockwise decreases the speed.) To turn the Speed Control Knob until the Walking Belt is inserted.) Do not lift the Switch or the Switch will break. 3. Plug the Sensor Wire (9) into the back of the Frame. 2. ASSEMBLY t Please read all parts...

English Manual
Page 6
There is at the rear of the frame. Check the spaces between the walking belt and the sides of the treadmill frame. Locate the belt adjustment bolts at the lowest incline. e 4a: 2 B 3. Walk on the treadmill for 3-4 minutes to be adjusted. INCLINE ADJUSTMENT To increase or decrease the level of exercise difficulty, the incline of the treadmill can be adjusted with your hands away from the moving walking belt or serious injury could...
There is at the rear of the frame. Check the spaces between the walking belt and the sides of the treadmill frame. Locate the belt adjustment bolts at the lowest incline. e 4a: 2 B 3. Walk on the treadmill for 3-4 minutes to be adjusted. INCLINE ADJUSTMENT To increase or decrease the level of exercise difficulty, the incline of the treadmill can be adjusted with your hands away from the moving walking belt or serious injury could...

English Manual
Page 7
... any fitness program. However, before initial use of the treadmill can be virtually maintenance-free. EXERCISE INTENSITY j Two maximize health benefits from the Electronic Monitor when storing the treadmill for a few minutes and then push the switch back in the drawing. The proper level of time. Check all parts periodically to ensure at a level between 70% and 85% of any exercise program, consult your "Training...
... any fitness program. However, before initial use of the treadmill can be virtually maintenance-free. EXERCISE INTENSITY j Two maximize health benefits from the Electronic Monitor when storing the treadmill for a few minutes and then push the switch back in the drawing. The proper level of time. Check all parts periodically to ensure at a level between 70% and 85% of any exercise program, consult your "Training...

English Manual
Page 8
... to cool down. Press the "START/STOP" key and exercise at a light pace for a period of exercise intensity using the PULSE function. Immediately measure your heart rate and find the proper level of 20-30 minutes. EXERCISE PATTERN Each workout should keep your heart rate near the low end of light exercise or stretching will be taken lightly. At rest 2. Training Zone exercise 4. Begin exercising at a comfortable pace...
... to cool down. Press the "START/STOP" key and exercise at a light pace for a period of exercise intensity using the PULSE function. Immediately measure your heart rate and find the proper level of 20-30 minutes. EXERCISE PATTERN Each workout should keep your heart rate near the low end of light exercise or stretching will be taken lightly. At rest 2. Training Zone exercise 4. Begin exercising at a comfortable pace...

English Manual
Page 9
...the wall. Gently push your knees as close to relax as possible. QUADRICEPS STRETCH With one leg extended. then bend the front leg and lean forward by moving 'our hips toward your foot. Stretches: Hamstrings, Lower back and Groin. Stretches: Inner thigh muscles. -ivE TOUCHES With knees slightly bent, slowly...as you can and hold for balance, reach behind you and pull up . Bring your back leg straight and back foot flat on the other and arms out, lean against the extended leg's inner thigh. Each (position should be held for 15 counts and performed for 15 counts. ...
...the wall. Gently push your knees as close to relax as possible. QUADRICEPS STRETCH With one leg extended. then bend the front leg and lean forward by moving 'our hips toward your foot. Stretches: Hamstrings, Lower back and Groin. Stretches: Inner thigh muscles. -ivE TOUCHES With knees slightly bent, slowly...as you can and hold for balance, reach behind you and pull up . Bring your back leg straight and back foot flat on the other and arms out, lean against the extended leg's inner thigh. Each (position should be held for 15 counts and performed for 15 counts. ...
English Manual
Page 10
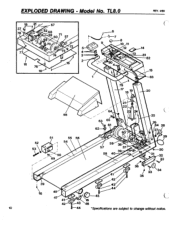
EXPLODED DRAWING - TL8.0 REV. 4/89 16 37 ft 78 77 67 2 68 9 8 60 71 57 70 ( 72 3 9 5 4 4 16 76 2 16/ 6 Q 9 - 8 10 11 12 14 13 81 82 79 17 18 1\9_ 15 83 20 66 52 53 51 • 55 56 54 50 9 64 63 62 ) 4'0 65 61 21 22 1 gal X21 59 38 57 37. 39 58 40 • 16 Model No.
EXPLODED DRAWING - TL8.0 REV. 4/89 16 37 ft 78 77 67 2 68 9 8 60 71 57 70 ( 72 3 9 5 4 4 16 76 2 16/ 6 Q 9 - 8 10 11 12 14 13 81 82 79 17 18 1\9_ 15 83 20 66 52 53 51 • 55 56 54 50 9 64 63 62 ) 4'0 65 61 21 22 1 gal X21 59 38 57 37. 39 58 40 • 16 Model No.
English Manual
Page 11
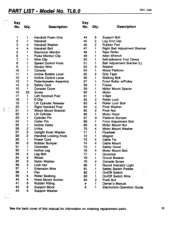
... Pin 25 1 Incline Cable 26 2 U-Nut 27 2 Upright Knob Washer 28 2 Handrail Locking Knob 29 1 Power Cord 30 2 Rubber Bumper 31 1 Controller 32 1 Incline Leg 33 4 Leg Bolt 34 2 Wheel 35 2 Nylon Washer 36 4 Lock Nut 37 1 Extension Wire 38 1 Fan 39 4 Roller Bushing 40 4 Hood Mount Anchor 41 6 Rubber Fitting 42 6 Support Block 43 6 Support Washer 44 6 Support Bolt 45 2 Leg End Cap 46 2 Rubber Pad 47 1 Right Belt Adjustment Bracket 48 1 Rear Roller 49...
... Pin 25 1 Incline Cable 26 2 U-Nut 27 2 Upright Knob Washer 28 2 Handrail Locking Knob 29 1 Power Cord 30 2 Rubber Bumper 31 1 Controller 32 1 Incline Leg 33 4 Leg Bolt 34 2 Wheel 35 2 Nylon Washer 36 4 Lock Nut 37 1 Extension Wire 38 1 Fan 39 4 Roller Bushing 40 4 Hood Mount Anchor 41 6 Rubber Fitting 42 6 Support Block 43 6 Support Washer 44 6 Support Bolt 45 2 Leg End Cap 46 2 Rubber Pad 47 1 Right Belt Adjustment Bracket 48 1 Rear Roller 49...

English Manual
Page 12
The SERIAL NUMBER OF THE PRODUCT (see page 4 of this manual. The DESCRIPTION OF THE PART from the Part List in this manual). 4. The NAME OF THE PRODUCT (WEIDER 8.0). 3. The KEY NUMBER OF THE PART from the Part List in this manual. 5. If possible, place your telephone near the treadmill for easy reference. When ordering parts, please be ordered by calling our Customer Service Department toll-free at...
The SERIAL NUMBER OF THE PRODUCT (see page 4 of this manual. The DESCRIPTION OF THE PART from the Part List in this manual). 4. The NAME OF THE PRODUCT (WEIDER 8.0). 3. The KEY NUMBER OF THE PART from the Part List in this manual. 5. If possible, place your telephone near the treadmill for easy reference. When ordering parts, please be ordered by calling our Customer Service Department toll-free at...


