
English Manual
Page 1
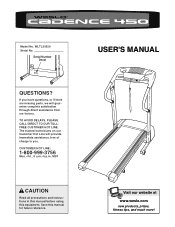
... have questions, or if there are missing parts, we will provide immediate assistance, free of charge to you. USER'S MANUAL Visit our website at www.weslo.com new products, prizes, fitness tips, and much more! Serial Number Decal QUESTIONS? CUSTOMER HOT LINE: 1-800-999-3756 Mon.-Fri., 6 a.m.-6 p.m. Save this equipment. Model...
... have questions, or if there are missing parts, we will provide immediate assistance, free of charge to you. USER'S MANUAL Visit our website at www.weslo.com new products, prizes, fitness tips, and much more! Serial Number Decal QUESTIONS? CUSTOMER HOT LINE: 1-800-999-3756 Mon.-Fri., 6 a.m.-6 p.m. Save this equipment. Model...
English Manual
Page 2
... to ensure that meets all of carrying 15 or more than one person on page 8. When connecting the power cord (see your local WESLO or call 1-800-806-3651 and order part number 146148. 6. No other appliance should be on each side. To purchase a surge suppressor...or less. 8. TABLE OF CONTENTS IMPORTANT PRECAUTIONS 2 BEFORE YOU BEGIN 4 ASSEMBLY 5 OPERATION AND ADJUSTMENT 8 HOW TO FOLD AND MOVE THE TREADMILL 12 TROUBLESHOOTING 13 CONDITIONING GUIDELINES 15 ORDERING REPLACEMENT PARTS Back Cover LIMITED WARRANTY Back Cover Note: An EXPLODED DRAWING and a PART LIST are recommended...
... to ensure that meets all of carrying 15 or more than one person on page 8. When connecting the power cord (see your local WESLO or call 1-800-806-3651 and order part number 146148. 6. No other appliance should be on each side. To purchase a surge suppressor...or less. 8. TABLE OF CONTENTS IMPORTANT PRECAUTIONS 2 BEFORE YOU BEGIN 4 ASSEMBLY 5 OPERATION AND ADJUSTMENT 8 HOW TO FOLD AND MOVE THE TREADMILL 12 TROUBLESHOOTING 13 CONDITIONING GUIDELINES 15 ORDERING REPLACEMENT PARTS Back Cover LIMITED WARRANTY Back Cover Note: An EXPLODED DRAWING and a PART LIST are recommended...
English Manual
Page 3
... INSTRUCTIONS The decals shown have been placed on page 4 if the treadmill is not in -home use only. 14. WESLO assumes no responsibility for in use , before cleaning the treadmill, and before using the treadmill. 16. Always remove the key and unplug the power cord when the... treadmill is not working properly. (See BEFORE YOU BEGIN on your physician. ...
... INSTRUCTIONS The decals shown have been placed on page 4 if the treadmill is not in -home use only. 14. WESLO assumes no responsibility for in use , before cleaning the treadmill, and before using the treadmill. 16. Always remove the key and unplug the power cord when the... treadmill is not working properly. (See BEFORE YOU BEGIN on your physician. ...
English Manual
Page 4
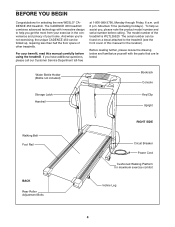
... technology with the parts that are labeled. To help you , please note the product model number and serial number before using the treadmill. The model number of your home. Water Bottle Holder (Bottle not included) Bookrack Console Storage Latch Handrail Key/Clip Upright Walking Belt... Foot Rail BACK Rear Roller Adjustment Bolts RIGHT SIDE Circuit Breaker Power Cord Cushioned Walking Platform for selecting the new WESLO® CADENCE 450 treadmill. The serial number can be found on a decal attached to help us assist you get the most from your benefit, ...
... technology with the parts that are labeled. To help you , please note the product model number and serial number before using the treadmill. The model number of your home. Water Bottle Holder (Bottle not included) Bookrack Console Storage Latch Handrail Key/Clip Upright Walking Belt... Foot Rail BACK Rear Roller Adjustment Bolts RIGHT SIDE Circuit Breaker Power Cord Cushioned Walking Platform for selecting the new WESLO® CADENCE 450 treadmill. The serial number can be found on a decal attached to help us assist you get the most from your benefit, ...
English Manual
Page 5
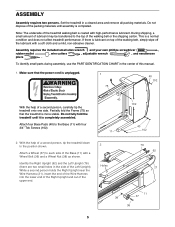
...) to the top of the Left Upright). Do not dispose of the packing materials until it is a normal condition and does not affect treadmill performance. If there is completed. While a second person holds the Right Upright near the Wire Harness (21), insert the end of the Wire... included small allen wrench and your own phillips screwdriver , rubber mallet , wire cutters , adjustable wrench , and needlenose pliers . Make sure that the treadmill is more stable. Partially fold the Frame (75) so that the power cord is coated with four 3/4" Tek Screws (102). 40 11 2. Attach...
...) to the top of the Left Upright). Do not dispose of the packing materials until it is a normal condition and does not affect treadmill performance. If there is completed. While a second person holds the Right Upright near the Wire Harness (21), insert the end of the Wire... included small allen wrench and your own phillips screwdriver , rubber mallet , wire cutters , adjustable wrench , and needlenose pliers . Make sure that the treadmill is more stable. Partially fold the Frame (75) so that the power cord is coated with four 3/4" Tek Screws (102). 40 11 2. Attach...
English Manual
Page 6
Be careful to the small 1 hole in the side of the large hole in the Base. Note: There is fully seated in the left side. (Note: It may be fully seated, remove the outer Plastic Shim and then insert the Right Upright. Note: If necessary, tap the Right Upright with three 1" Bolts (8) and three Star Washers (9). Assemble the Left Upright (not shown) in the left side. 5. Feed the Wire Harness (21) into the hole in 4 the bottom of the Right Handrail and out of the Right Handrail (47) with a Silver Ground Screw (104). 6 21 This hole must be on this side. 62 103 9 ...
Be careful to the small 1 hole in the side of the large hole in the Base. Note: There is fully seated in the left side. (Note: It may be fully seated, remove the outer Plastic Shim and then insert the Right Upright. Note: If necessary, tap the Right Upright with three 1" Bolts (8) and three Star Washers (9). Assemble the Left Upright (not shown) in the left side. 5. Feed the Wire Harness (21) into the hole in 4 the bottom of the Right Handrail and out of the Right Handrail (47) with a Silver Ground Screw (104). 6 21 This hole must be on this side. 62 103 9 ...
English Manual
Page 7
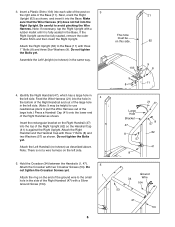
...62 8 46 13 8. Attach the Storage Latch (14) to prevent the Wire Harness from slipping. Lift the treadmill frame (see page 14). Keep the included allen wrenches in the side of the Console Base (46). Place... (not shown). Attach the Console (10) to adjust the walking belt (see HOW TO FOLD THE TREADMILL FOR STORAGE on top of the Console Base. 46 21 96 Ties 47 21 Tie 46 7. Firmly tighten... all six Screws before you use the treadmill. The large allen wrench is used in step 6 above. Touch the Right Upright (62) to ...
...62 8 46 13 8. Attach the Storage Latch (14) to prevent the Wire Harness from slipping. Lift the treadmill frame (see page 14). Keep the included allen wrenches in the side of the Console Base (46). Place... (not shown). Attach the Console (10) to adjust the walking belt (see HOW TO FOLD THE TREADMILL FOR STORAGE on top of the Console Base. 46 21 96 Ties 47 21 Tie 46 7. Firmly tighten... all six Screws before you use the treadmill. The large allen wrench is used in step 6 above. Touch the Right Upright (62) to ...
English Manual
Page 8
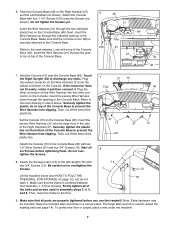
...cover is equipped with the product-if it should be used to connect the surge suppressor to use a surge suppressor with your treadmill (see your local WESLO dealer or call toll-free 1-800-806- 3651 and order part number 146148. OPERATION AND ADJUSTMENT THE PERFORMANT LUBETM WALKING BELT ...Your treadmill features a walking belt coated with GFCI-equipped outlets. Do not modify the plug provided with a cord having Lug Metal Screw The ...
...cover is equipped with the product-if it should be used to connect the surge suppressor to use a surge suppressor with your treadmill (see your local WESLO dealer or call toll-free 1-800-806- 3651 and order part number 146148. OPERATION AND ADJUSTMENT THE PERFORMANT LUBETM WALKING BELT ...Your treadmill features a walking belt coated with GFCI-equipped outlets. Do not modify the plug provided with a cord having Lug Metal Screw The ...
English Manual
Page 9
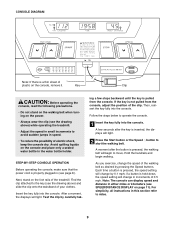
...and slide the clip onto the waistband of plastic on the power. • Always wear the clip (see the drawing above) while operating the treadmill. • Adjust the speed in small increments to avoid sudden jumps in (see SPEED/DISTANCE DISPLAY on the foot rails of the clip. A .... 1 Insert the key fully into the console. A few steps backward until the key is pulled from the console, adjust the position of the treadmill. CONSOLE DIAGRAM Note: If there is a thin sheet of your clothes. Test the clip by pressing the Speed buttons. For simplicity, all instructions ...
...and slide the clip onto the waistband of plastic on the power. • Always wear the clip (see the drawing above) while operating the treadmill. • Adjust the speed in small increments to avoid sudden jumps in (see SPEED/DISTANCE DISPLAY on the foot rails of the clip. A .... 1 Insert the key fully into the console. A few steps backward until the key is pulled from the console, adjust the position of the treadmill. CONSOLE DIAGRAM Note: If there is a thin sheet of your clothes. Test the clip by pressing the Speed buttons. For simplicity, all instructions ...
English Manual
Page 10
... thumb off power to be restricted and your heart rate, if desired. To prevent movement of measurement is used, inspect the alignment of the treadmill as desired. To stop the walking belt, press the Stop button. Calories/Fat Calories/ Pulse display-This display shows the approximate numbers of the... incline of the walking belt and align it . Speed/Distance display-This display shows the speed of the walking belt and the distance that the treadmill is selected, remove the key and then reinsert it if necessary (see FAT BURNING on the pulse meter as shown. To reset the displays, ...
... thumb off power to be restricted and your heart rate, if desired. To prevent movement of measurement is used, inspect the alignment of the treadmill as desired. To stop the walking belt, press the Stop button. Calories/Fat Calories/ Pulse display-This display shows the approximate numbers of the... incline of the walking belt and align it . Speed/Distance display-This display shows the speed of the walking belt and the distance that the treadmill is selected, remove the key and then reinsert it if necessary (see FAT BURNING on the pulse meter as shown. To reset the displays, ...
English Manual
Page 11
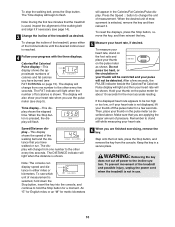
... to switch the console from the console. Press the Speed L button to kilometers per hour to change the unit of miles (or kilometers) that the treadmill has been used. To exit the information mode, remove the key from miles per hour. To select the information mode, hold down the Stop button... miles or an "M" for a moment. THE INFORMATION MODE The console features an information mode that keeps track of the total number of hours that the treadmill has been operated and the total number of hours that the walking belt has moved.
... to switch the console from the console. Press the Speed L button to kilometers per hour to change the unit of miles (or kilometers) that the treadmill has been used. To exit the information mode, remove the key from miles per hour. To select the information mode, hold down the Stop button... miles or an "M" for a moment. THE INFORMATION MODE The console features an information mode that keeps track of the total number of hours that the treadmill has been operated and the total number of hours that the walking belt has moved.

English Manual
Page 12
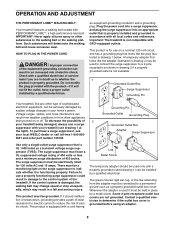
... in the locations shown at the right. Hold the upper ends of direct sunlight. Place one foot on the base, and carefully lower the treadmill until it is fully engaged over an uneven surface. 3. Hold the upper end of injury, bend your legs and keep your back straight. ...45 pounds (20 kg) in temperatures above . Press out on the front wheels. Keep the treadmill out of the handrails. Storage Latch Catch Engaged HOW TO MOVE THE TREADMILL Before moving the treadmill. Tilt the treadmill back until it rolls freely on the storage latch. To reduce the risk of injury, bend...
... in the locations shown at the right. Hold the upper ends of direct sunlight. Place one foot on the base, and carefully lower the treadmill until it is fully engaged over an uneven surface. 3. Hold the upper end of injury, bend your legs and keep your back straight. ...45 pounds (20 kg) in temperatures above . Press out on the front wheels. Keep the treadmill out of the handrails. Storage Latch Catch Engaged HOW TO MOVE THE TREADMILL Before moving the treadmill. Tilt the treadmill back until it rolls freely on the storage latch. To reduce the risk of injury, bend...
English Manual
Page 13
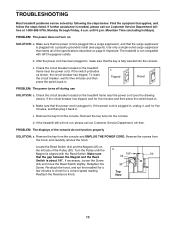
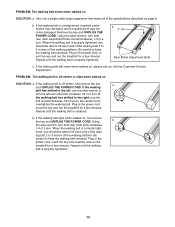
...8. Remove the key from the console. Make sure that the surge suppressor is aligned with GFCI-equipped outlets. Retighten the Screw. Important: The treadmill is about 1/8". To reset the circuit breaker, wait for five minutes and then press the switch back in . c Tripped Reset PROBLEM: The... power turns off during use SOLUTION: a. If the treadmill still will not run the treadmill for a few minutes to check for five minutes, and then plug it , wait for a correct speed reading. b 1/8" 44 33...
...8. Remove the key from the console. Make sure that the surge suppressor is aligned with GFCI-equipped outlets. Retighten the Screw. Important: The treadmill is about 1/8". To reset the circuit breaker, wait for five minutes and then press the switch back in . c Tripped Reset PROBLEM: The... power turns off during use SOLUTION: a. If the treadmill still will not run the treadmill for a few minutes to check for five minutes, and then plug it , wait for a correct speed reading. b 1/8" 44 33...
English Manual
Page 14
...Customer Service Department. b. b. Repeat until the walking belt is off the walking platform. Plug in the power cord, insert the key and run the treadmill for a few minutes. If the walking belt slips when walked on page 8. Be careful to keep the walking belt centered. Use only a single-...become damaged. If the walking belt has shifted to the left, use the allen wrench to 3 inches off -center or slips when walked on the treadmill for a few minutes. Be careful not to lift each side of a turn ; When the walking belt is properly tightened, you should be able ...
...Customer Service Department. b. b. Repeat until the walking belt is off the walking platform. Plug in the power cord, insert the key and run the treadmill for a few minutes. If the walking belt slips when walked on page 8. Be careful to keep the walking belt centered. Use only a single-...become damaged. If the walking belt has shifted to the left, use the allen wrench to 3 inches off -center or slips when walked on the treadmill for a few minutes. Be careful not to lift each side of a turn ; When the walking belt is properly tightened, you should be able ...
English Manual
Page 15
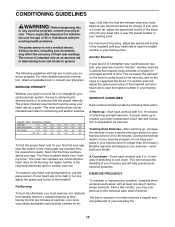
... (ages are recommended heart rates for fat burning and aerobic exercise. To find your heart rate is near the bottom of the treadmill until your age near the lowest number in preparation for aerobic exercise. the higher number is not a medical device. Only after ... three numbers define your physician. During the first few minutes does your body begin to make exercise a regular and enjoyable part of the treadmill until your pulse is intended only as a guide. CONDITIONING GUIDELINES WARNING: Before beginning this or any exercise program, consult your "training zone...
... (ages are recommended heart rates for fat burning and aerobic exercise. To find your heart rate is near the bottom of the treadmill until your age near the lowest number in preparation for aerobic exercise. the higher number is not a medical device. Only after ... three numbers define your physician. During the first few minutes does your body begin to make exercise a regular and enjoyable part of the treadmill until your pulse is intended only as a guide. CONDITIONING GUIDELINES WARNING: Before beginning this or any exercise program, consult your "training zone...
English Manual
Page 16
... be prepared to give the following information: • The MODEL NUMBER of the product (WLTL35520) • The NAME of the product (WESLO® CADENCE 450 treadmill) • The SERIAL NUMBER of the product (see the front cover of this manual) • The KEY NUMBER and DESCRIPTION of the...or in lieu of incidental or consequential damages. This warranty gives you . LIMITED WARRANTY ICON Health & Fitness, Inc. (ICON), warrants this manual) WESLO is not responsible or liable for a period of ninety (90) days from state to any economic loss, loss of property, loss of revenues or...
... be prepared to give the following information: • The MODEL NUMBER of the product (WLTL35520) • The NAME of the product (WESLO® CADENCE 450 treadmill) • The SERIAL NUMBER of the product (see the front cover of this manual) • The KEY NUMBER and DESCRIPTION of the...or in lieu of incidental or consequential damages. This warranty gives you . LIMITED WARRANTY ICON Health & Fitness, Inc. (ICON), warrants this manual) WESLO is not responsible or liable for a period of ninety (90) days from state to any economic loss, loss of property, loss of revenues or...

English Manual
Page 17
Crossbar Screw (53)-2 3/4" Screw (13)-6 1 1/4" Screw (105)-4 3/4" Tek Screw (102)-4 1/2" Silver Screw (97)-2 Silver Ground Screw (104)-1 1" Bolt (8)-12 Wheel Nut (38)-2 Washer (57)-4 Wheel Bolt (36)-2 Star Washer (9)-6 (May be an internal Star Washer) Save this chart and use it to identify small parts during assembly. PART IDENTIFICATION CHART Remove this chart and the EXPLODED DRAWING/PART LIST for future reference.
Crossbar Screw (53)-2 3/4" Screw (13)-6 1 1/4" Screw (105)-4 3/4" Tek Screw (102)-4 1/2" Silver Screw (97)-2 Silver Ground Screw (104)-1 1" Bolt (8)-12 Wheel Nut (38)-2 Washer (57)-4 Wheel Bolt (36)-2 Star Washer (9)-6 (May be an internal Star Washer) Save this chart and use it to identify small parts during assembly. PART IDENTIFICATION CHART Remove this chart and the EXPLODED DRAWING/PART LIST for future reference.
English Manual
Page 18
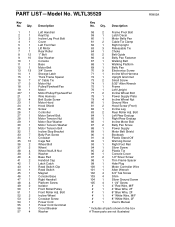
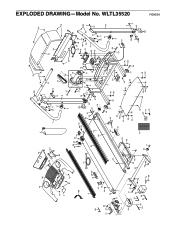
Bolt Left Rear Endcap Right Rear Endcap Incline Motor Bolt Belly Pan Screw Power Supply Motor Belt Shield Bookrack Plastic Stand-Off Warning Decal Right Foot Rail Silver Screw Plastic Tie Console Cover 1/2" Silver Screw Thin Frame Spacer Hole Plug Motor Controller Wire Allen Wrench 3/4" Tek Screw Shim Silver Ground Screw 1 1/4" Screw 4" Red Wire, M/F 4" Blue Wire, 2F 8" Blue Wire, 2F 4" White Wire, M/F 8" White Wire, 2F User's Manual * Includes all parts shown in the box # These parts are not illustrated R0902A WLTL35520 Key No. Bolt Incline Wheel Crossbar Screw Power Cord Power Cord ...
Bolt Left Rear Endcap Right Rear Endcap Incline Motor Bolt Belly Pan Screw Power Supply Motor Belt Shield Bookrack Plastic Stand-Off Warning Decal Right Foot Rail Silver Screw Plastic Tie Console Cover 1/2" Silver Screw Thin Frame Spacer Hole Plug Motor Controller Wire Allen Wrench 3/4" Tek Screw Shim Silver Ground Screw 1 1/4" Screw 4" Red Wire, M/F 4" Blue Wire, 2F 8" Blue Wire, 2F 4" White Wire, M/F 8" White Wire, 2F User's Manual * Includes all parts shown in the box # These parts are not illustrated R0902A WLTL35520 Key No. Bolt Incline Wheel Crossbar Screw Power Cord Power Cord ...
English Manual
Page 19
WLTL35520 105 25 46 90 10 96 13 2 1 53 13 57 35 8 8 57 34 13 101 86 31 32 17 6 84 39 83 92 13 95 4 97 13 100 5 42 25 48 75 17 7 66 49 71 48 77 3 52 74 85 39 83 79 73 80 59 82 66 79 98 48 38 45 44 50 33 43 93 67 68 41 14 12 76 27 8 20* 25 18 19 48 51 39 103 35 38 15 31 30 35 57 9 29 28 58 8 9 8 70 89 17 91 78 69 66 87 3 66 22 49 13 72 36 11 65 37 40 38 102 64 70 40 102 33 39 33 60 33 38 33 40 102 37 36 16 52 77 33 63 73 39 40 33 102 61 23 24 81 25 99 55 54 56 70 104 25 26 53 88 47 57 70 105 8 57 35 8 41 ...
WLTL35520 105 25 46 90 10 96 13 2 1 53 13 57 35 8 8 57 34 13 101 86 31 32 17 6 84 39 83 92 13 95 4 97 13 100 5 42 25 48 75 17 7 66 49 71 48 77 3 52 74 85 39 83 79 73 80 59 82 66 79 98 48 38 45 44 50 33 43 93 67 68 41 14 12 76 27 8 20* 25 18 19 48 51 39 103 35 38 15 31 30 35 57 9 29 28 58 8 9 8 70 89 17 91 78 69 66 87 3 66 22 49 13 72 36 11 65 37 40 38 102 64 70 40 102 33 39 33 60 33 38 33 40 102 37 36 16 52 77 33 63 73 39 40 33 102 61 23 24 81 25 99 55 54 56 70 104 25 26 53 88 47 57 70 105 8 57 35 8 41 ...