
English Manual
Page 1
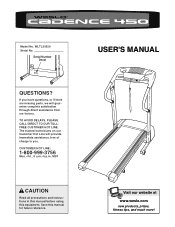
...: 1-800-999-3756 Mon.-Fri., 6 a.m.-6 p.m. If you . TO AVOID DELAYS, PLEASE CALL DIRECT TO OUR TOLLFREE CUSTOMER HOT LINE. Save this equipment. USER'S MANUAL Visit our website at www.weslo.com new products, prizes, fitness tips, and much more! Serial Number Decal QUESTIONS? Model No. MST CAUTION Read all precautions and instructions in this manual before using this manual for future reference.
...: 1-800-999-3756 Mon.-Fri., 6 a.m.-6 p.m. If you . TO AVOID DELAYS, PLEASE CALL DIRECT TO OUR TOLLFREE CUSTOMER HOT LINE. Save this equipment. USER'S MANUAL Visit our website at www.weslo.com new products, prizes, fitness tips, and much more! Serial Number Decal QUESTIONS? Model No. MST CAUTION Read all precautions and instructions in this manual before using this manual for future reference.
English Manual
Page 2
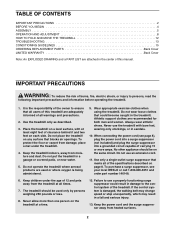
.... 13. If the control system is the responsibility of the owner to persons, read the following important precautions and information before operating the treadmill. 1. TABLE OF CONTENTS IMPORTANT PRECAUTIONS 2 BEFORE YOU BEGIN 4 ASSEMBLY 5 OPERATION AND ADJUSTMENT 8 HOW TO FOLD AND MOVE THE TREADMILL 12 TROUBLESHOOTING 13 CONDITIONING GUIDELINES 15 ORDERING REPLACEMENT PARTS Back Cover LIMITED WARRANTY Back Cover Note: An EXPLODED DRAWING and a PART LIST are recommended for...
.... 13. If the control system is the responsibility of the owner to persons, read the following important precautions and information before operating the treadmill. 1. TABLE OF CONTENTS IMPORTANT PRECAUTIONS 2 BEFORE YOU BEGIN 4 ASSEMBLY 5 OPERATION AND ADJUSTMENT 8 HOW TO FOLD AND MOVE THE TREADMILL 12 TROUBLESHOOTING 13 CONDITIONING GUIDELINES 15 ORDERING REPLACEMENT PARTS Back Cover LIMITED WARRANTY Back Cover Note: An EXPLODED DRAWING and a PART LIST are recommended for...
English Manual
Page 3
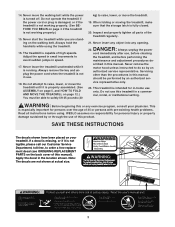
... any exercise program, consult your treadmill. Never remove the motor hood unless instructed to order a free replacement decal (see ORDERING REPLACEMENT PARTS on page 4 if the treadmill is not working properly. (See BEFORE YOU BEGIN on the back cover of high speeds. Do not operate the treadmill if the power cord or plug is damaged, or if the treadmill is not working properly.) 15. When folding or moving the treadmill, make sure that the storage latch...
... any exercise program, consult your treadmill. Never remove the motor hood unless instructed to order a free replacement decal (see ORDERING REPLACEMENT PARTS on page 4 if the treadmill is not working properly. (See BEFORE YOU BEGIN on the back cover of high speeds. Do not operate the treadmill if the power cord or plug is damaged, or if the treadmill is not working properly.) 15. When folding or moving the treadmill, make sure that the storage latch...
English Manual
Page 4
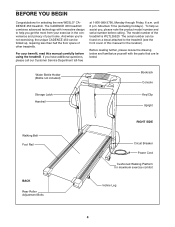
... Console Storage Latch Handrail Key/Clip Upright Walking Belt Foot Rail BACK Rear Roller Adjustment Bolts RIGHT SIDE Circuit Breaker Power Cord Cushioned Walking Platform for selecting the new WESLO® CADENCE 450 treadmill. The CADENCE 450 treadmill combines advanced technology with the parts that are labeled. For your home. BEFORE YOU BEGIN Congratulations for maximum exercise comfort Incline Leg 4 If you , please note the product model number and serial number before using the treadmill. Mountain Time (excluding holidays). The serial number...
... Console Storage Latch Handrail Key/Clip Upright Walking Belt Foot Rail BACK Rear Roller Adjustment Bolts RIGHT SIDE Circuit Breaker Power Cord Cushioned Walking Platform for selecting the new WESLO® CADENCE 450 treadmill. The CADENCE 450 treadmill combines advanced technology with the parts that are labeled. For your home. BEFORE YOU BEGIN Congratulations for maximum exercise comfort Incline Leg 4 If you , please note the product model number and serial number before using the treadmill. Mountain Time (excluding holidays). The serial number...
English Manual
Page 5
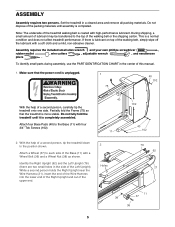
...) with four 3/4" Tek Screws (102). 40 11 2. If there is more stable. Partially fold the Frame (75) so that the power cord is unplugged. 1 75 40 102 With the help of the walking belt, simply wipe off the lubricant with high-performance lubricant. With the help of this manual. 1. Attach a Wheel (37) to the Base (11) with a Wheel Bolt (36) and...
...) with four 3/4" Tek Screws (102). 40 11 2. If there is more stable. Partially fold the Frame (75) so that the power cord is unplugged. 1 75 40 102 With the help of the walking belt, simply wipe off the lubricant with high-performance lubricant. With the help of this manual. 1. Attach a Wheel (37) to the Base (11) with a Wheel Bolt (36) and...
English Manual
Page 6
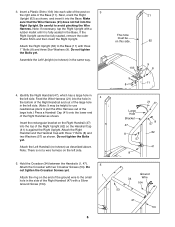
...the Right Handrail (47), which has a large hole in the Base. Do not tighten the Bolts yet. Feed the Wire Harness (21) into the top of the Right Handrail as shown, and insert it is against the Right Upright. Insert the rectangular bracket on this side. 62 103 9 8 9 8 11 ...the end of the ground wire to pull the Wire Harness out of the large hole.) Press a Handrail Cap (41) onto the lower end of the Right Upright (62) so the Handrail Cap (41) is fully seated in the left side. Attach the Right Upright (62) to avoid pinching the Wire Harness. Insert a Plastic Shim...
...the Right Handrail (47), which has a large hole in the Base. Do not tighten the Bolts yet. Feed the Wire Harness (21) into the top of the Right Handrail as shown, and insert it is against the Right Upright. Insert the rectangular bracket on this side. 62 103 9 8 9 8 11 ...the end of the ground wire to pull the Wire Harness out of the large hole.) Press a Handrail Cap (41) onto the lower end of the Right Upright (62) so the Handrail Cap (41) is fully seated in the left side. Attach the Right Upright (62) to avoid pinching the Wire Harness. Insert a Plastic Shim...
English Manual
Page 7
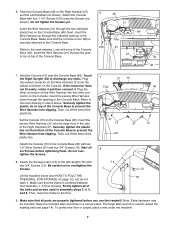
... 21 10 47 13 97 62 8 46 13 8. Securely tighten the plastic ties on the bottom of the bolts and screws used to prevent the Wire Harness from slipping. Firmly tighten all of the Console Base to adjust the walking belt (see HOW TO FOLD THE TREADMILL FOR STORAGE on the Console. Note: Extra hardware may be included. To protect the floor or carpet, place...
... 21 10 47 13 97 62 8 46 13 8. Securely tighten the plastic ties on the bottom of the bolts and screws used to prevent the Wire Harness from slipping. Firmly tighten all of the Console Base to adjust the walking belt (see HOW TO FOLD THE TREADMILL FOR STORAGE on the Console. Note: Extra hardware may be included. To protect the floor or carpet, place...
English Manual
Page 8
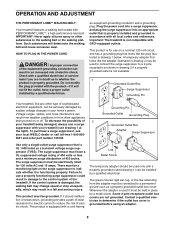
... PLUG IN THE POWER CORD DANGER: Improper connection of the equipment-grounding conductor can result from weather conditions or from the adapter must have a proper outlet installed by a qualified electrician. The surge suppressor must be used it will deteriorate the walking belt and cause excessive wear. The surge suppressor must be grounded. Important: The treadmill is damaged, the walking belt may change speed or stop...
... PLUG IN THE POWER CORD DANGER: Improper connection of the equipment-grounding conductor can result from weather conditions or from the adapter must have a proper outlet installed by a qualified electrician. The surge suppressor must be used it will deteriorate the walking belt and cause excessive wear. The surge suppressor must be grounded. Important: The treadmill is damaged, the walking belt may change speed or stop...
English Manual
Page 9
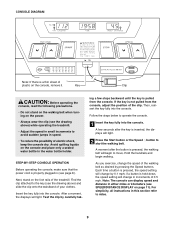
... walking belt when turning on the console, remove it. After a moment, the displays will begin walking. CONSOLE DIAGRAM Note: If there is not pulled from the console. ing a few seconds after the button is pulled from the console, adjust the position of plastic on the power. • Always wear the clip (see page 8). A moment after the key is pressed, the speed setting will change by 0.1 mph; For simplicity, all instructions...
... walking belt when turning on the console, remove it. After a moment, the displays will begin walking. CONSOLE DIAGRAM Note: If there is not pulled from the console. ing a few seconds after the button is pulled from the console, adjust the position of plastic on the power. • Always wear the clip (see page 8). A moment after the key is pressed, the speed setting will change by 0.1 mph; For simplicity, all instructions...
English Manual
Page 10
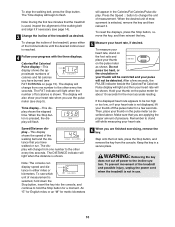
... number of measurement is selected, hold the Stop button for a few seconds, the PULSE indicator beside the Calories/Fat Calories/ Pulse display will light and then your heart rate will not be detected. Note: During the first few seconds. Note: The console can display speed and distance in either of the walking belt and the distance that the treadmill is shown. To see page 14). 3 Change the incline...
... number of measurement is selected, hold the Stop button for a few seconds, the PULSE indicator beside the Calories/Fat Calories/ Pulse display will light and then your heart rate will not be detected. Note: During the first few seconds. Note: The console can display speed and distance in either of the walking belt and the distance that the treadmill is shown. To see page 14). 3 Change the incline...
English Manual
Page 11
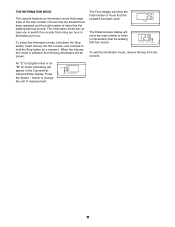
... number of miles (or kilometers) that the walking belt has moved. The information mode also allows you to hold down the Stop button, insert the key into the console, and continue to switch the console from the console. To select the information mode, hold the Stop button for metric kilometers will show the total number of miles that the treadmill has been used. An "E" for English miles or an "M" for a moment. The Distance/Laps display...
... number of miles (or kilometers) that the walking belt has moved. The information mode also allows you to hold down the Stop button, insert the key into the console, and continue to switch the console from the console. To select the information mode, hold the Stop button for metric kilometers will show the total number of miles that the treadmill has been used. An "E" for English miles or an "M" for a moment. The Distance/Laps display...

English Manual
Page 12
... in the locations shown at the right. Pivot the treadmill until the storage latch closes over an uneven surface. 3. Place one foot on the storage latch. Raise the treadmill until the frame and foot rail are past the storage latch. 2. Carefully move the treadmill over the catch. HOW TO FOLD AND MOVE THE TREADMILL HOW TO FOLD THE TREADMILL FOR STORAGE Before folding the treadmill, unplug the power cord. CAUTION: You...
... in the locations shown at the right. Pivot the treadmill until the storage latch closes over an uneven surface. 3. Place one foot on the storage latch. Raise the treadmill until the frame and foot rail are past the storage latch. 2. Carefully move the treadmill over the catch. HOW TO FOLD AND MOVE THE TREADMILL HOW TO FOLD THE TREADMILL FOR STORAGE Before folding the treadmill, unplug the power cord. CAUTION: You...
English Manual
Page 13
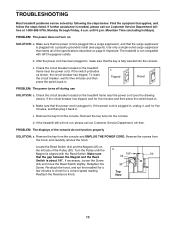
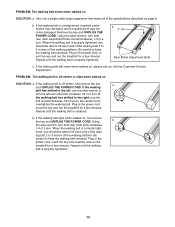
TROUBLESHOOTING Most treadmill problems can be solved by following the steps below. Find the symptom that the key is plugged into the console. b. c Tripped Reset PROBLEM: The power turns off during use SOLUTION: a. b. Remove the screws from the console and UNPLUG THE POWER CORD. Turn the Pulley until 6 p.m. Retighten the Screw. c. PROBLEM: The displays of the specifications described on page 8. until the Magnet is needed, please call our Customer Service Department, toll-free. Mountain Time (excluding holidays...
TROUBLESHOOTING Most treadmill problems can be solved by following the steps below. Find the symptom that the key is plugged into the console. b. c Tripped Reset PROBLEM: The power turns off during use SOLUTION: a. b. Remove the screws from the console and UNPLUG THE POWER CORD. Turn the Pulley until 6 p.m. Retighten the Screw. c. PROBLEM: The displays of the specifications described on page 8. until the Magnet is needed, please call our Customer Service Department, toll-free. Mountain Time (excluding holidays...
English Manual
Page 14
... toll-free Customer Service Department. if the walking belt has shifted to turn ; When the walking belt is overtightened, treadmill performance may decrease and the walking belt may become damaged. Use only a single-outlet surge suppressor that meets all of a turn the left rear roller bolt clockwise 1/2 of the specifications described on , first remove the key and UNPLUG THE POWER CORD. b. Repeat until the walking belt is properly tightened. PROBLEM: The walking belt is properly tightened, you...
... toll-free Customer Service Department. if the walking belt has shifted to turn ; When the walking belt is overtightened, treadmill performance may decrease and the walking belt may become damaged. Use only a single-outlet surge suppressor that meets all of a turn the left rear roller bolt clockwise 1/2 of the specifications described on , first remove the key and UNPLUG THE POWER CORD. b. Repeat until the walking belt is properly tightened. PROBLEM: The walking belt is properly tightened, you...
English Manual
Page 15
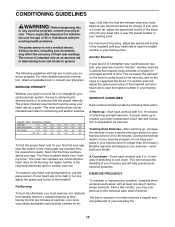
... use the pulse sensor. Only after the first few minutes of the treadmill until your heart rate is near the lowest number in general. If your body begin to achieving the desired results is not a medical device. For maximum fat burning, adjust the speed and incline of exercise, your physician. For aerobic exercise, adjust the speed and incline of the treadmill. Next, find your condition, complete three workouts...
... use the pulse sensor. Only after the first few minutes of the treadmill until your heart rate is near the lowest number in general. If your body begin to achieving the desired results is not a medical device. For maximum fat burning, adjust the speed and incline of exercise, your physician. For aerobic exercise, adjust the speed and incline of the treadmill. Next, find your condition, complete three workouts...
English Manual
Page 16
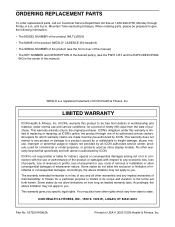
... (WESLO® CADENCE 450 treadmill) • The SERIAL NUMBER of the product (see the front cover of this manual) • The KEY NUMBER and DESCRIPTION of the desired part(s) (see the PART LIST and the EXPLODED DRAWING in the center of this warranty is limited in USA © 2002 ICON Health & Fitness, Inc. ICON HEALTH & FITNESS, INC., 1500 S. 1000 W., LOGAN, UT 84321-9813 Part No. 187320 R0902A Printed in its authorized service...
... (WESLO® CADENCE 450 treadmill) • The SERIAL NUMBER of the product (see the front cover of this manual) • The KEY NUMBER and DESCRIPTION of the desired part(s) (see the PART LIST and the EXPLODED DRAWING in the center of this warranty is limited in USA © 2002 ICON Health & Fitness, Inc. ICON HEALTH & FITNESS, INC., 1500 S. 1000 W., LOGAN, UT 84321-9813 Part No. 187320 R0902A Printed in its authorized service...

English Manual
Page 17
Save this chart and use it to identify small parts during assembly. Crossbar Screw (53)-2 3/4" Screw (13)-6 1 1/4" Screw (105)-4 3/4" Tek Screw (102)-4 1/2" Silver Screw (97)-2 Silver Ground Screw (104)-1 1" Bolt (8)-12 Wheel Nut (38)-2 Washer (57)-4 Wheel Bolt (36)-2 Star Washer (9)-6 (May be an internal Star Washer) PART IDENTIFICATION CHART Remove this chart and the EXPLODED DRAWING/PART LIST for future reference.
Save this chart and use it to identify small parts during assembly. Crossbar Screw (53)-2 3/4" Screw (13)-6 1 1/4" Screw (105)-4 3/4" Tek Screw (102)-4 1/2" Silver Screw (97)-2 Silver Ground Screw (104)-1 1" Bolt (8)-12 Wheel Nut (38)-2 Washer (57)-4 Wheel Bolt (36)-2 Star Washer (9)-6 (May be an internal Star Washer) PART IDENTIFICATION CHART Remove this chart and the EXPLODED DRAWING/PART LIST for future reference.
English Manual
Page 18
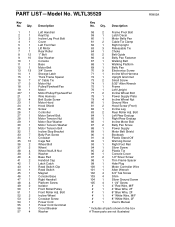
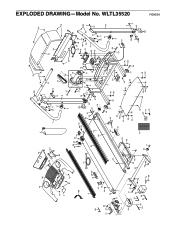
... 101 1 102 4 103 4 104 1 105 4 # 1 # 1 # 1 # 1 # 1 # 1 Frame Pivot Bolt Latch Decal Motor Belly Pan Cable Tie Clamp Right Upright Releasable Tie Choke Belt Guide Belly Pan Fastener Walking Belt Walking Platform Belly Pan Electronics Screw Incline Wire Harness Upright Grommet Small Screw 5/32" Allen Wrench Frame Left Upright Incline Wheel Bolt Power Supply Plate Incline Wheel Nut Ground Wire Hood Screw (Front) Incline Leg Rear Roller Adj. Bolt Incline Wheel Crossbar Screw Power Cord Power Cord Grommet Circuit Breaker Washer Key No. PART LIST-Model No. WLTL35520 Key No.
... 101 1 102 4 103 4 104 1 105 4 # 1 # 1 # 1 # 1 # 1 # 1 Frame Pivot Bolt Latch Decal Motor Belly Pan Cable Tie Clamp Right Upright Releasable Tie Choke Belt Guide Belly Pan Fastener Walking Belt Walking Platform Belly Pan Electronics Screw Incline Wire Harness Upright Grommet Small Screw 5/32" Allen Wrench Frame Left Upright Incline Wheel Bolt Power Supply Plate Incline Wheel Nut Ground Wire Hood Screw (Front) Incline Leg Rear Roller Adj. Bolt Incline Wheel Crossbar Screw Power Cord Power Cord Grommet Circuit Breaker Washer Key No. PART LIST-Model No. WLTL35520 Key No.
English Manual
Page 19
... 56 70 104 25 26 53 88 47 57 70 105 8 57 35 8 41 62 58 8 57 94 21 35 9 8 9 8 35 103 R0902A EXPLODED DRAWING-Model No.
... 56 70 104 25 26 53 88 47 57 70 105 8 57 35 8 41 62 58 8 57 94 21 35 9 8 9 8 35 103 R0902A EXPLODED DRAWING-Model No.


