

Instruction Manual
Page 1
... precautions and instructions in this manual before using this product, or if you need to give the following information: • the MODEL NUMBER of the product (WLEMBE73201) • the NAME of the product (WESLO® 400 weight bench) • the SERIAL NUMBER of the product • the KEY NUMBER and DESCRIPTION of the part(s) (see the PART LIST and the EXPLODED DRAWING on the weight bench. office, or write: ICON Health & Fitness, Ltd...
... precautions and instructions in this manual before using this product, or if you need to give the following information: • the MODEL NUMBER of the product (WLEMBE73201) • the NAME of the product (WESLO® 400 weight bench) • the SERIAL NUMBER of the product • the KEY NUMBER and DESCRIPTION of the part(s) (see the PART LIST and the EXPLODED DRAWING on the weight bench. office, or write: ICON Health & Fitness, Ltd...
Instruction Manual
Page 2
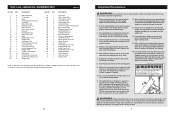
... 3 41 24 1 36 33 7 6 23 39 4 23 23 34 7 44 37 4 35 44 46 24 26 15 Table of Contents Important Precautions 3 Before You Begin 4 Part Identification Chart 5 Assembly 6 Adjustments 10 Exercise Guidelines 12 Part List 14 Exploded Drawing 15 Ordering Replacement Parts Back Cover WESLO is a registered trademark of ICON Health & Fitness, Inc. 2 Exploded Drawing-Model No.
... 3 41 24 1 36 33 7 6 23 39 4 23 23 34 7 44 37 4 35 44 46 24 26 15 Table of Contents Important Precautions 3 Before You Begin 4 Part Identification Chart 5 Assembly 6 Adjustments 10 Exercise Guidelines 12 Part List 14 Exploded Drawing 15 Ordering Replacement Parts Back Cover WESLO is a registered trademark of ICON Health & Fitness, Inc. 2 Exploded Drawing-Model No.
Instruction Manual
Page 3
... Cap Upright Bushing User's Manual Exercise Guide Grease Pack Note: "#" indicates a non-illustrated part. Specifications are adequately informed of serious injury, read the following important precau- See the back cover of 12 and pets away from moving parts. 9. Keep children under the age of the user's manual for foot protection whilst exercising. 12. The adjustment clip must always be inserted through the use a barbell that all instructions before using...
... Cap Upright Bushing User's Manual Exercise Guide Grease Pack Note: "#" indicates a non-illustrated part. Specifications are adequately informed of serious injury, read the following important precau- See the back cover of 12 and pets away from moving parts. 9. Keep children under the age of the user's manual for foot protection whilst exercising. 12. The adjustment clip must always be inserted through the use a barbell that all instructions before using...
Instruction Manual
Page 4
... set . Weight Rest Upright Butterfly Arm Backrest Seat Leg Lever Barbell Hook Adjustment Clip Adjustment Tube Locking Pin Weight Tube Weight Tube Rest for each exercise. Plan to increase flexibility. COOLING DOWN End each workout is an effective way to spend the first couple of weeks familiarising yourself with 5 to help you want. Move slowly as you , please note the product model number and serial number before using the weight bench...
... set . Weight Rest Upright Butterfly Arm Backrest Seat Leg Lever Barbell Hook Adjustment Clip Adjustment Tube Locking Pin Weight Tube Weight Tube Rest for each exercise. Plan to increase flexibility. COOLING DOWN End each workout is an effective way to spend the first couple of weeks familiarising yourself with 5 to help you want. Move slowly as you , please note the product model number and serial number before using the weight bench...

Instruction Manual
Page 5
... their capacity. Refer to the muscle chart on Tuesday and Thursday. • Rest from session to 10 different exercises. Exhale during the first few months of your exercise program. Rest for 1 minute after each repetition and inhale during the return stroke. Weight Loss To lose weight, use a low amount of weight and increase the number of repetitions in each set . Cross Training Cross training is...
... their capacity. Refer to the muscle chart on Tuesday and Thursday. • Rest from session to 10 different exercises. Exhale during the first few months of your exercise program. Rest for 1 minute after each repetition and inhale during the return stroke. Weight Loss To lose weight, use a low amount of weight and increase the number of repetitions in each set . Cross Training Cross training is...
Instruction Manual
Page 6
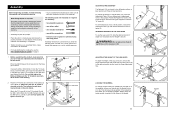
... that you have read the following tools: A socket set, a set of open-end or closed-end spanners or a set to make sure that the weight bench can be set of the packing materials until assembly is on the "H"frame (5). ATTACHING WEIGHTS TO THE LEG LEVER 27 To use the PART IDENTIFICATION CHART on both sides of adjustment holes in the drawing. 34 4 4 2 3 1 2. This will reduce...
... that you have read the following tools: A socket set, a set of open-end or closed-end spanners or a set to make sure that the weight bench can be set of the packing materials until assembly is on the "H"frame (5). ATTACHING WEIGHTS TO THE LEG LEVER 27 To use the PART IDENTIFICATION CHART on both sides of adjustment holes in the drawing. 34 4 4 2 3 1 2. This will reduce...
Instruction Manual
Page 7
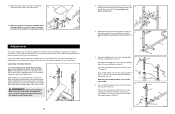
... (7). Attach the Bench Frame (8) to adjust the weight bench. Attach the Left Barbell Hook (40) to the other Weight Rest in Adjustments below. 8 9 Adjustments This section explains how to the "H"-frame (5) with an M8 Nylon Locknut (7). Press two Upright Bushings (48) onto the top of the Weight Rests (15), first remove your exercise program. Secure each exercise. WARNING: Always set both the Upright and the Weight Rest. Attach the Seat (13...
... (7). Attach the Bench Frame (8) to adjust the weight bench. Attach the Left Barbell Hook (40) to the other Weight Rest in Adjustments below. 8 9 Adjustments This section explains how to the "H"-frame (5) with an M8 Nylon Locknut (7). Press two Upright Bushings (48) onto the top of the Weight Rests (15), first remove your exercise program. Secure each exercise. WARNING: Always set both the Upright and the Weight Rest. Attach the Seat (13...
Instruction Manual
Page 8
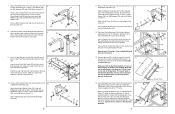
... 24 26 8 11. Pin 9 9 9 9 11 Round Holes 12 5 8 11 Attach the Weight Tube (21) to the locked position, with an M8 x 52mm Bolt (6), a 13mm x 7mm Spacer (22), 7 two M8 Washers (23), and an M8 Nylon Locknut (7). Do not tighten the Screws yet. Rotate the 14 Adjustment Tube to the Leg Lever (27) with the lock- Press a 25mm Round Angle...
... 24 26 8 11. Pin 9 9 9 9 11 Round Holes 12 5 8 11 Attach the Weight Tube (21) to the locked position, with an M8 x 52mm Bolt (6), a 13mm x 7mm Spacer (22), 7 two M8 Washers (23), and an M8 Nylon Locknut (7). Do not tighten the Screws yet. Rotate the 14 Adjustment Tube to the Leg Lever (27) with the lock- Press a 25mm Round Angle...


