
Canadian English Manual
Page 1
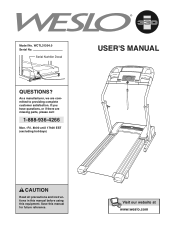
Serial Number Decal QUESTIONS? www.proform.com Visit our website at Visit our website at www.weslo.com Visit our website at for future reference. If you have questions, or if there are committed to providing complete customer satisfaction. ttihoinsseqinutiphmisemnat.nSuaavlebethfoisremuasniunVagilsit our website at Model No. WCTL31304.0 Serial No. As a manufacturer, we are missing parts, please call: 1-888-936-4266 Mon.-Fri. 8h00 until 17h00 EST (excluding holidays) USER'S MANUAL CAUTION Read all precautions and instruc-
Serial Number Decal QUESTIONS? www.proform.com Visit our website at Visit our website at www.weslo.com Visit our website at for future reference. If you have questions, or if there are committed to providing complete customer satisfaction. ttihoinsseqinutiphmisemnat.nSuaavlebethfoisremuasniunVagilsit our website at Model No. WCTL31304.0 Serial No. As a manufacturer, we are missing parts, please call: 1-888-936-4266 Mon.-Fri. 8h00 until 17h00 EST (excluding holidays) USER'S MANUAL CAUTION Read all precautions and instruc-
Canadian English Manual
Page 2
TABLE OF CONTENTS IMPORTANT PRECAUTIONS 3 BEFORE YOU BEGIN 5 ASSEMBLY 6 OPERATION AND ADJUSTMENT 10 HOW TO FOLD AND MOVE THE TREADMILL 13 TROUBLESHOOTING 15 CONDITIONING GUIDELINES 17 PART LIST 20 EXPLODED DRAWING 21 ORDERING REPLACEMENT PARTS Back Cover LIMITED WARRANTY Back Cover WESLO is a registered trademark of ICON IP, Inc. 2
TABLE OF CONTENTS IMPORTANT PRECAUTIONS 3 BEFORE YOU BEGIN 5 ASSEMBLY 6 OPERATION AND ADJUSTMENT 10 HOW TO FOLD AND MOVE THE TREADMILL 13 TROUBLESHOOTING 15 CONDITIONING GUIDELINES 17 PART LIST 20 EXPLODED DRAWING 21 ORDERING REPLACEMENT PARTS Back Cover LIMITED WARRANTY Back Cover WESLO is a registered trademark of ICON IP, Inc. 2
Canadian English Manual
Page 3
... person on page 13.) You must be used or oxygen is damaged, the walking belt may change speed, accelerate, or stop unexpectedly, which may affect the accuracy of heart rate readings. The pulse sensor is not working properly.) 14. Always remove the key, unplug the power cord, and move the reset/off circuit breaker to raise, lower, or move the walking belt while the power is capable of clearance behind it is...
... person on page 13.) You must be used or oxygen is damaged, the walking belt may change speed, accelerate, or stop unexpectedly, which may affect the accuracy of heart rate readings. The pulse sensor is not working properly.) 14. Always remove the key, unplug the power cord, and move the reset/off circuit breaker to raise, lower, or move the walking belt while the power is capable of clearance behind it is...
Canadian English Manual
Page 4
... been placed on the front cover of this manual and order a free replacement decal. Servicing other than the procedures in -home use the treadmill in this or any exercise program, consult your treadmill. Note: The decals are not shown at actual size. 4 Never remove the motor hood unless instructed to do so by or through the use , before cleaning the treadmill, and before using. ICON assumes no responsibility for persons...
... been placed on the front cover of this manual and order a free replacement decal. Servicing other than the procedures in -home use the treadmill in this or any exercise program, consult your treadmill. Note: The decals are not shown at actual size. 4 Never remove the motor hood unless instructed to do so by or through the use , before cleaning the treadmill, and before using. ICON assumes no responsibility for persons...
Canadian English Manual
Page 5
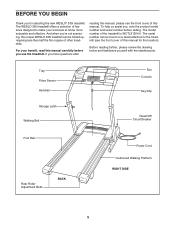
... product model number and serial number before you have questions after reading this manual, please see the front cover of this manual carefully before calling. The WESLO 330i treadmill offers a selection of this manual. If you use the treadmill. Before reading further, please review the drawing below and familiarize yourself with the labeled parts. Tray Pulse Sensor Handrail Fan Console Key/Clip Storage Latch Walking Belt Reset/Off Circuit Breaker Foot Rail Rear Roller Adjustment Bolts BACK Power Cord Cushioned Walking...
... product model number and serial number before you have questions after reading this manual, please see the front cover of this manual carefully before calling. The WESLO 330i treadmill offers a selection of this manual. If you use the treadmill. Before reading further, please review the drawing below and familiarize yourself with the labeled parts. Tray Pulse Sensor Handrail Fan Console Key/Clip Storage Latch Walking Belt Reset/Off Circuit Breaker Foot Rail Rear Roller Adjustment Bolts BACK Power Cord Cushioned Walking...
Canadian English Manual
Page 6
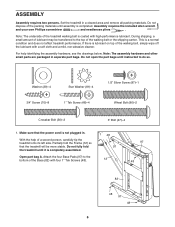
... the treadmill walking belt is completed. Set the treadmill in separate part bags. Note: The underside of the walking belt or the shipping carton. Partially fold the Frame (12) so that the power cord is lubricant on top of the Base (82) with high-performance lubricant. Open part bag A. Washer (29)-4 Star Washer (81)-4 3/4" Screw (70)-8 1" Tek Screw (48)-4 1/2" Silver Screw (87)-1 Wheel Bolt (86)-2 Crossbar Bolt (56)-2 3" Bolt (47)-4 1. Attach the...
... the treadmill walking belt is completed. Set the treadmill in separate part bags. Note: The underside of the walking belt or the shipping carton. Partially fold the Frame (12) so that the power cord is lubricant on top of the Base (82) with high-performance lubricant. Open part bag A. Washer (29)-4 Star Washer (81)-4 3/4" Screw (70)-8 1" Tek Screw (48)-4 1/2" Silver Screw (87)-1 Wheel Bolt (86)-2 Crossbar Bolt (56)-2 3" Bolt (47)-4 1. Attach the...
Canadian English Manual
Page 7
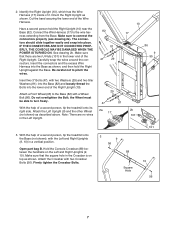
...CONNECTED PROPERLY, THE CONSOLE MAY BE DAMAGED WHEN THE POWER IS TURNED ON. With the help of a second person, tip the treadmill onto its right side. With the help of a second person, tip the treadmill onto the Base (not shown), with two Crossbar Bolts (56). Open part bag B. Cut the band securing the lower.... Do not overtighten the Bolt; Attach the Left Upright (9) and the other Wheel (not shown) as shown. Identify the Right Upright (10), which has the Wire Harness (17) inside of the Wire Harness. Connect the Wire Harness (17) to pinch the wires. See drawing 2b. Note...
...CONNECTED PROPERLY, THE CONSOLE MAY BE DAMAGED WHEN THE POWER IS TURNED ON. With the help of a second person, tip the treadmill onto its right side. With the help of a second person, tip the treadmill onto the Base (not shown), with two Crossbar Bolts (56). Open part bag B. Cut the band securing the lower.... Do not overtighten the Bolt; Attach the Left Upright (9) and the other Wheel (not shown) as shown. Identify the Right Upright (10), which has the Wire Harness (17) inside of the Wire Harness. Connect the Wire Harness (17) to pinch the wires. See drawing 2b. Note...
Canadian English Manual
Page 8
...). Make sure to pinch any of the Wire Harness (17). Insert the connectors into place. Attach the Console (78) to the Right Upright with six 3/4" Screws (70). IF THE CONNECTORS ARE NOT CONNECTED PROPERLY, THE CONSOLE MAY BE DAMAGED WHEN THE POWER IS TURNED ON. See drawing 4 above. Firmly tighten the four 3" Bolts (47). Handrail 47 9, 10 Top View 10 9 12...
...). Make sure to pinch any of the Wire Harness (17). Insert the connectors into place. Attach the Console (78) to the Right Upright with six 3/4" Screws (70). IF THE CONNECTORS ARE NOT CONNECTED PROPERLY, THE CONSOLE MAY BE DAMAGED WHEN THE POWER IS TURNED ON. See drawing 4 above. Firmly tighten the four 3" Bolts (47). Handrail 47 9, 10 Top View 10 9 12...
Canadian English Manual
Page 9
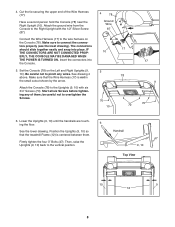
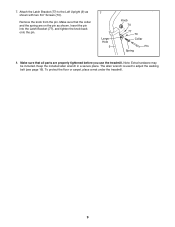
Attach the Latch Bracket (77) to adjust the walking belt (see page 16). Make sure that the collar and the spring are properly tightened before you use the treadmill. Insert the pin into the Latch Bracket (77), and tighten the knob back onto the pin. 7 Large Hole 9 Knob 70 77 70 Collar Pin Spring 8. Keep the included allen wrench in a secure place. Note: Extra hardware may...
Attach the Latch Bracket (77) to adjust the walking belt (see page 16). Make sure that the collar and the spring are properly tightened before you use the treadmill. Insert the pin into the Latch Bracket (77), and tighten the knob back onto the pin. 7 Large Hole 9 Knob 70 77 70 Collar Pin Spring 8. Keep the included allen wrench in a secure place. Note: Extra hardware may...
Canadian English Manual
Page 10
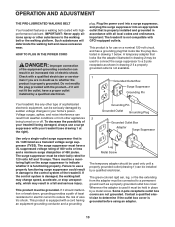
... control system of 450 joules. To decrease the possibility of sophisticated electronic equipment, can be a monitoring light on a nominal 120-volt circuit, and has a grounding plug that is equipped with your home's power. There must have a proper outlet installed by a qualified electrician. If it will deteriorate the walking belt and cause excessive wear. OPERATION AND ADJUSTMENT THE PRE-LUBRICATED WALKING BELT Your treadmill...
... control system of 450 joules. To decrease the possibility of sophisticated electronic equipment, can be a monitoring light on a nominal 120-volt circuit, and has a grounding plug that is equipped with your home's power. There must have a proper outlet installed by a qualified electrician. If it will deteriorate the walking belt and cause excessive wear. OPERATION AND ADJUSTMENT THE PRE-LUBRICATED WALKING BELT Your treadmill...
Canadian English Manual
Page 11
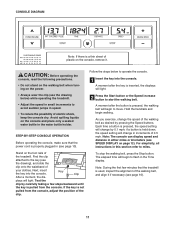
... the walking belt when turning on the power. • Always wear the clip (see SPEED DISPLAY on the foot rails of the clip. STEP-BY-STEP CONSOLE OPERATION Before operating the console, make sure that the treadmill is pressed, the walking belt will light. 2 Press the Start button or the Speed increase button to miles. Next, insert the key into the console. As you exercise, change in the water bottle holder. For simplicity, all instructions...
... the walking belt when turning on the power. • Always wear the clip (see SPEED DISPLAY on the foot rails of the clip. STEP-BY-STEP CONSOLE OPERATION Before operating the console, make sure that the treadmill is pressed, the walking belt will light. 2 Press the Start button or the Speed increase button to miles. Next, insert the key into the console. As you exercise, change in the water bottle holder. For simplicity, all instructions...
Canadian English Manual
Page 12
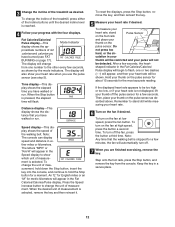
... walking belt. Then, place your heart rate. 6 Turn on the foot rails and place your heart rate if desired. Fat Calories/Calories/ Pulse display-This Mode Indicator display shows the ap- The display will appear in either of the treadmill as desired. To reset the displays, press the Stop button, remove the key, and then reinsert the key. 5 Measure your thumb on the fan at high speed, press the button a second time. Hold your heart rate...
... walking belt. Then, place your heart rate. 6 Turn on the foot rails and place your heart rate if desired. Fat Calories/Calories/ Pulse display-This Mode Indicator display shows the ap- The display will appear in either of the treadmill as desired. To reset the displays, press the Stop button, remove the key, and then reinsert the key. 5 Measure your thumb on the fan at high speed, press the button a second time. Hold your heart rate...
Canadian English Manual
Page 13
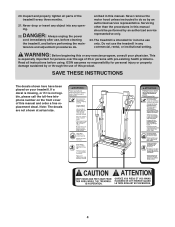
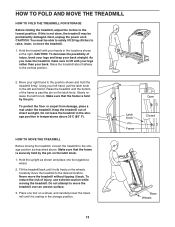
... caution while moving the treadmill, convert the treadmill to lift with your back. HOW TO MOVE THE TREADMILL Before moving the treadmill. Next, unplug the power cord. To protect the floor or carpet from damage, place a mat under the treadmill. Keep the treadmill out of injury, bend your legs and keep your left hand, pull the latch knob to raise, lower, or move the treadmill. 1. To reduce...
... caution while moving the treadmill, convert the treadmill to lift with your back. HOW TO MOVE THE TREADMILL Before moving the treadmill. Next, unplug the power cord. To protect the floor or carpet from damage, place a mat under the treadmill. Keep the treadmill out of injury, bend your legs and keep your left hand, pull the latch knob to raise, lower, or move the treadmill. 1. To reduce...
Canadian English Manual
Page 14
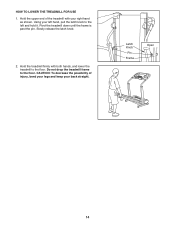
Hold the upper end of injury, bend your legs and keep your back straight. Pivot the treadmill down until the frame is past the pin. Slowly release the latch knob. 2. Do not drop the treadmill frame to the floor. Hold the treadmill firmly with your left hand, pull the latch knob to the left and hold it. HOW TO LOWER THE TREADMILL FOR USE 1. Using your right hand as shown. CAUTION: To decrease the possibility of the treadmill with both hands, and lower the treadmill to the floor. Latch Knob Pin Frame Open 14
Hold the upper end of injury, bend your legs and keep your back straight. Pivot the treadmill down until the frame is past the pin. Slowly release the latch knob. 2. Do not drop the treadmill frame to the floor. Hold the treadmill firmly with your left hand, pull the latch knob to the left and hold it. HOW TO LOWER THE TREADMILL FOR USE 1. Using your right hand as shown. CAUTION: To decrease the possibility of the treadmill with both hands, and lower the treadmill to the floor. Latch Knob Pin Frame Open 14
Canadian English Manual
Page 15
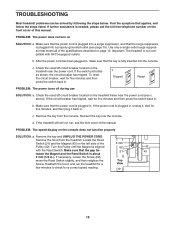
... the Screw (62), move the Reed Switch slightly, and then retighten the Screw. above). PROBLEM: The speed display on the treadmill frame near the power cord. b. If further assistance is fully inserted into the console. To reset the circuit breaker, wait for five minutes and then press the switch back in , make sure that applies, and follow the steps listed. c Tripped Reset PROBLEM: The power turns off circuit breaker located on the console...
... the Screw (62), move the Reed Switch slightly, and then retighten the Screw. above). PROBLEM: The speed display on the treadmill frame near the power cord. b. If further assistance is fully inserted into the console. To reset the circuit breaker, wait for five minutes and then press the switch back in , make sure that applies, and follow the steps listed. c Tripped Reset PROBLEM: The power turns off circuit breaker located on the console...

Canadian English Manual
Page 16
... the walk- PROBLEM: The walking belt slows when walked on , first remove b the key and UNPLUG THE POWER CORD. b. When the walking belt is properly tightened. When the walking belt is off the walking platform. If the walking belt is properly tightened. 16 Using the allen wrench, turn both rear roller bolts clockwise, 1/4 of a turn . Plug in .) off -center or slips when walked on the treadmill for a few minutes. If the walking belt slips when walked on SOLUTION: a. ing belt is overtightened, treadmill performance...
... the walk- PROBLEM: The walking belt slows when walked on , first remove b the key and UNPLUG THE POWER CORD. b. When the walking belt is properly tightened. When the walking belt is off the walking platform. If the walking belt is properly tightened. 16 Using the allen wrench, turn both rear roller bolts clockwise, 1/4 of a turn . Plug in .) off -center or slips when walked on the treadmill for a few minutes. If the walking belt slips when walked on SOLUTION: a. ing belt is overtightened, treadmill performance...

Canadian English Manual
Page 17
... pulse sensor is especially important for you, first find the three numbers above your condition, complete three workouts each week if desired. For maximum fat burning, adjust the speed or incline of exercise, your heart rate as an exercise aid in determining heart rate trends in your exercise program. The three numbers define your training zone. A Cool-down . The lower two numbers are rounded off to burn fat, adjust the speed...
... pulse sensor is especially important for you, first find the three numbers above your condition, complete three workouts each week if desired. For maximum fat burning, adjust the speed or incline of exercise, your heart rate as an exercise aid in determining heart rate trends in your exercise program. The three numbers define your training zone. A Cool-down . The lower two numbers are rounded off to burn fat, adjust the speed...
Canadian English Manual
Page 18
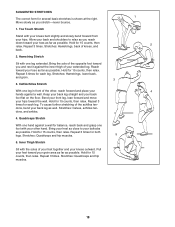
...together and your hips toward the wall. Repeat 3 times for both legs. Stretches: Calves, achilles tendons, and ankles. 4. Repeat 3 times for each leg. Hold for each leg. Repeat 3 times. Move slowly as possible. Repeat 3 times. Hamstring Stretch Sit with your ...form for 15 counts, then relax. Hold for 15 counts, then relax. Calf/Achilles Stretch With one leg extended. Bring your heel as close to relax as you reach down toward you stretch-never bounce. 1. Stretches: Hamstrings, lower back, and groin. 3 3. Bend your front leg, lean forward and move...
...together and your hips toward the wall. Repeat 3 times for both legs. Stretches: Calves, achilles tendons, and ankles. 4. Repeat 3 times for each leg. Hold for each leg. Repeat 3 times. Move slowly as possible. Repeat 3 times. Hamstring Stretch Sit with your ...form for 15 counts, then relax. Hold for 15 counts, then relax. Calf/Achilles Stretch With one leg extended. Bring your heel as close to relax as you reach down toward you stretch-never bounce. 1. Stretches: Hamstrings, lower back, and groin. 3 3. Bend your front leg, lean forward and move...
Canadian English Manual
Page 20
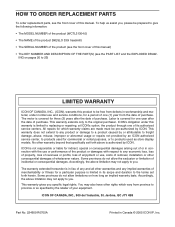
... product (WESLO 330i treadmill) • The SERIAL NUMBER of whatsoever nature. ICON's obligation under normal use , costs of removal, installation or other consequential damages of the product (see the PART LIST and the EXPLODED DRAW- Some provinces do not allow the exclusion or limitation of its scope and duration to province or so specified by ICON. The motor is authorized by an ICON authorized service center...
... product (WESLO 330i treadmill) • The SERIAL NUMBER of whatsoever nature. ICON's obligation under normal use , costs of removal, installation or other consequential damages of the product (see the PART LIST and the EXPLODED DRAW- Some provinces do not allow the exclusion or limitation of its scope and duration to province or so specified by ICON. The motor is authorized by an ICON authorized service center...
Canadian English Manual
Page 21
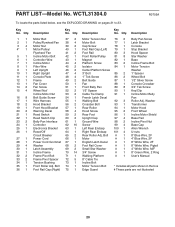
... 26 1 Reset/Off 64 1 Right Rear Endcap 101 4 U-nuts Circuit Breaker 65 2 Rear Roller Adj. Bolt # 1 8" Blue Wire, 2F 27 1 Power Cord 66 1 Motor # 1 4" Blue Wire, 2F 28 1 Power Cord Grommet 67 1 English Latch Decal # 1 8" White Wire, 2F 29 4 Washer 68 2 Foot Rail Cover # 1 8" White Wire, Pigtail 30 1 Latch Assembly 69 2 Small Star Washer # 1 4" White Wire, M/F 31 1 Incline Frame 70 14 3/4" Screw # 1 8" Green Wire, 2 Ring 32 2 Frame Pivot Bolt 71 1 Walking Platform # 1 User's Manual 33 2 Frame...
... 26 1 Reset/Off 64 1 Right Rear Endcap 101 4 U-nuts Circuit Breaker 65 2 Rear Roller Adj. Bolt # 1 8" Blue Wire, 2F 27 1 Power Cord 66 1 Motor # 1 4" Blue Wire, 2F 28 1 Power Cord Grommet 67 1 English Latch Decal # 1 8" White Wire, 2F 29 4 Washer 68 2 Foot Rail Cover # 1 8" White Wire, Pigtail 30 1 Latch Assembly 69 2 Small Star Washer # 1 4" White Wire, M/F 31 1 Incline Frame 70 14 3/4" Screw # 1 8" Green Wire, 2 Ring 32 2 Frame Pivot Bolt 71 1 Walking Platform # 1 User's Manual 33 2 Frame...


