
English Manual
Page 1
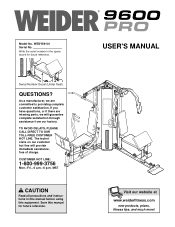
Save this equipment. The technicians on our customer hot line will guarantee complete satisfaction through assistance from our factory. As a manufacturer, we are missing parts, we will provide immediate assistance, free of charge. CUSTOMER HOT LINE: 1-800-999-3756 Mon.-Fri., 6 a.m.-6 p.m. Serial Number Decal (Under Seat) QUESTIONS? USER'S MANUAL Visit ...
Save this equipment. The technicians on our customer hot line will guarantee complete satisfaction through assistance from our factory. As a manufacturer, we are missing parts, we will provide immediate assistance, free of charge. CUSTOMER HOT LINE: 1-800-999-3756 Mon.-Fri., 6 a.m.-6 p.m. Serial Number Decal (Under Seat) QUESTIONS? USER'S MANUAL Visit ...

English Manual
Page 2
WEIDER is a registered trademark of ICON Health & Fitness, Inc. ICON's ... ICON HEALTH & FITNESS, INC., 1500 S. 1000 W., LOGAN, UT 84321-9813 2 Remove the PART IDENTIFICATION CHART and the PART LIST/EXPLODED DRAWING before beginning assembly. All products for which vary from the date of purchase. Accordingly... ADJUSTMENTS 21 WEIGHT RESISTANCE CHART 23 TROUBLESHOOTING AND MAINTENANCE 24 CABLE DIAGRAMS 25 ORDERING REPLACEMENT PARTS Back Cover Note: A PART IDENTIFICATION CHART and a PART LIST/EXPLODED DRAWING are attached in connection with the use or performance of the product...
WEIDER is a registered trademark of ICON Health & Fitness, Inc. ICON's ... ICON HEALTH & FITNESS, INC., 1500 S. 1000 W., LOGAN, UT 84321-9813 2 Remove the PART IDENTIFICATION CHART and the PART LIST/EXPLODED DRAWING before beginning assembly. All products for which vary from the date of purchase. Accordingly... ADJUSTMENTS 21 WEIGHT RESISTANCE CHART 23 TROUBLESHOOTING AND MAINTENANCE 24 CABLE DIAGRAMS 25 ORDERING REPLACEMENT PARTS Back Cover Note: A PART IDENTIFICATION CHART and a PART LIST/EXPLODED DRAWING are attached in connection with the use or performance of the product...
English Manual
Page 3
...a level surface. Make sure that all users of the weight system are on all of 35 or persons with great force. 10. Read all parts are properly tightened each time you are raised. It is intended for foot protection. 9. Do not use the weight system in the literature. ... health problems. Read all times. 7. The decal shown here has been placed on page 4. Keep children under 12 and pets away from moving parts. 8. This is missing or illegible, please call our Customer Service Department toll-free at all instructions before using . IMPORTANT PRECAUTIONS WARNING: To reduce...
...a level surface. Make sure that all users of the weight system are on all of 35 or persons with great force. 10. Read all parts are properly tightened each time you are raised. It is intended for foot protection. 9. Do not use the weight system in the literature. ... health problems. Read all times. 7. The decal shown here has been placed on page 4. Keep children under 12 and pets away from moving parts. 8. This is missing or illegible, please call our Customer Service Department toll-free at all instructions before using . IMPORTANT PRECAUTIONS WARNING: To reduce...
English Manual
Page 4
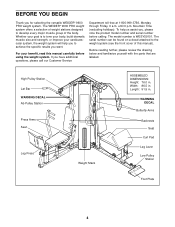
... every major muscle group of this manual carefully before calling. Before reading further, please review the drawing below and familiarize yourself with the parts that are labeled. For your benefit, read this manual). Length: 91.5 in . Width: 86.5 in . If you want. ... Pulley Station Lat Bar WARNING DECAL Ab Pulley Station Press Arms Seat Leg Press Weight Stack ASSEMBLED DIMENSIONS: Height: 76.0 in. The WEIDER® 9600 PRO weight system offers a selection of weight stations designed to the weight system (see the front cover of the body. Whether your cardiovascular...
... every major muscle group of this manual carefully before calling. Before reading further, please review the drawing below and familiarize yourself with the parts that are labeled. For your benefit, read this manual). Length: 91.5 in . Width: 86.5 in . If you want. ... Pulley Station Lat Bar WARNING DECAL Ab Pulley Station Press Arms Seat Leg Press Weight Stack ASSEMBLED DIMENSIONS: Height: 76.0 in. The WEIDER® 9600 PRO weight system offers a selection of weight stations designed to the weight system (see the front cover of the body. Whether your cardiovascular...
English Manual
Page 5
... rubber mallet • You will assemble the seats and the backrest. 5 If you will go smoothly. until you begin by deciding to Orient Parts As you will also need grease or petroleum jelly, a small amount of the weight system. Seat Assembly-During the final stage you assemble the weight... system, make the task enjoyable, assembly will attach the cables and pulleys that all parts are found in the center of the weight system in a cleared area and remove the packing materials. Assembly Requires Two Persons For your ...
... rubber mallet • You will assemble the seats and the backrest. 5 If you will go smoothly. until you begin by deciding to Orient Parts As you will also need grease or petroleum jelly, a small amount of the weight system. Seat Assembly-During the final stage you assemble the weight... system, make the task enjoyable, assembly will attach the cables and pulleys that all parts are found in the center of the weight system in a cleared area and remove the packing materials. Assembly Requires Two Persons For your ...
English Manual
Page 6
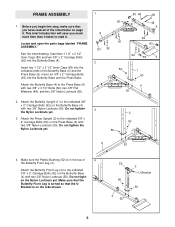
... (4) with two 3/8" Nylon Locknuts (50). Do not tighten the Nylon Locknuts yet. Insert six 3/8" x 2" Carriage Bolts (92) into the Butterfly Base (4). Locate and open the parts bags labeled "FRAME ASSEMBLY." This brief introduction will save you begin this step, make sure that the UBracket is in the top of the Butterfly...
... (4) with two 3/8" Nylon Locknuts (50). Do not tighten the Nylon Locknuts yet. Insert six 3/8" x 2" Carriage Bolts (92) into the Butterfly Base (4). Locate and open the parts bags labeled "FRAME ASSEMBLY." This brief introduction will save you begin this step, make sure that the UBracket is in the top of the Butterfly...
English Manual
Page 9
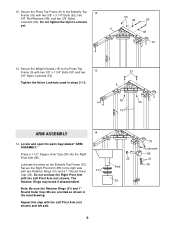
... the Nylon Locknuts 50 48 62 yet. 9 48 33 13. Press a 1 1/2" Square Inner Cap (35) into the Right Pivot Arm (85). Locate and open the parts bag labeled "ARM ASSEMBLY." Secure the Weight Guides (15) to the Press Top Frame (9) with two 3/8" x 3 1/4" Bolts (62), two 3/8" Flat Washers (48), and two 3/8" Nylon...
... the Nylon Locknuts 50 48 62 yet. 9 48 33 13. Press a 1 1/2" Square Inner Cap (35) into the Right Pivot Arm (85). Locate and open the parts bag labeled "ARM ASSEMBLY." Secure the Weight Guides (15) to the Press Top Frame (9) with two 3/8" x 3 1/4" Bolts (62), two 3/8" Flat Washers (48), and two 3/8" Nylon...
English Manual
Page 11
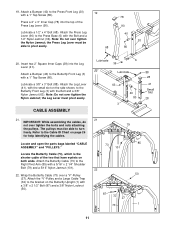
... (28) into the top of the two that have eyelets on the Butterfly Upright (1) with the Bolt and a 1/2" Nylon Jamnut (36). Locate and open the parts bags labeled "CABLE ASSEMBLY" and "PULLEYS." Attach the "V"-Pulley and a Large Cable Trap (32) to the Press Base (6) with a 3/8" x 2 1/2" Bolt (87) and a 3/8" Nylon Locknut (50...
... (28) into the top of the two that have eyelets on the Butterfly Upright (1) with the Bolt and a 1/2" Nylon Jamnut (36). Locate and open the parts bags labeled "CABLE ASSEMBLY" and "PULLEYS." Attach the "V"-Pulley and a Large Cable Trap (32) to the Press Base (6) with a 3/8" x 2 1/2" Bolt (87) and a 3/8" Nylon Locknut (50...

English Manual
Page 19
... Backrest Frame (44) into the Press Upright and snap the Adjustment Knob into the end of the Butterfly Backrest Frame (70). Locate and open the parts bag labeled "SEAT ASSEMBLY." Attach the Shroud (34) to the Press Backrest Frame with four 1/4" x 3/4" Bolts (49). 35 49 Pull out the Adjustment Knob (5) on...
... Backrest Frame (44) into the Press Upright and snap the Adjustment Knob into the end of the Butterfly Backrest Frame (70). Locate and open the parts bag labeled "SEAT ASSEMBLY." Attach the Shroud (34) to the Press Backrest Frame with four 1/4" x 3/4" Bolts (49). 35 49 Pull out the Adjustment Knob (5) on...
English Manual
Page 20
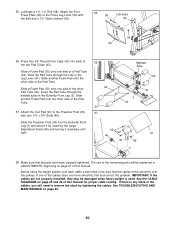
... a 1/2" x 4" Bolt (68). Slide a Foam Pad (30) onto one side of the other Pad Tube (42). Slide a Foam Pad (30) onto one side of the remaining parts will need to the Press Leg Lever (90) with four 1/4" x 3/4" Bolts (49). The use of a Pad Tube (42). Before using the weight system, pull each... the cables are not properly installed, they may be damaged when heavy weight is any slack in the cables, you will be sure that all parts have been properly tightened. 55.
... a 1/2" x 4" Bolt (68). Slide a Foam Pad (30) onto one side of the other Pad Tube (42). Slide a Foam Pad (30) onto one side of the remaining parts will need to the Press Leg Lever (90) with four 1/4" x 3/4" Bolts (49). The use of a Pad Tube (42). Before using the weight system, pull each... the cables are not properly installed, they may be damaged when heavy weight is any slack in the cables, you will be sure that all parts have been properly tightened. 55.
English Manual
Page 21
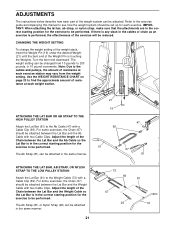
... THE LOW PULLEY STATION Attach the Lat Bar (61) to the Weight Cable (72) with a Cable Clip (69). ADJUSTMENTS The instructions below describe how each part of the Chain between the Lat Bar and the Ab Cable with two Cable Clips. Refer to the exercise guide accompanying this manual to 200...
... THE LOW PULLEY STATION Attach the Lat Bar (61) to the Weight Cable (72) with a Cable Clip (69). ADJUSTMENTS The instructions below describe how each part of the Chain between the Lat Bar and the Ab Cable with two Cable Clips. Refer to the exercise guide accompanying this manual to 200...
English Manual
Page 24
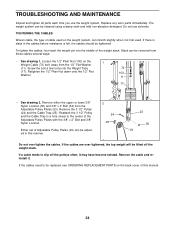
... stack. Remove the cable and reinstall it may have become twisted. Replace any worn parts immediately. Slack can be replaced, see ORDERING REPLACEMENT PARTS on the back cover of cable used . TROUBLESHOOTING AND MAINTENANCE Inspect and tighten all parts each time you use solvents. Remove either the upper or lower 3/8" Nylon Locknut (50...
... stack. Remove the cable and reinstall it may have become twisted. Replace any worn parts immediately. Slack can be replaced, see ORDERING REPLACEMENT PARTS on the back cover of cable used . TROUBLESHOOTING AND MAINTENANCE Inspect and tighten all parts each time you use solvents. Remove either the upper or lower 3/8" Nylon Locknut (50...
English Manual
Page 28
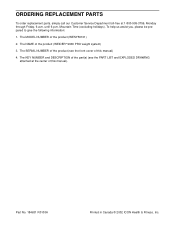
... Customer Service Department toll-free at the center of this manual) 4. The KEY NUMBER and DESCRIPTION of the part(s) (see the front cover of the product (see the PART LIST and EXPLODED DRAWING attached at 1-800-999-3756, Monday through Friday, 6 a.m. The NAME of the ...product (WESY59101) 2. To help us assist you, please be prepared to give the following information: 1. The SERIAL NUMBER of this manual). until 6 p.m. The MODEL NUMBER of the product (WEIDER® 9600 PRO...
... Customer Service Department toll-free at the center of this manual) 4. The KEY NUMBER and DESCRIPTION of the part(s) (see the front cover of the product (see the PART LIST and EXPLODED DRAWING attached at 1-800-999-3756, Monday through Friday, 6 a.m. The NAME of the ...product (WESY59101) 2. To help us assist you, please be prepared to give the following information: 1. The SERIAL NUMBER of this manual). until 6 p.m. The MODEL NUMBER of the product (WEIDER® 9600 PRO...
English Manual
Page 29
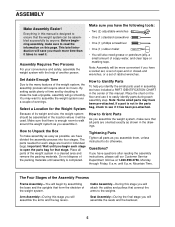
.... This chart is divided into four stages: 1) frame assembly, 2) arm assembly, 3) cable assembly, and 4) seat assembly. Important: Some parts may have been pre-assembled for each part description refers to see if it has been pre-assembled. Note: The assembly procedure is provided to help you cannot find... a part in the parts bags, check to the key number of the part from the PART LIST in parenthesis following each stage is...
.... This chart is divided into four stages: 1) frame assembly, 2) arm assembly, 3) cable assembly, and 4) seat assembly. Important: Some parts may have been pre-assembled for each part description refers to see if it has been pre-assembled. Note: The assembly procedure is provided to help you cannot find... a part in the parts bags, check to the key number of the part from the PART LIST in parenthesis following each stage is...
English Manual
Page 30
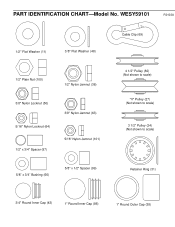
WESY59101 R0103A 1/2" Flat Washer (11) 3/8" Flat Washer (48) Cable Clip (69) 1/2" Plain Nut (100) 1/2" Nylon Jamnut (36) 3/8" Nylon Locknut (50) 5/16" Nylon Locknut (64) 1/2" x 3/4" Spacer (97) 3/8" Nylon Jamnut (63) 5/16" Nylon Jamnut (101) 5/8" x 3/4" Bushing (66) 5/8" x 1/2" Spacer (99) 4 1/2" Pulley (82) (Not shown to scale) "V" Pulley (27) (Not shown to scale) 3 1/2" Pulley (24) (Not shown to scale) Retainer Ring (31) 3/4" Round Inner Cap (43) 1" Round Inner Cap (86) 1" Round Outer Cap (38) PART IDENTIFICATION CHART-Model No.
WESY59101 R0103A 1/2" Flat Washer (11) 3/8" Flat Washer (48) Cable Clip (69) 1/2" Plain Nut (100) 1/2" Nylon Jamnut (36) 3/8" Nylon Locknut (50) 5/16" Nylon Locknut (64) 1/2" x 3/4" Spacer (97) 3/8" Nylon Jamnut (63) 5/16" Nylon Jamnut (101) 5/8" x 3/4" Bushing (66) 5/8" x 1/2" Spacer (99) 4 1/2" Pulley (82) (Not shown to scale) "V" Pulley (27) (Not shown to scale) 3 1/2" Pulley (24) (Not shown to scale) Retainer Ring (31) 3/4" Round Inner Cap (43) 1" Round Inner Cap (86) 1" Round Outer Cap (38) PART IDENTIFICATION CHART-Model No.
English Manual
Page 33
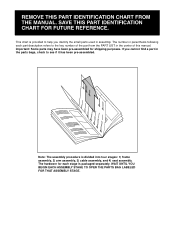
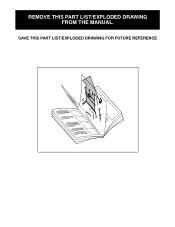
REMOVE THIS PART LIST/EXPLODED DRAWING FROM THE MANUAL. SAVE THIS PART LIST/EXPLODED DRAWING FOR FUTURE REFERENCE 81
REMOVE THIS PART LIST/EXPLODED DRAWING FROM THE MANUAL. SAVE THIS PART LIST/EXPLODED DRAWING FOR FUTURE REFERENCE 81
English Manual
Page 34
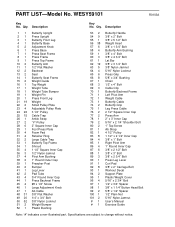
Description Key No. WESY59101 R0103A Key No. Qty. Specifications are subject to change without notice. PART LIST-Model No. Description 11 21 31 41 52 61 71 81 91 10 2 11 1 12 2 13 2 14 1 15 2 16 1 17 1 18 1 19 1 20 1 21 ... Support Plate Plastic Weight Cover 5/16" x 2 3/4" Bolt 1/2" x 3/4" Spacer 3/8" x 1 1/4" Button Head Bolt 5/8" x 1/2" Spacer 1/2" Plain Nut 5/16" Nylon Jamnut User's Manual Exercise Guide Note: "#" indicates a non-illustrated part. Qty.
Description Key No. WESY59101 R0103A Key No. Qty. Specifications are subject to change without notice. PART LIST-Model No. Description 11 21 31 41 52 61 71 81 91 10 2 11 1 12 2 13 2 14 1 15 2 16 1 17 1 18 1 19 1 20 1 21 ... Support Plate Plastic Weight Cover 5/16" x 2 3/4" Bolt 1/2" x 3/4" Spacer 3/8" x 1 1/4" Button Head Bolt 5/8" x 1/2" Spacer 1/2" Plain Nut 5/16" Nylon Jamnut User's Manual Exercise Guide Note: "#" indicates a non-illustrated part. Qty.


