

English Manual
Page 1
..., PLEASE CALL DIRECT TO OUR TOLL-FREE CUSTOMER HOT LINE. WESY29101 Serial No. Save this equipment. If you have questions, or if there are missing parts, we are committed to you. Model No. Serial Number Decal (Under Seat) QUESTIONS?
..., PLEASE CALL DIRECT TO OUR TOLL-FREE CUSTOMER HOT LINE. WESY29101 Serial No. Save this equipment. If you have questions, or if there are missing parts, we are committed to you. Model No. Serial Number Decal (Under Seat) QUESTIONS?
English Manual
Page 2
... HEALTH & FITNESS, INC., 1500 S. 1000 W., LOGAN, UT 84321-9813 2 ICON is authorized by ICON. Remove the PART IDENTIFICATION CHART and the PART LIST/EXPLODED DRAWING before beginning assembly. ICON's obligation under normal use or performance of the product or damages with all other ...23 TROUBLE-SHOOTING AND MAINTENANCE 24 CABLE DIAGRAMS 25 ORDERING REPLACEMENT PARTS Back Cover Note: A PART IDENTIFICATION CHART and a PART LIST/EXPLODED DRAWING are attached in the center of incidental or consequential damages. WEIDER is limited to you specific legal rights. All returns must...
... HEALTH & FITNESS, INC., 1500 S. 1000 W., LOGAN, UT 84321-9813 2 ICON is authorized by ICON. Remove the PART IDENTIFICATION CHART and the PART LIST/EXPLODED DRAWING before beginning assembly. ICON's obligation under normal use or performance of the product or damages with all other ...23 TROUBLE-SHOOTING AND MAINTENANCE 24 CABLE DIAGRAMS 25 ORDERING REPLACEMENT PARTS Back Cover Note: A PART IDENTIFICATION CHART and a PART LIST/EXPLODED DRAWING are attached in the center of incidental or consequential damages. WEIDER is limited to you specific legal rights. All returns must...
English Manual
Page 3
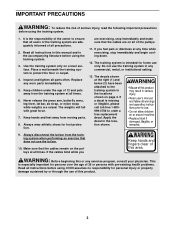
...with great force. 7. If you Keep hands and fingers clear of 12 and pets away from moving parts. 8. ICON assumes no responsibility for home use the training system in this or any worn parts immediately. 5. Inspect and tighten all instructions before using. Read all times. 6. The decals shown ...injury, read the following important precautions before using the training system. 3. The weights will fall with pre-existing health problems. Read all parts often. This is intended for personal injury or property damage sustained by or through the use the lat bar. 10.
...with great force. 7. If you Keep hands and fingers clear of 12 and pets away from moving parts. 8. ICON assumes no responsibility for home use the training system in this or any worn parts immediately. 5. Inspect and tighten all instructions before using. Read all times. 6. The decals shown ...injury, read the following important precautions before using the training system. 3. The weights will fall with pre-existing health problems. Read all parts often. This is intended for personal injury or property damage sustained by or through the use the lat bar. 10.
English Manual
Page 4
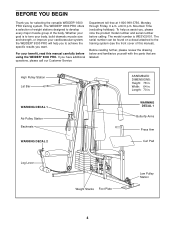
... Pulley Station Backrests WARNING DECAL 2 ASSEMBLED DIMENSIONS: Height: 78 in . Length: 70 in. Whether your cardiovascular system, the WEIDER® 9300 PRO will help us assist you have additional questions, please call our Customer Service Department toll-free at 1-800-999-3756, Monday through... please review the drawing below and familiarize yourself with the parts that are labeled. WARNING DECAL 1 Butterfly Arms Press Arm Curl Pad Leg Lever Weight Stacks Foot Plate Low Pulley Station 4 The WEIDER® 9300 PRO offers a selection of weight stations designed to the training ...
... Pulley Station Backrests WARNING DECAL 2 ASSEMBLED DIMENSIONS: Height: 78 in . Length: 70 in. Whether your cardiovascular system, the WEIDER® 9300 PRO will help us assist you have additional questions, please call our Customer Service Department toll-free at 1-800-999-3756, Monday through... please review the drawing below and familiarize yourself with the parts that are labeled. WARNING DECAL 1 Butterfly Arms Press Arm Curl Pad Leg Lever Weight Stacks Foot Plate Low Pulley Station 4 The WEIDER® 9300 PRO offers a selection of weight stations designed to the training ...
English Manual
Page 5
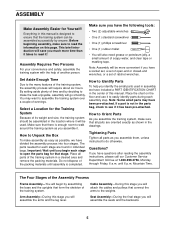
...If you assemble them, unless instructed to assemble the training system over a couple of the packing materials until 6 p.m. How to easily identify parts during each assembly step. Do not dispose of evenings. The Four Stages of the Assembly Process Frame Assembly-You will begin each stage are ...six hours. Everything in the center of the training system in the drawings. Place the chart on this manual. Tightening Parts Tighten all parts are found in the parts bag, check to see if it to Unpack the Box To make the task enjoyable, assembly will be used in ...
...If you assemble them, unless instructed to assemble the training system over a couple of the packing materials until 6 p.m. How to easily identify parts during each assembly step. Do not dispose of evenings. The Four Stages of the Assembly Process Frame Assembly-You will begin each stage are ...six hours. Everything in the center of the training system in the drawings. Place the chart on this manual. Tightening Parts Tighten all parts are found in the parts bag, check to see if it to Unpack the Box To make the task enjoyable, assembly will be used in ...

English Manual
Page 6
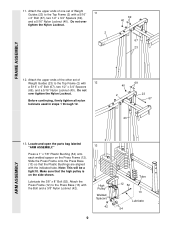
... Frame (3) to read all of the Butterfly Frame. 1. Before you begin this step, make sure that the Bolt is on page 5. Locate and open the parts bags labeled "FRAME ASSEMBLY BAG ONE" and "FRAME ASSEMBLY BAG TWO." Press two 2" Square Inner Caps (56) into the top of the information on the...
... Frame (3) to read all of the Butterfly Frame. 1. Before you begin this step, make sure that the Bolt is on page 5. Locate and open the parts bags labeled "FRAME ASSEMBLY BAG ONE" and "FRAME ASSEMBLY BAG TWO." Press two 2" Square Inner Caps (56) into the top of the information on the...
English Manual
Page 9
... Bushing (54) onto each welded spacer on the side shown. Lubricate the 3/8" x 8" Bolt (52). Do not over tighten the Nylon Locknut. Locate and open the parts bag labeled "ARM ASSEMBLY." Make sure that the Plastic Bushings are aligned with the Bolt and a 3/8" Nylon Locknut (42). 13 High Pulley Welded Spacers 42...
... Bushing (54) onto each welded spacer on the side shown. Lubricate the 3/8" x 8" Bolt (52). Do not over tighten the Nylon Locknut. Locate and open the parts bag labeled "ARM ASSEMBLY." Make sure that the Plastic Bushings are aligned with the Bolt and a 3/8" Nylon Locknut (42). 13 High Pulley Welded Spacers 42...
English Manual
Page 11
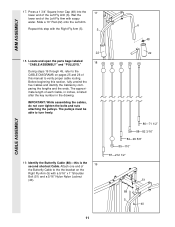
Locate and open the parts bags labeled 18 "CABLE ASSEMBLY" and "PULLEYS." IMPORTANT: While assembling the cables, do not over tighten the bolts and nuts attaching the pulleys. The pulleys ...
Locate and open the parts bags labeled 18 "CABLE ASSEMBLY" and "PULLEYS." IMPORTANT: While assembling the cables, do not over tighten the bolts and nuts attaching the pulleys. The pulleys ...
English Manual
Page 12
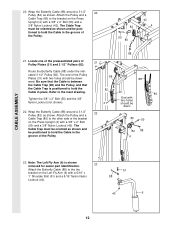
... (42). Be sure that the Cable is between the Cable Trap (80) and the Pulley, and that the Cable Trap is shown removed for easier part identification. 23 Attach the Butterfly Cable (88) to the the bracket on the Press Upright (4) with two holes 31 should be down 22. Attach the...
... (42). Be sure that the Cable is between the Cable Trap (80) and the Pulley, and that the Cable Trap is shown removed for easier part identification. 23 Attach the Butterfly Cable (88) to the the bracket on the Press Upright (4) with two holes 31 should be down 22. Attach the...
English Manual
Page 19
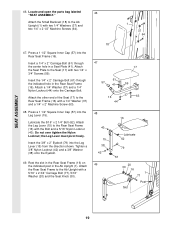
...) to the Ab Upright (1) with two 1/4" Washers (37) and two 1/4" x 2 1/2" Machine Screws (64). 1 37 64 47. Lubricate the 5/16" x 2 1/4" Bolt (62). Locate and open the parts bag labeled 46 "SEAT ASSEMBLY." Attach a 1/4" Washer (37) and a 1/4" Nylon Locknut (44) onto the Carriage Bolt. Insert the 1/4" x 2" Carriage Bolt (61) through the center hole...
...) to the Ab Upright (1) with two 1/4" Washers (37) and two 1/4" x 2 1/2" Machine Screws (64). 1 37 64 47. Lubricate the 5/16" x 2 1/4" Bolt (62). Locate and open the parts bag labeled 46 "SEAT ASSEMBLY." Attach a 1/4" Washer (37) and a 1/4" Nylon Locknut (44) onto the Carriage Bolt. Insert the 1/4" x 2" Carriage Bolt (61) through the center hole...

English Manual
Page 20
...Attach the Large Backrest (19) to the Press Upright (4) above the warning decal, where shown. 51 64 37 WEIDER 9300 4 PRO decal 19 SEAT ASSEMBLY 52. Remove the 'WEIDER 9300 PRO' decal from the backing paper and apply the decal to the Press Upright (4) with a 1/4" Washer (37) ...and a 1/4" x 2 1/2" Machine Screw (64). IMPORTANT: If the cables are not properly installed, they may be damaged when heavy weight is any slack in the cables, you will be sure that all parts...
...Attach the Large Backrest (19) to the Press Upright (4) above the warning decal, where shown. 51 64 37 WEIDER 9300 4 PRO decal 19 SEAT ASSEMBLY 52. Remove the 'WEIDER 9300 PRO' decal from the backing paper and apply the decal to the Press Upright (4) with a 1/4" Washer (37) ...and a 1/4" x 2 1/2" Machine Screw (64). IMPORTANT: If the cables are not properly installed, they may be damaged when heavy weight is any slack in the cables, you will be sure that all parts...
English Manual
Page 21
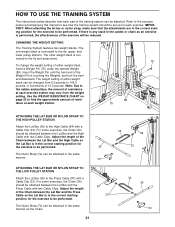
... (36) to be adjusted. The one weight stack is in the same manner. HOW TO USE THE TRAINING SYSTEM The instructions below describe how each part of 12.5 pounds. For some exercises, the Chain (34) should be attached between the Lat Bar and the Press Cable with a Cable Clip (33). Adjust...
... (36) to be adjusted. The one weight stack is in the same manner. HOW TO USE THE TRAINING SYSTEM The instructions below describe how each part of 12.5 pounds. For some exercises, the Chain (34) should be attached between the Lat Bar and the Press Cable with a Cable Clip (33). Adjust...
English Manual
Page 24
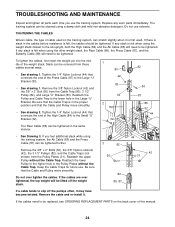
...Bracket (83). Keep the Cable Traps for future use solvents. If the cables are over tighten the cables. Do not use . If any worn parts immediately. If you use the training system. Reattach the upper Pulley without the Cable Trap. Be sure that connects the end of this manual. 24... and re-install it. If the cables need to the Large "U" Bracket (83). • See drawing 1. TROUBLESHOOTING AND MAINTENANCE Inspect and tighten all parts each time you feel additional slack while using the training system, the Ab Cable (85) and the Press Cable (87) can be tightened. Replace any...
...Bracket (83). Keep the Cable Traps for future use solvents. If the cables are over tighten the cables. Do not use . If any worn parts immediately. If you use the training system. Reattach the upper Pulley without the Cable Trap. Be sure that connects the end of this manual. 24... and re-install it. If the cables need to the Large "U" Bracket (83). • See drawing 1. TROUBLESHOOTING AND MAINTENANCE Inspect and tighten all parts each time you feel additional slack while using the training system, the Ab Cable (85) and the Press Cable (87) can be tightened. Replace any...

English Manual
Page 29
PART IDENTIFICATION CHART-Model No. WESY29101 1/4" Washer (37) 5/16" x 1" Shoulder Bolt (51) 5/16" Washer (20) 1" Retainer (45) 5/16" x 1" Bolt (51) 3/8" Washer (38) 1/4" Nylon Locknut (44) 5/16" Nylon Locknut (40) 5/16" Nylon Jam Nut (90) 3/8" Nylon Locknut (42) 3/8" Nylon Jam Nut (43) 5/16" x 1 3/4" Bolt (68) 3/8" x 2" Bolt (50) 5/16" x 2 1/4" Bolt (62) 3/8" x 2 1/4" Bolt (71) 5/16" x 2 1/2" Bolt (39) 5/16" x 2 3/4" Bolt (55) 1/4" x 3/4" Screw (59) 5/16" x 3" Bolt (91) 3/8" x 3 1/2" Bolt (66)
PART IDENTIFICATION CHART-Model No. WESY29101 1/4" Washer (37) 5/16" x 1" Shoulder Bolt (51) 5/16" Washer (20) 1" Retainer (45) 5/16" x 1" Bolt (51) 3/8" Washer (38) 1/4" Nylon Locknut (44) 5/16" Nylon Locknut (40) 5/16" Nylon Jam Nut (90) 3/8" Nylon Locknut (42) 3/8" Nylon Jam Nut (43) 5/16" x 1 3/4" Bolt (68) 3/8" x 2" Bolt (50) 5/16" x 2 1/4" Bolt (62) 3/8" x 2 1/4" Bolt (71) 5/16" x 2 1/2" Bolt (39) 5/16" x 2 3/4" Bolt (55) 1/4" x 3/4" Screw (59) 5/16" x 3" Bolt (91) 3/8" x 3 1/2" Bolt (66)
English Manual
Page 31
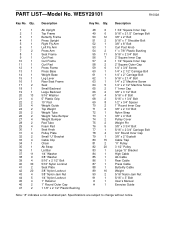
... 87 1 Press Cable 88 1 Butterfly Cable 89 16 Weight 90 2 5/16" Nylon Jam Nut 91 1 5/16" x 3" Bolt # 1 User's Manual # 1 Exercise Guide Note: "#" indicates a non-illustrated part. Description Key No. Specifications are subject to change without notice. Qty. WESY29101 R1002A Key No...
... 87 1 Press Cable 88 1 Butterfly Cable 89 16 Weight 90 2 5/16" Nylon Jam Nut 91 1 5/16" x 3" Bolt # 1 User's Manual # 1 Exercise Guide Note: "#" indicates a non-illustrated part. Description Key No. Specifications are subject to change without notice. Qty. WESY29101 R1002A Key No...

English Manual
Page 33
... call our Customer Service Department toll-free at the center of the product (WEIDER® 9300 PRO training system) 3. Mountain Time (excluding holidays). The SERIAL NUMBER of the product (see the PART LIST and EXPLODED DRAWING attached at 1-800-999-3756, Monday through Friday, 6 a.m. The MODEL NUMBER of this manual). The NAME of this...
... call our Customer Service Department toll-free at the center of the product (WEIDER® 9300 PRO training system) 3. Mountain Time (excluding holidays). The SERIAL NUMBER of the product (see the PART LIST and EXPLODED DRAWING attached at 1-800-999-3756, Monday through Friday, 6 a.m. The MODEL NUMBER of this manual). The NAME of this...


