

English Manual
Page 1
The MODEL NUMBER starts with parts and information by calling our toll free numb'4 1-800-225-0653, Mon. - "idere OWNER'S MANUAL WEIDER Is committed to havemissingor defective partsplease haveready the followinginformation Istedbelow before eating the 800NUMBER The ASSEMBLYMANUAL MODELNUMBERofthis UNIT PART NAME or DESCRIPTION ORDERING NUMBER THE QUANTrTY of each part that you need THE MODEL NUMBER of this unit is found on the PARTS LISTPAGE. Call...
The MODEL NUMBER starts with parts and information by calling our toll free numb'4 1-800-225-0653, Mon. - "idere OWNER'S MANUAL WEIDER Is committed to havemissingor defective partsplease haveready the followinginformation Istedbelow before eating the 800NUMBER The ASSEMBLYMANUAL MODELNUMBERofthis UNIT PART NAME or DESCRIPTION ORDERING NUMBER THE QUANTrTY of each part that you need THE MODEL NUMBER of this unit is found on the PARTS LISTPAGE. Call...
English Manual
Page 2
... WITH CONTINUED USE THE MOVING.PARTS OF TH1$VNrf WILL BECOME STIFF AND POSSIBLY BEGIN SQUEAKING. STROY.jHE PACKINOAND:CARTON::UNTIL ETEL -Y;] SSEMS. INSTRUCTION MANUALU.SEAT:FOR ORDERING REPLACEMENTP.A 9. NOTE: IT MAY BE NECESSARY TO PARTIALLY DIS-ASSEMBLE THE PARTS TO LUBRICATE THE PARTS PROPERLY. Q ...:.. iIGHTNESSANDPARTS.:WEART.0:INSURET TE : 12. LUBRICATE THE MOVING PARTS WITH ANY HOUSEHOLD LUBRICATING OIL. BEFORE BEGINNING ASSEMBLY READ THE FOLLOWING THIS PRODUCT REPRESENTS THE STATE OF THE ART IN TECHNOLOGY IN HOME FITNESS EQUIPMENT. WE HOPE YOU WILL FIND THIS...
... WITH CONTINUED USE THE MOVING.PARTS OF TH1$VNrf WILL BECOME STIFF AND POSSIBLY BEGIN SQUEAKING. STROY.jHE PACKINOAND:CARTON::UNTIL ETEL -Y;] SSEMS. INSTRUCTION MANUALU.SEAT:FOR ORDERING REPLACEMENTP.A 9. NOTE: IT MAY BE NECESSARY TO PARTIALLY DIS-ASSEMBLE THE PARTS TO LUBRICATE THE PARTS PROPERLY. Q ...:.. iIGHTNESSANDPARTS.:WEART.0:INSURET TE : 12. LUBRICATE THE MOVING PARTS WITH ANY HOUSEHOLD LUBRICATING OIL. BEFORE BEGINNING ASSEMBLY READ THE FOLLOWING THIS PRODUCT REPRESENTS THE STATE OF THE ART IN TECHNOLOGY IN HOME FITNESS EQUIPMENT. WE HOPE YOU WILL FIND THIS...

English Manual
Page 3
... ROLLERS 4" X 151/2" 24 ARM PRESS CABLE 178" BALL STOP 25 LOWER CABLE 151" BALL STOP 26 PEC-DECK CABLE 108" 27 DOUBLE PULLEY BRACKET 28 U-BRACKET W/LATCH HOOK 29 "Ll A MI V. X 1 1/2" LONG 59 TAPERED SPACERS 60 2 3/8" SQUARE PLASTIC CAP 61 1 yr SQUARE PLASTIC CAP 62 PEC-DECK BUMPER ii 63 13/4" SQUARE PLASTIC CAP . 64 3/4' ROUND PLASTIC CAP - .- - . 70 3/8" X 2 1/4" HEX HEAD BOLT...
... ROLLERS 4" X 151/2" 24 ARM PRESS CABLE 178" BALL STOP 25 LOWER CABLE 151" BALL STOP 26 PEC-DECK CABLE 108" 27 DOUBLE PULLEY BRACKET 28 U-BRACKET W/LATCH HOOK 29 "Ll A MI V. X 1 1/2" LONG 59 TAPERED SPACERS 60 2 3/8" SQUARE PLASTIC CAP 61 1 yr SQUARE PLASTIC CAP 62 PEC-DECK BUMPER ii 63 13/4" SQUARE PLASTIC CAP . 64 3/4' ROUND PLASTIC CAP - .- - . 70 3/8" X 2 1/4" HEX HEAD BOLT...

English Manual
Page 4
NAME OF PART ORDERING NUMBER MAX RESISTANCE DECAL SUPER CIRCUIT MASTER DECAL WEIGHT PLATE DECALS STATION 2 DECAL STATION1DECAL HARDWARE BAG (NUTS & BOLTS) HARDWARE BAG (PLASTICS & BRACKETS) HARDWARE BAG (FEET & GRIPS) HARDWARE BAG (PULLEY) ASSEMBLY MANUAL TRAINING MANUAL 1 2 35 28 1 6 2 2 • 2 2 13 1 ' 3 2 2 1 . 1 1 1 SET 1 1 1 1 _ 1 1 • 1 1 . THH-5312•F01 . ALWAYS • • INCLUDE THE FOLLOWING INFORMATION WHEN ORDE• RING PARTS: MODEL NO. ORDEAlflallo THH-5062`F01 THH...
NAME OF PART ORDERING NUMBER MAX RESISTANCE DECAL SUPER CIRCUIT MASTER DECAL WEIGHT PLATE DECALS STATION 2 DECAL STATION1DECAL HARDWARE BAG (NUTS & BOLTS) HARDWARE BAG (PLASTICS & BRACKETS) HARDWARE BAG (FEET & GRIPS) HARDWARE BAG (PULLEY) ASSEMBLY MANUAL TRAINING MANUAL 1 2 35 28 1 6 2 2 • 2 2 13 1 ' 3 2 2 1 . 1 1 1 SET 1 1 1 1 _ 1 1 • 1 1 . THH-5312•F01 . ALWAYS • • INCLUDE THE FOLLOWING INFORMATION WHEN ORDE• RING PARTS: MODEL NO. ORDEAlflallo THH-5062`F01 THH...

English Manual
Page 5
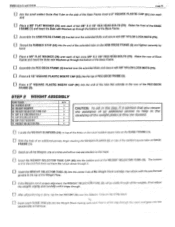
...assembled. to be Instructed. Press 1 1/2' X 3' RUBBER BASE FEET (50) onto each end of these to tighten: fhe bolts after these three steps are 1 1/2' x 3'. This is the side that are completed. Each has a raised area on the floor. P -52 O 0 0 0 53 • 0 3 . 50. SQUARE PLASTIC INSERT CAP 1 63 THREADED RUBBER STOP...75 75 5- CAUTION: step. 1, 2, Do not tighten or 3 unless you will be four of the cross tubtos that is 2' x 2' insert a 2' SQUARE PLASTIC INSERT CAP (51). as.se.m.. WEIOESI HEALTH end FITNESS • STEP I FRAME ASSEMBLY PART NAME OTT 50 1...
...assembled. to be Instructed. Press 1 1/2' X 3' RUBBER BASE FEET (50) onto each end of these to tighten: fhe bolts after these three steps are 1 1/2' x 3'. This is the side that are completed. Each has a raised area on the floor. P -52 O 0 0 0 53 • 0 3 . 50. SQUARE PLASTIC INSERT CAP 1 63 THREADED RUBBER STOP...75 75 5- CAUTION: step. 1, 2, Do not tighten or 3 unless you will be four of the cross tubtos that is 2' x 2' insert a 2' SQUARE PLASTIC INSERT CAP (51). as.se.m.. WEIOESI HEALTH end FITNESS • STEP I FRAME ASSEMBLY PART NAME OTT 50 1...
English Manual
Page 6
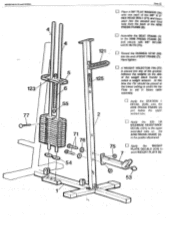
...rear of Base Rama and insert the Bolts with the pre-formed groove in the steadying of the weight plates as they are stacked on the base. STEP 2 WEIGHT ASSEMBLY PART NAME 53 RUBBER STOP 54 WEIGHT BUMPER 55 WEIGHT SELECTOR TUBE CAP 71 3/8• X 3' HEX HEAD BOLT 75 '1,0"NY, ^NLOCK !.!"1" 76 3/8' FLAT WASHER 77 WEIGHT SELECTOR PIN ...HEALTH and FITNESS PAGE 5 u Into the small welded Guide Rod Tube on the side of the Base Frame insert a 2" SQUARE PLASTIC CAP (51) into the square tube at a time until all the weights, if not adjust the weights slightly and carefully until it . u Assemble...
...rear of Base Rama and insert the Bolts with the pre-formed groove in the steadying of the weight plates as they are stacked on the base. STEP 2 WEIGHT ASSEMBLY PART NAME 53 RUBBER STOP 54 WEIGHT BUMPER 55 WEIGHT SELECTOR TUBE CAP 71 3/8• X 3' HEX HEAD BOLT 75 '1,0"NY, ^NLOCK !.!"1" 76 3/8' FLAT WASHER 77 WEIGHT SELECTOR PIN ...HEALTH and FITNESS PAGE 5 u Into the small welded Guide Rod Tube on the side of the Base Frame insert a 2" SQUARE PLASTIC CAP (51) into the square tube at a time until all the weights, if not adjust the weights slightly and carefully until it . u Assemble...
English Manual
Page 7
Hand tighten. PRESS FRAME (2) in future cable assembly. 75 C u Apply the STATION 1 DECAL (125) onto the ARM PRESS FRAME (2) just below the upper welded tube. D Apply the 225 LB MAXIMUM RESISTANCE' DECAL (121) to select a weight amount. WEIDER HEALTH and FITNESS 123 77 3 3 55 71 1r-if 76 V-> 0 54 PAGE 6 u Place a 3/8' FLAT WASHER (76) onto one each of two 3/8' X 3" HEX HEAD BOLT (71...
Hand tighten. PRESS FRAME (2) in future cable assembly. 75 C u Apply the STATION 1 DECAL (125) onto the ARM PRESS FRAME (2) just below the upper welded tube. D Apply the 225 LB MAXIMUM RESISTANCE' DECAL (121) to select a weight amount. WEIDER HEALTH and FITNESS 123 77 3 3 55 71 1r-if 76 V-> 0 54 PAGE 6 u Place a 3/8' FLAT WASHER (76) onto one each of two 3/8' X 3" HEX HEAD BOLT (71...

English Manual
Page 8
...(8). Secure with a 3/8" NYLON LOCK NUT (75). u Adjust the ARM PRESS FRAME (2) under the TOP FRAME (8) aligning the bolt holes. WEIDER HEALTH and FITNESS STEP 3 TOP FRAME ASSEMBLY PART.NAME ,'::::.: 1 61 2' SQUARE PLASTIC INSERT CAP 72 3/13' X 31/4" HEX HEAD BOLT 73 SW X 31/2' HEX HEAD BOLT 76 3/8" NYLON LOCK NUT 76 3tr FLAT WASHER OTT ... 7' O El Press 2" SQUARE PLASTIC INSERT CAPS (51) into its corresponding hole. El, Fi check for the correct direction of the TOP FRAME (8) and bring the short welded tube to the GUIDE RODS (4) and ease each Rod into each end of the rear bracket on the ...
...(8). Secure with a 3/8" NYLON LOCK NUT (75). u Adjust the ARM PRESS FRAME (2) under the TOP FRAME (8) aligning the bolt holes. WEIDER HEALTH and FITNESS STEP 3 TOP FRAME ASSEMBLY PART.NAME ,'::::.: 1 61 2' SQUARE PLASTIC INSERT CAP 72 3/13' X 31/4" HEX HEAD BOLT 73 SW X 31/2' HEX HEAD BOLT 76 3/8" NYLON LOCK NUT 76 3tr FLAT WASHER OTT ... 7' O El Press 2" SQUARE PLASTIC INSERT CAPS (51) into its corresponding hole. El, Fi check for the correct direction of the TOP FRAME (8) and bring the short welded tube to the GUIDE RODS (4) and ease each Rod into each end of the rear bracket on the ...

English Manual
Page 9
... Pec-Deck Station (rear) requires the SMALL SEAT (12). Place a 3/8" FLAT WASHER (76) onto a 3/8" X 3" HEX HEAD BOLT (71) and insert through the back of Upright Frame Tube through the front hole of the Seat Frame into the threaded holes in the Backrest. WEIDER HALTH •nd FITNESS STEP 4 BACKREST AND SEAT ASSEMBLY RADE 8 PART NAME' 71 3/8' X 3' HEX HEAD BOLT 74 318X2112 HEX...
... Pec-Deck Station (rear) requires the SMALL SEAT (12). Place a 3/8" FLAT WASHER (76) onto a 3/8" X 3" HEX HEAD BOLT (71) and insert through the back of Upright Frame Tube through the front hole of the Seat Frame into the threaded holes in the Backrest. WEIDER HALTH •nd FITNESS STEP 4 BACKREST AND SEAT ASSEMBLY RADE 8 PART NAME' 71 3/8' X 3' HEX HEAD BOLT 74 318X2112 HEX...
English Manual
Page 10
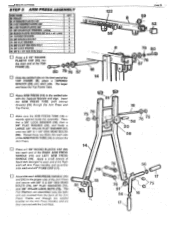
... inserted from the back of the Arm Press and secure with the Tapered Spacers and align. Assemble each end a 6' FOAM GRIP (17). Place first a 3/8" LOCK WASHER (79), then a 3/8' FLAT WASHER (76), and finally a LARGE 3/8' NYLON FLAT WASHER (57) onto two 3/8" X 1 1/4" HEX HEAD BOLTS (80). WEIOER HEALTH and FITNESS STEP 5 ARM PRESS ASSEMBLY PART NAME QTY 20 PULLEY . 2 51 2' SQUARE PLASTIC CAP 4 62...
... inserted from the back of the Arm Press and secure with the Tapered Spacers and align. Assemble each end a 6' FOAM GRIP (17). Place first a 3/8" LOCK WASHER (79), then a 3/8' FLAT WASHER (76), and finally a LARGE 3/8' NYLON FLAT WASHER (57) onto two 3/8" X 1 1/4" HEX HEAD BOLTS (80). WEIOER HEALTH and FITNESS STEP 5 ARM PRESS ASSEMBLY PART NAME QTY 20 PULLEY . 2 51 2' SQUARE PLASTIC CAP 4 62...
English Manual
Page 11
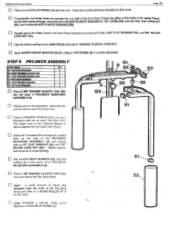
... each end of the PEC-DECK MOUNTING ASSEMBLY (9). Ci Press 1 1/2" SQUARE PLASTIC CAPS (61) into each Pec-Deck Arm. Apply a small amount of liquid dish detergent onto the ends of the Tapered Spacer is threadedon both ends. WEIDEP.HEALTH end FITNESS u There are two PULLEY RODS (19) with a 3/8" FLAT ...) to cause binding. Slip the PEC-DECK BUMPER (62) onto the welded tab in position illustrated. O Apply STATION 2 DECAL (124) above Backrest on the side of the holes in the Arm Press and secure at each end with this unit. STEP:6 PEG-DECK ASSEMBLY PART NAME C/TY. 59 ...
... each end of the PEC-DECK MOUNTING ASSEMBLY (9). Ci Press 1 1/2" SQUARE PLASTIC CAPS (61) into each Pec-Deck Arm. Apply a small amount of liquid dish detergent onto the ends of the Tapered Spacer is threadedon both ends. WEIDEP.HEALTH end FITNESS u There are two PULLEY RODS (19) with a 3/8" FLAT ...) to cause binding. Slip the PEC-DECK BUMPER (62) onto the welded tab in position illustrated. O Apply STATION 2 DECAL (124) above Backrest on the side of the holes in the Arm Press and secure at each end with this unit. STEP:6 PEG-DECK ASSEMBLY PART NAME C/TY. 59 ...
English Manual
Page 12
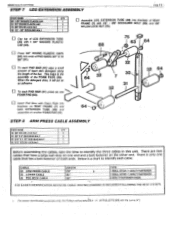
... ARM PRESS CABLE 17r 25 LOWER CABLE 151" ti 1 BALL STOP /1 BOLT FASTENER 1 BALL STOP / 1 BOLT FASTENER 26 PEC-DECK CABLE 108" 2 BOLT FASTENER ENDS ,:, r FOR EASIER IDENTIFICATION AN ENTIRE CABLE ROUTING DRAWING IS INCLUDED FOLLOWING THE NEXT 3 STEPS. - For easier identification purposes only, the Pulleys will act as an adhesive. H. El Press 3/4' ROUND PLASTIC CAPS (64) into brackets on SEAT FRAME (7) and LEG EXTENSION TUBE (30) and assemble...
... ARM PRESS CABLE 17r 25 LOWER CABLE 151" ti 1 BALL STOP /1 BOLT FASTENER 1 BALL STOP / 1 BOLT FASTENER 26 PEC-DECK CABLE 108" 2 BOLT FASTENER ENDS ,:, r FOR EASIER IDENTIFICATION AN ENTIRE CABLE ROUTING DRAWING IS INCLUDED FOLLOWING THE NEXT 3 STEPS. - For easier identification purposes only, the Pulleys will act as an adhesive. H. El Press 3/4' ROUND PLASTIC CAPS (64) into brackets on SEAT FRAME (7) and LEG EXTENSION TUBE (30) and assemble...
English Manual
Page 13
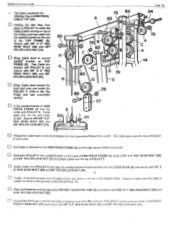
... top of the PULLEYS A - The Cable goes over the top and under the Cable (cable running on the end of WEIGHT SELECTOR TUBE (6) and secure with PULLEY D. WEIDER Mt AL TM lad FITNESS The Cable needed for the following Step is draping toward the front and over and under . n Using PULLEY G go to .the ARM PRESS FRAME (2) and through square Cable access hole. 0 Assemble PULLEY F into top -end...
... top of the PULLEYS A - The Cable goes over the top and under the Cable (cable running on the end of WEIGHT SELECTOR TUBE (6) and secure with PULLEY D. WEIDER Mt AL TM lad FITNESS The Cable needed for the following Step is draping toward the front and over and under . n Using PULLEY G go to .the ARM PRESS FRAME (2) and through square Cable access hole. 0 Assemble PULLEY F into top -end...
English Manual
Page 14
... HEAD BOLT 87 FIREMAN'S LATCH HOOK 'QTY 1 For easier identification purposes only, the Pulleys will be assembled in 4-BRACKET 75 WITH LATCH HOOK (28). Trap the Cable into the hole on BASE FRAME (1) behind ARM PRESS FRAME (2). u Assemble PULLEY A in the first welded bracket on the side of the PEC-DECK ARMS (21) or (22). WEIDER HEALTH •nd FITNESS STEP 9 PEC-DECK CABLE ASSEMBLY PAGE 13 PART...
... HEAD BOLT 87 FIREMAN'S LATCH HOOK 'QTY 1 For easier identification purposes only, the Pulleys will be assembled in 4-BRACKET 75 WITH LATCH HOOK (28). Trap the Cable into the hole on BASE FRAME (1) behind ARM PRESS FRAME (2). u Assemble PULLEY A in the first welded bracket on the side of the PEC-DECK ARMS (21) or (22). WEIDER HEALTH •nd FITNESS STEP 9 PEC-DECK CABLE ASSEMBLY PAGE 13 PART...
English Manual
Page 15
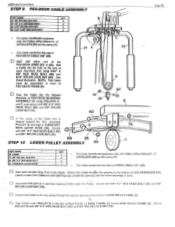
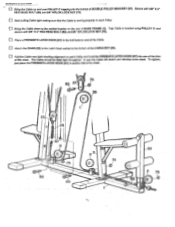
... the bottom of DOUBLE PULLEY BRACKET (27). The Cable should be fairly tight throughout. To tighten, justplace the FIREMAN'S LATCH HOOK (87) in the bolt fastener endof the Cable. u Attach the CHAIN (29) to the Latch Hook welded to the welded bracket on each Pulley. u Start pulling Cable tight making sure that the Cable is seating properly in bracket using PULLEY D and secure with 3/8' X 2" HEX...
... the bottom of DOUBLE PULLEY BRACKET (27). The Cable should be fairly tight throughout. To tighten, justplace the FIREMAN'S LATCH HOOK (87) in the bolt fastener endof the Cable. u Attach the CHAIN (29) to the Latch Hook welded to the welded bracket on each Pulley. u Start pulling Cable tight making sure that the Cable is seating properly in bracket using PULLEY D and secure with 3/8' X 2" HEX...
English Manual
Page 16
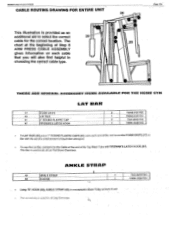
... Base Pulley at the end of unit: This accessory is used for the correct location. The chart at the beginning of Step 8 ARM PRESS CABLE ASSEMBLY gives information on each cable that you will also find helpful in choosing the correct cable type. 25 O O THERE ARE SEVERAL ACCESSORY ITEMS AVAILABLE FOR THE HOME GYM LAT BAR 17 FOAM GRIPS 40 LAT BAR 41 1" ROUND PLASTIC CAP 87 FIREMAN'S LATCH...
... Base Pulley at the end of unit: This accessory is used for the correct location. The chart at the beginning of Step 8 ARM PRESS CABLE ASSEMBLY gives information on each cable that you will also find helpful in choosing the correct cable type. 25 O O THERE ARE SEVERAL ACCESSORY ITEMS AVAILABLE FOR THE HOME GYM LAT BAR 17 FOAM GRIPS 40 LAT BAR 41 1" ROUND PLASTIC CAP 87 FIREMAN'S LATCH...
English Manual
Page 17
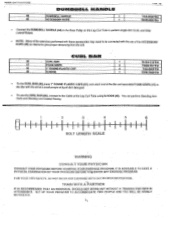
...), connect to the Cable at the Leg Curl Tube using S-HOOK (43). FOR YOUR OWN SAFETY, DO NOT BEGIN ANY EXERCISE WITH OUT PROPER INSTRUCTION.. TRAIN WITH. a To use of the ACCESSORY ROPE (45) as desired to give proper distancing from the unit. SET UP YOUR PROGRAM TO ACCOMMODATE TWO PEOPLE AND 'YOU WILL BE HIGHLY MOTIVATED. WEIDEFI I:EALTH •nd FITNESS...
...), connect to the Cable at the Leg Curl Tube using S-HOOK (43). FOR YOUR OWN SAFETY, DO NOT BEGIN ANY EXERCISE WITH OUT PROPER INSTRUCTION.. TRAIN WITH. a To use of the ACCESSORY ROPE (45) as desired to give proper distancing from the unit. SET UP YOUR PROGRAM TO ACCOMMODATE TWO PEOPLE AND 'YOU WILL BE HIGHLY MOTIVATED. WEIDEFI I:EALTH •nd FITNESS...


