Owner Manual
Page 2
...or gases to avoid creating a fire or explosion and/or causing damage to operate this manual and on your extension cord is designed for line trimmer use blades or flail- This plug will fit into the polarized wall outlet only one way. Cord must be caught in good condition. Cord ... reverse the plug. If in doubt, use in rain, in any other ) and will require the use of fire, electric shock, and serious injury. WARNING: Trimmer line throws ob- Always wear heavy, long pants, long sleeves, boots, and gloves. To reduce the risk of injury. If the plug does not fit...
...or gases to avoid creating a fire or explosion and/or causing damage to operate this manual and on your extension cord is designed for line trimmer use blades or flail- This plug will fit into the polarized wall outlet only one way. Cord must be caught in good condition. Cord ... reverse the plug. If in doubt, use in rain, in any other ) and will require the use of fire, electric shock, and serious injury. WARNING: Trimmer line throws ob- Always wear heavy, long pants, long sleeves, boots, and gloves. To reduce the risk of injury. If the plug does not fit...
Owner Manual
Page 3
...the unit so the line limiter blade (on the appliance. Clean after each use wire, rope, string, etc. • Use specified trimmer spool. Tools built with less risk of extension cord from the power supply before use the unit if the switch does not turn the ... provides added protection against electric shock. pliance is properly installed and all handles, guards, and fasteners are securely fastened. • Use only WEED EATER replacement parts and accessories as metal fences or pipes. • Ground Fault Circuit Interrupter (GFCI) protection should a means of grounding be added...
...the unit so the line limiter blade (on the appliance. Clean after each use wire, rope, string, etc. • Use specified trimmer spool. Tools built with less risk of extension cord from the power supply before use the unit if the switch does not turn the ... provides added protection against electric shock. pliance is properly installed and all handles, guards, and fasteners are securely fastened. • Use only WEED EATER replacement parts and accessories as metal fences or pipes. • Ground Fault Circuit Interrupter (GFCI) protection should a means of grounding be added...
Owner Manual
Page 5
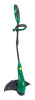
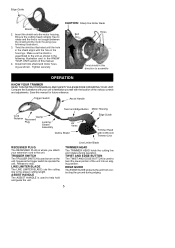
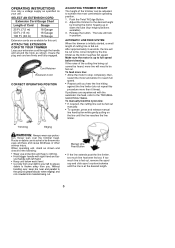
...housing. Tighten securely. CAUTION: Sharp line limiter blade Holes Bolt Twist shield in this direction to familiarize yourself with 0.065 inch Trimmer Line RECESSED PLUG The RECESSED PLUG is assembled to the unit. Trigger Switch Assist Handle Twist and Edge Button Motor Housing Cord ... OPERATING YOUR UNIT. Edge Guide Shield 2. Twist the shield as shown. Install bolt into an edging position. Line Limiter Blade TRIMMER HEAD The TRIMMER HEAD holds the cutting line and rotates during edging. 5 EDGE GUIDE The EDGE GUIDE protects the unit from contacting the ground ...
...housing. Tighten securely. CAUTION: Sharp line limiter blade Holes Bolt Twist shield in this direction to familiarize yourself with 0.065 inch Trimmer Line RECESSED PLUG The RECESSED PLUG is assembled to the unit. Trigger Switch Assist Handle Twist and Edge Button Motor Housing Cord ... OPERATING YOUR UNIT. Edge Guide Shield 2. Twist the shield as shown. Install bolt into an edging position. Line Limiter Blade TRIMMER HEAD The TRIMMER HEAD holds the cutting line and rotates during edging. 5 EDGE GUIDE The EDGE GUIDE protects the unit from contacting the ground ...
Owner Manual
Page 6
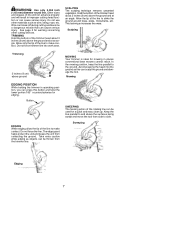
...Gauge 16 Gauge Extension cords are experienced with the automatic line feed, refer to ensure debris is initially started, a small length of the trimmer can be fed out. Trimming Edging WARNING: Always wear eye protec- When operating unit, stand as shown and check for this procedure more... the Twist 'N Edge Button. 2. The tube will need to achieve the most comfortable operating position. 1. AUTOMATIC LINE FEED SYSTEM When the trimmer is thrown away from your right to the ground (perpendicular when edging) and not crowded into eyes and face and cause blindness or other ...
...Gauge 16 Gauge Extension cords are experienced with the automatic line feed, refer to ensure debris is initially started, a small length of the trimmer can be fed out. Trimming Edging WARNING: Always wear eye protec- When operating unit, stand as shown and check for this procedure more... the Twist 'N Edge Button. 2. The tube will need to achieve the most comfortable operating position. 1. AUTOMATIC LINE FEED SYSTEM When the trimmer is thrown away from your right to the ground (perpendicular when edging) and not crowded into eyes and face and cause blindness or other ...
Owner Manual
Page 7
...pressing the head into work area. Do not force the line. SWEEPING The fanning action of the rotating line can be thrown from the trimmer line. Wire can break off during cutting and become a dangerous missile that can scalp the ground and damage the tool. SCALPING The scalping... line wear. In the mowing position, keep the line parallel to strike the ground around trees, posts, monuments, etc. Allow the tip of the trimmer head about 3 inches (8 cm) above the surfaces being swept and move the tool from contacting the ground. Scalping Trimming 3 inches (8 cm) above...
...pressing the head into work area. Do not force the line. SWEEPING The fanning action of the rotating line can be thrown from the trimmer line. Wire can break off during cutting and become a dangerous missile that can scalp the ground and damage the tool. SCALPING The scalping... line wear. In the mowing position, keep the line parallel to strike the ground around trees, posts, monuments, etc. Allow the tip of the trimmer head about 3 inches (8 cm) above the surfaces being swept and move the tool from contacting the ground. Scalping Trimming 3 inches (8 cm) above...
Owner Manual
Page 9
...dry place out of the reach of line fully extended. 4. Check line routing. 2. Use only 0.065 inch (1.65 mm) dia. TROUBLE Trimmer head stops under a load or does not turn when switch is incorrect. 2. Allow tip of head. 5. Not enough line outside of line ... being cut. 1. Cut with correct spool. 3. Remove spool cap and pull 4 inches (10 cm) of line outside of line fully extended. 1. Crowding trimmer line against material being cut . 4. Crowding line against material being cut . 2. Replace spool. 3. Contact your authorized service dealer. 3. Line is incorrect. ...
...dry place out of the reach of line fully extended. 4. Check line routing. 2. Use only 0.065 inch (1.65 mm) dia. TROUBLE Trimmer head stops under a load or does not turn when switch is incorrect. 2. Allow tip of head. 5. Not enough line outside of line ... being cut. 1. Cut with correct spool. 3. Remove spool cap and pull 4 inches (10 cm) of line outside of line fully extended. 1. Crowding trimmer line against material being cut . 4. Crowding line against material being cut . 2. Replace spool. 3. Contact your authorized service dealer. 3. Line is incorrect. ...
Parts List
Page 1
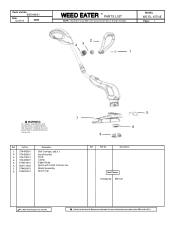
Description Not Shown 115254226 Manual = New Part Number For This IPL = Refer to design changes. Part No. MODEL WE EL-15TNE Page: 1 2 43 1 WARNING All repairs, adjustments and maintenance not described in the Operator's Manual must be performed by Qualified Service Personnel. 7...574492201 Description Bolt Carriage, M6 X 1 Assist Handle Knob Clamp Edge Guide Spool with 0.065" Trimmer line Shield Assembly Spool Cap Ref. Parts List No. 966048001 Date 02/26/10 NEW WEED EATER R PARTS LIST NOTE : Illustration may differ from actual model due to the Service Reference Indicated ...
Description Not Shown 115254226 Manual = New Part Number For This IPL = Refer to design changes. Part No. MODEL WE EL-15TNE Page: 1 2 43 1 WARNING All repairs, adjustments and maintenance not described in the Operator's Manual must be performed by Qualified Service Personnel. 7...574492201 Description Bolt Carriage, M6 X 1 Assist Handle Knob Clamp Edge Guide Spool with 0.065" Trimmer line Shield Assembly Spool Cap Ref. Parts List No. 966048001 Date 02/26/10 NEW WEED EATER R PARTS LIST NOTE : Illustration may differ from actual model due to the Service Reference Indicated ...

