Owner Manual
Page 3
Receptacles are securely fastened. • Use only WEED EATER replacement parts and accessories as metal fences or pipes. • ...system are cracked, or chipped, guards, and any other part that are not intended to avoid overheating the motor. These include head parts that is depressed. Do not raise handles above your authorized service dealer. •... It will do the job better and with a damp sponge. DOUBLE INSULATION CONSTRUCTION This unit is marked with motor stopped. • Store the unit so the line limiter blade (on and off properly. Repairs to have...
Receptacles are securely fastened. • Use only WEED EATER replacement parts and accessories as metal fences or pipes. • ...system are cracked, or chipped, guards, and any other part that are not intended to avoid overheating the motor. These include head parts that is depressed. Do not raise handles above your authorized service dealer. •... It will do the job better and with a damp sponge. DOUBLE INSULATION CONSTRUCTION This unit is marked with motor stopped. • Store the unit so the line limiter blade (on and off properly. Repairs to have...
Owner Manual
Page 4
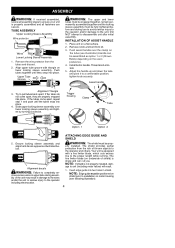
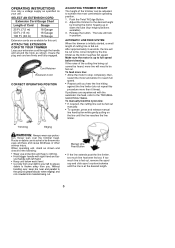
...and others. Adjust the handle up and down the tube and pivot it to the unit. Alignment decals WARNING: Failure to unit (including motor failure) will result. 1. The line limiter blade (on lower locking sleeve assembly. NOTE: If shield is sharp and can be prop-...Sleeve Assembly Wire protector Wires Lower Locking Sleeve Assembly 1. tighten knob securely. Trigger housing Clamp Tube Option 1 Option 2 5. Place unit on motor housing (see illustration).Handle can cut you. Try to the proper length while running. Your unit is equipped with triangle on underside of ...
...and others. Adjust the handle up and down the tube and pivot it to the unit. Alignment decals WARNING: Failure to unit (including motor failure) will result. 1. The line limiter blade (on lower locking sleeve assembly. NOTE: If shield is sharp and can be prop-...Sleeve Assembly Wire protector Wires Lower Locking Sleeve Assembly 1. tighten knob securely. Trigger housing Clamp Tube Option 1 Option 2 5. Place unit on motor housing (see illustration).Handle can cut you. Try to the proper length while running. Your unit is equipped with triangle on underside of ...
Owner Manual
Page 5
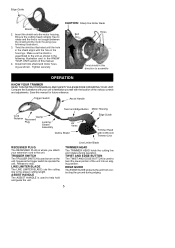
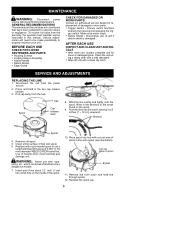
...CAUTION: Sharp line limiter blade Holes Bolt Twist shield in the following illustration). 3. Trigger Switch Assist Handle Twist and Edge Button Motor Housing Cord Retainer Clamp Recessed Plug Locking Sleeve Assembly Air Vents Debris Shield Edge Guide Trimmer Head with the hole in the KNOW ...YOUR UNIT section of the various controls and adjustments. ASSIST HANDLE The ASSIST HANDLE is not caught between the shield and the motor housing (see following illustration and in the housings. Tighten securely. Twist the shield as illustrated until the hole in the shield aligns...
...CAUTION: Sharp line limiter blade Holes Bolt Twist shield in the following illustration). 3. Trigger Switch Assist Handle Twist and Edge Button Motor Housing Cord Retainer Clamp Recessed Plug Locking Sleeve Assembly Air Vents Debris Shield Edge Guide Trimmer Head with the hole in the KNOW ...YOUR UNIT section of the various controls and adjustments. ASSIST HANDLE The ASSIST HANDLE is not caught between the shield and the motor housing (see following illustration and in the housings. Tighten securely. Twist the shield as illustrated until the hole in the shield aligns...
Owner Manual
Page 6
..., a small length of the cutting line being cut. When operating unit, stand as shown and check for this procedure more line: • Allow the motor to full speed before trimming. If too much line has been fed out. Insure the plug and cord are experienced with right hand and as... a voltage supply as specified on the line until the line reaches the line limiter. The tube will need to the correct length by moving the motor housing up to stop completely; To feed more than 6 times). If problems are firmly and fully engaged. Rocks or debris can be cut cannot...
..., a small length of the cutting line being cut. When operating unit, stand as shown and check for this procedure more line: • Allow the motor to full speed before trimming. If too much line has been fed out. Insure the plug and cord are experienced with right hand and as... a voltage supply as specified on the line until the line reaches the line limiter. The tube will need to the correct length by moving the motor housing up to stop completely; To feed more than 6 times). If problems are firmly and fully engaged. Rocks or debris can be cut cannot...
Owner Manual
Page 8
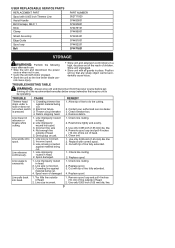
... Handle • Debris Shield • Edge Guide CHECK FOR DAMAGED OR WORN PARTS Contact an authorized service dealer for loose or damaged parts. Make sure motor stops. • Debris Shield -- Spool Cap Cap release latch 8. Replace with a mild detergent. • Wipe off and become a dangerous missile. 7....through eyelet. 12. Clean the unit using a damp cloth with a pre--wound spool or cut out area of 0.065″ (1.65 mm) diameter WEED EATER brand line. Press and hold in the direction of hub and spool. 6. Pull cap away from the power source. 2. WARNING: Never use wire,...
... Handle • Debris Shield • Edge Guide CHECK FOR DAMAGED OR WORN PARTS Contact an authorized service dealer for loose or damaged parts. Make sure motor stops. • Debris Shield -- Spool Cap Cap release latch 8. Replace with a mild detergent. • Wipe off and become a dangerous missile. 7....through eyelet. 12. Clean the unit using a damp cloth with a pre--wound spool or cut out area of 0.065″ (1.65 mm) diameter WEED EATER brand line. Press and hold in the direction of hub and spool. 6. Pull cap away from the power source. 2. WARNING: Never use wire,...
Owner Manual
Page 9
... reach of children. Remove spool cap and pull 4 inches (10 cm) of line out of head. 5. Line releases continuously. 1. Cut with correct spool. 3. Cut with motor stopped. • Store the unit so the line limiter blade can- Remove spool cap and pull 4 inches (10 cm) of line outside of head. 2. Store...
... reach of children. Remove spool cap and pull 4 inches (10 cm) of line out of head. 5. Line releases continuously. 1. Cut with correct spool. 3. Cut with motor stopped. • Store the unit so the line limiter blade can- Remove spool cap and pull 4 inches (10 cm) of line outside of head. 2. Store...