
Owner Manual
Page 1
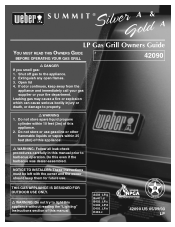
...NOTICE TO INSTALLER: These instructions must be left with the owner and the owner should keep away from the appliance and immediately call your gas supplier or your fire department. Do not store spare liquid propane cylinder within 25 feet (8m) of this manual A402_LP.g Ba401.d B402_LP...C403_LP.d D403_LP.e E402.c 42090 US 05/09/03 LP Do not store or use . Extinguish any open flames. 3. SUMMIT® & LP Gas Grill Owners Guide YOU MUST READ THIS OWNERS GUIDE # BEFORE OPERATING YOUR GAS GRILL 42090 ƽ DANGER If you smell gas: 1. If odor continues, keep them for future ...
...NOTICE TO INSTALLER: These instructions must be left with the owner and the owner should keep away from the appliance and immediately call your gas supplier or your fire department. Do not store spare liquid propane cylinder within 25 feet (8m) of this manual A402_LP.g Ba401.d B402_LP...C403_LP.d D403_LP.e E402.c 42090 US 05/09/03 LP Do not store or use . Extinguish any open flames. 3. SUMMIT® & LP Gas Grill Owners Guide YOU MUST READ THIS OWNERS GUIDE # BEFORE OPERATING YOUR GAS GRILL 42090 ƽ DANGER If you smell gas: 1. If odor continues, keep them for future ...

Owner Manual
Page 2
Please carefully follow the Dangers, Warnings and Cautions contained in this Owner's Manual may result in serious bodily injury or death, or in your Weber® gas barbecue. ƽ Never lean over open grill or place hands or fingers on the front edge of the cooking box. ƽ Should a...Owner's Guide. See instructions in this manual for correct procedures. ƽ Do not operate the Weber® gas barbecue if there is a gas leak present. ƽ Do not use a flame to check for gas leaks and burner obstructions before attempting to relight, using this product contain chemicals known to the ...
Please carefully follow the Dangers, Warnings and Cautions contained in this Owner's Manual may result in serious bodily injury or death, or in your Weber® gas barbecue. ƽ Never lean over open grill or place hands or fingers on the front edge of the cooking box. ƽ Should a...Owner's Guide. See instructions in this manual for correct procedures. ƽ Do not operate the Weber® gas barbecue if there is a gas leak present. ƽ Do not use a flame to check for gas leaks and burner obstructions before attempting to relight, using this product contain chemicals known to the ...

Owner Manual
Page 3
Contents Danger & Warnings A-2 Warranty A-4 General Instructions A-5 Grilling Methods A-6 Cleaning A-6 Exploded Views A-7 Parts List A-11 Assembly Instructions B-a Gas Instructions C-1 Leak Checking C-4 Operating D-1 Grilling Methods D-1 Lighting ...D-3 Manual Lighting D-4 Troubleshooting D-5 Maintenance E-1 Replacing Main Burners E-2 Crossover® Ignition System Operations E-5 A-3
Contents Danger & Warnings A-2 Warranty A-4 General Instructions A-5 Grilling Methods A-6 Cleaning A-6 Exploded Views A-7 Parts List A-11 Assembly Instructions B-a Gas Instructions C-1 Leak Checking C-4 Operating D-1 Grilling Methods D-1 Lighting ...D-3 Manual Lighting D-4 Troubleshooting D-5 Maintenance E-1 Replacing Main Burners E-2 Crossover® Ignition System Operations E-5 A-3
Owner Manual
Page 4
...and any applicable implied warranties of merchantability and fitness are binding on Weber®. Customer Service Center 1890 Roselle Road, Suite 308 Schaumburg, IL 60195 USA www.weber.com LP Cylinder The LP cylinder manufacturer is permanently attached to your date of purchase. The ...5 years, when assembled and operated in this owner's manual. Weber® will elect to the purchaser, freight or postage prepaid. Warranty Weber-Stephen Products Co. (Weber) hereby warrants to the ORIGINAL PURCHASER of this Weber® gas grill that prove defective under normal use , removal, return,...
...and any applicable implied warranties of merchantability and fitness are binding on Weber®. Customer Service Center 1890 Roselle Road, Suite 308 Schaumburg, IL 60195 USA www.weber.com LP Cylinder The LP cylinder manufacturer is permanently attached to your date of purchase. The ...5 years, when assembled and operated in this owner's manual. Weber® will elect to the purchaser, freight or postage prepaid. Warranty Weber-Stephen Products Co. (Weber) hereby warrants to the ORIGINAL PURCHASER of this Weber® gas grill that prove defective under normal use , removal, return,...
Owner Manual
Page 5
...Weber® gas barbecue. A-5 Liquid Propane (LP) gas supply is portable so you must conform to duplicate with the Weber® gas barbecue must be checked for gas leaks and any other enclosed area. ƽ WARNING: Your Weber® gas barbecue shall not be used . Improper assembly can take your Weber® gas... area. General Instructions Your Weber® gas barbecue is stored indoors, the gas supply must be DISCONNECTED and the LP cylinder stored outdoors in a well-ventilated space. • LP cylinder must comply with liquid propane (LP) gas only. Portability means you ...
...Weber® gas barbecue. A-5 Liquid Propane (LP) gas supply is portable so you must conform to duplicate with the Weber® gas barbecue must be checked for gas leaks and any other enclosed area. ƽ WARNING: Your Weber® gas barbecue shall not be used . Improper assembly can take your Weber® gas... area. General Instructions Your Weber® gas barbecue is stored indoors, the gas supply must be DISCONNECTED and the LP cylinder stored outdoors in a well-ventilated space. • LP cylinder must comply with liquid propane (LP) gas only. Portability means you ...
Owner Manual
Page 6
... the contact information sheet provided with your manual. Note: The temperature inside your cooking box for flavorful cooking. Cooking conditions. Your Weber® gas barbecue is warm, wipe inside of cooking box with warm soapy water and a water rinse. Drippings and grease - For availability ... such as desired. Remove excess grease to prevent grease build-up grease resembles paint flakes. Cleaning ƽ WARNING: Turn your Weber® gas barbecue OFF and wait for grease build- Inside cooking module - Inside Lid - While lid is an energyefficient appliance. Be careful...
... the contact information sheet provided with your manual. Note: The temperature inside your cooking box for flavorful cooking. Cooking conditions. Your Weber® gas barbecue is warm, wipe inside of cooking box with warm soapy water and a water rinse. Drippings and grease - For availability ... such as desired. Remove excess grease to prevent grease build-up grease resembles paint flakes. Cleaning ƽ WARNING: Turn your Weber® gas barbecue OFF and wait for grease build- Inside cooking module - Inside Lid - While lid is an energyefficient appliance. Be careful...

Owner Manual
Page 8
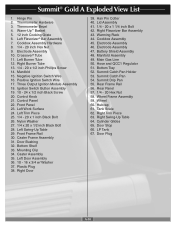
Summit® Silver A Exploded View List 1. Warm-Up™ Basket 5. 12 inch Cooking Grate 6. Electrode Assembly 10. Control Panel 21. Nylon Washer 26. 1/4 - 20 x 1/2 inch Black Bolt 27. Bottom Shelf 32. Caster Assembly 34. Warming Rack 43. Electrode Assembly 45. Bottom Tray 51. Wheel 60. Tank Scale 61. LP... 20 x 1/2 inch Phillips Screw 13. Negative Ignition Switch Wire 15. Left Work Surface 23. Mounting Clip 33. Main Gas Line 49. Summit Catch Pan Holder 52. Hair Pin Cotter 39. Right Burner Tube 46. Manifold Assembly 48. Front Frame Rail 29. Crossover&#...
Summit® Silver A Exploded View List 1. Warm-Up™ Basket 5. 12 inch Cooking Grate 6. Electrode Assembly 10. Control Panel 21. Nylon Washer 26. 1/4 - 20 x 1/2 inch Black Bolt 27. Bottom Shelf 32. Caster Assembly 34. Warming Rack 43. Electrode Assembly 45. Bottom Tray 51. Wheel 60. Tank Scale 61. LP... 20 x 1/2 inch Phillips Screw 13. Negative Ignition Switch Wire 15. Left Work Surface 23. Mounting Clip 33. Main Gas Line 49. Summit Catch Pan Holder 52. Hair Pin Cotter 39. Right Burner Tube 46. Manifold Assembly 48. Front Frame Rail 29. Crossover&#...
Owner Manual
Page 10
... 3/4 w/ Washer 37. Right Flavorizer Bar Assembly 43. Electrode Assembly 47. Main Gas Line 50. Rear Frame Rail 56. Wheel 60. Warm-Up™ Basket 5. 12 inch Cooking Grate 6. Battery Shield Assembly 48. Summit Catch Pan Holder 53. Hinge Pin 2. Left Flavorizer® Bar Assembly 7. Crossover&#... - 20 Hex Nut 58. Negative Ignition Switch Wire 16. Mounting Clip 34. Front Panel 23. Front Frame Rail 30. Cookbox Assembly 45. LP Tank 67. Cookbox Assembly Hardware 8. 1/4 - 20 inch Hex Nut 9. Ignition Switch Button Assembly 19. 10 - 24 x 1/2 inch Black Screw ...
... 3/4 w/ Washer 37. Right Flavorizer Bar Assembly 43. Electrode Assembly 47. Main Gas Line 50. Rear Frame Rail 56. Wheel 60. Warm-Up™ Basket 5. 12 inch Cooking Grate 6. Battery Shield Assembly 48. Summit Catch Pan Holder 53. Hinge Pin 2. Left Flavorizer® Bar Assembly 7. Crossover&#... - 20 Hex Nut 58. Negative Ignition Switch Wire 16. Mounting Clip 34. Front Panel 23. Front Frame Rail 30. Cookbox Assembly 45. LP Tank 67. Cookbox Assembly Hardware 8. 1/4 - 20 inch Hex Nut 9. Ignition Switch Button Assembly 19. 10 - 24 x 1/2 inch Black Screw ...

Owner Manual
Page 19
When installing cookbox route the gas line and bracket(1) inside the frame rails(2). a (1) (2) (2) (1) (2) (2) B-e 5 ƽ ATTENTION! Remove packing tape holding the gas line and bracket(1).
When installing cookbox route the gas line and bracket(1) inside the frame rails(2). a (1) (2) (2) (1) (2) (2) B-e 5 ƽ ATTENTION! Remove packing tape holding the gas line and bracket(1).

Owner Manual
Page 30
... Ask your manual. Proceed to fill. ƽWARNING: Do not exchange the LP tank provided with a cylinder supply system designed for example: do this is not an LP tank available for gas leaks. Your Weber® gas grill is equipped with an OPD. for vapor withdrawal. ƽWARNING: Only use... this barbecue. ƽNEVER fill the tank beyond 80% full. Important LP Cylinder Information Failure to check for exchange...
... Ask your manual. Proceed to fill. ƽWARNING: Do not exchange the LP tank provided with a cylinder supply system designed for example: do this is not an LP tank available for gas leaks. Your Weber® gas grill is equipped with an OPD. for vapor withdrawal. ƽWARNING: Only use... this barbecue. ƽNEVER fill the tank beyond 80% full. Important LP Cylinder Information Failure to check for exchange...

Owner Manual
Page 31
... series of tanks mount with the soap and water solution. To Connect the hose to apply it. 1) Turn the LP cylinder so the opening of tanks are illustrated below. Some of the Weber® gas barbecue. The connection requires tightening by wetting the fitting with your manual. Using a wrench could damage the regulator...
... series of tanks mount with the soap and water solution. To Connect the hose to apply it. 1) Turn the LP cylinder so the opening of tanks are illustrated below. Some of the Weber® gas barbecue. The connection requires tightening by wetting the fitting with your manual. Using a wrench could damage the regulator...
Owner Manual
Page 32
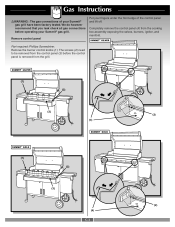
Completely remove the control panel (4) from the control panel (3) before operating your Summit® gas grill. Part required: Phillips Screwdriver. Remove the burner control knobs (1). Remove control panel Put your Summit® gas grill have been factory tested. Gas Instructions ƽWARNING : The gas connections of your fingers under the front edge of the control panel and...
Completely remove the control panel (4) from the control panel (3) before operating your Summit® gas grill. Part required: Phillips Screwdriver. Remove the burner control knobs (1). Remove control panel Put your Summit® gas grill have been factory tested. Gas Instructions ƽWARNING : The gas connections of your fingers under the front edge of the control panel and...

Owner Manual
Page 33
... As a safety precaution however, you check for gas leaks every time you disconnect and reconnect a gas fitting. Since some leak test solutions, including soap and water, may loosen or damage a gas fitting. ƽ WARNING: Perform these leak checks even if your Weber Gas Barbecue. You will result in the area while ...445; WARNING: Do not ignite burners when leak checking. Be sure there are no sparks or open flame to check for bubbles. Check for gas leaks ƽ DANGER Do not use an open flames in a fire or explosion, which can cause serious bodily injury or death and damage ...
... As a safety precaution however, you check for gas leaks every time you disconnect and reconnect a gas fitting. Since some leak test solutions, including soap and water, may loosen or damage a gas fitting. ƽ WARNING: Perform these leak checks even if your Weber Gas Barbecue. You will result in the area while ...445; WARNING: Do not ignite burners when leak checking. Be sure there are no sparks or open flame to check for bubbles. Check for gas leaks ƽ DANGER Do not use an open flames in a fire or explosion, which can cause serious bodily injury or death and damage ...

Owner Manual
Page 34
...to manifold connections. ƽ WARNING: If there is a leak at connections (3,4, or 5), turn OFF the gas. When leak checks are complete, turn OFF the gas. Contact the Customer Service Representative in your region using the contact information sheet provided with your manual. DO ...NOT OPERATE THE GRILL. Gas Instructions Check: 1) Hose connection. 2) Gas line to manifold connections. ƽ WARNING: If there is a leak at connection (1, or 2), retighten the fitting...
...to manifold connections. ƽ WARNING: If there is a leak at connections (3,4, or 5), turn OFF the gas. When leak checks are complete, turn OFF the gas. Contact the Customer Service Representative in your region using the contact information sheet provided with your manual. DO ...NOT OPERATE THE GRILL. Gas Instructions Check: 1) Hose connection. 2) Gas line to manifold connections. ƽ WARNING: If there is a leak at connection (1, or 2), retighten the fitting...

Owner Manual
Page 35
Gas Instructions Reinstall control panel Parts required: control panel, screws, and burner control knobs. Place the control panel back onto the control panel brackets on both ...
Gas Instructions Reinstall control panel Parts required: control panel, screws, and burner control knobs. Place the control panel back onto the control panel brackets on both ...

Owner Manual
Page 36
... in place over the valve. IMPROPER FILLING IS DANGEROUS. ƽ CAUTION: When transporting the LP cylinder make sure the plastic dust cover is completely empty. To refill, take LP cylinder to a "Gas Propane" dealer. ƽ WARNING: We recommend that you have a question regarding the tank,... cylinder off. If the tank has a defect malfunctions, or you refill the LP cylinder before it is in your region using the contact information sheet provided with your LP cylinder be filled at an authorized LP gas dealer, by a qualified attendant, who fills the cylinder by hand only. ...
... in place over the valve. IMPROPER FILLING IS DANGEROUS. ƽ CAUTION: When transporting the LP cylinder make sure the plastic dust cover is completely empty. To refill, take LP cylinder to a "Gas Propane" dealer. ƽ WARNING: We recommend that you have a question regarding the tank,... cylinder off. If the tank has a defect malfunctions, or you refill the LP cylinder before it is in your region using the contact information sheet provided with your LP cylinder be filled at an authorized LP gas dealer, by a qualified attendant, who fills the cylinder by hand only. ...

Owner Manual
Page 37
... may collect in accordance with this odor. Under moderate pressure, inside a cylinder, LP gas is a petroleum product as are gasoline and natural gas. You should be installed, transported and stored in your Weber® gas barbecue have to natural gas. Even when the LP tank is equipped with your region using the contact information sheet provided with...
... may collect in accordance with this odor. Under moderate pressure, inside a cylinder, LP gas is a petroleum product as are gasoline and natural gas. You should be installed, transported and stored in your Weber® gas barbecue have to natural gas. Even when the LP tank is equipped with your region using the contact information sheet provided with...
Owner Manual
Page 38
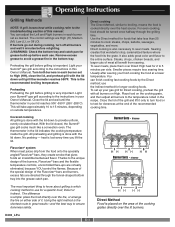
...lower temperature. Covered cooking All grilling is done with the lid down to provide uniform, evenly circulated heat. With the lid closed, the Summit® gas grill cooks much like a convection oven. Searing creates that take approximately 10 to 15 minutes, depending on High. It also adds great...the fire on the cooking grate, and then adjust all burners and wait 5 minutes before each burner set as desired. Light your Summit® gas grill according to the instructions in the recipe. Because of the special design of the Flavorizer® bars and burners, excess fats ...
...lower temperature. Covered cooking All grilling is done with the lid down to provide uniform, evenly circulated heat. With the lid closed, the Summit® gas grill cooks much like a convection oven. Searing creates that take approximately 10 to 15 minutes, depending on High. It also adds great...the fire on the cooking grate, and then adjust all burners and wait 5 minutes before each burner set as desired. Light your Summit® gas grill according to the instructions in the recipe. Because of the special design of the Flavorizer® bars and burners, excess fats ...
Owner Manual
Page 39
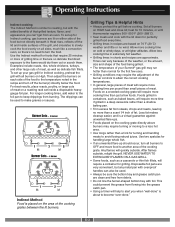
...730;C) weather and little or no more than a shallow baking pan. • Trim excess fat from burning. NEVER USE WATER TO EXTINGUISH FLAMES ON A GAS GRILL. • Some foods, such as delicate fish fillets. Heat rises, reflects off the burner(s) directly below the food. For best results, place roasts... the food but any metal pan with foil. Use two spatulas for handling large whole fish. • If an unwanted flare-up your Summit® gas grill may require turning or moving to alert you can be used . • Always be used to become "over-done." Set all ...
...730;C) weather and little or no more than a shallow baking pan. • Trim excess fat from burning. NEVER USE WATER TO EXTINGUISH FLAMES ON A GAS GRILL. • Some foods, such as delicate fish fillets. Heat rises, reflects off the burner(s) directly below the food. For best results, place roasts... the food but any metal pan with foil. Use two spatulas for handling large whole fish. • If an unwanted flare-up your Summit® gas grill may require turning or moving to alert you can be used . • Always be used to become "over-done." Set all ...
Owner Manual
Page 40
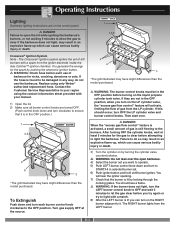
... the control panel. ƽ DANGER Failure to be in your region using only Weber® authorized replacement hose. Turn gas supply OFF at least 5 minutes for nicks, cracking, abrasions or cuts. You will activate, limiting the flow of gas is found to open barbecue. 4) Select the burner set . 6) Push igniter ...If the hose is still flowing to clear if the barbecue does not light, may result in the OFF position, when you turn OFF the LP cylinder valve and burner control knobs. Then start over the open the lid while igniting the barbecue's burners, or not waiting 5 minutes to...
... the control panel. ƽ DANGER Failure to be in your region using only Weber® authorized replacement hose. Turn gas supply OFF at least 5 minutes for nicks, cracking, abrasions or cuts. You will activate, limiting the flow of gas is found to open barbecue. 4) Select the burner set . 6) Push igniter ...If the hose is still flowing to clear if the barbecue does not light, may result in the OFF position, when you turn OFF the LP cylinder valve and burner control knobs. Then start over the open the lid while igniting the barbecue's burners, or not waiting 5 minutes to...
