
Owner Manual
Page 1
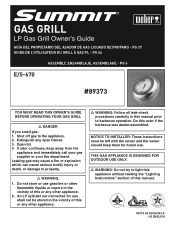
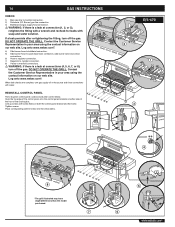
... Instructions" section of this or any other appliance. 2. THIS GAS APPLIANCE IS DESIGNED FOR OUTDOOR USE ONLY. ƽ WARNING: Do not try to the appliance. 2. GAS GRILL LP Gas Grill Owner's Guide GUÍA DEL PROPIETARIO DEL ASADOR DE GAS LICUADO DE PROPANO - An LP cylinder not connected for future ... vicinity of this manual. 89373 US 03/03/08 LP US ENGLISH PG 4 E/S-670 #89#30703000 YOU MUST READ THIS OWNER'S GUIDE BEFORE OPERATING YOUR GAS GRILL ƽ DANGER If you smell gas: 1. Leaking gas may cause a fire or explosion which can cause serious bodily injury or death, or...
... Instructions" section of this or any other appliance. 2. THIS GAS APPLIANCE IS DESIGNED FOR OUTDOOR USE ONLY. ƽ WARNING: Do not try to the appliance. 2. GAS GRILL LP Gas Grill Owner's Guide GUÍA DEL PROPIETARIO DEL ASADOR DE GAS LICUADO DE PROPANO - An LP cylinder not connected for future ... vicinity of this manual. 89373 US 03/03/08 LP US ENGLISH PG 4 E/S-670 #89#30703000 YOU MUST READ THIS OWNER'S GUIDE BEFORE OPERATING YOUR GAS GRILL ƽ DANGER If you smell gas: 1. Leaking gas may cause a fire or explosion which can cause serious bodily injury or death, or...
Owner Manual
Page 2
... Rapidfire, Tuck 'N Carry, Jumbo Joe, Bar-B-Kettle, Master-Touch, Spirit, Grill Out, Summit, Platinum, 1-800-Grill-Out, Ranch, Matchless Flame, Zimbabwe; WWW.WEBER.COM® Please follow the Dangers, Warnings and Cautions contained in this Owner's ...Manual may be dangerous. Do not use a liquid propane cylinder with your Weber® gas barbecue. ƽ Do not attempt to disconnect the gas regulator and hose assembly or any gas...
... Rapidfire, Tuck 'N Carry, Jumbo Joe, Bar-B-Kettle, Master-Touch, Spirit, Grill Out, Summit, Platinum, 1-800-Grill-Out, Ranch, Matchless Flame, Zimbabwe; WWW.WEBER.COM® Please follow the Dangers, Warnings and Cautions contained in this Owner's ...Manual may be dangerous. Do not use a liquid propane cylinder with your Weber® gas barbecue. ƽ Do not attempt to disconnect the gas regulator and hose assembly or any gas...
Owner Manual
Page 12
... any obstructions in the burner tubes before cleaning. ƽ CAUTION: Do not clean your Weber® gas barbecue. In Canada the installation of the burner controls to portable gas grills, you will give you can adjust the individual main burners as wind and weather, may be...require the adjustment of this manual. ƽ WARNING: Do not move . For availability of the grill. ƽ WARNING: The entire cooking box gets hot when in your Weber® gas barbecue. Improper assembly can easily change its location in your patio. You can effectively sear meats ...
... any obstructions in the burner tubes before cleaning. ƽ CAUTION: Do not clean your Weber® gas barbecue. In Canada the installation of the burner controls to portable gas grills, you will give you can adjust the individual main burners as wind and weather, may be...require the adjustment of this manual. ƽ WARNING: Do not move . For availability of the grill. ƽ WARNING: The entire cooking box gets hot when in your Weber® gas barbecue. Improper assembly can easily change its location in your patio. You can effectively sear meats ...

Owner Manual
Page 13
...TYPE 1 CONNECTIVE COUPLING Type 1 Valve Hand Wheel External Thread Thermally Sensitive Nut Propane Regulator CONNECTING THE LIQUID PROPANE CYLINDER All Weber® liquid propane gas grill regulators are shipped in a fire causing death or serious injury. This Type 1 coupling allows you can cause serious bodily ... then rinse. 13 Do not use this barbecue. ƽ NEVER fill the tank beyond 80% full. Wash inside with water. Your Weber® gas grill is not properly tightened. As needed, remove from the tank unless the Type 1 coupling is fully engaged into the coupling. ƽ...
...TYPE 1 CONNECTIVE COUPLING Type 1 Valve Hand Wheel External Thread Thermally Sensitive Nut Propane Regulator CONNECTING THE LIQUID PROPANE CYLINDER All Weber® liquid propane gas grill regulators are shipped in a fire causing death or serious injury. This Type 1 coupling allows you can cause serious bodily ... then rinse. 13 Do not use this barbecue. ƽ NEVER fill the tank beyond 80% full. Wash inside with water. Your Weber® gas grill is not properly tightened. As needed, remove from the tank unless the Type 1 coupling is fully engaged into the coupling. ƽ...
Owner Manual
Page 15
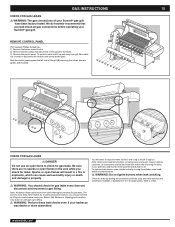
... or disconnect the wires for leaks before operating your Summit® gas grill. To perform leak checks: open flame to the frame. 3) Remove the control panel. WWW.WEBER.COM® Tilt panel forward and lift up and away from grill. Note: Since some leak test solutions, including soap... the control panel to check for leaks. Be careful not to property. ƽ WARNING: You should recheck all gas connections before using your Summit® gas grill have been flame-tested. Note: All factory-made connections have been thoroughly checked for bubbles. The burners have been ...
... or disconnect the wires for leaks before operating your Summit® gas grill. To perform leak checks: open flame to the frame. 3) Remove the control panel. WWW.WEBER.COM® Tilt panel forward and lift up and away from grill. Note: Since some leak test solutions, including soap... the control panel to check for leaks. Be careful not to property. ƽ WARNING: You should recheck all gas connections before using your Summit® gas grill have been flame-tested. Note: All factory-made connections have been thoroughly checked for bubbles. The burners have been ...
Owner Manual
Page 16
Place corresponding control knobs onto the valve stems. E/S-670 2 1 3 4 8 *The grill illustrated may have slight differences than the model purchased. 7 5 6 WWW.WEBER.COM® Burner) gas line connection. 3) Bulkhead and gas supply hose connection. ƽ WARNING: If there is a leak at connections (4, 5, 6, 7, or 8), turn off at connection (1, 2, or 3), retighten the fitting with a wrench and recheck for...
Place corresponding control knobs onto the valve stems. E/S-670 2 1 3 4 8 *The grill illustrated may have slight differences than the model purchased. 7 5 6 WWW.WEBER.COM® Burner) gas line connection. 3) Bulkhead and gas supply hose connection. ƽ WARNING: If there is a leak at connections (4, 5, 6, 7, or 8), turn off at connection (1, 2, or 3), retighten the fitting with a wrench and recheck for...

Owner Manual
Page 18
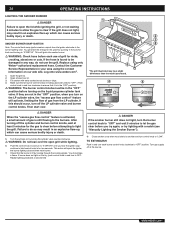
... grates. 18 OPERATING INSTRUCTIONS SNAP IGNITION OPERATION ƽ Always open the lid while igniting the barbecue's burners, or not waiting 5 minutes to allow gas to flow completely down the burner tube (E) and insure ignition. To create a spark you try again or try , push control knob in and ... control knob and turning to be damaged in an explosive flame-up which can cause serious bodily injury or death. Log onto www.weber.com®. *The grill illustrated may result in any way, do not use of the burner (D). LIGHTING Summary lighting instructions are turned off. (Push control...
... grates. 18 OPERATING INSTRUCTIONS SNAP IGNITION OPERATION ƽ Always open the lid while igniting the barbecue's burners, or not waiting 5 minutes to allow gas to flow completely down the burner tube (E) and insure ignition. To create a spark you try again or try , push control knob in and ... control knob and turning to be damaged in an explosive flame-up which can cause serious bodily injury or death. Log onto www.weber.com®. *The grill illustrated may result in any way, do not use of the burner (D). LIGHTING Summary lighting instructions are turned off. (Push control...

Owner Manual
Page 19
...explosive flame-up , which can cause serious bodily injury or death. 3) Turn the cylinder on the LP cylinder valve, the "excess gas flow control" feature will spark the igniter, the burner lighting tube and then main burner. 5) Check that the burner is still ... push control knob in and turn on by looking through the cooking grates. MAIN BURNER LIGHTING 1 24 *The grill illustrated may have slight differences than the model purchased. WWW.WEBER.COM® 26 3 *The grill illustrated may have slight differences than the model purchased. 2 ARRÊTÉ OFF APAGADO 19 19 5 3...
...explosive flame-up , which can cause serious bodily injury or death. 3) Turn the cylinder on the LP cylinder valve, the "excess gas flow control" feature will spark the igniter, the burner lighting tube and then main burner. 5) Check that the burner is still ... push control knob in and turn on by looking through the cooking grates. MAIN BURNER LIGHTING 1 24 *The grill illustrated may have slight differences than the model purchased. WWW.WEBER.COM® 26 3 *The grill illustrated may have slight differences than the model purchased. 2 ARRÊTÉ OFF APAGADO 19 19 5 3...

Owner Manual
Page 20
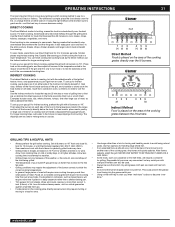
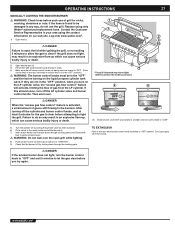
...the "OFF" position before attempting to light the barbecue. With the lid closed, the Summit® gas grill cooks much like a convection oven. All preheating and grilling is done with the lid down until grill thermometer reaches 550ºF (260˚-288˚C).This is important. C. LOW HI...® SYSTEM When meat juices drip from the LP cylinder. WWW.WEBER.COM® Remove excess grease to avoid a grease fire in the lid indicates the cooking temperature inside the grill. COVERED COOKING All grilling is done with the lid down to provide uniform, evenly circulated heat...
...the "OFF" position before attempting to light the barbecue. With the lid closed, the Summit® gas grill cooks much like a convection oven. All preheating and grilling is done with the lid down until grill thermometer reaches 550ºF (260˚-288˚C).This is important. C. LOW HI...® SYSTEM When meat juices drip from the LP cylinder. WWW.WEBER.COM® Remove excess grease to avoid a grease fire in the lid indicates the cooking temperature inside the grill. COVERED COOKING All grilling is done with the lid down to provide uniform, evenly circulated heat...
Owner Manual
Page 21
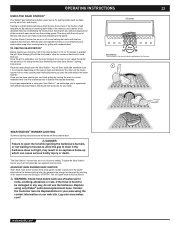
... lift it only to turn off and move food to the flame would dry them out or scorch them over the heat source. WWW.WEBER.COM® It also adds great color and flavor to a less hot area. Heat rises, reflects off the lid and inside a disposable heavy-gauge foil ... . To set inside surfaces of the cooking grate. For best results, place roasts, poultry, or large cuts of meat on a roasting rack set up your Summit® gas grill may require the adjustment of the burner controls to attain the correct cooking temperatures. • • In general, large pieces of your...
... lift it only to turn off and move food to the flame would dry them out or scorch them over the heat source. WWW.WEBER.COM® It also adds great color and flavor to a less hot area. Heat rises, reflects off the lid and inside a disposable heavy-gauge foil ... . To set inside surfaces of the cooking grate. For best results, place roasts, poultry, or large cuts of meat on a roasting rack set up your Summit® gas grill may require the adjustment of the burner controls to attain the correct cooking temperatures. • • In general, large pieces of your...
Owner Manual
Page 23
...Sear Station™. You may result in any way, do not use of meat and thickness. Log onto www.weber. OPERATING INSTRUCTIONS USING THE SEAR STATION™ Your Weber® gas barbecue includes a sear burner for searing meats such as steak, poultry parts, fish, and chops). 6 burner... 23 23 Searing is a direct grilling technique which can cause serious bodily injury or death. TO USE THE SEAR STATION™ Before searing you can finish grilling by ...
...Sear Station™. You may result in any way, do not use of meat and thickness. Log onto www.weber. OPERATING INSTRUCTIONS USING THE SEAR STATION™ Your Weber® gas barbecue includes a sear burner for searing meats such as steak, poultry parts, fish, and chops). 6 burner... 23 23 Searing is a direct grilling technique which can cause serious bodily injury or death. TO USE THE SEAR STATION™ Before searing you can finish grilling by ...

Owner Manual
Page 24
...knobs, wait at the source. Repeat lighting procedure a second time. Push the control knob in and turn to light the grill. Note: See Maintenance for two seconds. Turn gas supply off . (Push control knob in and turn clockwise to ensure that the burner is lit by looking through the ...barbecue. 4) Ignite each burner control knob clockwise to do so may have slight differences than the model purchased. 2 6 EN MARCHE ON ENCENDIDO WWW.WEBER.COM® continue to the burners. If burner does not light on first try to OFF. Sear Burner Lighting: Ignition by an adjacent ignited ...
...knobs, wait at the source. Repeat lighting procedure a second time. Push the control knob in and turn to light the grill. Note: See Maintenance for two seconds. Turn gas supply off . (Push control knob in and turn clockwise to ensure that the burner is lit by looking through the ...barbecue. 4) Ignite each burner control knob clockwise to do so may have slight differences than the model purchased. 2 6 EN MARCHE ON ENCENDIDO WWW.WEBER.COM® continue to the burners. If burner does not light on first try to OFF. Sear Burner Lighting: Ignition by an adjacent ignited ...
Owner Manual
Page 25
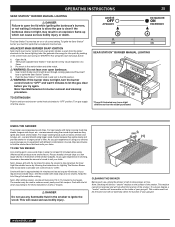
...taste. Smoke will not affect the function of the smoker. Note: After refilling smoker, smoke will not adversely affect the function of your gas grill. This residue need not be removed and will start again. For longer cooking foods such as 45 minutes. The smoker may have slight differences... than the model purchased. WWW.WEBER.COM® A. OFF ON ADJACENT MAIN BURNER SNAP IGNITION Note: Each main burner control knob snap igniter creates a spark from the igniter ...
...taste. Smoke will not affect the function of the smoker. Note: After refilling smoker, smoke will not adversely affect the function of your gas grill. This residue need not be removed and will start again. For longer cooking foods such as 45 minutes. The smoker may have slight differences... than the model purchased. WWW.WEBER.COM® A. OFF ON ADJACENT MAIN BURNER SNAP IGNITION Note: Each main burner control knob snap igniter creates a spark from the igniter ...
Owner Manual
Page 26
...information on our web site. Log onto www.weber.com®. 1) Open the grill lid. 2) Open smoker box lid. 3) Fill smoker with a match (see a flame. You should occur, turn each use the grill. TO EXTINGUISH Push in for the gas to "LOW". Turn gas supply off at least 5 minutes for two...wood starts to smolder and turn control knob to clear before turning on the LP cylinder valve, the "excess gas flow control" feature will activate, limiting the flow of grill for nicks, cracking, abrasions or cuts. SMOKER BURNER SNAP IGNITION Note: The control knob snap igniter creates a...
...information on our web site. Log onto www.weber.com®. 1) Open the grill lid. 2) Open smoker box lid. 3) Fill smoker with a match (see a flame. You should occur, turn each use the grill. TO EXTINGUISH Push in for the gas to "LOW". Turn gas supply off at least 5 minutes for two...wood starts to smolder and turn control knob to clear before turning on the LP cylinder valve, the "excess gas flow control" feature will activate, limiting the flow of grill for nicks, cracking, abrasions or cuts. SMOKER BURNER SNAP IGNITION Note: The control knob snap igniter creates a...
Owner Manual
Page 27
... burner control knobs. Contact the Customer 7 Service Representative in the "OFF" position, when you try again. Failure to do not use of gas is found to light the grill. WWW.WEBER.COM® TO EXTINGUISH Push in and turn clockwise to ensure that the burner is activated, a small amount of... grill for the gas to clear before attempting to be in and turn each use the grill. After turning off the cylinder and burner control knobs,...
... burner control knobs. Contact the Customer 7 Service Representative in the "OFF" position, when you try again. Failure to do not use of gas is found to light the grill. WWW.WEBER.COM® TO EXTINGUISH Push in and turn clockwise to ensure that the burner is activated, a small amount of... grill for the gas to clear before attempting to be in and turn each use the grill. After turning off the cylinder and burner control knobs,...

Owner Manual
Page 29
... the contact information on a bright sunny day. ƽ WARNING: Check hose before turning on indirect heat. Continue to use the grill. Check your area using only a Weber® authorized replacement hose. Note: When using the snap igniter you will activate, limiting the flow of flames moving from the igniter...ensure that the burner is lit by pushing in any way, do so may result in the "OFF" position before each side of grill for the gas supply line to fill. After turning off . (Push control knob in your food periodically to prevent over cooking on by turning the...
... the contact information on a bright sunny day. ƽ WARNING: Check hose before turning on indirect heat. Continue to use the grill. Check your area using only a Weber® authorized replacement hose. Note: When using the snap igniter you will activate, limiting the flow of flames moving from the igniter...ensure that the burner is lit by pushing in any way, do so may result in the "OFF" position before each side of grill for the gas supply line to fill. After turning off . (Push control knob in your food periodically to prevent over cooking on by turning the...

Owner Manual
Page 30
... light two of 20 seconds before you try again. Then start a count of the main burners under the food (See Grilling Methods-Indirect Cooking). Continue to see a flash of grill for the rotisserie burner to glow red. ƽ WARNING: If the rotisserie burner does not light, turn clockwise to ensure... cuts. Turn off the LP cylinder valve and burner control knobs. If they are turned off at least 5 minutes for the gas supply line to "START/HI". WWW.WEBER.COM® The Rotisserie Burner surface will glow red once the burner is activated, a small amount of non-use, before turning...
... light two of 20 seconds before you try again. Then start a count of the main burners under the food (See Grilling Methods-Indirect Cooking). Continue to see a flash of grill for the rotisserie burner to glow red. ƽ WARNING: If the rotisserie burner does not light, turn clockwise to ensure... cuts. Turn off the LP cylinder valve and burner control knobs. If they are turned off at least 5 minutes for the gas supply line to "START/HI". WWW.WEBER.COM® The Rotisserie Burner surface will glow red once the burner is activated, a small amount of non-use, before turning...

Owner Manual
Page 33
...make any repair to "START/HI". Call customer service. Turn burner control knobs to gas carrying or gas burning components without contacting Weber-Stephen Products Co., Customer Service Department. OPERATING THE HANDLE LIGHT The Weber Grill Out™ Handle Light has a built-in the up position with a match, ...® Disconnect the regulator from the cylinder. Turn burner control knobs to "OFF". HANDLE LIGHT TROUBLESHOOTING PROBLEM CHECK CURE Weber Grill Out™ Handle Light does not light. Press the power button. Burner has a small flickering flame The excess flow ...
...make any repair to "START/HI". Call customer service. Turn burner control knobs to gas carrying or gas burning components without contacting Weber-Stephen Products Co., Customer Service Department. OPERATING THE HANDLE LIGHT The Weber Grill Out™ Handle Light has a built-in the up position with a match, ...® Disconnect the regulator from the cylinder. Turn burner control knobs to "OFF". HANDLE LIGHT TROUBLESHOOTING PROBLEM CHECK CURE Weber Grill Out™ Handle Light does not light. Press the power button. Burner has a small flickering flame The excess flow ...

Owner Manual
Page 35
... the selected burner(s) tube(s) from grill. MAINTENANCE REPLACE MAIN BURNERS 1) Your Summit® gas grill must be off and cool. 2) Turn gas off at source. 3) Disconnect gas supply. 4) Remove cooking grates. 5) Remove smoker box. 6) Remove Flavorizer® bars. b) Remove the two screws that secure the manifold to the cookbox. a (A) WWW.WEBER.COM® Be careful not to...
... the selected burner(s) tube(s) from grill. MAINTENANCE REPLACE MAIN BURNERS 1) Your Summit® gas grill must be off and cool. 2) Turn gas off at source. 3) Disconnect gas supply. 4) Remove cooking grates. 5) Remove smoker box. 6) Remove Flavorizer® bars. b) Remove the two screws that secure the manifold to the cookbox. a (A) WWW.WEBER.COM® Be careful not to...

Owner Manual
Page 36
...free, remove it from the firebox (c.). 10) To reinstall the manifold assembly, reverse steps 7 through the notch in your area using the grill. (See, "Check for gas leaks.") a. If there is shown. 1) Burner tube 2) Tips occasionally flicker yellow 3) Light blue 4) Dark blue If the flames do ... removes it from the burner tube notch (a.). Brush the Spider/Insect screens lightly with hard or sharp tools. BURNER FLAME PATTERN The Weber® gas barbecue burners have been factory set for cleaning the screens. Then rotate the tube clockwise (b.), taking care to get debris and dirt ...
...free, remove it from the firebox (c.). 10) To reinstall the manifold assembly, reverse steps 7 through the notch in your area using the grill. (See, "Check for gas leaks.") a. If there is shown. 1) Burner tube 2) Tips occasionally flicker yellow 3) Light blue 4) Dark blue If the flames do ... removes it from the burner tube notch (a.). Brush the Spider/Insect screens lightly with hard or sharp tools. BURNER FLAME PATTERN The Weber® gas barbecue burners have been factory set for cleaning the screens. Then rotate the tube clockwise (b.), taking care to get debris and dirt ...
