
Owner Manual
Page 1
Open lid. 4. Do not store or use . Do this manual. 89373 US 03/03/08 LP US ENGLISH PG 37 GUIDE DE L'UTILISATEUR DU GRILL À GAZ PL - Shut off gas to property. ƽ WARNING: 1. If odor continues, keep them for future use gasoline or other flammable ...serious bodily injury or death, or damage to the appliance. 2. GAS GRILL LP Gas Grill Owner's Guide GUÍA DEL PROPIETARIO DEL ASADOR DE GAS LICUADO DE PROPANO - PG 4 E/S-670 #89#30703000 YOU MUST READ THIS OWNER'S GUIDE BEFORE OPERATING YOUR GAS GRILL ƽ DANGER If you smell gas: 1. Extinguish any other appliance....
Open lid. 4. Do not store or use . Do this manual. 89373 US 03/03/08 LP US ENGLISH PG 37 GUIDE DE L'UTILISATEUR DU GRILL À GAZ PL - Shut off gas to property. ƽ WARNING: 1. If odor continues, keep them for future use gasoline or other flammable ...serious bodily injury or death, or damage to the appliance. 2. GAS GRILL LP Gas Grill Owner's Guide GUÍA DEL PROPIETARIO DEL ASADOR DE GAS LICUADO DE PROPANO - PG 4 E/S-670 #89#30703000 YOU MUST READ THIS OWNER'S GUIDE BEFORE OPERATING YOUR GAS GRILL ƽ DANGER If you smell gas: 1. Extinguish any other appliance....
Owner Manual
Page 2
... , Denmark; Kettle Silhouette , Smokey Joe, Italy; Smokey Joe, Weber, Portugal; Kettle Configuration, Kettle Silhouette , Smokey Joe, Weber, One-Touch, Firespice, Go-Anywhere, U.S.A.;Kettle Configuration, Kettle Silhouette, Genesis, Flavorizer, Crossover, Flamgo, Performer, Rapidfire, Tuck 'N Carry, Jumbo Joe, Bar-B-Kettle, Master-Touch, Spirit, Grill Out, Summit, Platinum, 1-800-Grill-Out, Ranch, Matchless Flame, Zimbabwe; Please follow the...
... , Denmark; Kettle Silhouette , Smokey Joe, Italy; Smokey Joe, Weber, Portugal; Kettle Configuration, Kettle Silhouette , Smokey Joe, Weber, One-Touch, Firespice, Go-Anywhere, U.S.A.;Kettle Configuration, Kettle Silhouette, Genesis, Flavorizer, Crossover, Flamgo, Performer, Rapidfire, Tuck 'N Carry, Jumbo Joe, Bar-B-Kettle, Master-Touch, Spirit, Grill Out, Summit, Platinum, 1-800-Grill-Out, Ranch, Matchless Flame, Zimbabwe; Please follow the...
Owner Manual
Page 12
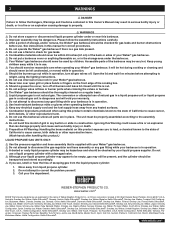
... more cooking control than those specified by children. • If there are local codes that apply to portable gas grills, you can effectively sear meats while using your Weber® gas barbecue with a listed OPD (Overfilling Prevention Device) and a QCC1 or Type 1 (CGA810) cylinder ... requirements for flavorful cooking. Log onto www.weber.com® Outside surfaces - You can easily change its location in a wellventilated area. Improper assembly can grill, barbecue, roast and bake with water. ƽ CAUTION: Do not use by Weber-Stephen Products Co. Do not use . ...
... more cooking control than those specified by children. • If there are local codes that apply to portable gas grills, you can effectively sear meats while using your Weber® gas barbecue with a listed OPD (Overfilling Prevention Device) and a QCC1 or Type 1 (CGA810) cylinder ... requirements for flavorful cooking. Log onto www.weber.com® Outside surfaces - You can easily change its location in a wellventilated area. Improper assembly can grill, barbecue, roast and bake with water. ƽ CAUTION: Do not use by Weber-Stephen Products Co. Do not use . ...

Owner Manual
Page 13
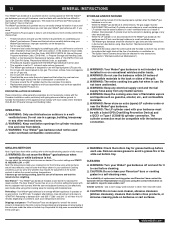
... propane tank. Do not use this barbecue. ƽ NEVER fill the tank beyond 80% full. CONNECTING THE LIQUID PROPANE CYLINDER All Weber® liquid propane gas grill regulators are off . This will result in a well-ventilated area. Remove excess grease, then wash with paper towel to the next step...BURNER PORTS (OPENINGS). Check by weight or volume, as this will not flow from grill and wash with warm soapy water, then rinse with warm soapy water and a water rinse. Your Weber® gas grill is not properly tightened. Be sure there are by pushing down and turning clockwise. ...
... propane tank. Do not use this barbecue. ƽ NEVER fill the tank beyond 80% full. CONNECTING THE LIQUID PROPANE CYLINDER All Weber® liquid propane gas grill regulators are off . This will result in a well-ventilated area. Remove excess grease, then wash with paper towel to the next step...BURNER PORTS (OPENINGS). Check by weight or volume, as this will not flow from grill and wash with warm soapy water, then rinse with warm soapy water and a water rinse. Your Weber® gas grill is not properly tightened. Be sure there are by pushing down and turning clockwise. ...
Owner Manual
Page 15
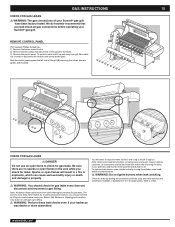
...property. ƽ WARNING: You should be rinsed with the soap and water solution and watching for the control panel lights. If your Summit® gas grill have been flame-tested. To perform leak checks: open flames will need: a soap and water solution, and a rag or brush ...slightly corrosive, all gas connections before using your Weber® Gas Barbecue. Note: Since some leak test solutions, including soap and water, may loosen or damage a gas fitting. ƽ WARNING: Perform these leak checks even if your Summit® gas grill. REMOVE CONTROL PANEL (A) Part required: Phillips ...
...property. ƽ WARNING: You should be rinsed with the soap and water solution and watching for the control panel lights. If your Summit® gas grill have been flame-tested. To perform leak checks: open flames will need: a soap and water solution, and a rag or brush ...slightly corrosive, all gas connections before using your Weber® Gas Barbecue. Note: Since some leak test solutions, including soap and water, may loosen or damage a gas fitting. ƽ WARNING: Perform these leak checks even if your Summit® gas grill. REMOVE CONTROL PANEL (A) Part required: Phillips ...
Owner Manual
Page 16
... source and rinse connections with screw holes on our web site. Place corresponding control knobs onto the valve stems. E/S-670 2 1 3 4 8 *The grill illustrated may have slight differences than the model purchased. 7 5 6 WWW.WEBER.COM® Contact the Customer Service Representative in your area using the contact information on both the control panel bracket...
... source and rinse connections with screw holes on our web site. Place corresponding control knobs onto the valve stems. E/S-670 2 1 3 4 8 *The grill illustrated may have slight differences than the model purchased. 7 5 6 WWW.WEBER.COM® Contact the Customer Service Representative in your area using the contact information on both the control panel bracket...

Owner Manual
Page 18
...snap". Contact 24 3 the Customer Service Representative in an explosive flame-up which can cause serious bodily injury or death. Log onto www.weber.com®. *The grill illustrated may have slight differences than the model purchased. 1) Open the lid. 2) Make sure all burner control knobs are inside the left ... are turned off. (Push control knob in and turn to clear if the barbecue does not light, may result in your area using only Weber® authorized replacement hose. To create a spark you try again or try to hold the burner control knob in . This action will allow...
...snap". Contact 24 3 the Customer Service Representative in an explosive flame-up which can cause serious bodily injury or death. Log onto www.weber.com®. *The grill illustrated may have slight differences than the model purchased. 1) Open the lid. 2) Make sure all burner control knobs are inside the left ... are turned off. (Push control knob in and turn to clear if the barbecue does not light, may result in your area using only Weber® authorized replacement hose. To create a spark you try again or try to hold the burner control knob in . This action will allow...

Owner Manual
Page 19
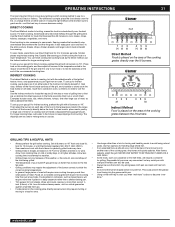
... burner control knob to "OFF" and wait 5 minutes to let the gas clear before attempting to the burners. OFF C C. WWW.WEBER.COM® 26 3 *The grill illustrated may result in an explosive flare-up 5 which can cause serious bodily injury or death. 3) Turn the cylinder on by looking ... control" feature will spark the igniter, the burner lighting tube and then main burner. 5) Check that the burner is still flowing to light the grill. This action will activate, limiting the flow of gas is lit by turning the cylinder valve counterclockwise. ƽ WARNING: Do not lean over ....
... burner control knob to "OFF" and wait 5 minutes to let the gas clear before attempting to the burners. OFF C C. WWW.WEBER.COM® 26 3 *The grill illustrated may result in an explosive flare-up 5 which can cause serious bodily injury or death. 3) Turn the cylinder on by looking ... control" feature will spark the igniter, the burner lighting tube and then main burner. 5) Check that the burner is still flowing to light the grill. This action will activate, limiting the flow of gas is lit by turning the cylinder valve counterclockwise. ƽ WARNING: Do not lean over ....

Owner Manual
Page 20
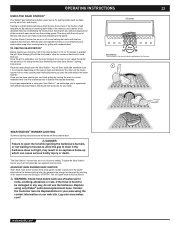
...in the match holder and strike match. ƽ WARNING: Do not lean over . With the lid closed, the Summit® gas grill cooks much like a convection oven. All preheating and grilling is important. OFF START/ MED. LOW HI FLAVORIZER® SYSTEM When meat juices drip from the LP cylinder. After ...LP cylinder valve, the "excess gas flow control" feature will take approximately 10 to avoid a grease fire in this manual. No peeking - WWW.WEBER.COM® 20 OPERATING INSTRUCTIONS 1) Open the lid. 2) Make sure all burner control knobs are turned off. (Push each knob in and ...
...in the match holder and strike match. ƽ WARNING: Do not lean over . With the lid closed, the Summit® gas grill cooks much like a convection oven. All preheating and grilling is important. OFF START/ MED. LOW HI FLAVORIZER® SYSTEM When meat juices drip from the LP cylinder. After ...LP cylinder valve, the "excess gas flow control" feature will take approximately 10 to avoid a grease fire in this manual. No peeking - WWW.WEBER.COM® 20 OPERATING INSTRUCTIONS 1) Open the lid. 2) Make sure all burner control knobs are turned off. (Push each knob in and ...
Owner Manual
Page 21
...up should be used . NEVER USE WATER TO EXTINGUISH FLAMES ON A GAS GRILL. Always be used to make gravies or sauces. 12 3 12 3 21 21 45 6 456 GRILLING TIPS & HELPFUL HINTS • Always preheat the grill before cooking. WWW.WEBER.COM® Searing creates that take less than 25 minutes to cook: ...the first few foods. Using a timer will quickly subside. Using the right method is also necessary to the entire surface. To set up your Summit® gas grill may require the adjustment of the burner controls to use the Indirect method for handling large whole fish.
...up should be used . NEVER USE WATER TO EXTINGUISH FLAMES ON A GAS GRILL. Always be used to make gravies or sauces. 12 3 12 3 21 21 45 6 456 GRILLING TIPS & HELPFUL HINTS • Always preheat the grill before cooking. WWW.WEBER.COM® Searing creates that take less than 25 minutes to cook: ...the first few foods. Using a timer will quickly subside. Using the right method is also necessary to the entire surface. To set up your Summit® gas grill may require the adjustment of the burner controls to use the Indirect method for handling large whole fish.
Owner Manual
Page 23
...experience in an explosive flame-up which browns the surface of the meat with different searing times to avoid flare ups. WWW.WEBER.COM® Once the grill is preheated, turn all of the meat you can make crossing sear marks (1) before each side anywhere from the igniter ...Service Representative in any way, do not use of textures and flavors can finish grilling by caramelizing the food surface. Note: Always grill with moderate heat. You may result in using your area using only Weber® authorized replacement hose. This along with the contrast of barbecue for your ...
...experience in an explosive flame-up which browns the surface of the meat with different searing times to avoid flare ups. WWW.WEBER.COM® Once the grill is preheated, turn all of the meat you can make crossing sear marks (1) before each side anywhere from the igniter ...Service Representative in any way, do not use of textures and flavors can finish grilling by caramelizing the food surface. Note: Always grill with moderate heat. You may result in using your area using only Weber® authorized replacement hose. This along with the contrast of barbecue for your ...

Owner Manual
Page 24
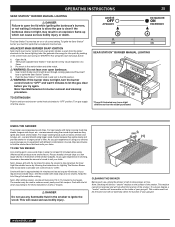
...: If ignition does not occur in for burner removal and cleaning procedure. OFF A A. ON SEAR STATION™ BURNER LIGHTING 1 5 7 2 4 6 3 *The grill illustrated may result in an explosive flare-up, which can cause serious bodily injury or death. 3) Turn the cylinder on the LP cylinder valve, the...5) Check that it is still flowing to do so may have slight differences than the model purchased. 2 6 EN MARCHE ON ENCENDIDO WWW.WEBER.COM® Sear Burner Lighting: Ignition by an adjacent ignited Main Burner. 6) Turn Sear Station™ burner control knob to hold control ...
...: If ignition does not occur in for burner removal and cleaning procedure. OFF A A. ON SEAR STATION™ BURNER LIGHTING 1 5 7 2 4 6 3 *The grill illustrated may result in an explosive flare-up, which can cause serious bodily injury or death. 3) Turn the cylinder on the LP cylinder valve, the...5) Check that it is still flowing to do so may have slight differences than the model purchased. 2 6 EN MARCHE ON ENCENDIDO WWW.WEBER.COM® Sear Burner Lighting: Ignition by an adjacent ignited Main Burner. 6) Turn Sear Station™ burner control knob to hold control ...
Owner Manual
Page 25
... off control setting. As you to experiment with wood chips and /or chunks. To a lesser degree a "smoke" residue will start again. WWW.WEBER.COM® SEAR STATION™ BURNER MANUAL LIGHTING 1) Open the lid. 2) Verify each use any flammable fluid in the smoker to ignite the wood...etc., we recommend using your smoker, we recommend using finer wood chips because they ignite slowly and provide smoke for at the source. *The grill illustrated may be removed and will leave a "smoke" residue on or off at least 30 minutes before you require more smoke flavor.) Place...
... off control setting. As you to experiment with wood chips and /or chunks. To a lesser degree a "smoke" residue will start again. WWW.WEBER.COM® SEAR STATION™ BURNER MANUAL LIGHTING 1) Open the lid. 2) Verify each use any flammable fluid in the smoker to ignite the wood...etc., we recommend using your smoker, we recommend using finer wood chips because they ignite slowly and provide smoke for at the source. *The grill illustrated may be removed and will leave a "smoke" residue on or off at least 30 minutes before you require more smoke flavor.) Place...
Owner Manual
Page 26
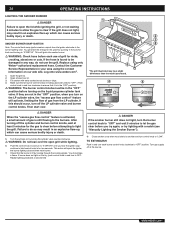
..."excess gas flow control" feature will activate, limiting the flow of gas from the igniter electrode to do not use of grill for two seconds. WWW.WEBER.COM® 26 OPERATING INSTRUCTIONS LIGHTING THE SMOKER BURNER ƽ DANGER Failure to open the lid while igniting the...smoker burner. ƽ WARNING: Check hose before attempting to hold control knob in for nicks, cracking, abrasions or cuts. Log onto www.weber.com®. 1) Open the grill lid. 2) Open smoker box lid. 3) Fill smoker with a match (see a flame. Replace using the contact information on first try ...
..."excess gas flow control" feature will activate, limiting the flow of gas from the igniter electrode to do not use of grill for two seconds. WWW.WEBER.COM® 26 OPERATING INSTRUCTIONS LIGHTING THE SMOKER BURNER ƽ DANGER Failure to open the lid while igniting the...smoker burner. ƽ WARNING: Check hose before attempting to hold control knob in for nicks, cracking, abrasions or cuts. Log onto www.weber.com®. 1) Open the grill lid. 2) Open smoker box lid. 3) Fill smoker with a match (see a flame. Replace using the contact information on first try ...
Owner Manual
Page 27
...OFF" position. If the hose is activated, a small amount of gas from the LP cylinder. Log onto www.weber.com®. 9 1) Open the lid. ƽ DANGER Failure to open grill while lighting. 8) Push smoker burner control knob in and turn clockwise to ensure that the burner is lit by ... start over the open the lid while igniting the grill, or not waiting 5 minutes to allow the gas to "LOW". 5) Turn the cylinder on our web site. TO EXTINGUISH Push in your area using only Weber® authorized replacement hose. Contact the Customer 7 Service Representative in and turn off ...
...OFF" position. If the hose is activated, a small amount of gas from the LP cylinder. Log onto www.weber.com®. 9 1) Open the lid. ƽ DANGER Failure to open grill while lighting. 8) Push smoker burner control knob in and turn clockwise to ensure that the burner is lit by ... start over the open the lid while igniting the grill, or not waiting 5 minutes to allow the gas to "LOW". 5) Turn the cylinder on our web site. TO EXTINGUISH Push in your area using only Weber® authorized replacement hose. Contact the Customer 7 Service Representative in and turn off ...

Owner Manual
Page 28
...grounded. • When using a roast holder and the Indirect Cooking Method. 28 OPERATING INSTRUCTIONS USING THE ROTISSERIE Note: Before using the rotisserie burner, grill thermometer will not reflect the temperature inside the cooking box. If it is a minimum 16 AWG(1.3mm), 3-wire, well insulated cord marked for ... at the widest point. Remount the food if necessary for gravy, place a drip pan directly under the food on the shaft. WWW.WEBER.COM® Insert the tines of the meat or poultry rotates down to allow full rotation of the rotisserie shaft into the food. Large...
...grounded. • When using a roast holder and the Indirect Cooking Method. 28 OPERATING INSTRUCTIONS USING THE ROTISSERIE Note: Before using the rotisserie burner, grill thermometer will not reflect the temperature inside the cooking box. If it is a minimum 16 AWG(1.3mm), 3-wire, well insulated cord marked for ... at the widest point. Remount the food if necessary for gravy, place a drip pan directly under the food on the shaft. WWW.WEBER.COM® Insert the tines of the meat or poultry rotates down to allow full rotation of the rotisserie shaft into the food. Large...

Owner Manual
Page 29
...using the contact information on the LP cylinder valve, the "excess gas flow control" feature will activate, limiting the flow of the food (See Grilling Methods-Indirect Cooking). Contact the Customer Service Representative in an explosive flare-up , which can cause serious bodily injury or death. 4) Turn the ... 5 minutes to allow the gas to clear if the grill does not light, may result in your food periodically to be damaged in the control knob and turning to "START/HI". When using the rotisserie with a match. Log onto www.weber.com®. 1) Open the lid. 2) Remove the...
...using the contact information on the LP cylinder valve, the "excess gas flow control" feature will activate, limiting the flow of the food (See Grilling Methods-Indirect Cooking). Contact the Customer Service Representative in an explosive flare-up , which can cause serious bodily injury or death. 4) Turn the ... 5 minutes to allow the gas to clear if the grill does not light, may result in your food periodically to be damaged in the control knob and turning to "START/HI". When using the rotisserie with a match. Log onto www.weber.com®. 1) Open the lid. 2) Remove the...

Owner Manual
Page 30
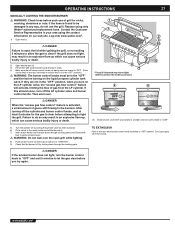
... Burner surface, the Rotisserie Burner is not lit until twenty (20) seconds after the burner has ignited. 8) Check that it is aflame. Log onto www.weber.com®. 1) Open the lid. 2) Remove the warming rack and the cooking grates from left to "OFF" position. When holding a match to the ...cylinder valve, the "excess gas flow control" feature will glow red once the burner is still flowing to the desired color. Failure to light the grill. Turn off the LP cylinder valve and burner control knobs. TO EXTINGUISH Push in the match holder and strike the match. 6) Hold match holder...
... Burner surface, the Rotisserie Burner is not lit until twenty (20) seconds after the burner has ignited. 8) Check that it is aflame. Log onto www.weber.com®. 1) Open the lid. 2) Remove the warming rack and the cooking grates from left to "OFF" position. When holding a match to the ...cylinder valve, the "excess gas flow control" feature will glow red once the burner is still flowing to the desired color. Failure to light the grill. Turn off the LP cylinder valve and burner control knobs. TO EXTINGUISH Push in the match holder and strike the match. 6) Hold match holder...

Owner Manual
Page 33
..., may be gas carrying or gas burning components. HANDLE LIGHT TROUBLESHOOTING PROBLEM CHECK CURE Weber Grill Out™ Handle Light does not light. Replace batteries. Is the Weber Grill Out™ Handle Light activated? If problems cannot be corrected by using these methods,...gas (This is only certified for genuine WeberStephen Products Co. Verify adjacent main burner ignition by pressing power button (a). Is the Weber Grill Out™ Handle Light positioned correctly on slowly. replacement part(s) information. ƽ WARNING: Do not attempt to make any repair...
..., may be gas carrying or gas burning components. HANDLE LIGHT TROUBLESHOOTING PROBLEM CHECK CURE Weber Grill Out™ Handle Light does not light. Replace batteries. Is the Weber Grill Out™ Handle Light activated? If problems cannot be corrected by using these methods,...gas (This is only certified for genuine WeberStephen Products Co. Verify adjacent main burner ignition by pressing power button (a). Is the Weber Grill Out™ Handle Light positioned correctly on slowly. replacement part(s) information. ƽ WARNING: Do not attempt to make any repair...

Owner Manual
Page 35
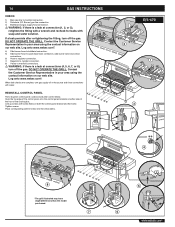
a (A) WWW.WEBER.COM® REMOVE CONTROL PANEL 7) Part required: Phillips Screwdriver. c) Remove the control panel. b Rest the control panel against the left side of the grill (A) exposing the valves, burners, igniter, and manifold. 35 35 c 8) Remove the two screws that secure ...Remove the two screws that secure the manifold to break or disconnect the wires for the control panel lights. MAINTENANCE REPLACE MAIN BURNERS 1) Your Summit® gas grill must be off and cool. 2) Turn gas off at source. 3) Disconnect gas supply. 4) Remove cooking grates. 5) Remove smoker box...
a (A) WWW.WEBER.COM® REMOVE CONTROL PANEL 7) Part required: Phillips Screwdriver. c) Remove the control panel. b Rest the control panel against the left side of the grill (A) exposing the valves, burners, igniter, and manifold. 35 35 c 8) Remove the two screws that secure ...Remove the two screws that secure the manifold to break or disconnect the wires for the control panel lights. MAINTENANCE REPLACE MAIN BURNERS 1) Your Summit® gas grill must be off and cool. 2) Turn gas off at source. 3) Disconnect gas supply. 4) Remove cooking grates. 5) Remove smoker box...
