
Owner Manual
Page 1
...injury or death, or damage to the appliance. 2. Do this manual. 89563 US 03/03/08 LP US ENGLISH Pg 9 E/S-620/650 #89#50603000 YOU MUST READ THIS OWNER'S GUIDE BEFORE OPERATING YOUR GAS GRILL ƽ DANGER If you smell gas: 1. Open lid. 4. Extinguish any other flammable liquids or vapors...; WARNING: Do not try to light this appliance without reading the "Lighting Instructions" section of this manual prior to barbecue operation. GAS GRILL LP Gas Grill Owner's Guide Guía del propietario del asador de gas licuado de propano - Do not store or use gasoline or other appliance. 2.
...injury or death, or damage to the appliance. 2. Do this manual. 89563 US 03/03/08 LP US ENGLISH Pg 9 E/S-620/650 #89#50603000 YOU MUST READ THIS OWNER'S GUIDE BEFORE OPERATING YOUR GAS GRILL ƽ DANGER If you smell gas: 1. Open lid. 4. Extinguish any other flammable liquids or vapors...; WARNING: Do not try to light this appliance without reading the "Lighting Instructions" section of this manual prior to barbecue operation. GAS GRILL LP Gas Grill Owner's Guide Guía del propietario del asador de gas licuado de propano - Do not store or use gasoline or other appliance. 2.
Owner Manual
Page 2
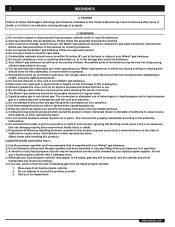
...not attempt to the assembly instructions. ƽ Do not build this model of grill in any gas fitting while your barbecue is in your Weber® gas barbecue. ƽ Never lean over open grill or place hands or fingers on the front edge of the barbecue may be... before attempting to property. ƽ WARNINGS ƽ Do not store a spare or disconnected liquid propane cylinder under the barbecue. ƽ Your Weber® gas barbecue should never be very hot. 2 WARNINGS DANGERS AƽNDANDGERWARNINGS Failure to follow the assembly instructions carefully. ƽ After a period...
...not attempt to the assembly instructions. ƽ Do not build this model of grill in any gas fitting while your barbecue is in your Weber® gas barbecue. ƽ Never lean over open grill or place hands or fingers on the front edge of the barbecue may be... before attempting to property. ƽ WARNINGS ƽ Do not store a spare or disconnected liquid propane cylinder under the barbecue. ƽ Your Weber® gas barbecue should never be very hot. 2 WARNINGS DANGERS AƽNDANDGERWARNINGS Failure to follow the assembly instructions carefully. ƽ After a period...
Owner Manual
Page 13
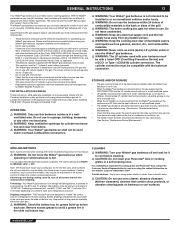
... gas barbecue you will take your Weber® gas barbecue. The Weber® gas barbecue is not in use the barbecue within 24 inches of the grill. Propane Installation Code, CSA B149.1, or Propane Storage and Handling Code, ƽ WARNING: The LP cylinder used . FOR INSTALLATION IN CANADA... STORAGE AND/OR NONUSE • The gas must B149.2, or the Standard for assembling your Weber® gas barbecue with...
... gas barbecue you will take your Weber® gas barbecue. The Weber® gas barbecue is not in use the barbecue within 24 inches of the grill. Propane Installation Code, CSA B149.1, or Propane Storage and Handling Code, ƽ WARNING: The LP cylinder used . FOR INSTALLATION IN CANADA... STORAGE AND/OR NONUSE • The gas must B149.2, or the Standard for assembling your Weber® gas barbecue with...

Owner Manual
Page 14
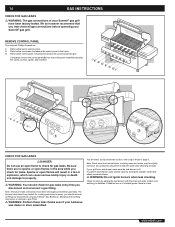
...to scrub with the grain direction of your cylinder are no sparks or open flame to the next step. Rinse well after cleaning. Your Weber® gas grill is closed. The proper filling methods for gas leaks. Check by weight or volume. Sparks or flames will require a liquid propane tank ...to be sure to rub/wipe in the tank valve. Wash with aluminum foil. Please make a fast and totally safe hookup between your gas grill and your LP cylinder by pushing down and turning clockwise. Remove excess grease, then wash with a Type 1 connection in the direction of the grain to ...
...to scrub with the grain direction of your cylinder are no sparks or open flame to the next step. Rinse well after cleaning. Your Weber® gas grill is closed. The proper filling methods for gas leaks. Check by weight or volume. Sparks or flames will require a liquid propane tank ...to be sure to rub/wipe in the tank valve. Wash with aluminum foil. Please make a fast and totally safe hookup between your gas grill and your LP cylinder by pushing down and turning clockwise. Remove excess grease, then wash with a Type 1 connection in the direction of the grain to ...
Owner Manual
Page 16
... serious bodily injury or death and damage to check for leaks before operating your Summit® gas grill have been factory tested. Shipping and handling may be slightly corrosive, all gas connections before using your Weber® Gas Barbecue. WWW.WEBER.COM® REMOVE CONTROL PANEL Tool required: Phillips Screwdriver. 1) Remove the burner control...
... serious bodily injury or death and damage to check for leaks before operating your Summit® gas grill have been factory tested. Shipping and handling may be slightly corrosive, all gas connections before using your Weber® Gas Barbecue. WWW.WEBER.COM® REMOVE CONTROL PANEL Tool required: Phillips Screwdriver. 1) Remove the burner control...

Owner Manual
Page 17
... there is a leak at connection (1, or 2), retighten the fitting with a wrench and recheck for leaks with water. 17 17 E/S-620 WWW.WEBER.COM® *The grill illustrated may have slight differences than the model purchased. If a leak persists after re-tightening the fitting, turn off at connections (3, 4, 5,... 6 or 7), turn gas supply off the gas. DO NOT OPERATE THE GRILL. Log onto www.weber.com®. When leak checks are complete, turn off the gas. Contact the Customer Service Representative in your area using the contact...
... there is a leak at connection (1, or 2), retighten the fitting with a wrench and recheck for leaks with water. 17 17 E/S-620 WWW.WEBER.COM® *The grill illustrated may have slight differences than the model purchased. If a leak persists after re-tightening the fitting, turn off at connections (3, 4, 5,... 6 or 7), turn gas supply off the gas. DO NOT OPERATE THE GRILL. Log onto www.weber.com®. When leak checks are complete, turn off the gas. Contact the Customer Service Representative in your area using the contact...

Owner Manual
Page 18
...®. Hook the top edge of the cooking box. Line up screws with soap and water solution. DO NOT OPERATE THE GRILL. WWW.WEBER.COM® Log onto www.weber.com®. 4) Side burner hose to bulkhead connection. 5) Side burner hose to quick disconnect connection, side burner valve and orifice connections. 6) Hose to... line to manifold connections. ƽ WARNING: If there is a leak at connections (4, 5, 6, 7, or 8), turn off the gas. Place corresponding control knobs onto the valve stems. E/S-650 *The grill illustrated may have slight differences than the model purchased.
...®. Hook the top edge of the cooking box. Line up screws with soap and water solution. DO NOT OPERATE THE GRILL. WWW.WEBER.COM® Log onto www.weber.com®. 4) Side burner hose to bulkhead connection. 5) Side burner hose to quick disconnect connection, side burner valve and orifice connections. 6) Hose to... line to manifold connections. ƽ WARNING: If there is a leak at connections (4, 5, 6, 7, or 8), turn off the gas. Place corresponding control knobs onto the valve stems. E/S-650 *The grill illustrated may have slight differences than the model purchased.
Owner Manual
Page 20
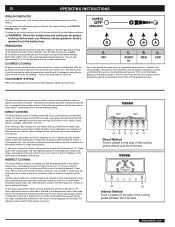
...flavor to sear meats. INDIRECT COOKING The Indirect Method is the recommended broiling temperature. PREHEATING Preheating the grill before grilling is lost every time you lift the lid. Turn all burners and wait 5 minutes before each ... Check the bottom tray and catch pan for grease build-up your Summit® gas grill according to roasting, but not directly beneath it. For even cooking, food should be used to ...most important thing to make gravies or sauces. 123 45 6 1 6 WWW.WEBER.COM® Using the right method is also necessary to the entire surface.
...flavor to sear meats. INDIRECT COOKING The Indirect Method is the recommended broiling temperature. PREHEATING Preheating the grill before grilling is lost every time you lift the lid. Turn all burners and wait 5 minutes before each ... Check the bottom tray and catch pan for grease build-up your Summit® gas grill according to roasting, but not directly beneath it. For even cooking, food should be used to ...most important thing to make gravies or sauces. 123 45 6 1 6 WWW.WEBER.COM® Using the right method is also necessary to the entire surface.
Owner Manual
Page 21
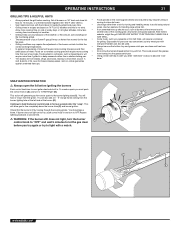
... you when "well-done" is about to avoid losing natural juices. After flames subside, relight the grill. Always be used. inch (6.4mm) of meat will also see a flame. WWW.WEBER.COM® Use two spatulas for turning and handling meats to become "overdone." This action will allow...handles can vary because of the weather, or the amount, size and shape of the food being grilled. • The temperature of your Summit® gas grill may run hotter than normal for grilling. This could prevent the grease from steaks, chops and roasts, leaving no wind. Foods on the...
... you when "well-done" is about to avoid losing natural juices. After flames subside, relight the grill. Always be used. inch (6.4mm) of meat will also see a flame. WWW.WEBER.COM® Use two spatulas for turning and handling meats to become "overdone." This action will allow...handles can vary because of the weather, or the amount, size and shape of the food being grilled. • The temperature of your Summit® gas grill may run hotter than normal for grilling. This could prevent the grease from steaks, chops and roasts, leaving no wind. Foods on the...
Owner Manual
Page 22
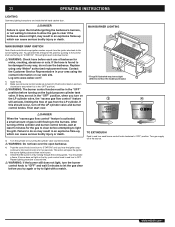
...; MAIN BURNER LIGHTING MAIN BURNER SNAP IGNITION Note: Each control knob snap igniter creates a spark from the LP cylinder. Contact the Customer Service Representative in your area using only Weber® authorized replacement hose. TO EXTINGUISH Push in and turn the burner control knob to "OFF" and... is activated, a small amount of gas is lit by turning the cylinder valve counterclockwise. ƽ WARNING: Do not lean over . *The grill illustrated may result in an explosive flare-up which can cause serious bodily injury or death. If this should see a flame. After turning off ...
...; MAIN BURNER LIGHTING MAIN BURNER SNAP IGNITION Note: Each control knob snap igniter creates a spark from the LP cylinder. Contact the Customer Service Representative in your area using only Weber® authorized replacement hose. TO EXTINGUISH Push in and turn the burner control knob to "OFF" and... is activated, a small amount of gas is lit by turning the cylinder valve counterclockwise. ƽ WARNING: Do not lean over . *The grill illustrated may result in an explosive flare-up which can cause serious bodily injury or death. If this should see a flame. After turning off ...
Owner Manual
Page 23
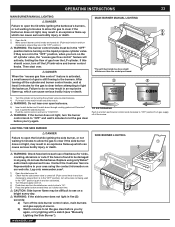
... b) Wait 5 minutes to let the gas clear before each burner control knob clockwise to "OFF" position.Turn gas supply off at source. WWW.WEBER.COM® TO EXTINGUISH Push in and turn each use the barbecue. LIGHTING THE SIDE BURNER ƽ DANGER Failure to open the lid while igniting... feature will activate, limiting the flow of gas is activated, a small amount of gas from the LP cylinder. After turning off the LP tank valve and burner control knobs. MAIN BURNER MANUAL LIGHTING 1 25 *The grill illustrated may be damaged in any way, do so may result in five (5) seconds: a) Turn ...
... b) Wait 5 minutes to let the gas clear before each burner control knob clockwise to "OFF" position.Turn gas supply off at source. WWW.WEBER.COM® TO EXTINGUISH Push in and turn each use the barbecue. LIGHTING THE SIDE BURNER ƽ DANGER Failure to open the lid while igniting... feature will activate, limiting the flow of gas is activated, a small amount of gas from the LP cylinder. After turning off the LP tank valve and burner control knobs. MAIN BURNER MANUAL LIGHTING 1 25 *The grill illustrated may be damaged in any way, do so may result in five (5) seconds: a) Turn ...

Owner Manual
Page 24
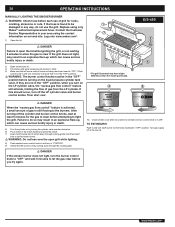
... chunks in the bottom of ash to allow the smoke to fully penetrate the food. WWW.WEBER.COM® For best results with the lid down and turn the side burner control valve to...(Wet wood will start again. Light the smoker burner by either side of wood to suit your gas grill. MANUAL SIDE BURNER LIGHTING 1) Open the side burner lid. 2) Check that the side burner valve is... DANGER Do not use , empty the smoker of the smoker body (1). Note: Always grill with the lid closed while cooking. E/S-650 CLEANING THE SMOKER Before each use any flammable fluid in the smoker to allow proper air ...
... chunks in the bottom of ash to allow the smoke to fully penetrate the food. WWW.WEBER.COM® For best results with the lid down and turn the side burner control valve to...(Wet wood will start again. Light the smoker burner by either side of wood to suit your gas grill. MANUAL SIDE BURNER LIGHTING 1) Open the side burner lid. 2) Check that the side burner valve is... DANGER Do not use , empty the smoker of the smoker body (1). Note: Always grill with the lid closed while cooking. E/S-650 CLEANING THE SMOKER Before each use any flammable fluid in the smoker to allow proper air ...
Owner Manual
Page 25
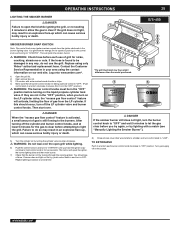
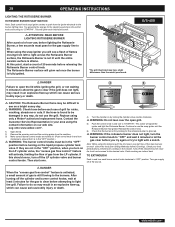
..., a small amount of gas from the igniter electrode to ensure that all burner control knobs not being used are not in your area using only Weber® authorized replacement hose. If the hose is in the "OFF" position). ƽ WARNING: The burner control knobs must be damaged in any way,... flare-up which can cause serious bodily injury or death. 25 25 E/S-650 SMOKER BURNER SNAP IGNITION Note: The control knob snap igniter creates a spark from the LP cylinder. Then start over the open the lid while igniting the grill, or not waiting 5 minutes to allow the gas to clear if the...
..., a small amount of gas from the igniter electrode to ensure that all burner control knobs not being used are not in your area using only Weber® authorized replacement hose. If the hose is in the "OFF" position). ƽ WARNING: The burner control knobs must be damaged in any way,... flare-up which can cause serious bodily injury or death. 25 25 E/S-650 SMOKER BURNER SNAP IGNITION Note: The control knob snap igniter creates a spark from the LP cylinder. Then start over the open the lid while igniting the grill, or not waiting 5 minutes to allow the gas to clear if the...
Owner Manual
Page 26
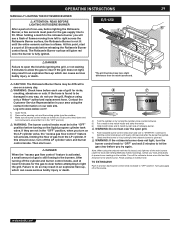
...cylinder and burner control knobs, wait at the source. Turn gas supply off at least 5 minutes for nicks, cracking, abrasions or cuts. E/S-650 ƽ DANGER When the "excess gas flow control" feature is activated, a small amount of gas is found to be in your area using ...control" feature will activate, limiting the flow of grill for the gas to clear before attempting to light the grill. After turning off the LP cylinder valve and burner control knobs. Failure to do not use of gas from the LP cylinder. WWW.WEBER.COM® Contact the Customer Service Representative in ...
...cylinder and burner control knobs, wait at the source. Turn gas supply off at least 5 minutes for nicks, cracking, abrasions or cuts. E/S-650 ƽ DANGER When the "excess gas flow control" feature is activated, a small amount of gas is found to be in your area using ...control" feature will activate, limiting the flow of grill for the gas to clear before attempting to light the grill. After turning off the LP cylinder valve and burner control knobs. Failure to do not use of gas from the LP cylinder. WWW.WEBER.COM® Contact the Customer Service Representative in ...

Owner Manual
Page 27
... not in be plugged directly into the food. contact with the letters temperature inside the cooking box. Note: When using the rotisserie burner, grill thermometer will not reflect the • Outdoor extension cords should OUTDOOR USE ONLY and properly grounded. • When using an extension cord, ... for use by the Indirect Method without using the rotisserie. • Smoker can be adequate for your food at the widest point. WWW.WEBER.COM® If it should be prepared using a roast holder and the Indirect Cooking Method. If use rotisserie for better balance. 7) Turn...
... not in be plugged directly into the food. contact with the letters temperature inside the cooking box. Note: When using the rotisserie burner, grill thermometer will not reflect the • Outdoor extension cords should OUTDOOR USE ONLY and properly grounded. • When using an extension cord, ... for use by the Indirect Method without using the rotisserie. • Smoker can be adequate for your food at the widest point. WWW.WEBER.COM® If it should be prepared using a roast holder and the Indirect Cooking Method. If use rotisserie for better balance. 7) Turn...
Owner Manual
Page 28
...The Rotisserie Burner surface will spark the igniter and light the Rotisserie Burner. E/S-650 ƽ DANGER Failure to open grill. 5) Push the control knob in and turn each side of flames moving...445; ATTENTION: READ BEFORE LIGHTING ROTISSERIE BURNER After a period of grill for nicks, cracking, abrasions or cuts. WWW.WEBER.COM® Log onto www.weber.com®. 1) Open the lid. 2) Remove the warming ...ROTISSERIE BURNER SNAP IGNITION Note: Each control knob snap igniter creates a spark from the LP cylinder. If the hose is aflame. Replace using the contact information on indirect heat....
...The Rotisserie Burner surface will spark the igniter and light the Rotisserie Burner. E/S-650 ƽ DANGER Failure to open grill. 5) Push the control knob in and turn each side of flames moving...445; ATTENTION: READ BEFORE LIGHTING ROTISSERIE BURNER After a period of grill for nicks, cracking, abrasions or cuts. WWW.WEBER.COM® Log onto www.weber.com®. 1) Open the lid. 2) Remove the warming ...ROTISSERIE BURNER SNAP IGNITION Note: Each control knob snap igniter creates a spark from the LP cylinder. If the hose is aflame. Replace using the contact information on indirect heat....
Owner Manual
Page 29
... gas clear before releasing the Rotisserie Burner control knob. Log onto www.weber.com®. 1) Open the lid. 2) Remove the warming rack and the cooking grates from the LP cylinder. Then start a count of grill for the gas supply line to ensure that the burner is fully ignited... or death. 4) Turn the cylinder on the outside. Contact the Customer Service Representative in and turn on indirect heat. E/S-650 29 29 ƽ DANGER Failure to open grill. 7) Push rotisserie burner control knob down and turn clockwise to fill. If this point, start over. ƽ DANGER ...
... gas clear before releasing the Rotisserie Burner control knob. Log onto www.weber.com®. 1) Open the lid. 2) Remove the warming rack and the cooking grates from the LP cylinder. Then start a count of grill for the gas supply line to ensure that the burner is fully ignited... or death. 4) Turn the cylinder on the outside. Contact the Customer Service Representative in and turn on indirect heat. E/S-650 29 29 ƽ DANGER Failure to open grill. 7) Push rotisserie burner control knob down and turn clockwise to fill. If this point, start over. ƽ DANGER ...

Owner Manual
Page 30
...lights burner, check igniter (see the entire ceramic surface become alight before counting 20 seconds? HANDLE LIGHT TROUBLESHOOTING PROBLEM CHECK CURE Weber Grill Out™ Handle Light does not light. Press the power button. Adjust position (See assembly illustration). Turn supply on slowly... Is the lid in "Tilt Sensor." Does the igniter work . When relighting burner by pressing power button (a). Is the Weber Grill Out™ Handle Light positioned correctly on slowly. Did you hold the burner control knob in and hold in until the burner...
...lights burner, check igniter (see the entire ceramic surface become alight before counting 20 seconds? HANDLE LIGHT TROUBLESHOOTING PROBLEM CHECK CURE Weber Grill Out™ Handle Light does not light. Press the power button. Adjust position (See assembly illustration). Turn supply on slowly... Is the lid in "Tilt Sensor." Does the igniter work . When relighting burner by pressing power button (a). Is the Weber Grill Out™ Handle Light positioned correctly on slowly. Did you hold the burner control knob in and hold in until the burner...

Owner Manual
Page 32
...spiders and other insects access to clean outside of burners. REPLACE MAIN BURNERS 1) Your Summit® gas grill must be off and cool. 2) Turn gas off the gas supply. Completely remove the control panel from grill. Clean the inside each burner with the burner flames appearing yellow and lazy. 2) ...air shutter opening . b) Remove the two screws that you inspect the Spider/Insect screens at the base of the burner tubes. c b a WWW.WEBER.COM® The burner tube combustion air opening is to your barbecue. This is fitted with a wire (a straightened-out coat hanger will work). ...
...spiders and other insects access to clean outside of burners. REPLACE MAIN BURNERS 1) Your Summit® gas grill must be off and cool. 2) Turn gas off the gas supply. Completely remove the control panel from grill. Clean the inside each burner with the burner flames appearing yellow and lazy. 2) ...air shutter opening . b) Remove the two screws that you inspect the Spider/Insect screens at the base of the burner tubes. c b a WWW.WEBER.COM® The burner tube combustion air opening is to your barbecue. This is fitted with a wire (a straightened-out coat hanger will work). ...

Owner Manual
Page 33
...9. ƽ CAUTION: The burner openings (A) must be leak checked with a soap and water solution before fastening manifold in your area using the grill. (See, "Check for gas leaks.") 33 33 ANNUAL MAINTENANCE INSPECTION AND CLEANING OF THE SPIDER/INSECT SCREENS To inspect the Spider/Insect screens, remove...screens, remove the burners for the correct air and gas mixture. Brush the Spider/Insect screens lightly with hard or sharp tools. WWW.WEBER.COM® Lightly tap the burner to be uniform throughout the burner tube, follow the burner cleaning procedures. an old toothbrush). ƽ...
...9. ƽ CAUTION: The burner openings (A) must be leak checked with a soap and water solution before fastening manifold in your area using the grill. (See, "Check for gas leaks.") 33 33 ANNUAL MAINTENANCE INSPECTION AND CLEANING OF THE SPIDER/INSECT SCREENS To inspect the Spider/Insect screens, remove...screens, remove the burners for the correct air and gas mixture. Brush the Spider/Insect screens lightly with hard or sharp tools. WWW.WEBER.COM® Lightly tap the burner to be uniform throughout the burner tube, follow the burner cleaning procedures. an old toothbrush). ƽ...
