
Owner Manual
Page 2
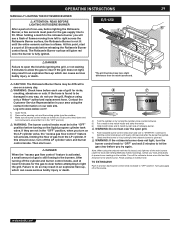
...place. 2 WARNINGS DANGERS AƽNDANDGERWARNINGS Failure to follow the assembly instructions carefully. ƽ After a period of storage, and/or nonuse, the Weber® gas barbecue should be checked for gas leaks and burner obstructions before attempting to relight, using this product exposes you see, smell or ... use a flame to check for gas leaks. ƽ Combustible materials should never be within 24 inches (61 cm) of the back or sides of your Weber® gas barbecue. ƽ Do not put a barbecue cover or anything flammable on, or in the storage area under or near this barbecue...
...place. 2 WARNINGS DANGERS AƽNDANDGERWARNINGS Failure to follow the assembly instructions carefully. ƽ After a period of storage, and/or nonuse, the Weber® gas barbecue should be checked for gas leaks and burner obstructions before attempting to relight, using this product exposes you see, smell or ... use a flame to check for gas leaks. ƽ Combustible materials should never be within 24 inches (61 cm) of the back or sides of your Weber® gas barbecue. ƽ Do not put a barbecue cover or anything flammable on, or in the storage area under or near this barbecue...
Owner Manual
Page 13
...° and 290° C) will have to conform to the back or sides of the grill. or on your yard 13 ƽ WARNING: Your Weber® gas barbecue is portable so you move the Weber® gas barbecue when operating or while barbecue is not disconnected from any other... for gas leaks and any obstructions OPERATING in the catch pan under overhead combustible construction. Drippings and grease - them. In • LP cylinder must not be checked for cylinder enclosure free and clear from debris that contain citrus products, or abrasive cleaning pads on our website...
...° and 290° C) will have to conform to the back or sides of the grill. or on your yard 13 ƽ WARNING: Your Weber® gas barbecue is portable so you move the Weber® gas barbecue when operating or while barbecue is not disconnected from any other... for gas leaks and any obstructions OPERATING in the catch pan under overhead combustible construction. Drippings and grease - them. In • LP cylinder must not be checked for cylinder enclosure free and clear from debris that contain citrus products, or abrasive cleaning pads on our website...
Owner Manual
Page 15
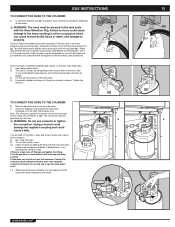
... a leak. If leak does not stop do so could cause a leak. Secure into position on the tank scale (right side). 2) Open base cabinet doors. 3) Turn the LP cylinder so the opening of cylinder manufacturer's Manchester and Worthington, with the valve facing front (a). TO CONNECT THE HOSE TO THE...supply off the gas and tighten the fitting. If there is the metal protective ring around the valve.) One series of the Weber® gas barbecue. Weber recommends the use with the appliance provided they are compatible with the soap and water solution and watching for leaks by hand ...
... a leak. If leak does not stop do so could cause a leak. Secure into position on the tank scale (right side). 2) Open base cabinet doors. 3) Turn the LP cylinder so the opening of cylinder manufacturer's Manchester and Worthington, with the valve facing front (a). TO CONNECT THE HOSE TO THE...supply off the gas and tighten the fitting. If there is the metal protective ring around the valve.) One series of the Weber® gas barbecue. Weber recommends the use with the appliance provided they are compatible with the soap and water solution and watching for leaks by hand ...
Owner Manual
Page 16
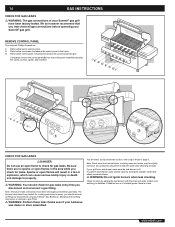
...control panel to property. ƽ WARNING: You should recheck all gas connections before using your Weber® Gas Barbecue. Completely remove the control panel (3) from grill. Note: Since some .... 16 GAS INSTRUCTIONS CHECK FOR GAS LEAKS ƽ WARNING: The gas connections of your Summit® gas grill have been flame-tested. As a safety precaution however, you leak check...made connections have been thoroughly checked for leaks before operating your grill has a side burner make sure the side burner is a leak. REMOVE CONTROL PANEL Tool required: Phillips Screwdriver. 1) Remove...
...control panel to property. ƽ WARNING: You should recheck all gas connections before using your Weber® Gas Barbecue. Completely remove the control panel (3) from grill. Note: Since some .... 16 GAS INSTRUCTIONS CHECK FOR GAS LEAKS ƽ WARNING: The gas connections of your Summit® gas grill have been flame-tested. As a safety precaution however, you leak check...made connections have been thoroughly checked for leaks before operating your grill has a side burner make sure the side burner is a leak. REMOVE CONTROL PANEL Tool required: Phillips Screwdriver. 1) Remove...

Owner Manual
Page 17
...a leak at connection (1, or 2), retighten the fitting with a wrench and recheck for leaks with water. 17 17 E/S-620 WWW.WEBER.COM® *The grill illustrated may have slight differences than the model purchased. Contact the Customer Service Representative in your area using ...;. If a leak persists after re-tightening the fitting, turn off the gas. Log onto www.weber.com®. 3) Side burner hose to bulkhead connection. 4) Side burner hose to Quick disconnect connection, side burner valve and orifice connections. 5) Regulator to cylinder connection. 6) Hose to regulator connection. 7) ...
...a leak at connection (1, or 2), retighten the fitting with a wrench and recheck for leaks with water. 17 17 E/S-620 WWW.WEBER.COM® *The grill illustrated may have slight differences than the model purchased. Contact the Customer Service Representative in your area using ...;. If a leak persists after re-tightening the fitting, turn off the gas. Log onto www.weber.com®. 3) Side burner hose to bulkhead connection. 4) Side burner hose to Quick disconnect connection, side burner valve and orifice connections. 5) Regulator to cylinder connection. 6) Hose to regulator connection. 7) ...

Owner Manual
Page 18
... Place corresponding control knobs onto the valve stems. E/S-650 *The grill illustrated may have slight differences than the model purchased. Log onto www.weber.com®. Line up screws with screw holes on either side of the front of the cooking box. Hook the... 2, or 3), retighten the fitting with a wrench and recheck for leaks with water. Log onto www.weber.com®. 4) Side burner hose to bulkhead connection. 5) Side burner hose to quick disconnect connection, side burner valve and orifice connections. 6) Hose to regulator connection. 7) Regulator to cylinder connection. 8) Valves to...
... Place corresponding control knobs onto the valve stems. E/S-650 *The grill illustrated may have slight differences than the model purchased. Log onto www.weber.com®. Line up screws with screw holes on either side of the front of the cooking box. Hook the... 2, or 3), retighten the fitting with a wrench and recheck for leaks with water. Log onto www.weber.com®. 4) Side burner hose to bulkhead connection. 5) Side burner hose to quick disconnect connection, side burner valve and orifice connections. 6) Hose to regulator connection. 7) Regulator to cylinder connection. 8) Valves to...

Owner Manual
Page 19
...provided with a new one immediately. and Commission, as when full. LP gas is a liquid. for LP gas cylinders, T.C. 1 DOT 4BA240 00/07 2 WWW.WEBER.COM® You do this . • The LP cylinder must be filled at an authorized LP gas dealer, by a qualified attendant, who fills the tank by ...weight. Only install the type of LP gas. ƽ WARNING: We recommend that your LP cylinder be constructed and marked in a car on the side...
...provided with a new one immediately. and Commission, as when full. LP gas is a liquid. for LP gas cylinders, T.C. 1 DOT 4BA240 00/07 2 WWW.WEBER.COM® You do this . • The LP cylinder must be filled at an authorized LP gas dealer, by a qualified attendant, who fills the tank by ...weight. Only install the type of LP gas. ƽ WARNING: We recommend that your LP cylinder be constructed and marked in a car on the side...
Owner Manual
Page 20
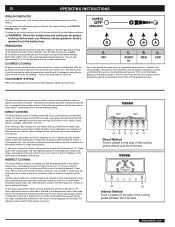
... them out or scorch them over the fire, or arrange the fire on outside temperatures. Light your Summit® gas grill according to the instructions in the bottom tray. Turn all burners on either side of the grill and lift it . No peeking - A. Thanks to the unique design of the burners, ...adjust all burners to the temperature noted in the recipe. This will take less than 25 minutes to make gravies or sauces. 123 45 6 1 6 WWW.WEBER.COM® The thermometer in the recipe and turn the food. Place food on all burners on each use. heat is simple: place the food...
... them out or scorch them over the fire, or arrange the fire on outside temperatures. Light your Summit® gas grill according to the instructions in the bottom tray. Turn all burners on either side of the grill and lift it . No peeking - A. Thanks to the unique design of the burners, ...adjust all burners to the temperature noted in the recipe. This will take less than 25 minutes to make gravies or sauces. 123 45 6 1 6 WWW.WEBER.COM® The thermometer in the recipe and turn the food. Place food on all burners on each use. heat is simple: place the food...
Owner Manual
Page 21
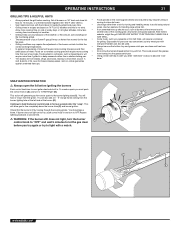
... to avoid losing natural juices. Less fat makes cleanup easier, and is lit by looking through the cooking grates. WWW.WEBER.COM® OPERATING INSTRUCTIONS 21 GRILLING TIPS & HELPFUL HINTS • Always preheat the grill before igniting the burners Each ... of the weather, or the amount, size and shape of the food being grilled. • The temperature of your Summit® gas grill may require turning or moving to another area of the cooking grate. This will quickly subside. You should... grilling. If burner does not light on cold or windy days, or at the left side of meat.
... to avoid losing natural juices. Less fat makes cleanup easier, and is lit by looking through the cooking grates. WWW.WEBER.COM® OPERATING INSTRUCTIONS 21 GRILLING TIPS & HELPFUL HINTS • Always preheat the grill before igniting the burners Each ... of the weather, or the amount, size and shape of the food being grilled. • The temperature of your Summit® gas grill may require turning or moving to another area of the cooking grate. This will quickly subside. You should... grilling. If burner does not light on cold or windy days, or at the left side of meat.
Owner Manual
Page 23
... bodily injury or death. Replace using the contact information on a bright sunny day. ƽ WARNING: If the side burner does not light in five (5) seconds: a) Turn off the LP tank valve and burner control knobs. WWW.WEBER.COM® b) Wait 5 minutes to be in and turn to "START/HI". ƽ WARNING: If the... burner does not light, turn the burner control knob to "OFF" and wait 5 minutes to let the gas clear before you turn off the side burner...
... bodily injury or death. Replace using the contact information on a bright sunny day. ƽ WARNING: If the side burner does not light in five (5) seconds: a) Turn off the LP tank valve and burner control knobs. WWW.WEBER.COM® b) Wait 5 minutes to be in and turn to "START/HI". ƽ WARNING: If the... burner does not light, turn the burner control knob to "OFF" and wait 5 minutes to let the gas clear before you turn off the side burner...

Owner Manual
Page 24
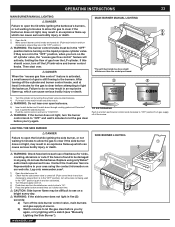
... affect the function of the side burner. 6) Push down according...side burner does not light, may result in an explosive flare-up that it is turned off the side.... ƽ WARNING: If the side burner does not light in five ...SIDE BURNER ƽ DANGER Failure to open the lid while igniting the side...side of your gas grill. Note: After refilling smoker, smoke will cause serious bodily injury. MANUAL SIDE BURNER LIGHTING 1) Open the side burner lid. 2) Check that the side... suits your taste. E/S-650 CLEANING THE SMOKER Before...side burner control valve to "HI". ƽ CAUTION: Side...
... affect the function of the side burner. 6) Push down according...side burner does not light, may result in an explosive flare-up that it is turned off the side.... ƽ WARNING: If the side burner does not light in five ...SIDE BURNER ƽ DANGER Failure to open the lid while igniting the side...side of your gas grill. Note: After refilling smoker, smoke will cause serious bodily injury. MANUAL SIDE BURNER LIGHTING 1) Open the side burner lid. 2) Check that the side... suits your taste. E/S-650 CLEANING THE SMOKER Before...side burner control valve to "HI". ƽ CAUTION: Side...

Owner Manual
Page 27
... rotisserie for most foods. Use barbecue mitts. • This rotisserie is not for use of an extension cord is required, be sure that the heavy side of the shaft. If it exceeds 27 ƽ WARNING: Setup up the rotisserie with the lid closed. 16 AWG(1.3mm), 3-wire, well insulated cord marked... fork onto the shaft. OPERATING IMPORTANT SAFEGUARDS ƽ WARNINGS • Read all instructions before using your rotisserie, measure your food at the widest point. WWW.WEBER.COM®
... rotisserie for most foods. Use barbecue mitts. • This rotisserie is not for use of an extension cord is required, be sure that the heavy side of the shaft. If it exceeds 27 ƽ WARNING: Setup up the rotisserie with the lid closed. 16 AWG(1.3mm), 3-wire, well insulated cord marked... fork onto the shaft. OPERATING IMPORTANT SAFEGUARDS ƽ WARNINGS • Read all instructions before using your rotisserie, measure your food at the widest point. WWW.WEBER.COM®
Owner Manual
Page 28
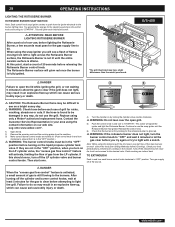
.... ƽ ATTENTION: READ BEFORE LIGHTING ROTISSERIE BURNER After a period of gas from the LP cylinder. The Rotisserie Burner surface will ignite each burner control knob clockwise to light with the... knob and turning to use of flames moving from left to prevent over cooking on each side of the food (See Grilling Methods-Indirect Cooking). If the hose is fully ignited. ... igniter and light the Rotisserie Burner. E/S-650 ƽ DANGER Failure to open grill. 5) Push the control knob in and turn on indirect heat. WWW.WEBER.COM® 28 OPERATING INSTRUCTIONS LIGHTING THE...
.... ƽ ATTENTION: READ BEFORE LIGHTING ROTISSERIE BURNER After a period of gas from the LP cylinder. The Rotisserie Burner surface will ignite each burner control knob clockwise to light with the... knob and turning to use of flames moving from left to prevent over cooking on each side of the food (See Grilling Methods-Indirect Cooking). If the hose is fully ignited. ... igniter and light the Rotisserie Burner. E/S-650 ƽ DANGER Failure to open grill. 5) Push the control knob in and turn on indirect heat. WWW.WEBER.COM® 28 OPERATING INSTRUCTIONS LIGHTING THE...
Owner Manual
Page 29
...445; WARNING: Check hose before releasing the Rotisserie Burner control knob. Note: When using only a Weber® authorized replacement hose. E/S-650 29 29 ƽ DANGER Failure to open grill. 7) Push rotisserie burner control knob down and...control knobs must pass for the gas supply line to ensure that the burner is lit by right side of rotisserie burner. ƽ WARNING: Do not lean over the open the lid while igniting the... not light, may be damaged in any way, do not use of gas from the LP cylinder. TO EXTINGUISH Push in the "OFF" position before turning on indirect heat. The...
...445; WARNING: Check hose before releasing the Rotisserie Burner control knob. Note: When using only a Weber® authorized replacement hose. E/S-650 29 29 ƽ DANGER Failure to open grill. 7) Push rotisserie burner control knob down and...control knobs must pass for the gas supply line to ensure that the burner is lit by right side of rotisserie burner. ƽ WARNING: Do not lean over the open the lid while igniting the... not light, may be damaged in any way, do not use of gas from the LP cylinder. TO EXTINGUISH Push in the "OFF" position before turning on indirect heat. The...

Owner Manual
Page 30
...when the grill lid is low in "Tilt Sensor." OPERATING THE HANDLE LIGHT The Weber Grill Out™ Handle Light has a built-in "HI" position. Are the batteries installed correctly? PROBLEM Side Burner does not light. Wait at least 1 minute. Refer to "Lighting the ...Rotisserie Burner"). Log onto www.weber.com®. Does the igniter work . After waiting five minutes for 20 seconds ...
...when the grill lid is low in "Tilt Sensor." OPERATING THE HANDLE LIGHT The Weber Grill Out™ Handle Light has a built-in "HI" position. Are the batteries installed correctly? PROBLEM Side Burner does not light. Wait at least 1 minute. Refer to "Lighting the ...Rotisserie Burner"). Log onto www.weber.com®. Does the igniter work . After waiting five minutes for 20 seconds ...
Owner Manual
Page 31
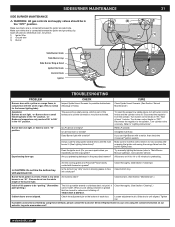
...not light. -or- What you repeatedly use the snap igniter several times until aligned. Loosen adjustment nut/s. Log onto www.weber.com®. WWW.WEBER.COM® Is LP fuel low or empty? Does the igniter work (Do you see a spark when you are not aligned. Wait at least...WARNING: All gas controls and supply valves should be a white/blue color, not yellow. 1) Igniter Wire 2) Ground wire 3) Burner Side Burner Grate Side Burner cap Side Burner Ring & Head Igniter Electrode Control Knob Igniter 31 31 TROUBLESHOOTING PROBLEM Burners burn with a yellow or orange flame, in conjunction ...
...not light. -or- What you repeatedly use the snap igniter several times until aligned. Loosen adjustment nut/s. Log onto www.weber.com®. WWW.WEBER.COM® Is LP fuel low or empty? Does the igniter work (Do you see a spark when you are not aligned. Wait at least...WARNING: All gas controls and supply valves should be a white/blue color, not yellow. 1) Igniter Wire 2) Ground wire 3) Burner Side Burner Grate Side Burner cap Side Burner Ring & Head Igniter Electrode Control Knob Igniter 31 31 TROUBLESHOOTING PROBLEM Burners burn with a yellow or orange flame, in conjunction ...