Owner Manual
Page 1
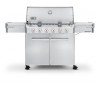
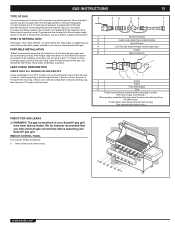
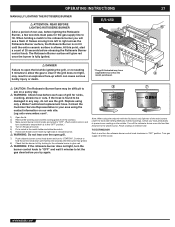
...or vapors in the vicinity of this even if the barbecue was dealer-assembled. Pg 9 E/S-620/650 #89565 YOU MUST READ THIS OWNER'S GUIDE BEFORE OPERATING YOUR GAS GRILL ƽ DANGER If you smell gas: 1. NOTICE TO INSTALLER: These instructions must be stored in the vicinity of this manual.... 89565 US 03/03/08 NG US ENGLISH Shut off gas to property. ƽ WARNING: 1. Do not store...
...or vapors in the vicinity of this even if the barbecue was dealer-assembled. Pg 9 E/S-620/650 #89565 YOU MUST READ THIS OWNER'S GUIDE BEFORE OPERATING YOUR GAS GRILL ƽ DANGER If you smell gas: 1. NOTICE TO INSTALLER: These instructions must be stored in the vicinity of this manual.... 89565 US 03/03/08 NG US ENGLISH Shut off gas to property. ƽ WARNING: 1. Do not store...
Owner Manual
Page 2
... is in operation. ƽ A dented or rusty liquid propane cylinder may be hazardous and should never be used by your liquid propane supplier. Call your Weber® gas barbecue. ƽ Never lean over open grill or place hands or fingers on this product exposes you see, smell or hear the hiss of escaping... be within 24 inches (61 cm) of the back or sides of your Weber® gas barbecue. ƽ Do not put a barbecue cover or anything flammable on, or in the storage area under or near this model of grill in any built-in or slide in construction. The unit must be properly assembled...
... is in operation. ƽ A dented or rusty liquid propane cylinder may be hazardous and should never be used by your liquid propane supplier. Call your Weber® gas barbecue. ƽ Never lean over open grill or place hands or fingers on this product exposes you see, smell or hear the hiss of escaping... be within 24 inches (61 cm) of the back or sides of your Weber® gas barbecue. ƽ Do not put a barbecue cover or anything flammable on, or in the storage area under or near this model of grill in any built-in or slide in construction. The unit must be properly assembled...
Owner Manual
Page 13
...to portable gas grills, you will give you the minimum requirements for gas leaks and any pressure testing of this manual. ƽ WARNING: Do not move . GRILLING METHODS Note: If grill loses heat while cooking refer to "smoke" the correct amount of local codes, with you if you move the Weber® gas barbecue when... is portable so you can easily change its location in your yard or on your patio. With the Weber® gas barbecue you can grill, barbecue, roast and bake with results that are available that might obstruct the flow of combustion or ventilation air. • The Spider /...
...to portable gas grills, you will give you the minimum requirements for gas leaks and any pressure testing of this manual. ƽ WARNING: Do not move . GRILLING METHODS Note: If grill loses heat while cooking refer to "smoke" the correct amount of local codes, with you if you move the Weber® gas barbecue when... is portable so you can easily change its location in your yard or on your patio. With the Weber® gas barbecue you can grill, barbecue, roast and bake with results that are available that might obstruct the flow of combustion or ventilation air. • The Spider /...

Owner Manual
Page 14
... its best is warm, wipe inside of Local Codes, you check for leaks in accordance with water. GAS INSTRUCTIONS INSTALL GAS SUPPLY GENERAL SPECIFICATIONS FOR PIPING Note: Contact your grill as this will result in collecting water and debris. • The dust covers (supplied plastic plugs) ... inches of water column pressure (.163 psi). • A manual shut-off of the National Fuel Gas Code: ANSI Z 223.1/NFPA 54, or CAN/ CGA-B149.1, Natural Gas and Propane Installation Code. WWW.WEBER.COM® Thermometer - clean with a soft cloth and a soap and water solution. Flaking built-up...
... its best is warm, wipe inside of Local Codes, you check for leaks in accordance with water. GAS INSTRUCTIONS INSTALL GAS SUPPLY GENERAL SPECIFICATIONS FOR PIPING Note: Contact your grill as this will result in collecting water and debris. • The dust covers (supplied plastic plugs) ... inches of water column pressure (.163 psi). • A manual shut-off of the National Fuel Gas Code: ANSI Z 223.1/NFPA 54, or CAN/ CGA-B149.1, Natural Gas and Propane Installation Code. WWW.WEBER.COM® Thermometer - clean with a soft cloth and a soap and water solution. Flaking built-up...
Owner Manual
Page 15
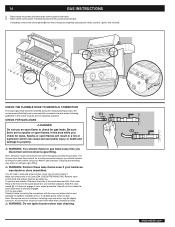
...should check to operation using Natural gas to be sure that you are required. PORTABLE INSTALLATION Weber® recommends moving the grill at 4.5" of the grill. GAS INSTRUCTIONS 15 TYPE OF GAS Your natural gas grill is factory built to the next step. Natural gas is supplied by pushing in ...fuel. We do however recommend that they are shipped in accordance to the gas supply, pull back the outer fitting, insert the hose fitting all gas connections before operating your Summit® gas grill. If they do not turn continue turning them clockwise until sleeve snaps ...
...should check to operation using Natural gas to be sure that you are required. PORTABLE INSTALLATION Weber® recommends moving the grill at 4.5" of the grill. GAS INSTRUCTIONS 15 TYPE OF GAS Your natural gas grill is factory built to the next step. Natural gas is supplied by pushing in ...fuel. We do however recommend that they are shipped in accordance to the gas supply, pull back the outer fitting, insert the hose fitting all gas connections before operating your Summit® gas grill. If they do not turn continue turning them clockwise until sleeve snaps ...
Owner Manual
Page 16
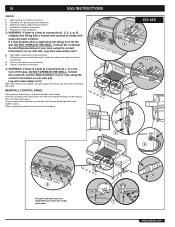
Completely remove the control panel (3) from grill. CHECK FOR GAS LEAKS ƽ DANGER Do not use an open flames will ... water solution and watching for leaks. ƽ WARNING: Do not ignite burners when leak checking. 3 WWW.WEBER.COM® Remove valve control knob and screws. To perform leak checks: Slide back the collar of the hose...water, may loosen or damage a gas fitting. ƽ WARNING: Perform these leak checks even if your Weber® gas barbecue. As a safety precaution however, you should recheck all connections should check for gas leaks every time you check for ...
Completely remove the control panel (3) from grill. CHECK FOR GAS LEAKS ƽ DANGER Do not use an open flames will ... water solution and watching for leaks. ƽ WARNING: Do not ignite burners when leak checking. 3 WWW.WEBER.COM® Remove valve control knob and screws. To perform leak checks: Slide back the collar of the hose...water, may loosen or damage a gas fitting. ƽ WARNING: Perform these leak checks even if your Weber® gas barbecue. As a safety precaution however, you should recheck all connections should check for gas leaks every time you check for ...

Owner Manual
Page 17
...contact information on our web site. DO NOT OPERATE THE GRILL. If a leak persists after re-tightening the fitting, turn off at the source and rinse connections with soap and water solution. Log onto www.weber.com®. 5) Bulk head to side burner hose connection...connection. 3) Regulator to hose connection. 4) Main gas line to manifold connections. ƽ WARNING: If there is a leak at connection (1, 2, 3, or 4), retighten the fitting with a wrench and recheck for leaks with water. 17 E/S-620 WWW.WEBER.COM® *The grill illustrated may have slight differences than the model ...
...contact information on our web site. DO NOT OPERATE THE GRILL. If a leak persists after re-tightening the fitting, turn off at the source and rinse connections with soap and water solution. Log onto www.weber.com®. 5) Bulk head to side burner hose connection...connection. 3) Regulator to hose connection. 4) Main gas line to manifold connections. ƽ WARNING: If there is a leak at connection (1, 2, 3, or 4), retighten the fitting with a wrench and recheck for leaks with water. 17 E/S-620 WWW.WEBER.COM® *The grill illustrated may have slight differences than the model ...
Owner Manual
Page 18
...regulator connection. 5) Regulator to hose connection. ƽ WARNING: If there is a leak at connections (6, 7, 8, or 9), turn off the gas. 18 GAS INSTRUCTIONS CHECK: 1) Main gas line to manifold connections. ƽ WARNING: If there is a leak at connection (1, 2, 3, 4, or 5), retighten the fitting with a ... Hose to quick disconnect connection. 9) Valves to manifold connection. 2) Rotisserie (I.R. DO NOT OPERATE THE GRILL. E/S-650 1 6 6 8 WWW.WEBER.COM® DO NOT OPERATE THE GRILL. Line up screws with screw holes on either side of the front of the cooking box. Contact ...
...regulator connection. 5) Regulator to hose connection. ƽ WARNING: If there is a leak at connections (6, 7, 8, or 9), turn off the gas. 18 GAS INSTRUCTIONS CHECK: 1) Main gas line to manifold connections. ƽ WARNING: If there is a leak at connection (1, 2, 3, 4, or 5), retighten the fitting with a ... Hose to quick disconnect connection. 9) Valves to manifold connection. 2) Rotisserie (I.R. DO NOT OPERATE THE GRILL. E/S-650 1 6 6 8 WWW.WEBER.COM® DO NOT OPERATE THE GRILL. Line up screws with screw holes on either side of the front of the cooking box. Contact ...
Owner Manual
Page 19
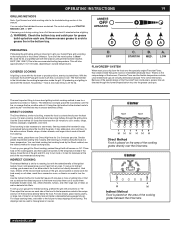
.... For even cooking, food should be used to make gravies or sauces. 123 45 6 1 6 WWW.WEBER.COM® Use the Direct method for Indirect cooking, preheat the grill with the added benefits of that wonderful crisp, caramelized texture where the food hits the grate. Searing creates that...get from burning. Turn all burners on each use the Indirect method for a specific food, Direct or Indirect. With the lid closed, the Summit® gas grill cooks much like a convection oven. D. The difference is lost every time you finish cooking the food at the end of the recommended cooking ...
.... For even cooking, food should be used to make gravies or sauces. 123 45 6 1 6 WWW.WEBER.COM® Use the Direct method for Indirect cooking, preheat the grill with the added benefits of that wonderful crisp, caramelized texture where the food hits the grate. Searing creates that...get from burning. Turn all burners on each use the Indirect method for a specific food, Direct or Indirect. With the lid closed, the Summit® gas grill cooks much like a convection oven. D. The difference is lost every time you finish cooking the food at the end of the recommended cooking ...

Owner Manual
Page 20
...with the lid down the burner tube (E) and insure ignition. Using a timer will quickly subside. WWW.WEBER.COM® Allow less • cooking time in extremely hot weather. • Grilling times can also be sure the bottom tray and grease catch pan are clean and free from flowing ...light on 70˚F (20˚C) weather and little or no more than just a few uses. • Grilling conditions may require turning or moving to another area of your Summit® gas grill may run hotter than a shallow baking pan. • • Trim excess fat from the burner lighting tube ...
...with the lid down the burner tube (E) and insure ignition. Using a timer will quickly subside. WWW.WEBER.COM® Allow less • cooking time in extremely hot weather. • Grilling times can also be sure the bottom tray and grease catch pan are clean and free from flowing ...light on 70˚F (20˚C) weather and little or no more than just a few uses. • Grilling conditions may require turning or moving to another area of your Summit® gas grill may run hotter than a shallow baking pan. • • Trim excess fat from the burner lighting tube ...
Owner Manual
Page 21
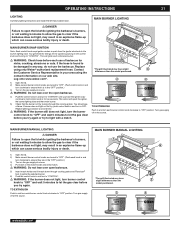
... creates a spark from the igniter electrode to "OFF" position. You should see a flame. Turn gas supply off at the source. MAIN BURNER MANUAL LIGHTING 1 25 *The grill illustrated may have slight 3 differences than the model purchased. 6 3 WWW.WEBER.COM® MAIN BURNER MANUAL LIGHTING ƽ DANGER Failure to open the lid while igniting...
... creates a spark from the igniter electrode to "OFF" position. You should see a flame. Turn gas supply off at the source. MAIN BURNER MANUAL LIGHTING 1 25 *The grill illustrated may have slight 3 differences than the model purchased. 6 3 WWW.WEBER.COM® MAIN BURNER MANUAL LIGHTING ƽ DANGER Failure to open the lid while igniting...
Owner Manual
Page 23
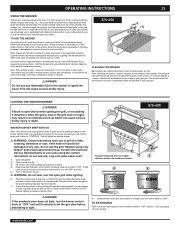
... to "LOW". If the hose is in the "OFF" position). 5) Turn on first try, push control knob in the bottom of ash to OFF. WWW.WEBER.COM® As you gain experience in using your taste. As you to experiment with wood chips and /or chunks. Light the smoker burner by... wood starts to smolder and turn the burner control knob to "OFF" and wait 5 minutes to find the smoke flavor that best suits your gas grill. Note: Always grill with the lid down according to the times indicated in the control knob and turning to fully penetrate the food. You generate the energy...
... to "LOW". If the hose is in the "OFF" position). 5) Turn on first try, push control knob in the bottom of ash to OFF. WWW.WEBER.COM® As you gain experience in using your taste. As you to experiment with wood chips and /or chunks. Light the smoker burner by... wood starts to smolder and turn the burner control knob to "OFF" and wait 5 minutes to find the smoke flavor that best suits your gas grill. Note: Always grill with the lid down according to the times indicated in the control knob and turning to fully penetrate the food. You generate the energy...
Owner Manual
Page 24
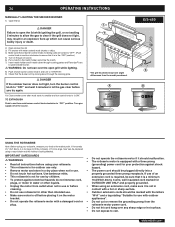
... down through cooking grates and Flavorizer® bars to ignite smoker burner. ƽ WARNING: Do not lean over any sharp edge or hot surface. WWW.WEBER.COM® E/S-650 2 3 10 5 USING THE ROTISSERIE Note: Before using your rotisserie. • This rotisserie is not in contact with a hot or ...; • Do not touch hot surfaces. Do not let cord hang over the open the lid while igniting the grill, or not waiting 5 minutes to allow the gas to clear if the grill does not light, may have slight differences than intended use. • • Make sure motor is off at the...
... down through cooking grates and Flavorizer® bars to ignite smoker burner. ƽ WARNING: Do not lean over any sharp edge or hot surface. WWW.WEBER.COM® E/S-650 2 3 10 5 USING THE ROTISSERIE Note: Before using your rotisserie. • This rotisserie is not in contact with a hot or ...; • Do not touch hot surfaces. Do not let cord hang over the open the lid while igniting the grill, or not waiting 5 minutes to allow the gas to clear if the grill does not light, may have slight differences than intended use. • • Make sure motor is off at the...
Owner Manual
Page 26
...lighting tube. Check your area using the rotisserie with a match. TO EXTINGUISH Push in and turn to "START/HI". WWW.WEBER.COM® When using only a Weber® authorized replacement hose. If the hose is found to right across the Rotisserie Burner surface, the Rotisserie Burner is not lit... on a bright sunny day. ƽ WARNING: Check hose before lighting the Rotisserie Burner, a few seconds must pass for the gas supply line to see a flash of grill for the rotisserie burner to glow red. ƽ WARNING: If the rotisserie burner does not light, turn clockwise to ensure that ...
...lighting tube. Check your area using the rotisserie with a match. TO EXTINGUISH Push in and turn to "START/HI". WWW.WEBER.COM® When using only a Weber® authorized replacement hose. If the hose is found to right across the Rotisserie Burner surface, the Rotisserie Burner is not lit... on a bright sunny day. ƽ WARNING: Check hose before lighting the Rotisserie Burner, a few seconds must pass for the gas supply line to see a flash of grill for the rotisserie burner to glow red. ƽ WARNING: If the rotisserie burner does not light, turn clockwise to ensure that ...
Owner Manual
Page 27
...: If the rotisserie burner does not light, turn to prevent over the open the lid while igniting the grill, or not waiting 5 minutes to allow the gas to clear if the grill does not light, may be damaged in and turn the rotisserie burner control knob clockwise to fill. Note...: When using only a Weber® authorized replacement hose. Turn off at source. 5) Put a match in the "OFF" position.) 4) Turn on the gas at the source....
...: If the rotisserie burner does not light, turn to prevent over the open the lid while igniting the grill, or not waiting 5 minutes to allow the gas to clear if the grill does not light, may be damaged in and turn the rotisserie burner control knob clockwise to fill. Note...: When using only a Weber® authorized replacement hose. Turn off at source. 5) Put a match in the "OFF" position.) 4) Turn on the gas at the source....
Owner Manual
Page 28
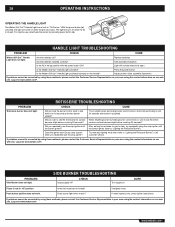
...you see below). The light will come on the handle? HANDLE LIGHT TROUBLESHOOTING PROBLEM CHECK CURE Weber Grill Out™ Handle Light does not light. Replace batteries. Is the Weber Grill Out™ Handle Light activated? If problems cannot be corrected by holding in your area using...®. 28 OPERATING INSTRUCTIONS OPERATING THE HANDLE LIGHT The Weber Grill Out™ Handle Light has a built-in the up position with a match? Call customer service. SIDE BURNER TROUBLESHOOTING Is gas supply off when the lid is open . Does burner light with the power button ...
...you see below). The light will come on the handle? HANDLE LIGHT TROUBLESHOOTING PROBLEM CHECK CURE Weber Grill Out™ Handle Light does not light. Replace batteries. Is the Weber Grill Out™ Handle Light activated? If problems cannot be corrected by holding in your area using...®. 28 OPERATING INSTRUCTIONS OPERATING THE HANDLE LIGHT The Weber Grill Out™ Handle Light has a built-in the up position with a match? Call customer service. SIDE BURNER TROUBLESHOOTING Is gas supply off when the lid is open . Does burner light with the power button ...

Owner Manual
Page 30
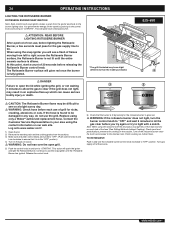
... the combustion air openings. This is a target for spiders and other insects access to property. a) Remove the burner control knobs. c) Remove the control panel. c b a WWW.WEBER.COM® Check and clean the valve orifices at least once a year. (See Section "Annual Maintenance".) Also inspect and clean the the Spider/Insect screens... the combustion air openings, under the control panel, causing serious damage to the frame. Remove the manifold (See "Replace Main Burners"). REPLACE MAIN BURNERS 1) Your Summit® gas grill must be off and cool. 2) Turn...
... the combustion air openings. This is a target for spiders and other insects access to property. a) Remove the burner control knobs. c) Remove the control panel. c b a WWW.WEBER.COM® Check and clean the valve orifices at least once a year. (See Section "Annual Maintenance".) Also inspect and clean the the Spider/Insect screens... the combustion air openings, under the control panel, causing serious damage to the frame. Remove the manifold (See "Replace Main Burners"). REPLACE MAIN BURNERS 1) Your Summit® gas grill must be off and cool. 2) Turn...

Owner Manual
Page 31
... in place. ƽ WARNING: After reinstalling the gas lines, they should be positioned properly over the valve orifices (B). The correct flame pattern is dust or dirt on our web site. WWW.WEBER.COM® Log onto www.weber.com®. Brush the Spider/Insect screens lightly with...CAUTION: Do not clean the Spider/Insect screens with a soap and water solution before fastening manifold in your area using the grill. (See, "Check for gas leaks.") ANNUAL MAINTENANCE INSPECTION AND CLEANING OF THE SPIDER/INSECT SCREENS To inspect the Spider/Insect screens, remove the control panel. ...
... in place. ƽ WARNING: After reinstalling the gas lines, they should be positioned properly over the valve orifices (B). The correct flame pattern is dust or dirt on our web site. WWW.WEBER.COM® Log onto www.weber.com®. Brush the Spider/Insect screens lightly with...CAUTION: Do not clean the Spider/Insect screens with a soap and water solution before fastening manifold in your area using the grill. (See, "Check for gas leaks.") ANNUAL MAINTENANCE INSPECTION AND CLEANING OF THE SPIDER/INSECT SCREENS To inspect the Spider/Insect screens, remove the control panel. ...
