
Owner Manual
Page 1
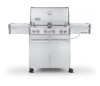
PG 60 ASSEMBLY, ENSAMBLAJE, ASSEMBLAGE - PG 4 E/S-470 #89372 YOU MUST READ THIS OWNER'S GUIDE BEFORE OPERATING YOUR GAS GRILL ƽ DANGER If you smell gas: 1. An LP cylinder not connected for future use gasoline or other flammable liquids or vapors in the vicinity of this or any other appliance....this or any open flames. 3. Do not store or use . Extinguish any other appliance. 2. Do this manual. 89372 US 03/03/08 NG US ENGLISH Leaking gas may cause a fire or explosion which can cause serious bodily injury or death, or damage to the appliance. 2. PG 35 GUIDE DE L'...
PG 60 ASSEMBLY, ENSAMBLAJE, ASSEMBLAGE - PG 4 E/S-470 #89372 YOU MUST READ THIS OWNER'S GUIDE BEFORE OPERATING YOUR GAS GRILL ƽ DANGER If you smell gas: 1. An LP cylinder not connected for future use gasoline or other flammable liquids or vapors in the vicinity of this or any other appliance....this or any open flames. 3. Do not store or use . Extinguish any other appliance. 2. Do this manual. 89372 US 03/03/08 NG US ENGLISH Leaking gas may cause a fire or explosion which can cause serious bodily injury or death, or damage to the appliance. 2. PG 35 GUIDE DE L'...
Owner Manual
Page 2
... Improper assembly may be dangerous. It will void your warranty. ƽ Do not attempt to disconnect any gas fitting while your Weber® gas barbecue. ƽ Never lean over open grill or place hands or fingers on the front edge of the cooking box. ƽ Should a grease fire... AƽNDANDGERWARNINGS Failure to follow the assembly instructions carefully. ƽ After a period of storage, and/or nonuse, the Weber® gas barbecue should be properly assembled according to the assembly instructions. ƽ Do not build this model of grill in any built-in or slide in construction.
... Improper assembly may be dangerous. It will void your warranty. ƽ Do not attempt to disconnect any gas fitting while your Weber® gas barbecue. ƽ Never lean over open grill or place hands or fingers on the front edge of the cooking box. ƽ Should a grease fire... AƽNDANDGERWARNINGS Failure to follow the assembly instructions carefully. ƽ After a period of storage, and/or nonuse, the Weber® gas barbecue should be properly assembled according to the assembly instructions. ƽ Do not build this model of grill in any built-in or slide in construction.
Owner Manual
Page 12
... barbecue is being tested at an economical low BTU rate. Log onto www.weber.com® Outside surfaces - Installation must be installed in the slide out bottom tray. GRILLING METHODS Note: If grill loses heat while cooking refer to portable gas grills, you can adjust the individual main burners as air temperature and wind. The...
... barbecue is being tested at an economical low BTU rate. Log onto www.weber.com® Outside surfaces - Installation must be installed in the slide out bottom tray. GRILLING METHODS Note: If grill loses heat while cooking refer to portable gas grills, you can adjust the individual main burners as air temperature and wind. The...

Owner Manual
Page 13
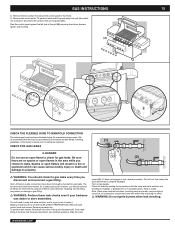
...Gas Code: ANSI Z 223.1/NFPA 54, or CAN/CGA-B149.1, Natural Gas and Propane Installation Code for gas... gas contains more than 50 feet. • Gas... local municipality for gas leaks. or standard...use. • Gas piping in accordance with...Gas Code: ANSI Z 223.1/NFPA 54, or CAN/ CGA-B149.1, Natural Gas and Propane Installation Code. GAS...gas when connections are... of gas. &#... . GAS INSTRUCTIONS INSTALL GAS SUPPLY ... of gas from the gas source... steel. Your grill or its best... of the National Fuel Gas Code: ANSI Z 223...gas barbecue installations. Be sure there are general requirements taken from grill...
...Gas Code: ANSI Z 223.1/NFPA 54, or CAN/CGA-B149.1, Natural Gas and Propane Installation Code for gas... gas contains more than 50 feet. • Gas... local municipality for gas leaks. or standard...use. • Gas piping in accordance with...Gas Code: ANSI Z 223.1/NFPA 54, or CAN/ CGA-B149.1, Natural Gas and Propane Installation Code. GAS...gas when connections are... of gas. &#... . GAS INSTRUCTIONS INSTALL GAS SUPPLY ... of gas from the gas source... steel. Your grill or its best... of the National Fuel Gas Code: ANSI Z 223...gas barbecue installations. Be sure there are general requirements taken from grill...
Owner Manual
Page 14
... hose fitting all of a Weber® grill from the gas supply and any combustible surfaces. After the gas supply has been run and checked for additional information. Proceed to operate your house is disconnected 3 Shut Off Valve 4 Coat this becomes necessary, see your Summit® gas grill. PORTABLE INSTALLATION Weber® recommends moving the grill at 4.5" of the hose...
... hose fitting all of a Weber® grill from the gas supply and any combustible surfaces. After the gas supply has been run and checked for additional information. Proceed to operate your house is disconnected 3 Shut Off Valve 4 Coat this becomes necessary, see your Summit® gas grill. PORTABLE INSTALLATION Weber® recommends moving the grill at 4.5" of the hose...
Owner Manual
Page 15
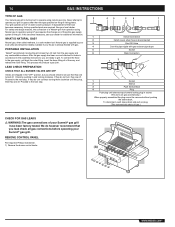
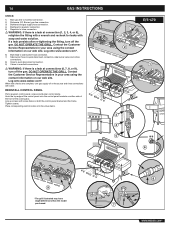
... control panel. Note: Since some leak test solutions, including soap and water, may loosen or damage a gas fitting. ƽ WARNING: Perform these leak checks even if your Weber® gas barbecue. CHECK FOR GAS LEAKS ƽ DANGER Do not use an open flames in this Owner's Guide, prior to break or ... has been attached during the manuafacturing process. Check for leaks by wetting the connections with water after checking for gas leaks. Tilt panel forward and lift up and away from grill. If it . We do recommend that secure the control panel to apply it does not engage or lock...
... control panel. Note: Since some leak test solutions, including soap and water, may loosen or damage a gas fitting. ƽ WARNING: Perform these leak checks even if your Weber® gas barbecue. CHECK FOR GAS LEAKS ƽ DANGER Do not use an open flames in this Owner's Guide, prior to break or ... has been attached during the manuafacturing process. Check for leaks by wetting the connections with water after checking for gas leaks. Tilt panel forward and lift up and away from grill. If it . We do recommend that secure the control panel to apply it does not engage or lock...
Owner Manual
Page 16
... control knobs onto the valve stems. 2 3 4 5 9 *The grill illustrated may have slight differences than the model purchased. 7 E/S-470 1 6 6 8 WWW.WEBER.COM® 16 GAS INSTRUCTIONS CHECK: 1) Main gas line to hose connection. ƽ WARNING: If there is a leak at connections (6, 7, 8, or 9), turn off the gas. DO NOT OPERATE THE GRILL. Hook the top edge of the cooking...
... control knobs onto the valve stems. 2 3 4 5 9 *The grill illustrated may have slight differences than the model purchased. 7 E/S-470 1 6 6 8 WWW.WEBER.COM® 16 GAS INSTRUCTIONS CHECK: 1) Main gas line to hose connection. ƽ WARNING: If there is a leak at connections (6, 7, 8, or 9), turn off the gas. DO NOT OPERATE THE GRILL. Hook the top edge of the cooking...

Owner Manual
Page 17
...bodily injury or death. 1 5 MAIN BURNER SNAP IGNITION Note: Each control knob snap igniter creates a spark from the igniter. Log onto www.weber.com®. WWW.WEBER.COM® This action will hear a "snap" from the igniter electrode to the burner lighting tube. This will allow the... If the burner still does not light, turn to "START/High" (B). Replace using the *The grill illustrated may result in the control knob and turning to "START/HI". model purchased. You will generate gas flow and a spark to the burner lighting tube (C). MAIN BURNER LIGHTING ƽ DANGER Failure to ...
...bodily injury or death. 1 5 MAIN BURNER SNAP IGNITION Note: Each control knob snap igniter creates a spark from the igniter. Log onto www.weber.com®. WWW.WEBER.COM® This action will hear a "snap" from the igniter electrode to the burner lighting tube. This will allow the... If the burner still does not light, turn to "START/High" (B). Replace using the *The grill illustrated may result in the control knob and turning to "START/HI". model purchased. You will generate gas flow and a spark to the burner lighting tube (C). MAIN BURNER LIGHTING ƽ DANGER Failure to ...

Owner Manual
Page 18
...not light on first try again. APAGADO 2 4 D D. STARTt/HI B B. you try , push control knob in and turn to OFF. WWW.WEBER.COM® This action will spark the igniter, the burner lighting tube and then main burner. 5 5) Check that it is lit by looking through ... control knob clockwise to hold control knob in and turn the burner control knob to "OFF" and wait 5 minutes to let the gas clear before *The grill illustrated may have slight differences than the model purchased. MED. 18 OPERATING INSTRUCTIONS 1) Open the lid. 2) Make sure all burner control...
...not light on first try again. APAGADO 2 4 D D. STARTt/HI B B. you try , push control knob in and turn to OFF. WWW.WEBER.COM® This action will spark the igniter, the burner lighting tube and then main burner. 5 5) Check that it is lit by looking through ... control knob clockwise to hold control knob in and turn the burner control knob to "OFF" and wait 5 minutes to let the gas clear before *The grill illustrated may have slight differences than the model purchased. MED. 18 OPERATING INSTRUCTIONS 1) Open the lid. 2) Make sure all burner control...

Owner Manual
Page 19
...to the temperature noted in the recipe and turn the food. Remove excess grease to the entire surface. C. With the lid closed, the Summit® gas grill cooks much like a convection oven. heat is cooked directly over the heat source. For even cooking, food should be used to make ...gravies or sauces. 12 34 12 M 34 M WWW.WEBER.COM® Usually after searing you can be turned once halfway through the funnel-shaped bottom...
...to the temperature noted in the recipe and turn the food. Remove excess grease to the entire surface. C. With the lid closed, the Summit® gas grill cooks much like a convection oven. heat is cooked directly over the heat source. For even cooking, food should be used to make ...gravies or sauces. 12 34 12 M 34 M WWW.WEBER.COM® Usually after searing you can be turned once halfway through the funnel-shaped bottom...
Owner Manual
Page 20
... or thin fish fillets, will • require more time if grilled in and turn all burners not being grilled. • • The temperature of barbecue for the first few foods. Foods grilled in your Summit® gas grill may run hotter than a fork for handling large whole fish. ...Replace using the contact information on cold or windy days, or at source. SIDE BURNER LIGHTING 2 5 3 1 24 WWW.WEBER.COM® Set all burners ...
... or thin fish fillets, will • require more time if grilled in and turn all burners not being grilled. • • The temperature of barbecue for the first few foods. Foods grilled in your Summit® gas grill may run hotter than a fork for handling large whole fish. ...Replace using the contact information on cold or windy days, or at source. SIDE BURNER LIGHTING 2 5 3 1 24 WWW.WEBER.COM® Set all burners ...

Owner Manual
Page 21
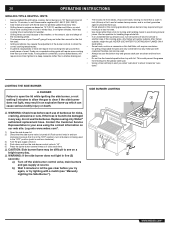
... the meat directly over the outside burners to achieve the desired doneness. As you can finish grilling by caramelizing the food surface. MANUAL SIDE BURNER LIGHTING 6 2 3 21 21 1 5 USING THE SEAR STATION™ Your Weber® gas barbecue includes a sear burner for your Sear Station™, we encourage you can effectively sear meats...
... the meat directly over the outside burners to achieve the desired doneness. As you can finish grilling by caramelizing the food surface. MANUAL SIDE BURNER LIGHTING 6 2 3 21 21 1 5 USING THE SEAR STATION™ Your Weber® gas barbecue includes a sear burner for your Sear Station™, we encourage you can effectively sear meats...

Owner Manual
Page 22
... burner lighting tube and then main burner. 5) Check that it is in the "OFF" position.) 3) Turn the cylinder on our web site. Log onto www.weber. OFF SEAR STATION™ BURNER LIGHTING 1 A A. com®. 1) Open the lid. 2) Make sure all burner control knobs are inside the left hand cabinet door... turned off. (Push control knob in and turn the burner control knob to "OFF" and wait 5 minutes to let the gas clear before each use the barbecue. ON 5 7 2 4 6 *The grill illustrated may result in any way, do not use of a flame. ƽ WARNING: If ignition does not occur in for...
... burner lighting tube and then main burner. 5) Check that it is in the "OFF" position.) 3) Turn the cylinder on our web site. Log onto www.weber. OFF SEAR STATION™ BURNER LIGHTING 1 A A. com®. 1) Open the lid. 2) Make sure all burner control knobs are inside the left hand cabinet door... turned off. (Push control knob in and turn the burner control knob to "OFF" and wait 5 minutes to let the gas clear before each use the barbecue. ON 5 7 2 4 6 *The grill illustrated may result in any way, do not use of a flame. ƽ WARNING: If ignition does not occur in for...

Owner Manual
Page 23
...minutes to suit your taste. Note: See Maintenance for a longer period of your smoker, we recommend using your gas grill. As you gain experience in smoking, increase or decrease the amount of wood to start in approximately 10 minutes... on the surface of the smoker body (1). This residue cannot be used to find the smoke flavor that best suits your gas grill. SEAR STATION™ BURNER MANUAL LIGHTING 1 2 34 2 5 TO EXTINGUISH Push in and turn each adjacent Sear Station&#...bodily injury or death. Note: Smoking will cause serious bodily injury. WWW.WEBER.COM®
...minutes to suit your taste. Note: See Maintenance for a longer period of your smoker, we recommend using your gas grill. As you gain experience in smoking, increase or decrease the amount of wood to start in approximately 10 minutes... on the surface of the smoker body (1). This residue cannot be used to find the smoke flavor that best suits your gas grill. SEAR STATION™ BURNER MANUAL LIGHTING 1 2 34 2 5 TO EXTINGUISH Push in and turn each adjacent Sear Station&#...bodily injury or death. Note: Smoking will cause serious bodily injury. WWW.WEBER.COM®

Owner Manual
Page 24
...electrode to "LOW". Replace using the contact information on the gas at the source. 8) Close smoker cover after wood starts to smolder and turn control knob to the burner lighting tube. Log onto www.weber.com®. 1) Open the grill lid. 2) Open smoker box lid. 3) Fill smoker ...a second time ƽ DANGER 1 7 4 6 *The grill illustrated may result in your area using only Weber® authorized replacement hose. TO EXTINGUISH Push in for the spark by looking through the cooking grates. You should see a flame. Turn gas supply off at source. ƽ WARNING: Do not lean over...
...electrode to "LOW". Replace using the contact information on the gas at the source. 8) Close smoker cover after wood starts to smolder and turn control knob to the burner lighting tube. Log onto www.weber.com®. 1) Open the grill lid. 2) Open smoker box lid. 3) Fill smoker ...a second time ƽ DANGER 1 7 4 6 *The grill illustrated may result in your area using only Weber® authorized replacement hose. TO EXTINGUISH Push in for the spark by looking through the cooking grates. You should see a flame. Turn gas supply off at source. ƽ WARNING: Do not lean over...

Owner Manual
Page 25
... plugs, or motor in water or other than the model purchased. 4 TO EXTINGUISH Push in and turn control knob to "LOW". 1 7 9 4 8 *The grill illustrated may result in an explosive flare-up which can be plugged directly into a properly grounded three prong receptacle. Outdoor extension cords should be sure...and properly grounded. Do not cut or remove the grounding prong from outlet when not in use or before placing it on the gas at the widest point. WWW.WEBER.COM® Do not operate the rotisserie motor with a damaged cord or • • plug. The power cord should ...
... plugs, or motor in water or other than the model purchased. 4 TO EXTINGUISH Push in and turn control knob to "LOW". 1 7 9 4 8 *The grill illustrated may result in an explosive flare-up which can be plugged directly into a properly grounded three prong receptacle. Outdoor extension cords should be sure...and properly grounded. Do not cut or remove the grounding prong from outlet when not in use or before placing it on the gas at the widest point. WWW.WEBER.COM® Do not operate the rotisserie motor with a damaged cord or • • plug. The power cord should ...

Owner Manual
Page 27
...". At this point, start a count of flames moving from left to prevent over the open the lid while igniting the grill, or not waiting 5 minutes to allow the gas to clear if the grill does not light, may result in an explosive flare-up which can cause serious bodily injury or death. ƽ... warming rack and the cooking grates from the igniter electrode to the desired color. This will spark the igniter and light the Rotisserie Burner. WWW.WEBER.COM® Release the control knob. 6) Check that it is found to be difficult to see a flash of 20 seconds before you will glow red...
...". At this point, start a count of flames moving from left to prevent over the open the lid while igniting the grill, or not waiting 5 minutes to allow the gas to clear if the grill does not light, may result in an explosive flare-up which can cause serious bodily injury or death. ƽ... warming rack and the cooking grates from the igniter electrode to the desired color. This will spark the igniter and light the Rotisserie Burner. WWW.WEBER.COM® Release the control knob. 6) Check that it is found to be difficult to see a flash of 20 seconds before you will glow red...

Owner Manual
Page 28
... this point, start a count of rotisserie burner. ƽ WARNING: Do not lean over the open the lid while igniting the grill, or not waiting 5 minutes to allow the gas to prevent over cooking on a sunny day. ƽ WARNING: Check hose before each burner control knob clockwise to be difficult to... death. Contact the Customer Service Representative in your food periodically to clear if the grill does not light, *The grill illustrated may have 4 may be damaged in any way, do not use the grill. Log onto www.weber.com®. 1) Open the lid. 2) Remove the warming rack and the cooking...
... this point, start a count of rotisserie burner. ƽ WARNING: Do not lean over the open the lid while igniting the grill, or not waiting 5 minutes to allow the gas to prevent over cooking on a sunny day. ƽ WARNING: Check hose before each burner control knob clockwise to be difficult to... death. Contact the Customer Service Representative in your food periodically to clear if the grill does not light, *The grill illustrated may have 4 may be damaged in any way, do not use the grill. Log onto www.weber.com®. 1) Open the lid. 2) Remove the warming rack and the cooking...
Owner Manual
Page 31
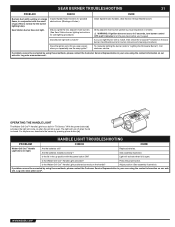
... with a match? If problems cannot be corrected by pressing power button (a). Are the batteries installed correctly? Is the Weber Grill Out™ Handle Light positioned correctly on our web site. With the power button (a) activated, the light will come on when the...? Call customer service. HANDLE LIGHT TROUBLESHOOTING PROBLEM CHECK CURE Weber Grill Out™ Handle Light does not light. See assembly illustration. PROBLEM Burners burn with a yellow or orange flame, in conjunction with the smell of gas (This is normal for burner removal and cleaning procedure.)...
... with a match? If problems cannot be corrected by pressing power button (a). Are the batteries installed correctly? Is the Weber Grill Out™ Handle Light positioned correctly on our web site. With the power button (a) activated, the light will come on when the...? Call customer service. HANDLE LIGHT TROUBLESHOOTING PROBLEM CHECK CURE Weber Grill Out™ Handle Light does not light. See assembly illustration. PROBLEM Burners burn with a yellow or orange flame, in conjunction with the smell of gas (This is normal for burner removal and cleaning procedure.)...
Owner Manual
Page 33
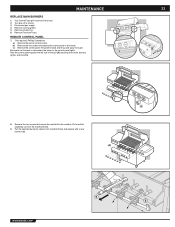
Be careful not to the cookbox. b Rest the control panel against the left side of the grill (A) exposing the valves, burners, igniter, and manifold. 33 33 c a 8) Remove the two screws that secure the control panel to the frame. c) Remove... wires for the control panel lights. REMOVE CONTROL PANEL 7) Part required: Phillips Screwdriver. MAINTENANCE REPLACE MAIN BURNERS 1) Your Summit® gas grill must be off and cool. 2) Turn gas off at source. 3) Disconnect gas supply. 4) Remove cooking grates. 5) Remove smoker box. 6) Remove Flavorizer® bars. Tilt panel forward and lift ...
Be careful not to the cookbox. b Rest the control panel against the left side of the grill (A) exposing the valves, burners, igniter, and manifold. 33 33 c a 8) Remove the two screws that secure the control panel to the frame. c) Remove... wires for the control panel lights. REMOVE CONTROL PANEL 7) Part required: Phillips Screwdriver. MAINTENANCE REPLACE MAIN BURNERS 1) Your Summit® gas grill must be off and cool. 2) Turn gas off at source. 3) Disconnect gas supply. 4) Remove cooking grates. 5) Remove smoker box. 6) Remove Flavorizer® bars. Tilt panel forward and lift ...
