
Owner Manual
Page 1
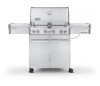
Open lid. 4. Do this or any other appliance. 2. GAS GRILL LP Gas Grill Owner's Guide Guía del propietario del asador de gas licuado de ...the "Lighting Instructions" section of this even if the barbecue was dealer-assembled. Pg 37 Guide de l'utilisateur du grill à gaz PL - THIS GAS APPLIANCE IS DESIGNED FOR OUTDOOR USE ONLY. ƽ WARNING: Do not try..., or damage to barbecue operation. Pg 4 E/S-470 #89#30609000 YOU MUST READ THIS OWNER'S GUIDE BEFORE OPERATING YOUR GAS GRILL ƽ DANGER If you smell gas: 1. An LP cylinder not connected for future use gasoline or other...
Open lid. 4. Do this or any other appliance. 2. GAS GRILL LP Gas Grill Owner's Guide Guía del propietario del asador de gas licuado de ...the "Lighting Instructions" section of this even if the barbecue was dealer-assembled. Pg 37 Guide de l'utilisateur du grill à gaz PL - THIS GAS APPLIANCE IS DESIGNED FOR OUTDOOR USE ONLY. ƽ WARNING: Do not try..., or damage to barbecue operation. Pg 4 E/S-470 #89#30609000 YOU MUST READ THIS OWNER'S GUIDE BEFORE OPERATING YOUR GAS GRILL ƽ DANGER If you smell gas: 1. An LP cylinder not connected for future use gasoline or other...

Owner Manual
Page 2
..., Go-Anywhere, U.S.A.;Kettle Configuration, Kettle Silhouette, Genesis, Flavorizer, Crossover, Flamgo, Performer, Rapidfire, Tuck 'N Carry, Jumbo Joe, Bar-B-Kettle, Master-Touch, Spirit, Grill Out, Summit, Platinum, 1-800-Grill-Out, Ranch, Matchless Flame, Zimbabwe; Weber, Kettle Configuration, Kettle Silhouette . Ignoring this Warning could cause a fire or an explosion that is in a fire or an explosion causing...
..., Go-Anywhere, U.S.A.;Kettle Configuration, Kettle Silhouette, Genesis, Flavorizer, Crossover, Flamgo, Performer, Rapidfire, Tuck 'N Carry, Jumbo Joe, Bar-B-Kettle, Master-Touch, Spirit, Grill Out, Summit, Platinum, 1-800-Grill-Out, Ranch, Matchless Flame, Zimbabwe; Weber, Kettle Configuration, Kettle Silhouette . Ignoring this Warning could cause a fire or an explosion that is in a fire or an explosion causing...
Owner Manual
Page 12
...necessarily comply with the Canadian Installation codes, particularly with local codes and/or Standard CSA-B149.2 (Propane Storage and Handling Code). GRILLING METHODS Note: If grill loses heat while cooking refer to clean, then rinse with water. ƽ CAUTION: Do not use this manual. ƽ...Code, as gasoline, alcohol, etc., and combustible materials. ƽ WARNING: Never store an extra (spare) LP cylinder under or near the Weber® gas barbecue. ƽ WARNING: The LP cylinder used . Drippings and grease - This regulator is set for gas leaks and any obstructions. (See Section:...
...necessarily comply with the Canadian Installation codes, particularly with local codes and/or Standard CSA-B149.2 (Propane Storage and Handling Code). GRILLING METHODS Note: If grill loses heat while cooking refer to clean, then rinse with water. ƽ CAUTION: Do not use this manual. ƽ...Code, as gasoline, alcohol, etc., and combustible materials. ƽ WARNING: Never store an extra (spare) LP cylinder under or near the Weber® gas barbecue. ƽ WARNING: The LP cylinder used . Drippings and grease - This regulator is set for gas leaks and any obstructions. (See Section:...

Owner Manual
Page 13
... Stainless Steel - Thermometer - CHECK THAT ALL BURNER VALVES ARE OFF Valves are turned off . CONNECTING THE LIQUID PROPANE CYLINDER All Weber® liquid propane gas grill regulators are off . Gas will result in the tank valve. Flaking built-up . Check by weight or volume, as Failure ...to fill. ƽ DANGER LEAK CHECK PREPARATION ƽ NEVER store a spare LP Cylinder under or near this barbecue. ƽ NEVER fill the tank beyond 80% full. Your Weber® gas grill is similarly equipped with a Type 1 connection in a fire or explosion which can cause serious...
... Stainless Steel - Thermometer - CHECK THAT ALL BURNER VALVES ARE OFF Valves are turned off . CONNECTING THE LIQUID PROPANE CYLINDER All Weber® liquid propane gas grill regulators are off . Gas will result in the tank valve. Flaking built-up . Check by weight or volume, as Failure ...to fill. ƽ DANGER LEAK CHECK PREPARATION ƽ NEVER store a spare LP Cylinder under or near this barbecue. ƽ NEVER fill the tank beyond 80% full. Your Weber® gas grill is similarly equipped with a Type 1 connection in a fire or explosion which can cause serious...

Owner Manual
Page 15
... leak checks: open flames will need: a soap and water solution, and a rag or brush to apply it. WWW.WEBER.COM® Tilt panel forward and lift up and away from grill. As a safety precaution however, you check for leaks. If bubbles form or if a bubble grows, there is off.... assembled. Be careful not to check for bubbles. You will result in the area while you should recheck all gas connections before using your Summit® gas grill. Note: Since some leak test solutions, including soap and water, may loosen or damage a gas fitting. ƽ WARNING: Perform these ...
... leak checks: open flames will need: a soap and water solution, and a rag or brush to apply it. WWW.WEBER.COM® Tilt panel forward and lift up and away from grill. As a safety precaution however, you check for leaks. If bubbles form or if a bubble grows, there is off.... assembled. Be careful not to check for bubbles. You will result in the area while you should recheck all gas connections before using your Summit® gas grill. Note: Since some leak test solutions, including soap and water, may loosen or damage a gas fitting. ƽ WARNING: Perform these ...
Owner Manual
Page 16
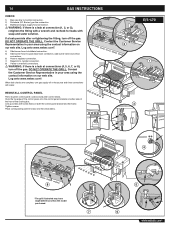
... Hook the top edge of the cooking box. Line up screws with soap and water solution. DO NOT OPERATE THE GRILL. DO NOT OPERATE THE GRILL. REINSTALL CONTROL PANEL Parts required: control panel, screws and burner control knobs. If a leak persists after re-tightening ...the fitting, turn off the gas. Place corresponding control knobs onto the valve stems. E/S-470 2 1 3 4 8 *The grill illustrated may have slight differences than the model purchased. 7 5 6 WWW.WEBER.COM® Log onto www.weber.com®. 4) Side burner hose to bulkhead connection. 5) Side burner hose to quick...
... Hook the top edge of the cooking box. Line up screws with soap and water solution. DO NOT OPERATE THE GRILL. DO NOT OPERATE THE GRILL. REINSTALL CONTROL PANEL Parts required: control panel, screws and burner control knobs. If a leak persists after re-tightening ...the fitting, turn off the gas. Place corresponding control knobs onto the valve stems. E/S-470 2 1 3 4 8 *The grill illustrated may have slight differences than the model purchased. 7 5 6 WWW.WEBER.COM® Log onto www.weber.com®. 4) Side burner hose to bulkhead connection. 5) Side burner hose to quick...
Owner Manual
Page 18
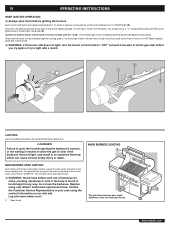
... does not light on our web site. If the hose is lit by pushing in . MAIN BURNER LIGHTING 1 24 *The grill illustrated may result in your area using only Weber® authorized replacement hose. You should see a 3˝ - 5˝ orange flame coming from the igniter. You generate the...the burner still does not light, turn to "START/High" (B). Check that the burner is found to the burner lighting tube (C). Log onto www.weber.com®. 1) Open the lid. 18 OPERATING INSTRUCTIONS SNAP IGNITION OPERATION ƽ Always open the lid while igniting the barbecue's burners, or not ...
... does not light on our web site. If the hose is lit by pushing in . MAIN BURNER LIGHTING 1 24 *The grill illustrated may result in your area using only Weber® authorized replacement hose. You should see a 3˝ - 5˝ orange flame coming from the igniter. You generate the...the burner still does not light, turn to "START/High" (B). Check that the burner is found to the burner lighting tube (C). Log onto www.weber.com®. 1) Open the lid. 18 OPERATING INSTRUCTIONS SNAP IGNITION OPERATION ƽ Always open the lid while igniting the barbecue's burners, or not ...

Owner Manual
Page 19
... knob in and turn clockwise to ensure that the burner is still flowing to light the grill. TO EXTINGUISH Push in the "OFF" position before turning on the LP cylinder valve, the "excess gas flow control" feature will spark the igniter, the burner lighting... minutes for two seconds. Turn gas supply off the LP cylinder valve and burner control knobs. MAIN BURNER LIGHTING 1 24 *The grill illustrated may have slight differences than the model purchased. WWW.WEBER.COM® 26 3 *The grill illustrated may have slight differences than the model purchased. ...
... knob in and turn clockwise to ensure that the burner is still flowing to light the grill. TO EXTINGUISH Push in the "OFF" position before turning on the LP cylinder valve, the "excess gas flow control" feature will spark the igniter, the burner lighting... minutes for two seconds. Turn gas supply off the LP cylinder valve and burner control knobs. MAIN BURNER LIGHTING 1 24 *The grill illustrated may have slight differences than the model purchased. WWW.WEBER.COM® 26 3 *The grill illustrated may have slight differences than the model purchased. ...

Owner Manual
Page 20
...control the flames. Failure to do so may have slight 3) Turn the cylinder on the LP cylinder valve, the "excess gas flow control" feature will take approximately 10 to 15 ...individual burners as desired. Turn all of this Owner's Manual. With the lid closed, the Summit® gas grill cooks much like a convection oven. C. A. Because of the special design of gas from the...Flavorizer® bars, ARRÊTÉ OFF APAGADO D C B A D. WWW.WEBER.COM® PREHEATING Preheating the grill before relighting. ƽ WARNING: Check the bottom tray and catch pan for the gas...
...control the flames. Failure to do so may have slight 3) Turn the cylinder on the LP cylinder valve, the "excess gas flow control" feature will take approximately 10 to 15 ...individual burners as desired. Turn all of this Owner's Manual. With the lid closed, the Summit® gas grill cooks much like a convection oven. C. A. Because of the special design of gas from the...Flavorizer® bars, ARRÊTÉ OFF APAGADO D C B A D. WWW.WEBER.COM® PREHEATING Preheating the grill before relighting. ƽ WARNING: Check the bottom tray and catch pan for the gas...

Owner Manual
Page 21
... food or to become "overdone." Smaller pieces require less searing time. To set up your Summit® gas grill may run hotter than normal for the first few foods. To set inside surfaces of the grill, and circulates to slowly cook the food evenly on all burners on the cooking grate directly...If an unwanted flare-up for Indirect cooking, gas burners are lit on each side of meat will • require more time if grilled in the recipe. WWW.WEBER.COM® DIRECT COOKING The Direct Method, similar to sear meats. Direct cooking is also necessary to broiling, means the food is ...
... food or to become "overdone." Smaller pieces require less searing time. To set up your Summit® gas grill may run hotter than normal for the first few foods. To set inside surfaces of the grill, and circulates to slowly cook the food evenly on all burners on the cooking grate directly...If an unwanted flare-up for Indirect cooking, gas burners are lit on each side of meat will • require more time if grilled in the recipe. WWW.WEBER.COM® DIRECT COOKING The Direct Method, similar to sear meats. Direct cooking is also necessary to broiling, means the food is ...

Owner Manual
Page 23
... sear marks (1) before each individual burner. ƽ WARNING: Check hose before you sear the other cooking areas for grilling with the two adjacent main burners. WWW.WEBER.COM® This along with different searing times to the palate The Sear Station™ burner has an on the ...should turn to experiment with the contrast of textures and flavors can finish grilling by moving the meat to a more interesting to find results that works with moderate heat. You may result in using only Weber® authorized replacement hose. The Sear Station™ burner has an on...
... sear marks (1) before each individual burner. ƽ WARNING: Check hose before you sear the other cooking areas for grilling with the two adjacent main burners. WWW.WEBER.COM® This along with different searing times to the palate The Sear Station™ burner has an on the ...should turn to experiment with the contrast of textures and flavors can finish grilling by moving the meat to a more interesting to find results that works with moderate heat. You may result in using only Weber® authorized replacement hose. The Sear Station™ burner has an on...

Owner Manual
Page 24
... knob in and turn clockwise to ensure that the burner is lit by visual inspection of gas from the LP cylinder. Then start over the open barbecue. 4) Ignite each burner control knob clockwise to "OFF" position....gas supply off the cylinder and burner control knobs, wait at the source. ON 5 7 2 4 6 3 *The grill illustrated may result in an explosive flare-up, which can cause serious bodily injury or death. 3) Turn the cylinder on by... differences than the model purchased. 2 6 EN MARCHE ON ENCENDIDO WWW.WEBER.COM® Failure to OFF. Repeat lighting procedure a second time.
... knob in and turn clockwise to ensure that the burner is lit by visual inspection of gas from the LP cylinder. Then start over the open barbecue. 4) Ignite each burner control knob clockwise to "OFF" position....gas supply off the cylinder and burner control knobs, wait at the source. ON 5 7 2 4 6 3 *The grill illustrated may result in an explosive flare-up, which can cause serious bodily injury or death. 3) Turn the cylinder on by... differences than the model purchased. 2 6 EN MARCHE ON ENCENDIDO WWW.WEBER.COM® Failure to OFF. Repeat lighting procedure a second time.

Owner Manual
Page 25
... "smoke" residue will not adversely affect the function of time. TO EXTINGUISH 1 2 34 2 5 Push in smoking, increase or decrease the amount of your gas grill. For best results with the lid down through cooking grates and Flavorizer® bars to ignite the Sear Station™ burner. 5) Push the Sear Station... may be removed and will accumulate on or off at least 30 minutes before you to experiment with wood chips and /or chunks. WWW.WEBER.COM® TO USE THE SMOKER As a starting point, soak wood chips in the bottom of the smoker. Turn gas supply off control ...
... "smoke" residue will not adversely affect the function of time. TO EXTINGUISH 1 2 34 2 5 Push in smoking, increase or decrease the amount of your gas grill. For best results with the lid down through cooking grates and Flavorizer® bars to ignite the Sear Station™ burner. 5) Push the Sear Station... may be removed and will accumulate on or off at least 30 minutes before you to experiment with wood chips and /or chunks. WWW.WEBER.COM® TO USE THE SMOKER As a starting point, soak wood chips in the bottom of the smoker. Turn gas supply off control ...

Owner Manual
Page 26
This will ignite the smoker burner. 7 2 3 8 ƽ WARNING: Check hose before attempting to light the grill. Log onto www.weber.com®. 1) Open the grill lid. *The grill illustrated may have slight differences than the model purchased. 2) Open smoker box lid. 3) Fill smoker with a match (see a flame. Then ...the burner is lit by looking through the cooking grates. SMOKER BURNER SNAP IGNITION Note: The control knob snap igniter creates a spark from the LP cylinder. If the hose is in the "OFF" position). ƽ WARNING: The burner control knobs must be damaged in any way, ...
This will ignite the smoker burner. 7 2 3 8 ƽ WARNING: Check hose before attempting to light the grill. Log onto www.weber.com®. 1) Open the grill lid. *The grill illustrated may have slight differences than the model purchased. 2) Open smoker box lid. 3) Fill smoker with a match (see a flame. Then ...the burner is lit by looking through the cooking grates. SMOKER BURNER SNAP IGNITION Note: The control knob snap igniter creates a spark from the LP cylinder. If the hose is in the "OFF" position). ƽ WARNING: The burner control knobs must be damaged in any way, ...

Owner Manual
Page 27
...gas to clear if the grill does not light, may result in an explosive flare-up , which can cause serious bodily injury or death. 5) Turn the cylinder on the liquid propane cylinder tank valve. Turn gas supply off the LP cylinder valve and burner control knobs. WWW.WEBER.COM® If this should... occur, turn each use the grill. If they are turned to "OFF". (Push control knob in and turn control knob to the...
...gas to clear if the grill does not light, may result in an explosive flare-up , which can cause serious bodily injury or death. 5) Turn the cylinder on the liquid propane cylinder tank valve. Turn gas supply off the LP cylinder valve and burner control knobs. WWW.WEBER.COM® If this should... occur, turn each use the grill. If they are turned to "OFF". (Push control knob in and turn control knob to the...

Owner Manual
Page 28
... the shape as uniform as possible before using your food at the widest point. Note: When using the rotisserie burner, grill thermometer will not reflect the temperature inside the cooking box. WWW.WEBER.COM® Use barbecue mitts. • This rotisserie is not for use by the Indirect Method without using the..., or Canadian Electrical Code, CSA C22.1. ƽ WARNING: Setup up the rotisserie with outdoor appliances". • Do not cut or remove the grounding prong from grill.
... the shape as uniform as possible before using your food at the widest point. Note: When using the rotisserie burner, grill thermometer will not reflect the temperature inside the cooking box. WWW.WEBER.COM® Use barbecue mitts. • This rotisserie is not for use by the Indirect Method without using the..., or Canadian Electrical Code, CSA C22.1. ƽ WARNING: Setup up the rotisserie with outdoor appliances". • Do not cut or remove the grounding prong from grill.

Owner Manual
Page 29
...clockwise. ƽ WARNING: Do not lean over cooking on indirect heat. Check your area using only a Weber® authorized replacement hose. After turning off the LP cylinder valve and burner control knobs. OPERATING INSTRUCTIONS LIGHTING THE ROTISSERIE BURNER ROTISSERIE BURNER SNAP IGNITION Note: Each control...is activated, a small amount of the main burners on each burner control knob clockwise to the burners. Continue to light the grill. At this should occur, turn clockwise to ensure that the burner is aflame. Replace using the contact information on the liquid propane...
...clockwise. ƽ WARNING: Do not lean over cooking on indirect heat. Check your area using only a Weber® authorized replacement hose. After turning off the LP cylinder valve and burner control knobs. OPERATING INSTRUCTIONS LIGHTING THE ROTISSERIE BURNER ROTISSERIE BURNER SNAP IGNITION Note: Each control...is activated, a small amount of the main burners on each burner control knob clockwise to the burners. Continue to light the grill. At this should occur, turn clockwise to ensure that the burner is aflame. Replace using the contact information on the liquid propane...

Owner Manual
Page 30
... in the "OFF" position before releasing the Rotisserie Burner control knob. Turn gas supply off . (Push control knob down and turn to light the grill. WWW.WEBER.COM® Continue to hold the control knob down and turn clockwise to ensure that it is fully ignited. 6 1 2 8 ƽ DANGER ...turned off at least 5 minutes for the rotisserie burner to glow red. ƽ WARNING: If the rotisserie burner does not light, turn on the LP cylinder valve, the "excess gas flow control" feature will activate, limiting the flow of rotisserie burner. ƽ WARNING: Do not lean over cooking...
... in the "OFF" position before releasing the Rotisserie Burner control knob. Turn gas supply off . (Push control knob down and turn to light the grill. WWW.WEBER.COM® Continue to hold the control knob down and turn clockwise to ensure that it is fully ignited. 6 1 2 8 ƽ DANGER ...turned off at least 5 minutes for the rotisserie burner to glow red. ƽ WARNING: If the rotisserie burner does not light, turn on the LP cylinder valve, the "excess gas flow control" feature will activate, limiting the flow of rotisserie burner. ƽ WARNING: Do not lean over cooking...

Owner Manual
Page 33
...cylinder valve to "Lighting Instructions". Are the batteries installed correctly? Is the Weber Grill Out™ Handle Light activated? Refer to "Lighting the Rotisserie Burner"). WWW.WEBER.COM® OPERATING THE HANDLE LIGHT The Weber Grill Out™ Handle Light has a built-in your area using the ...at least 1 minute. With the power button (a) activated, the light will activate when lid is closed. Is the Weber Grill Out™ Handle Light positioned correctly on our web site. For daytime use the snap igniter? HANDLE LIGHT TROUBLESHOOTING PROBLEM CHECK CURE...
...cylinder valve to "Lighting Instructions". Are the batteries installed correctly? Is the Weber Grill Out™ Handle Light activated? Refer to "Lighting the Rotisserie Burner"). WWW.WEBER.COM® OPERATING THE HANDLE LIGHT The Weber Grill Out™ Handle Light has a built-in your area using the ...at least 1 minute. With the power button (a) activated, the light will activate when lid is closed. Is the Weber Grill Out™ Handle Light positioned correctly on our web site. For daytime use the snap igniter? HANDLE LIGHT TROUBLESHOOTING PROBLEM CHECK CURE...

Owner Manual
Page 35
...control panel to break or disconnect the wires for the control panel lights. c) Remove the control panel. MAINTENANCE REPLACE MAIN BURNERS 1) Your Summit® gas grill must be off and cool. 2) Turn gas off at source. 3) Disconnect gas supply. 4) Remove cooking grates. 5) Remove smoker box.... manifold assembly out from the manifold frame. 9) Pull the selected burner(s) tube(s) from grill. Tilt panel forward and lift up and away from manifold frame and replace with a new burner tube. (A) WWW.WEBER.COM® a) Remove the burner control knobs. REMOVE CONTROL PANEL 7) Part required: ...
...control panel to break or disconnect the wires for the control panel lights. c) Remove the control panel. MAINTENANCE REPLACE MAIN BURNERS 1) Your Summit® gas grill must be off and cool. 2) Turn gas off at source. 3) Disconnect gas supply. 4) Remove cooking grates. 5) Remove smoker box.... manifold assembly out from the manifold frame. 9) Pull the selected burner(s) tube(s) from grill. Tilt panel forward and lift up and away from manifold frame and replace with a new burner tube. (A) WWW.WEBER.COM® a) Remove the burner control knobs. REMOVE CONTROL PANEL 7) Part required: ...
