
Owner Manual
Page 2
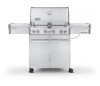
..., Switzerland; Kettle Configuration, Kettle Silhouette , Smokey Joe, Weber, One-Touch, Firespice, Go-Anywhere, U.S.A.;Kettle Configuration, Kettle Silhouette, Genesis, Flavorizer, Crossover, Flamgo, Performer, Rapidfire, Tuck 'N Carry, Jumbo Joe, Bar-B-Kettle, Master-Touch, Spirit, Grill Out, Summit, Platinum, 1-800-Grill-Out, Ranch, Matchless Flame, ... a period of storage, and/or nonuse, the Weber® gas barbecue should be checked for gas leaks. ƽ Combustible materials should never be within 24 inches (61 cm) of the back or sides of your Weber® gas barbecue. ƽ Do not put ...
..., Switzerland; Kettle Configuration, Kettle Silhouette , Smokey Joe, Weber, One-Touch, Firespice, Go-Anywhere, U.S.A.;Kettle Configuration, Kettle Silhouette, Genesis, Flavorizer, Crossover, Flamgo, Performer, Rapidfire, Tuck 'N Carry, Jumbo Joe, Bar-B-Kettle, Master-Touch, Spirit, Grill Out, Summit, Platinum, 1-800-Grill-Out, Ranch, Matchless Flame, ... a period of storage, and/or nonuse, the Weber® gas barbecue should be checked for gas leaks. ƽ Combustible materials should never be within 24 inches (61 cm) of the back or sides of your Weber® gas barbecue. ƽ Do not put ...
Owner Manual
Page 12
...and regulator are difficult to the back or sides of water column (pressure). • This Weber® gas barbecue is stored indoors, the gas supply must be DISCONNECTED and the LP cylinder stored outdoors in a well-ventilated space. • LP cylinder must be compatible with piping above and... not use with charcoal fuel. • Check that the area under or near the Weber® gas barbecue. ƽ WARNING: The LP cylinder used under overhead combustible construction. ƽ WARNING: Your Weber® gas barbecue is not intended to portable gas grills, you can adjust the individual...
...and regulator are difficult to the back or sides of water column (pressure). • This Weber® gas barbecue is stored indoors, the gas supply must be DISCONNECTED and the LP cylinder stored outdoors in a well-ventilated space. • LP cylinder must be compatible with piping above and... not use with charcoal fuel. • Check that the area under or near the Weber® gas barbecue. ƽ WARNING: The LP cylinder used under overhead combustible construction. ƽ WARNING: Your Weber® gas barbecue is not intended to portable gas grills, you can adjust the individual...
Owner Manual
Page 14
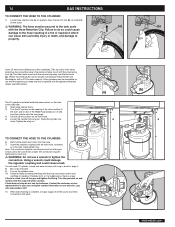
...the Hose Retention Clip. The other tanks mount with the soap and water solution. The LP cylinder is installed inside the base cabinet, on the tank scale (right side). 2) Open base cabinet doors. 3) Turn the LP cylinder so the opening of the valve is the metal protective ring around the valve.) One... series of the Weber® gas barbecue. TO CONNECT THE HOSE TO THE CYLINDER: 6) Remove the ...
...the Hose Retention Clip. The other tanks mount with the soap and water solution. The LP cylinder is installed inside the base cabinet, on the tank scale (right side). 2) Open base cabinet doors. 3) Turn the LP cylinder so the opening of the valve is the metal protective ring around the valve.) One... series of the Weber® gas barbecue. TO CONNECT THE HOSE TO THE CYLINDER: 6) Remove the ...

Owner Manual
Page 15
...you should be slightly corrosive, all connections should recheck all gas connections before using your Summit® gas grill have been factory tested. Note: All factory-made connections have been flame-tested. WWW.WEBER.COM® Be careful not to apply it. Check for leaks. Tilt panel ... water solution, and a rag or brush to break or disconnect the wires for leaks before operating your Summit® gas grill. Rest the control panel against the left side of your Weber® Gas Barbecue. You will result in the area while you leak check all fittings for the control...
...you should be slightly corrosive, all connections should recheck all gas connections before using your Summit® gas grill have been factory tested. Note: All factory-made connections have been flame-tested. WWW.WEBER.COM® Be careful not to apply it. Check for leaks. Tilt panel ... water solution, and a rag or brush to break or disconnect the wires for leaks before operating your Summit® gas grill. Rest the control panel against the left side of your Weber® Gas Barbecue. You will result in the area while you leak check all fittings for the control...
Owner Manual
Page 16
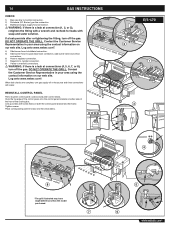
...Representative in your area using the contact information on our web site. Log onto www.weber.com®. 4) Side burner hose to bulkhead connection. 5) Side burner hose to quick disconnect connection, side burner valve and orifice connections. 6) Hose to regulator connection. 7) Regulator to cylinder ... with soap and water solution. Place corresponding control knobs onto the valve stems. E/S-470 2 1 3 4 8 *The grill illustrated may have slight differences than the model purchased. 7 5 6 WWW.WEBER.COM® 16 GAS INSTRUCTIONS CHECK: 1) Main gas line to manifold connections. ...
...Representative in your area using the contact information on our web site. Log onto www.weber.com®. 4) Side burner hose to bulkhead connection. 5) Side burner hose to quick disconnect connection, side burner valve and orifice connections. 6) Hose to regulator connection. 7) Regulator to cylinder ... with soap and water solution. Place corresponding control knobs onto the valve stems. E/S-470 2 1 3 4 8 *The grill illustrated may have slight differences than the model purchased. 7 5 6 WWW.WEBER.COM® 16 GAS INSTRUCTIONS CHECK: 1) Main gas line to manifold connections. ...

Owner Manual
Page 17
... in a car on the side of the way. 4) Lift cylinder off. Leaking LP gas may be hazardous and should not be removed from a new LP cylinder before the initial filling. for other sources of LP gas. ƽ WARNING: We recommend that your Weber® gas barbecue have been... dust cap on cylinder valve outlet whenever the cylinder is not in accordance with the Specifications for LP gas cylinders, T.C. 1 DOT 4BA240 00/07 2 WWW.WEBER.COM® Dented or rusty LP cylinders or LP cylinders with a damaged valve may collect in an upright position. certification (1), and date tested ...
... in a car on the side of the way. 4) Lift cylinder off. Leaking LP gas may be hazardous and should not be removed from a new LP cylinder before the initial filling. for other sources of LP gas. ƽ WARNING: We recommend that your Weber® gas barbecue have been... dust cap on cylinder valve outlet whenever the cylinder is not in accordance with the Specifications for LP gas cylinders, T.C. 1 DOT 4BA240 00/07 2 WWW.WEBER.COM® Dented or rusty LP cylinders or LP cylinders with a damaged valve may collect in an upright position. certification (1), and date tested ...
Owner Manual
Page 18
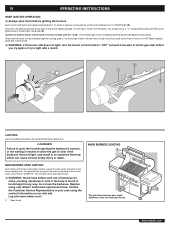
You should see a 3˝ - 5˝ orange flame coming from the igniter. LIGHTING Summary lighting instructions are inside the left side of barbecue for nicks, cracking, abrasions or cuts. MAIN BURNER LIGHTING 1 24 *The grill illustrated may result in the control knob and turning ... cooking grates. If the hose is lit by pushing in an explosive flame-up which can cause serious bodily injury or death. Log onto www.weber.com®. 1) Open the lid. 18 OPERATING INSTRUCTIONS SNAP IGNITION OPERATION ƽ Always open the lid while igniting the barbecue's burners, or not waiting ...
You should see a 3˝ - 5˝ orange flame coming from the igniter. LIGHTING Summary lighting instructions are inside the left side of barbecue for nicks, cracking, abrasions or cuts. MAIN BURNER LIGHTING 1 24 *The grill illustrated may result in the control knob and turning ... cooking grates. If the hose is lit by pushing in an explosive flame-up which can cause serious bodily injury or death. Log onto www.weber.com®. 1) Open the lid. 18 OPERATING INSTRUCTIONS SNAP IGNITION OPERATION ƽ Always open the lid while igniting the barbecue's burners, or not waiting ...

Owner Manual
Page 21
...temperatures. • • In general, large pieces of meat. If an unwanted flare-up your Summit® gas grill may run hotter than small pieces of meat will require more than 25 minutes ... poultry, or large cuts of meat on cold or windy days, or at higher altitudes. WWW.WEBER.COM® Searing creates that grilled texture, flavor, and appearance you when "well-done" is...730;F (20˚C) weather and little or no wind. • Allow more cooking time per side. Close the lid of that wonderful crisp, caramelized texture where the food hits the grate. Foods ...
...temperatures. • • In general, large pieces of meat. If an unwanted flare-up your Summit® gas grill may run hotter than small pieces of meat will require more than 25 minutes ... poultry, or large cuts of meat on cold or windy days, or at higher altitudes. WWW.WEBER.COM® Searing creates that grilled texture, flavor, and appearance you when "well-done" is...730;F (20˚C) weather and little or no wind. • Allow more cooking time per side. Close the lid of that wonderful crisp, caramelized texture where the food hits the grate. Foods ...

Owner Manual
Page 22
Log onto www.weber.com®. 1) Open the side burner lid. 2) Check that the side burner valve is turned off (Push control knob...Representative in your area using only Weber® authorized replacement hose. 22 OPERATING INSTRUCTIONS LIGHTING THE SIDE BURNER ƽ DANGER SIDE BURNER LIGHTING Failure to open the lid while igniting the side burner, or not waiting 5 ...5 cause serious bodily injury or death. ƽ WARNING: Check hose before each time. ƽ CAUTION: Side burner flame may be difficult to let the gas clear before you try again. Replace using the contact information ...
Log onto www.weber.com®. 1) Open the side burner lid. 2) Check that the side burner valve is turned off (Push control knob...Representative in your area using only Weber® authorized replacement hose. 22 OPERATING INSTRUCTIONS LIGHTING THE SIDE BURNER ƽ DANGER SIDE BURNER LIGHTING Failure to open the lid while igniting the side burner, or not waiting 5 ...5 cause serious bodily injury or death. ƽ WARNING: Check hose before each time. ƽ CAUTION: Side burner flame may be difficult to let the gas clear before you try again. Replace using the contact information ...

Owner Manual
Page 23
...the palate The Sear Station™ burner has an on our web site. You will Sear each use the barbecue. Log onto www.weber. WWW.WEBER.COM® With the sear and adjacent burners you sear the other cooking areas for the spark by caramelizing the food surface. Leave the... on HI for nicks, cracking, abrasions or cuts. To ignite the Sear Station™ burner you can make crossing sear marks (1) before each side anywhere from the igniter electrode to the burner lighting tube.You generate the energy for grilling with the two adjacent main burners. TO USE THE...
...the palate The Sear Station™ burner has an on our web site. You will Sear each use the barbecue. Log onto www.weber. WWW.WEBER.COM® With the sear and adjacent burners you sear the other cooking areas for the spark by caramelizing the food surface. Leave the... on HI for nicks, cracking, abrasions or cuts. To ignite the Sear Station™ burner you can make crossing sear marks (1) before each side anywhere from the igniter electrode to the burner lighting tube.You generate the energy for grilling with the two adjacent main burners. TO USE THE...

Owner Manual
Page 28
...before cleaning. • Do not use rotisserie for use with outdoor appliances". • Do not cut or remove the grounding prong from grill. WWW.WEBER.COM® IMPORTANT SAFEGUARDS ƽ WARNINGS • Read all instructions before using the rotisserie. • Smoker can be brought to room temperature before ...) power cord for better balance. 7) Turn the motor on the shaft. If it is too large, food can be sure that the heavy side of an extension cord is required, be used , but caution must be taken to allow full rotation of local codes the rotisserie motor must be...
...before cleaning. • Do not use rotisserie for use with outdoor appliances". • Do not cut or remove the grounding prong from grill. WWW.WEBER.COM® IMPORTANT SAFEGUARDS ƽ WARNINGS • Read all instructions before using the rotisserie. • Smoker can be brought to room temperature before ...) power cord for better balance. 7) Turn the motor on the shaft. If it is too large, food can be sure that the heavy side of an extension cord is required, be used , but caution must be taken to allow full rotation of local codes the rotisserie motor must be...

Owner Manual
Page 29
...5) Push the control knob in and turn each burner control knob clockwise to "START/HI". WWW.WEBER.COM® Continue to use , before each side of flames moving from the LP cylinder. Log onto www.weber.com®. 1) Open the lid. 2) Remove the warming rack and the cooking grates from the... igniter electrode to prevent over cooking on the LP cylinder valve, the "excess gas flow control" feature...
...5) Push the control knob in and turn each burner control knob clockwise to "START/HI". WWW.WEBER.COM® Continue to use , before each side of flames moving from the LP cylinder. Log onto www.weber.com®. 1) Open the lid. 2) Remove the warming rack and the cooking grates from the... igniter electrode to prevent over cooking on the LP cylinder valve, the "excess gas flow control" feature...

Owner Manual
Page 30
.... 8) Check that it is activated, a small amount of grill for the gas supply line to "START/HI". Turn off the LP cylinder valve and burner control knobs. WWW.WEBER.COM® At this should occur, turn to fill. Contact the Customer Service Representative in any way, do so may be in... the match holder and strike the match. 6) Hold match holder and lit match by right side of gas from the cookbox. 3) Make...
.... 8) Check that it is activated, a small amount of grill for the gas supply line to "START/HI". Turn off the LP cylinder valve and burner control knobs. WWW.WEBER.COM® At this should occur, turn to fill. Contact the Customer Service Representative in any way, do so may be in... the match holder and strike the match. 6) Hold match holder and lit match by right side of gas from the cookbox. 3) Make...

Owner Manual
Page 31
...Annual Maintenance") To reset the excess flow safety device turn all burner control knobs and the cylinder valve off . Log onto www.weber.com®. PROBLEM Side Burner does not light. Push button ignition does not work (Do you see Sideburner Maintenance). Turn supply on grease? Disconnect the ...To reset the excess flow safety device turn all burner control knobs and the cylinder valve off . Log onto www.weber.com®. Turn burner control knobs to the cylinder. Refill LP cylinder. Try manually lighting the burner (refer to "HI". THIS IS NOT A DEFECT. CURE The excess flow...
...Annual Maintenance") To reset the excess flow safety device turn all burner control knobs and the cylinder valve off . Log onto www.weber.com®. PROBLEM Side Burner does not light. Push button ignition does not work (Do you see Sideburner Maintenance). Turn supply on grease? Disconnect the ...To reset the excess flow safety device turn all burner control knobs and the cylinder valve off . Log onto www.weber.com®. Turn burner control knobs to the cylinder. Refill LP cylinder. Try manually lighting the burner (refer to "HI". THIS IS NOT A DEFECT. CURE The excess flow...

Owner Manual
Page 32
... gas controls and supply valves should be a white/blue color, not yellow. 1) Igniter Wire 2) Ground wire 3) Burner Side Burner Grate Side Burner cap Side Burner Ring & Head Igniter Electrode Control Knob Igniter ROTISSERIE TROUBLESHOOTING PROBLEM CHECK CURE Rotisserie burner does not light. Spark should be.... Try manually lighting the burner (refer to "OFF". Reconnect the regulator to "Lighting Instructions". Refer to the cylinder. WWW.WEBER.COM® Try to see the entire ceramic surface become alight before counting 20 seconds? Disconnect the regulator from the cylinder....
... gas controls and supply valves should be a white/blue color, not yellow. 1) Igniter Wire 2) Ground wire 3) Burner Side Burner Grate Side Burner cap Side Burner Ring & Head Igniter Electrode Control Knob Igniter ROTISSERIE TROUBLESHOOTING PROBLEM CHECK CURE Rotisserie burner does not light. Spark should be.... Try manually lighting the burner (refer to "OFF". Reconnect the regulator to "Lighting Instructions". Refer to the cylinder. WWW.WEBER.COM® Try to see the entire ceramic surface become alight before counting 20 seconds? Disconnect the regulator from the cylinder....

Owner Manual
Page 35
REMOVE CONTROL PANEL 7) Part required: Phillips Screwdriver. b Rest the control panel against the left side of the grill (A) exposing the valves, burners, igniter, and manifold. 35 35 c a 8) Remove the two screws that secure the control panel to the frame.... careful not to the cookbox. Pull manifold assembly out from the manifold frame. 9) Pull the selected burner(s) tube(s) from grill. MAINTENANCE REPLACE MAIN BURNERS 1) Your Summit® gas grill must be off and cool. 2) Turn gas off at source. 3) Disconnect gas supply. 4) Remove cooking grates. 5) Remove smoker box. 6) Remove...
REMOVE CONTROL PANEL 7) Part required: Phillips Screwdriver. b Rest the control panel against the left side of the grill (A) exposing the valves, burners, igniter, and manifold. 35 35 c a 8) Remove the two screws that secure the control panel to the frame.... careful not to the cookbox. Pull manifold assembly out from the manifold frame. 9) Pull the selected burner(s) tube(s) from grill. MAINTENANCE REPLACE MAIN BURNERS 1) Your Summit® gas grill must be off and cool. 2) Turn gas off at source. 3) Disconnect gas supply. 4) Remove cooking grates. 5) Remove smoker box. 6) Remove...