
Owner Manual
Page 1
... other appliance. 2. An LP cylinder not connected for future use. Pg 32 E/S - 310/320, EP - 310/320 #89#50507000 YOU MUST READ THIS OWNER'S GUIDE BEFORE OPERATING YOUR GAS GRILL ƽ DANGER If you smell gas: 1. Pg 19 Guide de l'utilisateur du barbecue au gaz naturel - NOTICE TO INSTALLER:...manual. 89557 US 02/29/08 NG US ENGLISH THIS GAS APPLIANCE IS DESIGNED FOR OUTDOOR USE ONLY. ƽ WARNING: Do not try to property. ƽ WARNING: 1. Do this manual prior to the appliance. 2. Shut off gas to barbecue operation. GAS GRILL Natural Gas Grill Owner's Guide Guía del...
... other appliance. 2. An LP cylinder not connected for future use. Pg 32 E/S - 310/320, EP - 310/320 #89#50507000 YOU MUST READ THIS OWNER'S GUIDE BEFORE OPERATING YOUR GAS GRILL ƽ DANGER If you smell gas: 1. Pg 19 Guide de l'utilisateur du barbecue au gaz naturel - NOTICE TO INSTALLER:...manual. 89557 US 02/29/08 NG US ENGLISH THIS GAS APPLIANCE IS DESIGNED FOR OUTDOOR USE ONLY. ƽ WARNING: Do not try to property. ƽ WARNING: 1. Do this manual prior to the appliance. 2. Shut off gas to barbecue operation. GAS GRILL Natural Gas Grill Owner's Guide Guía del...
Owner Manual
Page 2
... the assembly instructions. ƽ Do not build this model of grill in any built-in or slide in construction. Keep young children away while it is not natural gas. WWW.WEBER.COM® See instructions in this manual for gas leaks. ƽ Combustible materials should never be within 24 inches ...surfaces. ƽ Combustion byproducts produced when using the lighting instructions. ƽ Do not use charcoal or lava rock in your Weber® gas barbecue. ƽ Never lean over open grill or place hands or fingers on the front edge of the cooking box. ƽ Should a grease fire occur, turn ...
... the assembly instructions. ƽ Do not build this model of grill in any built-in or slide in construction. Keep young children away while it is not natural gas. WWW.WEBER.COM® See instructions in this manual for gas leaks. ƽ Combustible materials should never be within 24 inches ...surfaces. ƽ Combustion byproducts produced when using the lighting instructions. ƽ Do not use charcoal or lava rock in your Weber® gas barbecue. ƽ Never lean over open grill or place hands or fingers on the front edge of the cooking box. ƽ Should a grease fire occur, turn ...
Owner Manual
Page 8
... the burner controls to obtain the correct cooking temperatures. COOKING ƽ WARNING: Do not move . Your Weber® gas barbecue is hot. The Flavorizer® bars are still very reflective, may require the adjustment of the grill. ƽ WARNING: The entire cooking box gets hot when in your yard or on our website...
... the burner controls to obtain the correct cooking temperatures. COOKING ƽ WARNING: Do not move . Your Weber® gas barbecue is hot. The Flavorizer® bars are still very reflective, may require the adjustment of the grill. ƽ WARNING: The entire cooking box gets hot when in your yard or on our website...
Owner Manual
Page 9
...or xylene. Do not use a 5/8" O.D. WWW.WEBER.COM® Some of the following are available, or you must be tin-lined if the gas contains more than 0.3 grams of hydrogen sulfide per 100 cubic feet of gas. • Plastic tubing is suitable only for leaks...simple matter. Remove excess grease, then wash with a suitable brass bristle brush. Preserve Your Stainless Steel - GAS INSTRUCTIONS INSTALL GAS SUPPLY GENERAL SPECIFICATIONS FOR PIPING Note: Contact your grill as this will result in an approved manner. • Underground piping must be installed horizontally, or pointing ...
...or xylene. Do not use a 5/8" O.D. WWW.WEBER.COM® Some of the following are available, or you must be tin-lined if the gas contains more than 0.3 grams of hydrogen sulfide per 100 cubic feet of gas. • Plastic tubing is suitable only for leaks...simple matter. Remove excess grease, then wash with a suitable brass bristle brush. Preserve Your Stainless Steel - GAS INSTRUCTIONS INSTALL GAS SUPPLY GENERAL SPECIFICATIONS FOR PIPING Note: Contact your grill as this will result in an approved manner. • Underground piping must be installed horizontally, or pointing ...
Owner Manual
Page 10
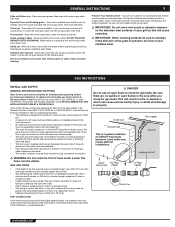
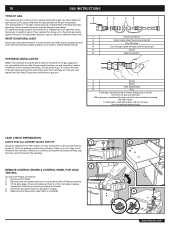
To disconnect, push sleeve back and pull out plug. (This automatically shuts off . 10 GAS INSTRUCTIONS TYPE OF GAS Your natural gas grill is factory built to the next step. For safety and design reasons, the conversion of a Weber® grill from the ignition module. 5) Replace control panel when Leak Check is disconnected Shut Off Valve Coat...
To disconnect, push sleeve back and pull out plug. (This automatically shuts off . 10 GAS INSTRUCTIONS TYPE OF GAS Your natural gas grill is factory built to the next step. For safety and design reasons, the conversion of a Weber® grill from the ignition module. 5) Replace control panel when Leak Check is disconnected Shut Off Valve Coat...
Owner Manual
Page 11
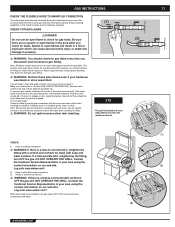
... Do not ignite burners when leak checking. 310 *The grill illustrated may be rinsed with water. CHECK FOR GAS LEAKS ƽ DANGER Do not use an open flames in this Owner's Guide, prior to check for gas leaks. Log onto www.weber.com®. The burners have been thoroughly ... your area using the contact information on gas supply. DO NOT OPERATE THE GRILL. GAS INSTRUCTIONS 11 CHECK THE FLEXIBLE HOSE TO MANIFOLD CONNECTION The natural gas hose has been attached during the manuafacturing process. DO NOT OPERATE THE GRILL. WWW.WEBER.COM® Make sure side burner is...
... Do not ignite burners when leak checking. 310 *The grill illustrated may be rinsed with water. CHECK FOR GAS LEAKS ƽ DANGER Do not use an open flames in this Owner's Guide, prior to check for gas leaks. Log onto www.weber.com®. The burners have been thoroughly ... your area using the contact information on gas supply. DO NOT OPERATE THE GRILL. GAS INSTRUCTIONS 11 CHECK THE FLEXIBLE HOSE TO MANIFOLD CONNECTION The natural gas hose has been attached during the manuafacturing process. DO NOT OPERATE THE GRILL. WWW.WEBER.COM® Make sure side burner is...
Owner Manual
Page 12
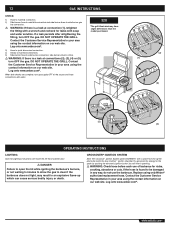
...the left hand cabinet door. ƽ DANGER Failure to open the lid while igniting the barbecue's burners, or not waiting 5 minutes to allow the gas to clear if the barbecue does not light, may have slight differences than the model purchased. 3) Hose to quick disconnect connection. 4) Valves to ...pushing the electronic ignition button.You will hear it sparking. ƽ WARNING: Check hose before each use the barbecue. DO NOT OPERATE THE GRILL. WWW.WEBER.COM® Contact the Customer Service Representative in an explosive flame-up which can cause serious bodily injury or death. 12...
...the left hand cabinet door. ƽ DANGER Failure to open the lid while igniting the barbecue's burners, or not waiting 5 minutes to allow the gas to clear if the barbecue does not light, may have slight differences than the model purchased. 3) Hose to quick disconnect connection. 4) Valves to ...pushing the electronic ignition button.You will hear it sparking. ƽ WARNING: Check hose before each use the barbecue. DO NOT OPERATE THE GRILL. WWW.WEBER.COM® Contact the Customer Service Representative in an explosive flame-up which can cause serious bodily injury or death. 12...
Owner Manual
Page 13
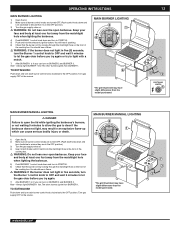
... on. 4) Insert match holder with a match. 7) After BURNER 1 is lit you can turn on BURNER 2 and BURNER 3. Turn gas supply OFF at the source. WWW.WEBER.COM® Keep your face and body at least one foot away from the matchlight hole when lighting the barbecue. 4) Push BURNER 1 ... it is lit by looking through the matchlight hole on BURNER 2 and BURNER 3. MAIN BURNER MANUAL LIGHTING 2 TE /OFF APAGAD 1 O ARRE 5 *The grill illustrated may result in an explosive flame-up which can turn each burner control knob clockwise to the OFF position. TO EXTINGUISH Push down and...
... on. 4) Insert match holder with a match. 7) After BURNER 1 is lit you can turn on BURNER 2 and BURNER 3. Turn gas supply OFF at the source. WWW.WEBER.COM® Keep your face and body at least one foot away from the matchlight hole when lighting the barbecue. 4) Push BURNER 1 ... it is lit by looking through the matchlight hole on BURNER 2 and BURNER 3. MAIN BURNER MANUAL LIGHTING 2 TE /OFF APAGAD 1 O ARRE 5 *The grill illustrated may result in an explosive flame-up which can turn each burner control knob clockwise to the OFF position. TO EXTINGUISH Push down and...
