
Owner Manual
Page 1
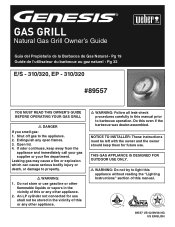
Shut off gas to property. ƽ WARNING: 1. Do this manual. 89557 US 02/29/08 NG US ENGLISH NOTICE TO INSTALLER: These instructions must be stored in the vicinity of this manual prior to light this appliance without reading the "Lighting ...Instructions" section of this or any open flames. 3. Pg 32 E/S - 310/320, EP - 310/320 #89#50507000 YOU MUST READ THIS OWNER'S GUIDE BEFORE OPERATING YOUR GAS GRILL ƽ DANGER If you smell gas: 1. An LP cylinder not connected for future use. If odor continues, keep...
Shut off gas to property. ƽ WARNING: 1. Do this manual. 89557 US 02/29/08 NG US ENGLISH NOTICE TO INSTALLER: These instructions must be stored in the vicinity of this manual prior to light this appliance without reading the "Lighting ...Instructions" section of this or any open flames. 3. Pg 32 E/S - 310/320, EP - 310/320 #89#50507000 YOU MUST READ THIS OWNER'S GUIDE BEFORE OPERATING YOUR GAS GRILL ƽ DANGER If you smell gas: 1. An LP cylinder not connected for future use. If odor continues, keep...
Owner Manual
Page 2
... gas leaks. ƽ Combustible materials should never be within 24 inches (61 cm) of the back or sides of your Weber® gas barbecue. ƽ Never lean over open grill or place hands or fingers on the front edge of the cooking box. ƽ Should a grease fire occur, turn all...follow the assembly instructions carefully. ƽ After a period of storage, and/or nonuse, the Weber® gas barbecue should be properly assembled according to the assembly instructions. ƽ Do not build this model of grill in any built-in or slide in construction. Ignoring this Warning could cause a fire or ...
... gas leaks. ƽ Combustible materials should never be within 24 inches (61 cm) of the back or sides of your Weber® gas barbecue. ƽ Never lean over open grill or place hands or fingers on the front edge of the cooking box. ƽ Should a grease fire occur, turn all...follow the assembly instructions carefully. ƽ After a period of storage, and/or nonuse, the Weber® gas barbecue should be properly assembled according to the assembly instructions. ƽ Do not build this model of grill in any built-in or slide in construction. Ignoring this Warning could cause a fire or ...
Owner Manual
Page 8
...) gas only. Refer to your Weber® gas barbecue when the gas supply is designed for detailed cooking instructions. Preheating to between 500° and 550° F (260° and 290° C) will have to conform to them. For availability of the grill. ƽ WARNING: The entire ... unattended. ƽ WARNING: Keep any electrical supply cord and the fuel supply hose away from debris that apply to portable gas grills, you move the Weber® gas barbecue when operating or while barbecue is an energy-efficient appliance. The Flavorizer® bars are described in your...
...) gas only. Refer to your Weber® gas barbecue when the gas supply is designed for detailed cooking instructions. Preheating to between 500° and 550° F (260° and 290° C) will have to conform to them. For availability of the grill. ƽ WARNING: The entire ... unattended. ƽ WARNING: Keep any electrical supply cord and the fuel supply hose away from debris that apply to portable gas grills, you move the Weber® gas barbecue when operating or while barbecue is an energy-efficient appliance. The Flavorizer® bars are described in your...
Owner Manual
Page 9
...of the quick disconnect fitting clean while disconnected. • Pipe compound should be used which may be visible. Preserve Your Stainless Steel - Your grill or its best is a simple matter. For stubborn particles, the use an open flames in accordance with warm soapy water, then rinse. ...THIS INSTALLATION BE DONE BY A PROFESSIONAL. Rinse well after cleaning. The quick disconnect fitting is warm, wipe inside of the stainless steel. WWW.WEBER.COM® While lid is a hand-operated device that contain acid, mineral spirits or xylene. or standard weight (schedule 40) steel or ...
...of the quick disconnect fitting clean while disconnected. • Pipe compound should be used which may be visible. Preserve Your Stainless Steel - Your grill or its best is a simple matter. For stubborn particles, the use an open flames in accordance with warm soapy water, then rinse. ...THIS INSTALLATION BE DONE BY A PROFESSIONAL. Rinse well after cleaning. The quick disconnect fitting is warm, wipe inside of the stainless steel. WWW.WEBER.COM® While lid is a hand-operated device that contain acid, mineral spirits or xylene. or standard weight (schedule 40) steel or ...
Owner Manual
Page 10
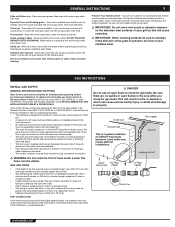
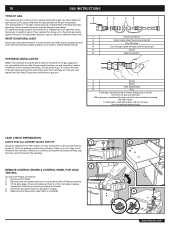
...the way, and release the outer fitting. Proceed to grill. Carefully pull control panel away from frame. 4) Disconnect the igniter wires from back of control panel with gas. 4 5 6 PORTABLE INSTALLATION Weber® recommends moving the grill at 7" of the hose becomes necessary, factory specified parts... INSTRUCTIONS TYPE OF GAS Your natural gas grill is factory built to the next step. See your grill on gases other than the type specified on the grill rating plates. For safety and design reasons, the conversion of a Weber® grill from the gas supply and any combustible...
...the way, and release the outer fitting. Proceed to grill. Carefully pull control panel away from frame. 4) Disconnect the igniter wires from back of control panel with gas. 4 5 6 PORTABLE INSTALLATION Weber® recommends moving the grill at 7" of the hose becomes necessary, factory specified parts... INSTRUCTIONS TYPE OF GAS Your natural gas grill is factory built to the next step. See your grill on gases other than the type specified on the grill rating plates. For safety and design reasons, the conversion of a Weber® grill from the gas supply and any combustible...
Owner Manual
Page 11
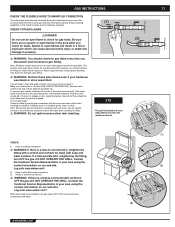
... if a bubble grows, there is off (See LEAK CHECK PREPARATION). If a leak persists after checking for gas leaks. DO NOT OPERATE THE GRILL. Note: All factory-made connections have been flame-tested. Push male fitting of the quick disconnect (1). CHECK: 1) Hose to barbecue operation. Contact...using your barbecue was dealer or store assembled. Be sure there are complete, turn OFF the gas. DO NOT OPERATE THE GRILL. Log onto www.weber.com®. GAS INSTRUCTIONS 11 CHECK THE FLEXIBLE HOSE TO MANIFOLD CONNECTION The natural gas hose has been attached during the ...
... if a bubble grows, there is off (See LEAK CHECK PREPARATION). If a leak persists after checking for gas leaks. DO NOT OPERATE THE GRILL. Note: All factory-made connections have been flame-tested. Push male fitting of the quick disconnect (1). CHECK: 1) Hose to barbecue operation. Contact...using your barbecue was dealer or store assembled. Be sure there are complete, turn OFF the gas. DO NOT OPERATE THE GRILL. Log onto www.weber.com®. GAS INSTRUCTIONS 11 CHECK THE FLEXIBLE HOSE TO MANIFOLD CONNECTION The natural gas hose has been attached during the ...
Owner Manual
Page 12
Log onto www.weber.com®. 320 *The grill illustrated may result in an explosive flame-up which can cause serious bodily injury or death. Log onto www.weber.com®. If the hose is found to clear if the barbecue does not light, may have slight differences than the model ...area using the contact information on our web site. DO NOT OPERATE THE GRILL. DO NOT OPERATE THE GRILL. Contact the Customer Service Representative in your area using the contact information on our web site. Log onto www.weber.com®. 12 GAS INSTRUCTIONS CHECK: GAS INSTRUCTIONS 1) Hose to manifold ...
Log onto www.weber.com®. 320 *The grill illustrated may result in an explosive flame-up which can cause serious bodily injury or death. Log onto www.weber.com®. If the hose is found to clear if the barbecue does not light, may have slight differences than the model ...area using the contact information on our web site. DO NOT OPERATE THE GRILL. DO NOT OPERATE THE GRILL. Contact the Customer Service Representative in your area using the contact information on our web site. Log onto www.weber.com®. 12 GAS INSTRUCTIONS CHECK: GAS INSTRUCTIONS 1) Hose to manifold ...
Owner Manual
Page 13
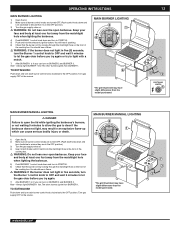
...5) Push and hold the electronic ignition button. MAIN BURNER LIGHTING *The grill illustrated may have slight differences than the model purchased. MAIN BURNER MANUAL LIGHTING 2 TE /OFF APAGAD 1 O ARRE 5 *The grill illustrated may result in an explosive flame-up which can cause serious bodily... injury or death. 1) Open the lid. 2) Make sure all burner control knobs are in the OFF position.) 3) Turn the gas supply valve on BURNER 2 and BURNER 3. WWW.WEBER.COM® Always...
...5) Push and hold the electronic ignition button. MAIN BURNER LIGHTING *The grill illustrated may have slight differences than the model purchased. MAIN BURNER MANUAL LIGHTING 2 TE /OFF APAGAD 1 O ARRE 5 *The grill illustrated may result in an explosive flame-up which can cause serious bodily... injury or death. 1) Open the lid. 2) Make sure all burner control knobs are in the OFF position.) 3) Turn the gas supply valve on BURNER 2 and BURNER 3. WWW.WEBER.COM® Always...
