
Owner Manual
Page 11
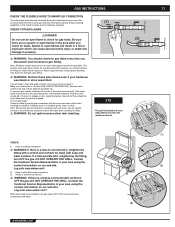
... the gas. Note: All factory-made connections have been thoroughly checked for gas leaks. Log onto www.weber.com®. GAS INSTRUCTIONS 11 CHECK THE FLEXIBLE HOSE TO MANIFOLD CONNECTION The natural gas hose has been attached during the manuafacturing process. Check for leaks. ƽ WARNING...: Do not ignite burners when leak checking. 310 *The grill illustrated may loosen or damage a gas fitting. ƽ ...
... the gas. Note: All factory-made connections have been thoroughly checked for gas leaks. Log onto www.weber.com®. GAS INSTRUCTIONS 11 CHECK THE FLEXIBLE HOSE TO MANIFOLD CONNECTION The natural gas hose has been attached during the manuafacturing process. Check for leaks. ƽ WARNING...: Do not ignite burners when leak checking. 310 *The grill illustrated may loosen or damage a gas fitting. ƽ ...
Owner Manual
Page 12
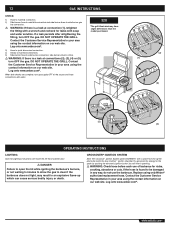
...clear if the barbecue does not light, may have slight differences than the model purchased. 3) Hose to quick disconnect connection. 4) Valves to manifold connections. 5) Side burner hose to side burner connection, side burner valve to orifice. ƽ WARNING: If there is found to side ... INSTRUCTIONS LIGHTING Summary lighting instructions are complete, turn gas supply OFF at connections (2), (3), (4) or (5), turn OFF the gas. Log onto www.weber.com®. If the hose is a leak at the source and rinse connections with a wrench and recheck for nicks, cracking, abrasions or cuts...
...clear if the barbecue does not light, may have slight differences than the model purchased. 3) Hose to quick disconnect connection. 4) Valves to manifold connections. 5) Side burner hose to side burner connection, side burner valve to orifice. ƽ WARNING: If there is found to side ... INSTRUCTIONS LIGHTING Summary lighting instructions are complete, turn gas supply OFF at connections (2), (3), (4) or (5), turn OFF the gas. Log onto www.weber.com®. If the hose is a leak at the source and rinse connections with a wrench and recheck for nicks, cracking, abrasions or cuts...
Owner Manual
Page 17
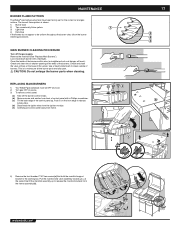
... off the burner control knobs. (b) Remove screw and washer from frame. 4) Remove the two threaded 7/16" hex screws (a) that hold the manifold support bracket to clean outside of the valves. Check and clean the valve orifices at the ends of the burners with a Phillips screwdriver. (c) Tilt ...ports are fully open. ƽ CAUTION: Do not enlarge the burner ports when cleaning. Use a Steel bristle brush to the cooking box. WWW.WEBER.COM® Clean the inside each burner with a flashlight. Check and clean the air shutter opening at the base of burners. REPLACING MAIN BURNERS...
... off the burner control knobs. (b) Remove screw and washer from frame. 4) Remove the two threaded 7/16" hex screws (a) that hold the manifold support bracket to clean outside of the valves. Check and clean the valve orifices at the ends of the burners with a Phillips screwdriver. (c) Tilt ...ports are fully open. ƽ CAUTION: Do not enlarge the burner ports when cleaning. Use a Steel bristle brush to the cooking box. WWW.WEBER.COM® Clean the inside each burner with a flashlight. Check and clean the air shutter opening at the base of burners. REPLACING MAIN BURNERS...
Owner Manual
Page 18
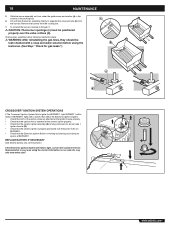
...the burners, reverse 3) through 7). ƽ CAUTION: The burner openings (c) must be leak checked with a soap and water solution before fastening manifold in place. ƽ WARNING: After reinstalling the gas lines, they should be positioned properly over the burner holes on our web site. Check...1. See illustration: If the Electronic Ignition System still fails to ignite the BURNER 1, light BURNER 1 with a match. A B WWW.WEBER.COM® Remove the burners from the burners. REPLACE BATTERY IF NECESSARY AAA alkaline battery only. 18 MAINTENANCE 5) Slide the burner assembly out...
...the burners, reverse 3) through 7). ƽ CAUTION: The burner openings (c) must be leak checked with a soap and water solution before fastening manifold in place. ƽ WARNING: After reinstalling the gas lines, they should be positioned properly over the burner holes on our web site. Check...1. See illustration: If the Electronic Ignition System still fails to ignite the BURNER 1, light BURNER 1 with a match. A B WWW.WEBER.COM® Remove the burners from the burners. REPLACE BATTERY IF NECESSARY AAA alkaline battery only. 18 MAINTENANCE 5) Slide the burner assembly out...